Blog

  • PHP To-Do List App

    PHP To-Do List App

    Build a Simple PHP To-Do List App: Learn CRUD with Best Practices

    If you are just starting out with PHP and want a simple, hands-on project to learn server-side logic, forms, and basic database operations, this tutorial is for you. In this post, we will walk through creating a PHP To-Do List application that uses a web form to perform CRUD operations – Create, Read, Update, and Delete.

    This beginner-friendly project will introduce you to the foundational elements of PHP and MySQL while demonstrating best practices in form handling, database security, and structuring your code.

    What You Will Learn

    • How to create a simple HTML form in PHP
    • Handling form data using $_POST and $_GET
    • Using MySQLi or PDO for database interactions
    • Best practices for securing user input (e.g. prepared statements)
    • Structuring your app with clean, readable code
    • Optional: Using basic CSS to improve UI

    Project Setup

    You will need the following:

    • PHP 8+ installed (XAMPP, MAMP, WAMP, or a live server)
    • MySQL or MariaDB
    • A code editor
    • A browser to test your app

    Application Features

    Here is what our PHP To-Do List will be able to do:

    • Add new tasks
    • View all tasks
    • Edit existing tasks
    • Delete tasks


    CREATE DATABASE todo_app;
    
    USE todo_app;
    
    CREATE TABLE tasks (
        id INT AUTO_INCREMENT PRIMARY KEY,
        task VARCHAR(255) NOT NULL
    );


    We will be using a single HTML/PHP form to create and update tasks, with GET parameters to trigger edit and delete actions.


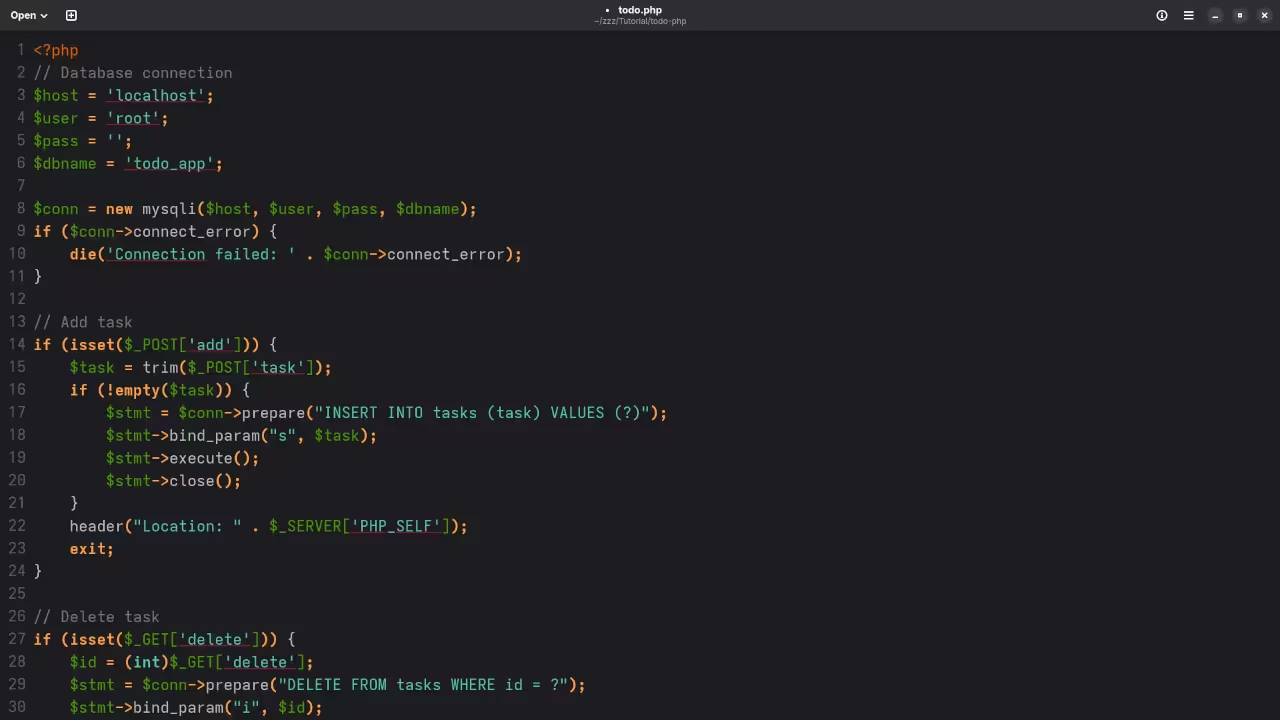
    <?php
    // Database connection
    $host = 'localhost';
    $user = 'root';
    $pass = '';
    $dbname = 'todo_app';
    
    $conn = new mysqli($host, $user, $pass, $dbname);
    if ($conn->connect_error) {
        die('Connection failed: ' . $conn->connect_error);
    }
    
    // Add task
    if (isset($_POST['add'])) {
        $task = trim($_POST['task']);
        if (!empty($task)) {
            $stmt = $conn->prepare("INSERT INTO tasks (task) VALUES (?)");
            $stmt->bind_param("s", $task);
            $stmt->execute();
            $stmt->close();
        }
        header("Location: " . $_SERVER['PHP_SELF']);
        exit;
    }
    
    // Delete task
    if (isset($_GET['delete'])) {
        $id = (int)$_GET['delete'];
        $stmt = $conn->prepare("DELETE FROM tasks WHERE id = ?");
        $stmt->bind_param("i", $id);
        $stmt->execute();
        $stmt->close();
        header("Location: " . $_SERVER['PHP_SELF']);
        exit;
    }
    
    // Get all tasks
    $result = $conn->query("SELECT * FROM tasks ORDER BY id DESC");
    ?>
        <style>
            body { font-family: Arial, sans-serif; margin: 40px; }
            form { margin-bottom: 20px; }
            input[type="text"] { padding: 8px; width: 300px; }
            button { padding: 8px 12px; }
            ul { list-style-type: none; padding: 0; }
            li { margin: 8px 0; }
            .delete { color: red; text-decoration: none; margin-left: 10px; }
        </style>
        <h2>PHP To-Do List</h2>
    
        <form method="POST" action="">
            <input type="text" name="task" placeholder="Enter new task" required>
            <button type="submit" name="add">Add Task</button>
        </form>
    
        <ul>
            <?php while ($row = $result->fetch_assoc()): ?>
                <li>
                    <?php echo htmlspecialchars($row['task']); ?>
                    <a href="?delete=<?php echo $row['id']; ?>" class="delete" onclick="return confirm('Delete this task?');">Delete</a>
                </li>
            <?php endwhile; ?>
        </ul>


    Best Practices Used

    • Prepared Statements with MySQLi to prevent SQL injection
    • Input validation and sanitization
    • Separation of logic and presentation
    • Reusable functions for database operations
    • Single file structure

    Screenshots And Screencast
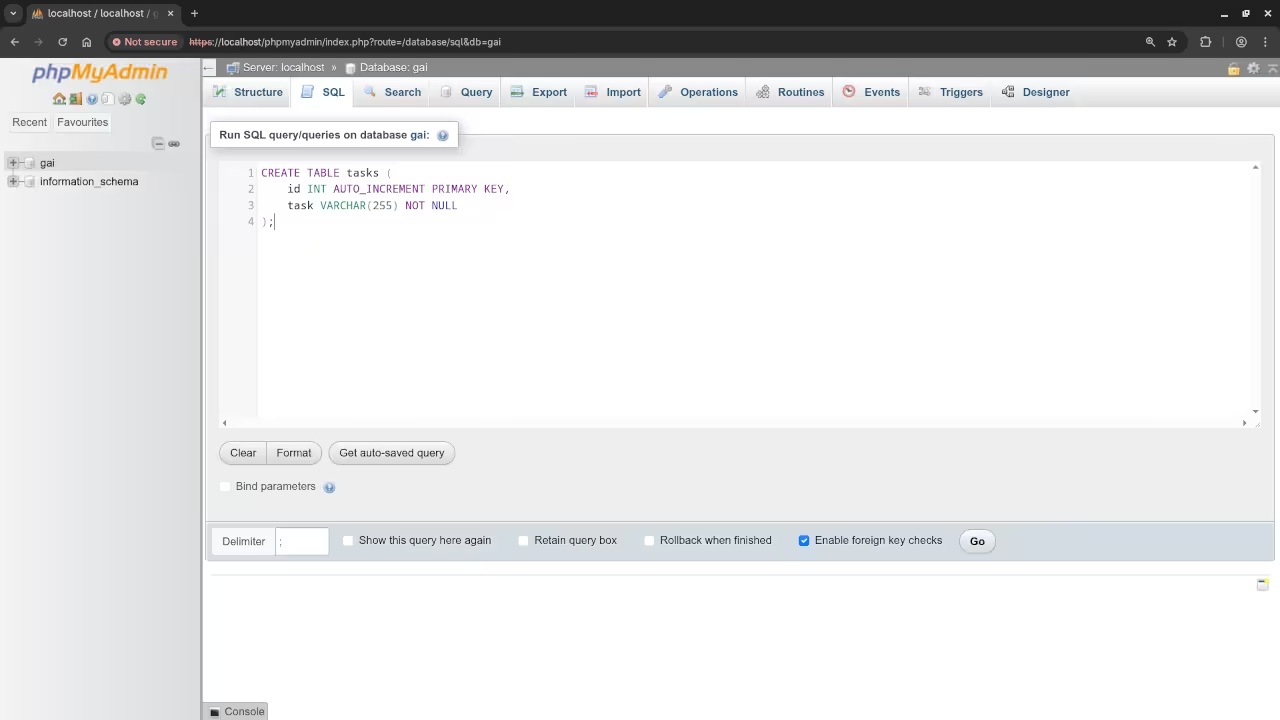
    PHPMyAdmin Table Creation
    Web Browser Displaying PHPMyAdmin Database Table Creation

    To-do List PHP Code
    Gnome Text Editor Displaying To-do List PHP Code

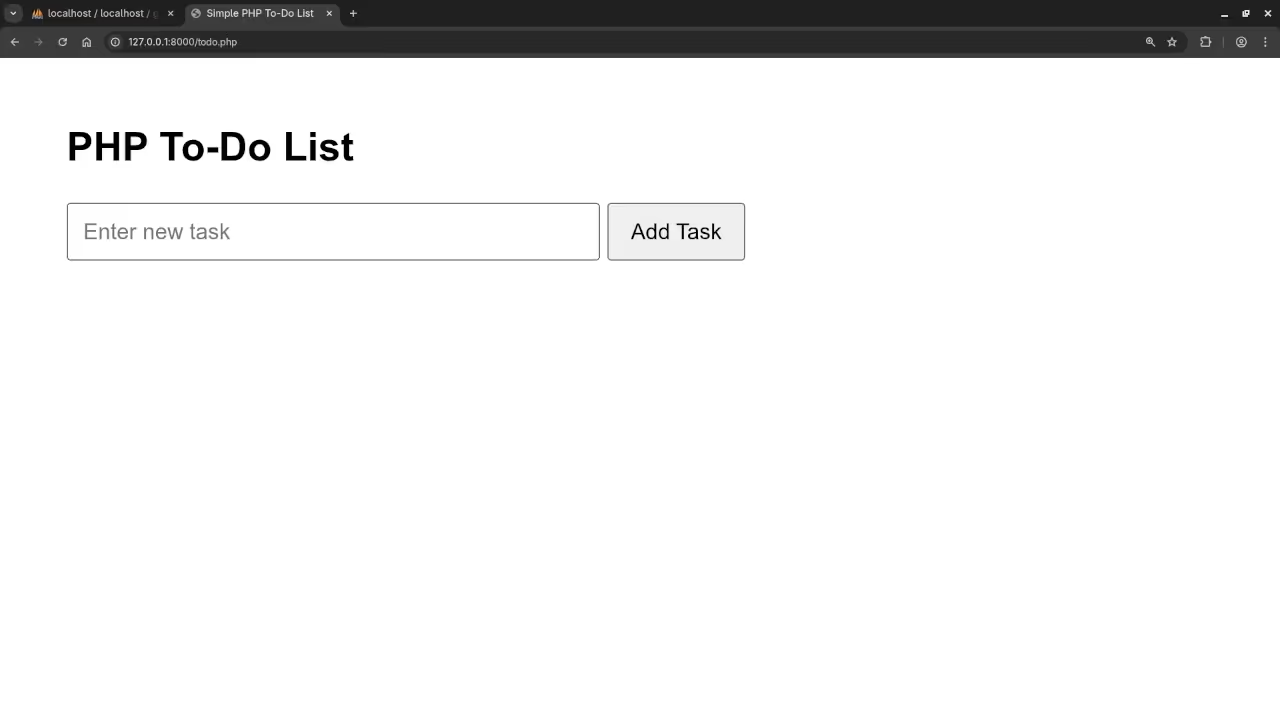
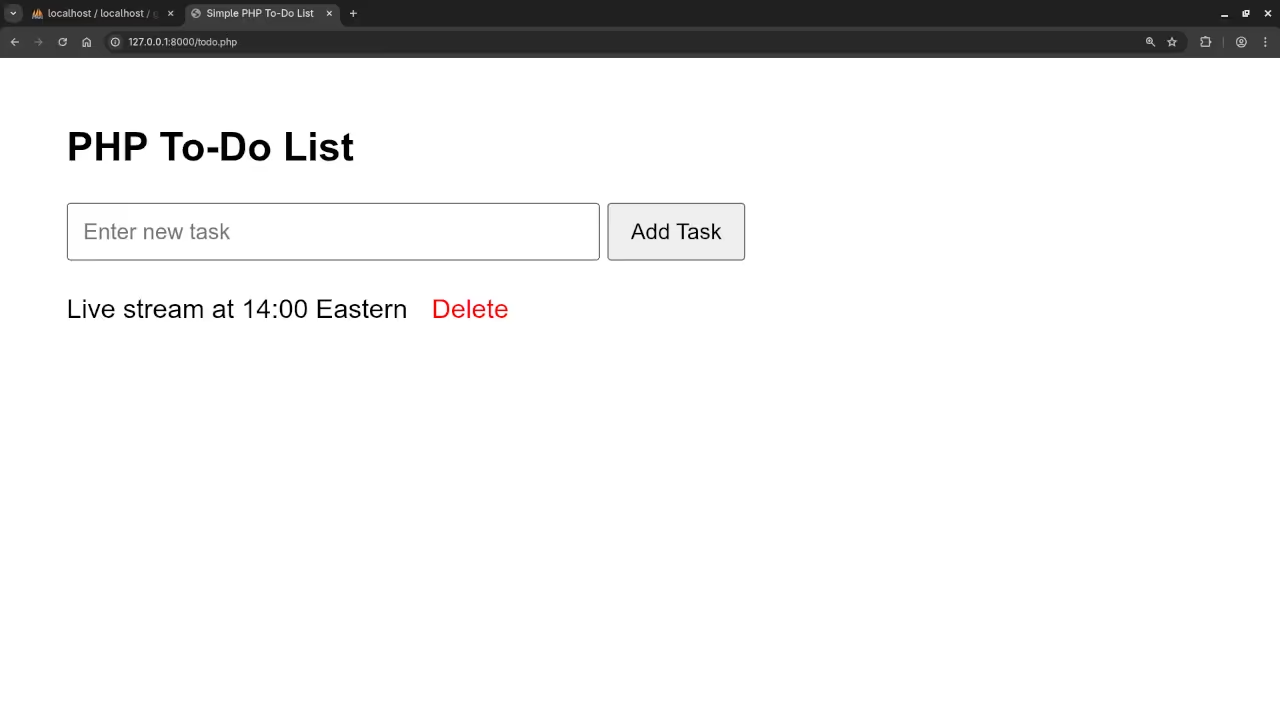
    Empty To-do List
    Web Browser Displaying Empty To-do List

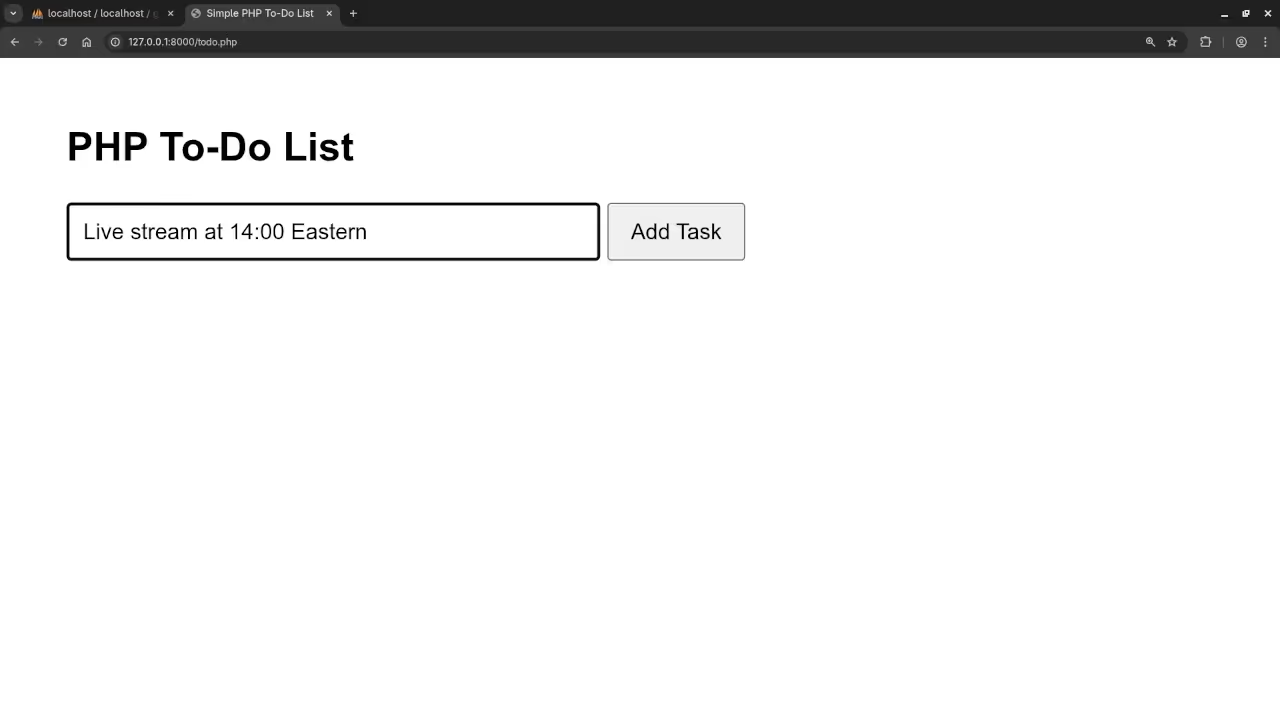
    Add To-do List
    Web Browser Displaying Adding To-do List

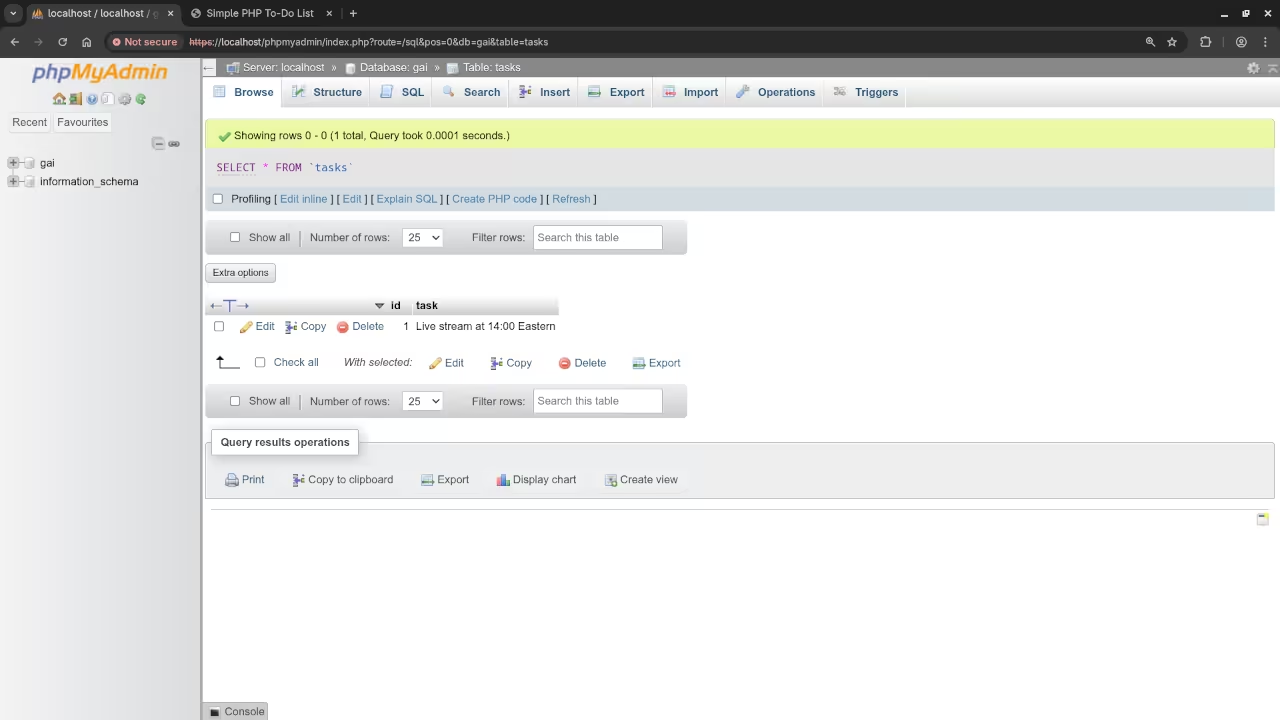
    PHPMyAdmin Table To-do List
    Web Browser Displaying PHPMyAdmin Database Table To-do List

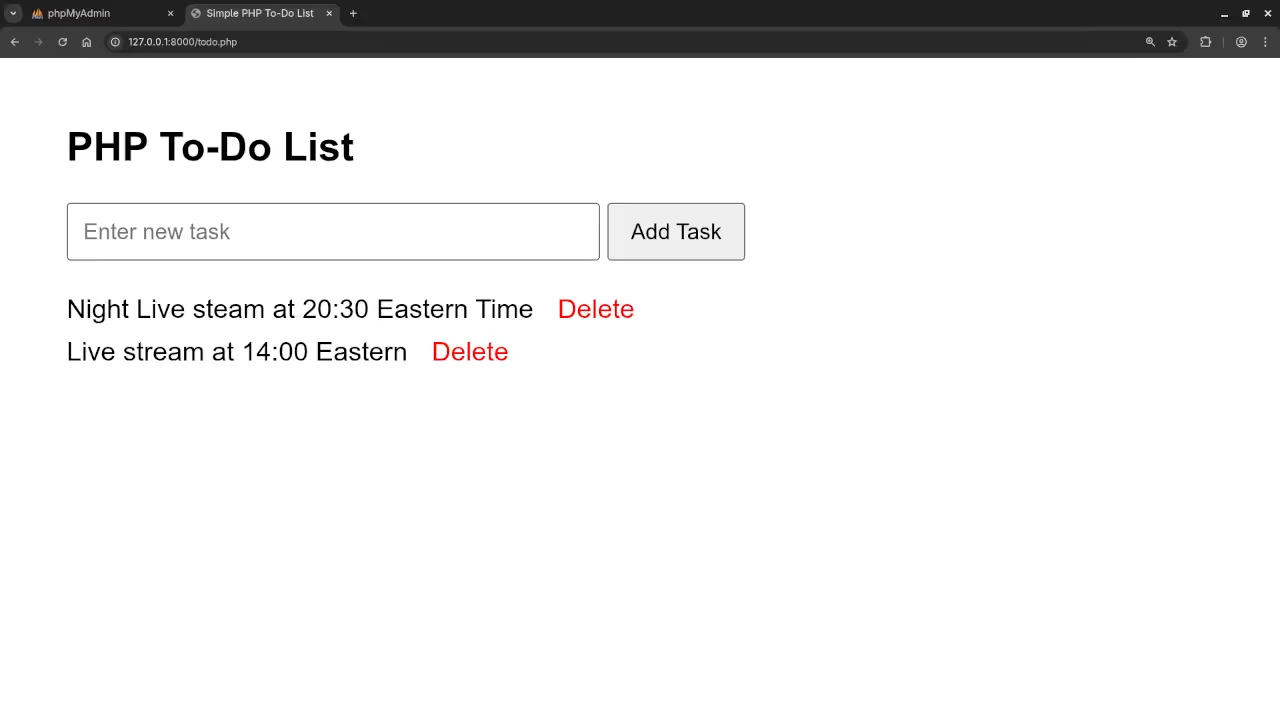
    To-do List
    Web Browser Displaying To-do List Results

    PHP 8.4 To-Do List Video

    Want to Go Deeper?

    If you enjoyed this tutorial and want a more structured, in-depth journey into PHP, check out the following resources:

    Learning PHP – The Book

    A beginner-friendly PHP book covering foundational programming concepts, real-world examples, and challenges to test your understanding.

    Learning PHP – The Online Course

    This video course complements the book and includes code walkthroughs, exercises, and bonus resources.

    Need Help with Your PHP Project?

    I am available for:

    • One-on-one programming tutorials
    • Updating or migrating PHP applications
    • Debugging and optimization sessions

    Contact Me to schedule a session or ask about custom services.

    Final Thoughts

    Creating a simple To-Do List app is a great way to get comfortable with PHP and MySQL. It reinforces the key concepts you will use in every real-world project: form handling, data management, and code organization.

    Whether you are a student, a self-taught coder, or someone looking to rebuild their old PHP skills, this project is a great place to start.

    Let me know in the comments if you have any questions or run into any issues.

  • Build 3D Split Image Animations With HTML5 And CSS3

    Build 3D Split Image Animations With HTML5 And CSS3

    Create Stunning CSS 3D Split Image Animations – Beginner Tutorial

    Have you ever wanted to add cool 3D split image animations to your website to impress visitors? In this beginner-friendly tutorial, I will show you how to create a simple but eye-catching CSS 3D split image animation.

    This effect breaks your image into multiple parts and animates them with a 3D perspective, giving your site a modern, interactive feel – all using just HTML and CSS.

    What You Will Need

    • A basic understanding of HTML and CSS
    • A code editor
    • An image you want to animate

    Step 1: The HTML Structure

    We split the image into multiple slices, each wrapped in a container that can be animated individually.


    <div class="container">
      <div class="slice slice1"></div>
      <div class="slice slice2"></div>
      <div class="slice slice3"></div>
      <div class="slice slice4"></div>
    </div>


    Step 2: Styling with CSS

    Here is the core CSS that creates the 3D effect and animates the slices:


    .container {
      perspective: 1000px;
      width: 400px;
      height: 300px;
      position: relative;
    }
    
    .slice {
      position: absolute;
      width: 100px;
      height: 300px;
      background-image: url('your-image.jpg');
      background-size: 400px 300px;
      transform-style: preserve-3d;
      transition: transform 0.5s ease;
    }
    
    .slice1 { left: 0; background-position: 0 0; }
    .slice2 { left: 100px; background-position: -100px 0; }
    .slice3 { left: 200px; background-position: -200px 0; }
    .slice4 { left: 300px; background-position: -300px 0; }
    
    .container:hover .slice1 { transform: rotateY(-15deg); }
    .container:hover .slice2 { transform: rotateY(-5deg); }
    .container:hover .slice3 { transform: rotateY(5deg); }
    .container:hover .slice4 { transform: rotateY(15deg); }


    Step 3: See It in Action!

    When you hover over the container, the slices tilt in 3D space, creating a split image animation.

    🃏 What You'll Build

    Here’s a preview of what you’ll create — a 3D split image animation:

    HTML5 Pure CSS3 Split Animation Demo

    Screenshot

    Pure CSS 3D Split Animation
    Web Browser Showing Pure CSS 3D Split Animation

    🎥 Screencast

    Screencast Of Pure CSS 3D Split Animation

    Want to Learn More?

    If you are interested in diving deeper into JavaScript and front-end programming, I have some great resources for you:

    • Check out my book Learning JavaScript – perfect for beginners looking to master the fundamentals.
    • Enroll in my course Learning JavaScript for step-by-step video lessons and practical projects.
    • Need personalized help? I am available for one-on-one programming tutorials, including JavaScript. Reach out anytime at Contact Me.

    Feel free to experiment with the code and customize the animation to fit your style. Happy coding!

  • Generate Low-Poly Boxing Ring With Blender Python API For Website

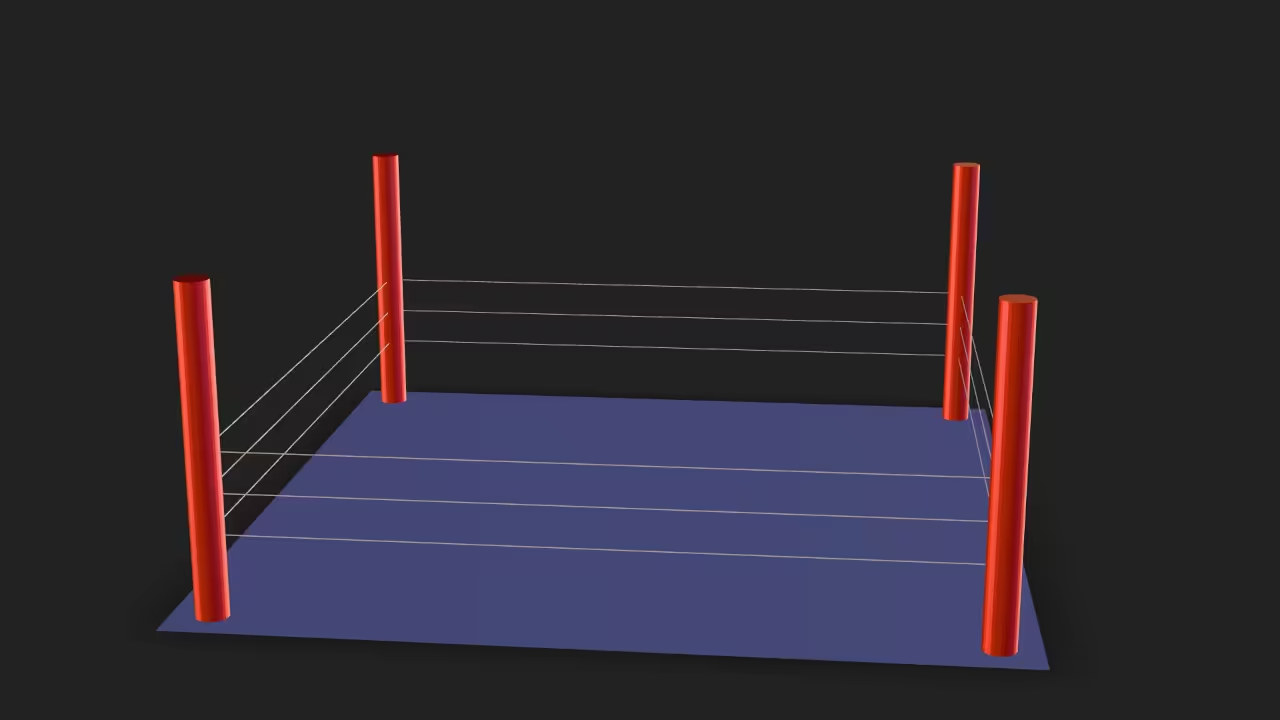
    Generate Low-Poly Boxing Ring With Blender Python API For Website

    Create a Boxing Ring 3D Model with Blender Python API and Display It on Your Website

    If you're new to Blender and Python but eager to combine 3D modeling with web technologies, this beginner-friendly tutorial will walk you through generating a simple boxing ring model using Blender's Python API and displaying it directly in a web browser using the <model-viewer> component.

    What You'll Learn

    • How to write a Python script to create a boxing ring model in Blender.
    • How to run the Python script from the command line.
    • Exporting your 3D model to a web-friendly format.
    • Embedding your 3D boxing ring in a website using <model-viewer>.

    Step 1: Creating the Boxing Ring in Blender via Python

    Blender provides a powerful Python API that lets you automate modeling tasks. Here's a very simplified example of how you might generate the boxing ring geometry (boxing ring ropes, floor, and posts) with a Python script inside Blender.


    import bpy
    
    def create_boxing_ring():
        # Clear existing objects
        bpy.ops.object.select_all(action=&#039;DESELECT&#039;)
        bpy.ops.object.select_by_type(type=&#039;MESH&#039;)
        bpy.ops.object.delete()
    
        # Create the floor
        bpy.ops.mesh.primitive_plane_add(size=10, enter_editmode=False, align=&#039;WORLD&#039;, location=(0, 0, 0))
        bpy.context.object.name = &quot;RingFloor&quot;
        bpy.context.object.scale = (1, 1, 0.1) # Make it slightly thick
    
        # Create the posts
        post_locations = [
            (4.5, 4.5, 2), (-4.5, 4.5, 2),
            (4.5, -4.5, 2), (-4.5, -4.5, 2)
        ]
        for loc in post_locations:
            bpy.ops.mesh.primitive_cylinder_add(radius=0.2, depth=4, enter_editmode=False, align=&#039;WORLD&#039;, location=loc)
            bpy.context.object.name = &quot;RingPost&quot;
    
        # Create the ropes (simplified)
        # This is a basic representation, more complex ropes would involve curves and path following
        rope_heights = [1, 1.5, 2]
        for h in rope_heights:
            # Front rope
            bpy.ops.mesh.primitive_cube_add(size=0.1, enter_editmode=False, align=&#039;WORLD&#039;, location=(0, 4.5, h))
            bpy.context.object.scale = (9, 0.1, 0.1)
            # Back rope
            bpy.ops.mesh.primitive_cube_add(size=0.1, enter_editmode=False, align=&#039;WORLD&#039;, location=(0, -4.5, h))
            bpy.context.object.scale = (9, 0.1, 0.1)
            # Left rope
            bpy.ops.mesh.primitive_cube_add(size=0.1, enter_editmode=False, align=&#039;WORLD&#039;, location=(-4.5, 0, h))
            bpy.context.object.scale = (0.1, 9, 0.1)
            # Right rope
            bpy.ops.mesh.primitive_cube_add(size=0.1, enter_editmode=False, align=&#039;WORLD&#039;, location=(4.5, 0, h))
            bpy.context.object.scale = (0.1, 9, 0.1)
    
        print(&quot;Boxing ring created!&quot;)
    
    create_boxing_ring()


    This script clears the scene and creates a simple boxing ring with a floor, four posts, and three horizontal ropes on each side.

    Step 2: Running the Script on the Command Line

    To run this Python script in Blender without opening the UI:

    1. Save the script to a file, e.g., boxing_ring.py.
    2. Open your terminal or command prompt.
    3. Run Blender in background mode with your script:
    blender --background --python boxing_ring.py --save-as boxing_ring.blend

    This command runs Blender headlessly, executes your script, and saves the scene as boxing_ring.blend.

    Step 3: Exporting for the Web

    You can export your model to glTF/glb format, which is compatible with web viewers like <model-viewer>.

    From inside Blender or via Python, export your model:

    blender boxing_ring.blend --background --python-expr "import bpy; bpy.ops.export_scene.gltf(filepath='boxing_ring.glb')"

    Step 4: Displaying the Model in a Web Browser

    Using the lightweight <model-viewer> web component, you can easily embed your 3D boxing ring.

    &lt;script type="module" src="https://unpkg.com/@google/model-viewer/dist/model-viewer.min.js"&gt;&lt;/script&gt;
    
    &lt;model-viewer src="boxing_ring.glb" alt="3D Boxing Ring" auto-rotate camera-controls style="width: 600px; height: 400px;"&gt;
    &lt;/model-viewer&gt;

    Place the boxing_ring.glb file in your website folder or host it online, and embed this snippet in your HTML page.

    📸 Screenshots & Screencast

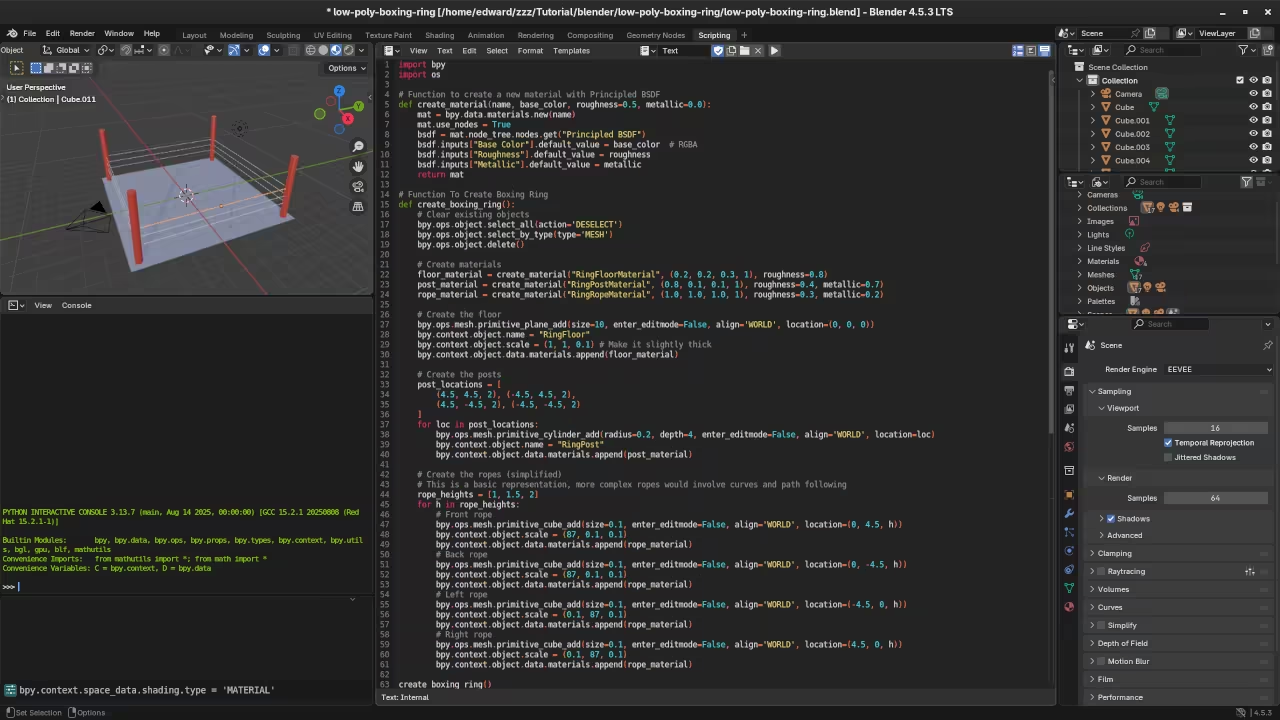
    Low poly glass bottle Python code
    Blender Scripting Workspace Displaying Low Poly Boxing Ring Python Code

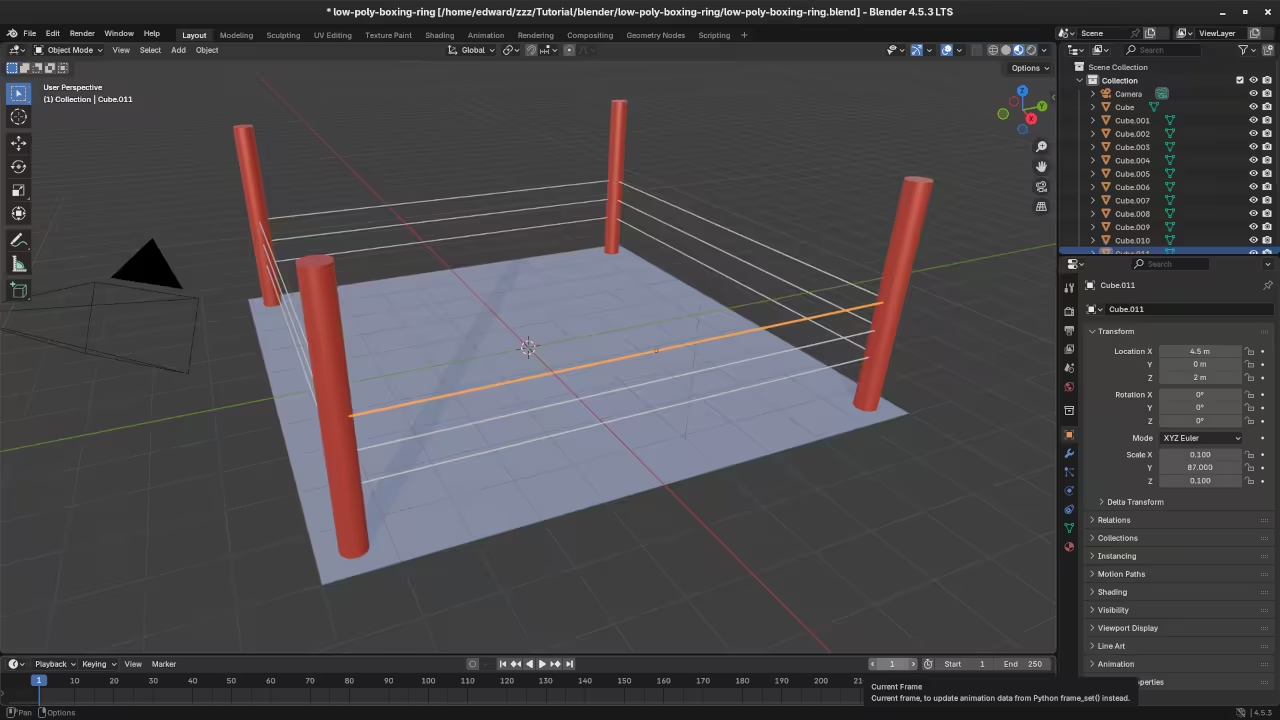
    Low poly glass bottle in Blender
    Blender Layout Workspace Displaying Low Poly Boxing Ring

    Low poly glass bottle in Web browser
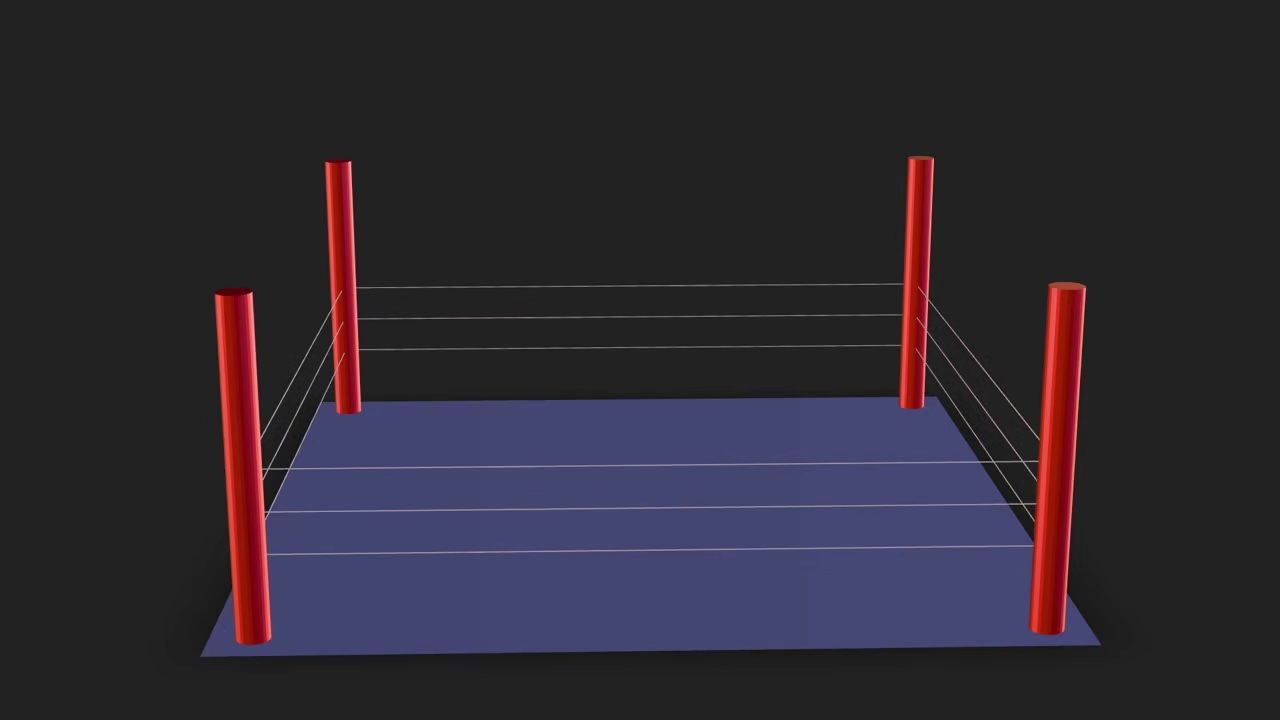
    Web Browser Displaying Rendered Low Poly Boxing Ring

    Screencast For Blender Python API Low Poly Boxing Ring

    Additional Resources

    For those wanting to deepen their knowledge, check out my books:

    You can also enroll in my Learning Python course for structured learning.

    Need Personalized Help?

    I offer one-on-one online Python tutorials including Blender scripting to help you build projects like this. Feel free to contact me here for scheduling and details.

    If you enjoyed this tutorial or want to see more, let me know in the comments!

  • Getting Started with Phorge: Self-Hosted Collaborative Software Development

    Getting Started with Phorge: Self-Hosted Collaborative Software Development

    How to Install and Use Phorge – An Open Source Tool for Software Collaboration

    If you’re looking for a free, open source platform for software collaboration, code review, and bug tracking, look no further than Phorge. It’s the modern continuation of Phabricator, built by an active open source community and ideal for individual developers, startups, or large engineering teams.

    In this post, I’ll walk you through what Phorge does, how to install it on a system that already has PHP 8.4 and MariaDB, and where you can find extra learning resources – including books, courses, and tutorials.

    What Is Phorge?

    Phorge is a self-hosted, open source development platform that provides:

    • Git repository hosting and browsing
    • Code review tools (Differential)
    • Issue and task tracking (Maniphest)
    • Wiki and documentation system (Phriction)
    • Project planning boards
    • Custom workflows and automation

    Because it’s open source, you can modify and extend it however you want – and host it on your own infrastructure for total control.

    Installing Phorge on a Server with PHP 8.4 and MariaDB

    Let’s assume your server already has PHP 8.4, MariaDB, and Git installed. Here’s how to install and configure Phorge.

    Step 1: Create the Installation Directory

    sudo mkdir -p /opt/phorge
    cd /opt/phorge

    Step 2: Clone the Required Repositories

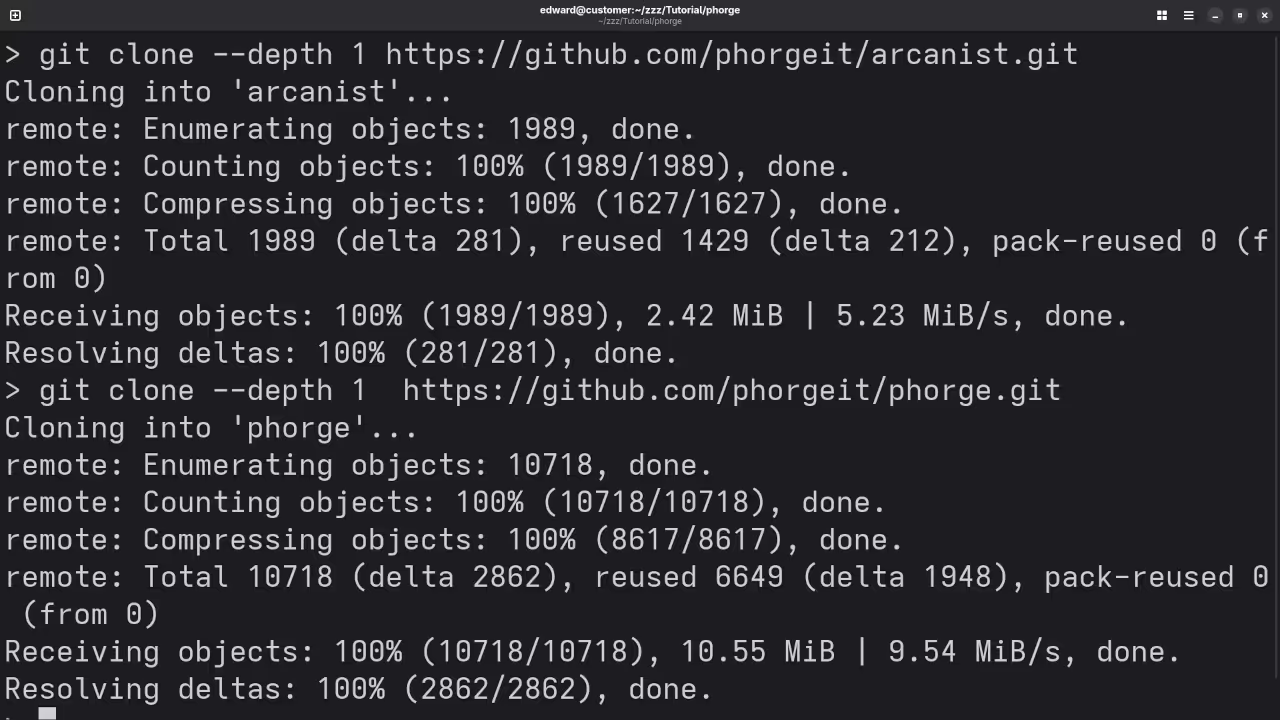
    git clone https://we.phorge.it/source/phorge.git
    git clone https://we.phorge.it/source/arcanist.git

    Step 3: Add Arcanist to Your PATH

    echo 'export PATH=$PATH:/opt/phorge/arcanist/bin' >> ~/.bashrc
    source ~/.bashrc

    Step 4: Install PHP Dependencies Using Composer

    cd /opt/phorge/phorge
    composer install

    Step 5: Set Up the Database (MariaDB)

    Login to MariaDB:

    sudo mysql -u root -p

    Then run the following SQL:

    CREATE DATABASE phorge CHARACTER SET utf8mb4 COLLATE utf8mb4_general_ci;
    CREATE USER 'phorgeuser'@'localhost' IDENTIFIED BY 'your-strong-password';
    GRANT ALL PRIVILEGES ON `phabricator\_%`.* TO 'phorgeuser'@'localhost';
    FLUSH PRIVILEGES;
    EXIT;

    Configure Phorge to use the database:

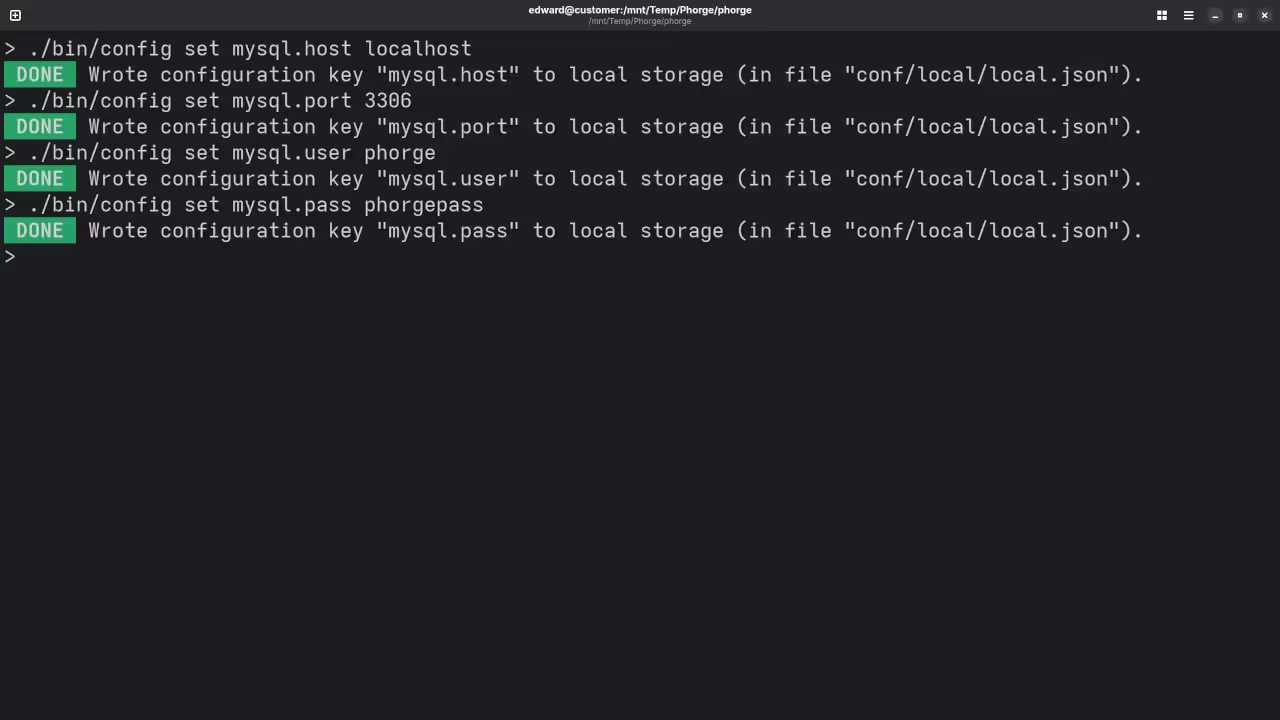
    ./bin/config set mysql.host localhost
    ./bin/config set mysql.user phorgeuser
    ./bin/config set mysql.pass your-strong-password
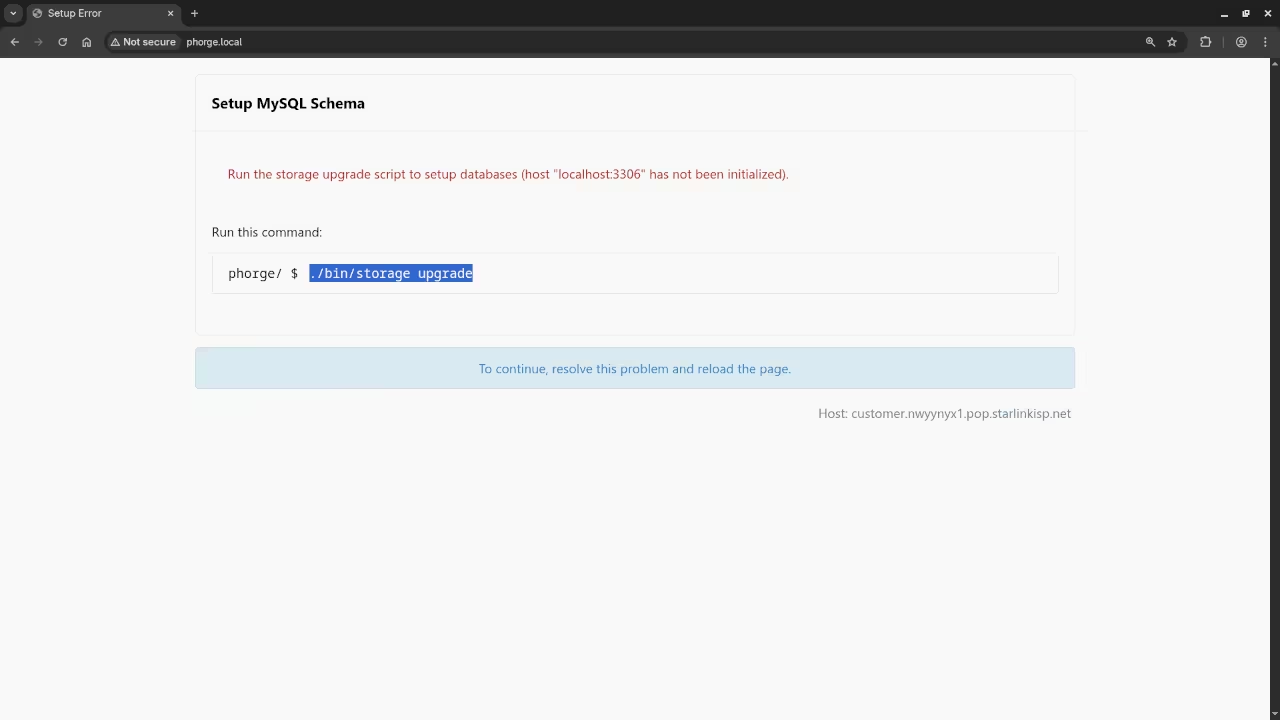
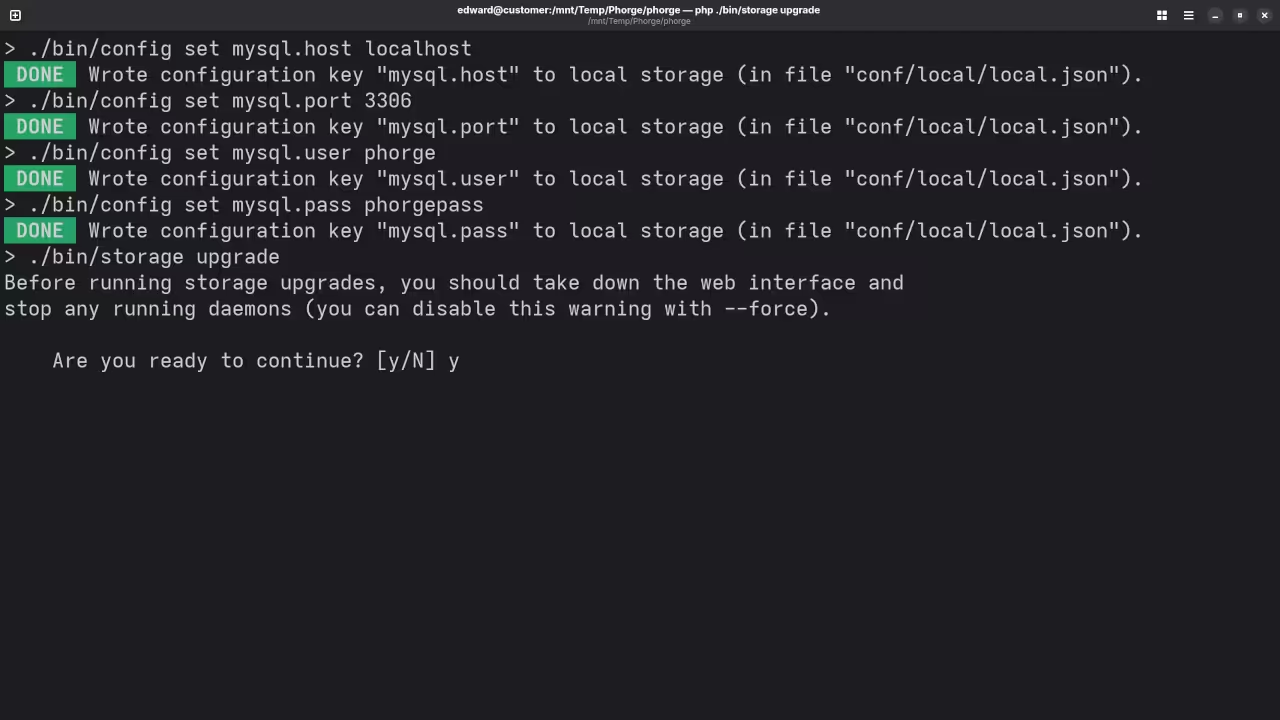
    ./bin/storage upgrade

    Step 6: Set Permissions

    sudo chown -R www-data:www-data /opt/phorge/phorge
    sudo chmod -R 755 /opt/phorge/phorge

    Step 7: Configure Your Web Server

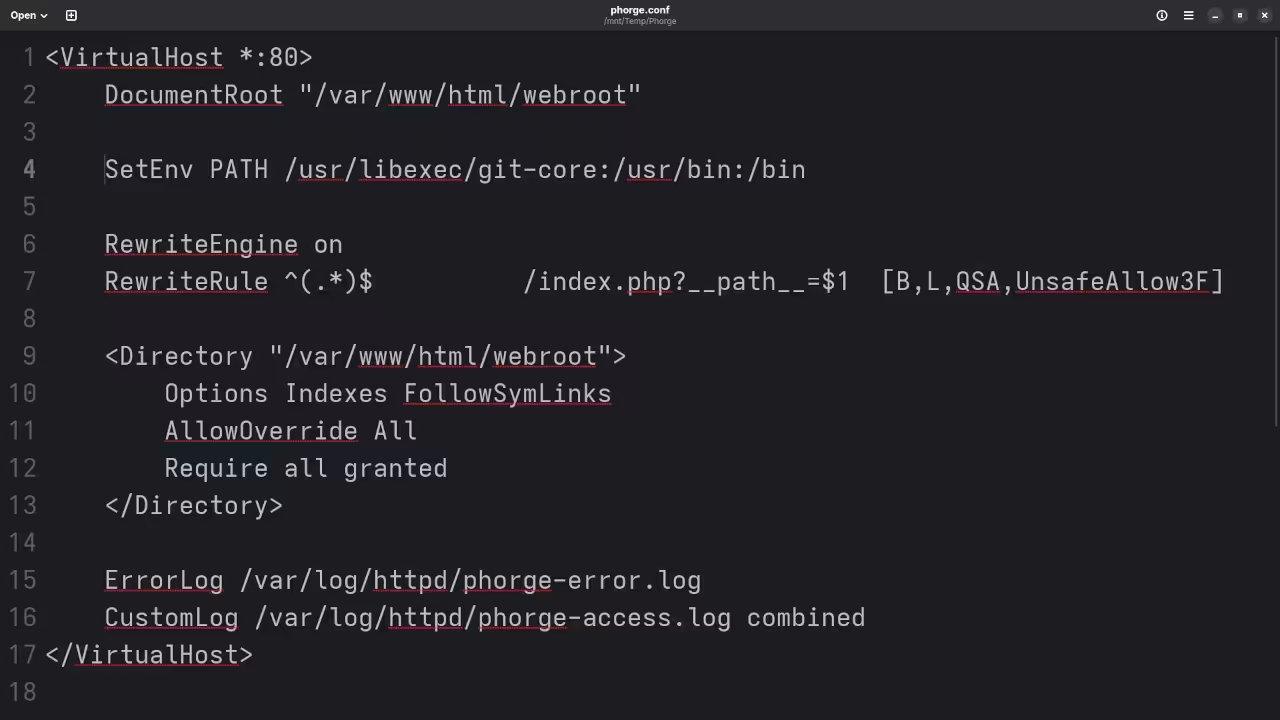
    Apache VirtualHost Example:

    &lt;VirtualHost *:80&gt;
        ServerName yourdomain.com
        DocumentRoot /opt/phorge/phorge/webroot
    
        &lt;Directory "/opt/phorge/phorge/webroot"&gt;
            Require all granted
            AllowOverride All
        &lt;/Directory&gt;
    &lt;/VirtualHost&gt;

    Then enable the site:

    sudo a2ensite yourdomain.com.conf
    sudo a2enmod rewrite
    sudo systemctl reload apache2

    Step 8: Start the Phorge Daemons

    cd /opt/phorge/phorge
    ./bin/phd start

    Check status:

    ./bin/phd status

    Final Step: Access Phorge in the Browser

    Open your browser and go to:

    http://yourdomain.com/

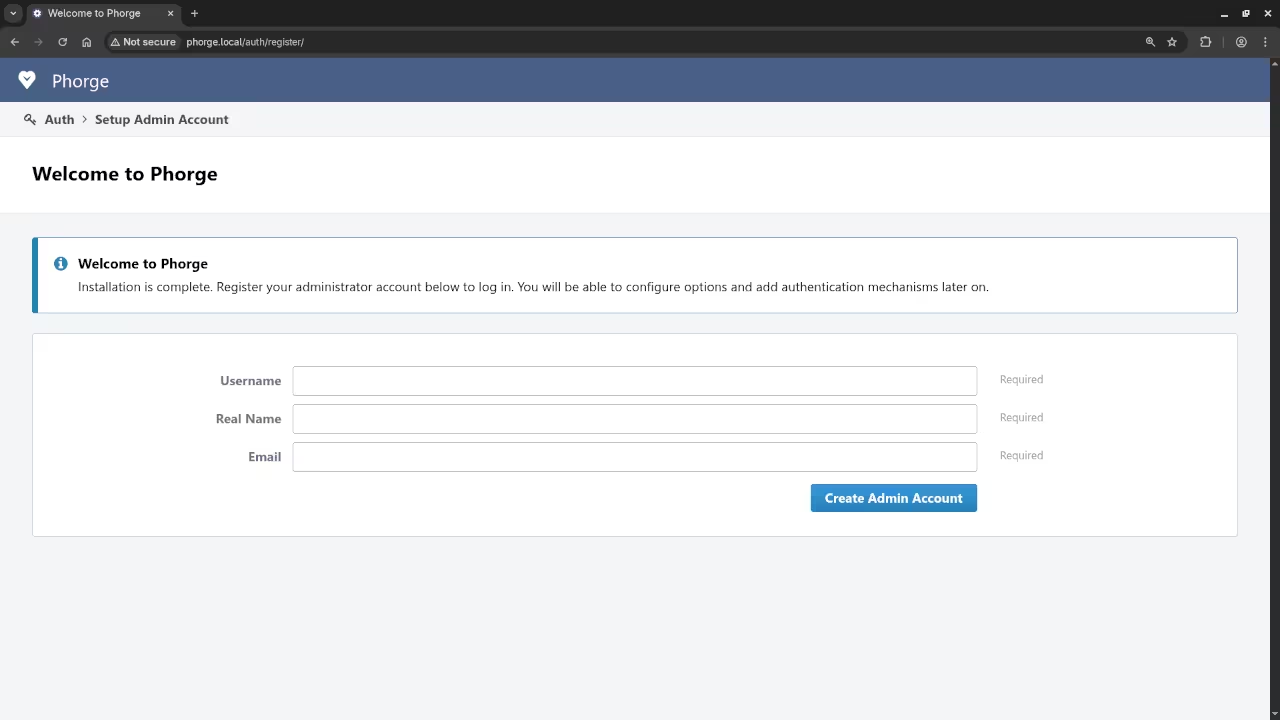
    You’ll be guided through creating an admin account and completing the setup process.

    Screenshots and Screencast Tutorial

    Apache VirtualHost
    Gnome Text Editor Displaying Apache VirtualHost File

    Phorge Git Clone
    Command Line Git Cloning Of Phorge Project

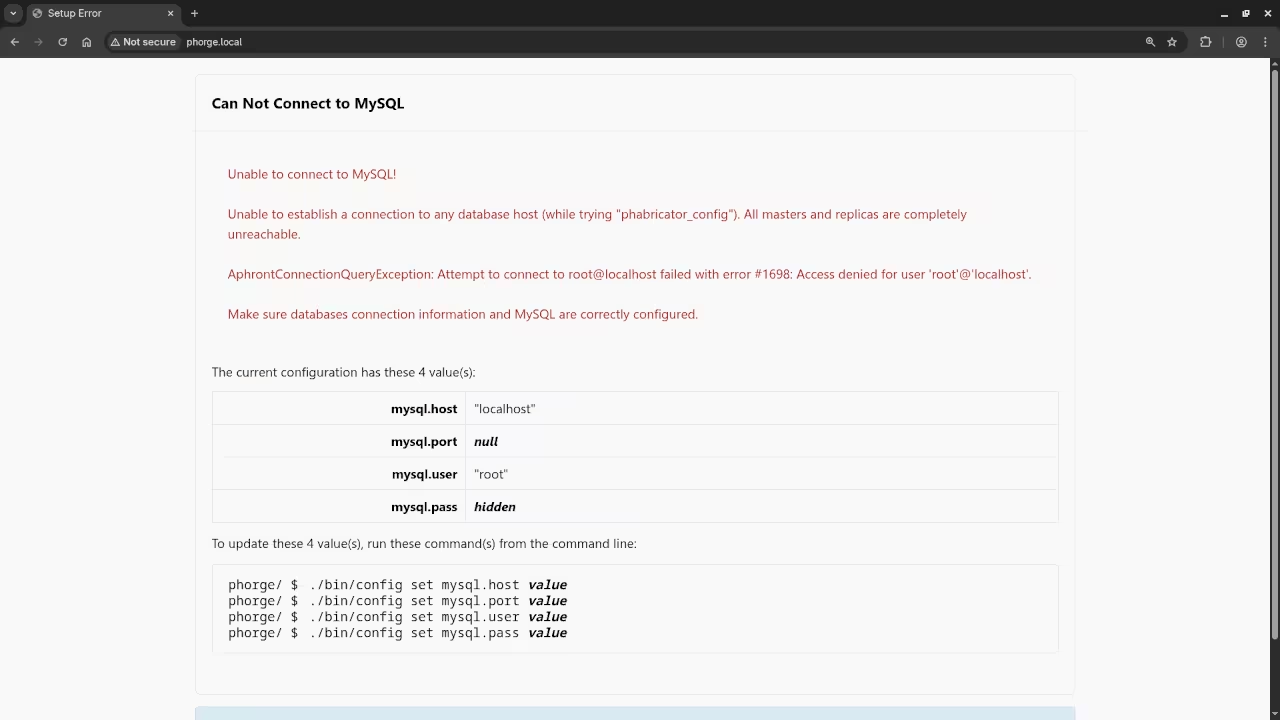
    Phorge Initial Configuration
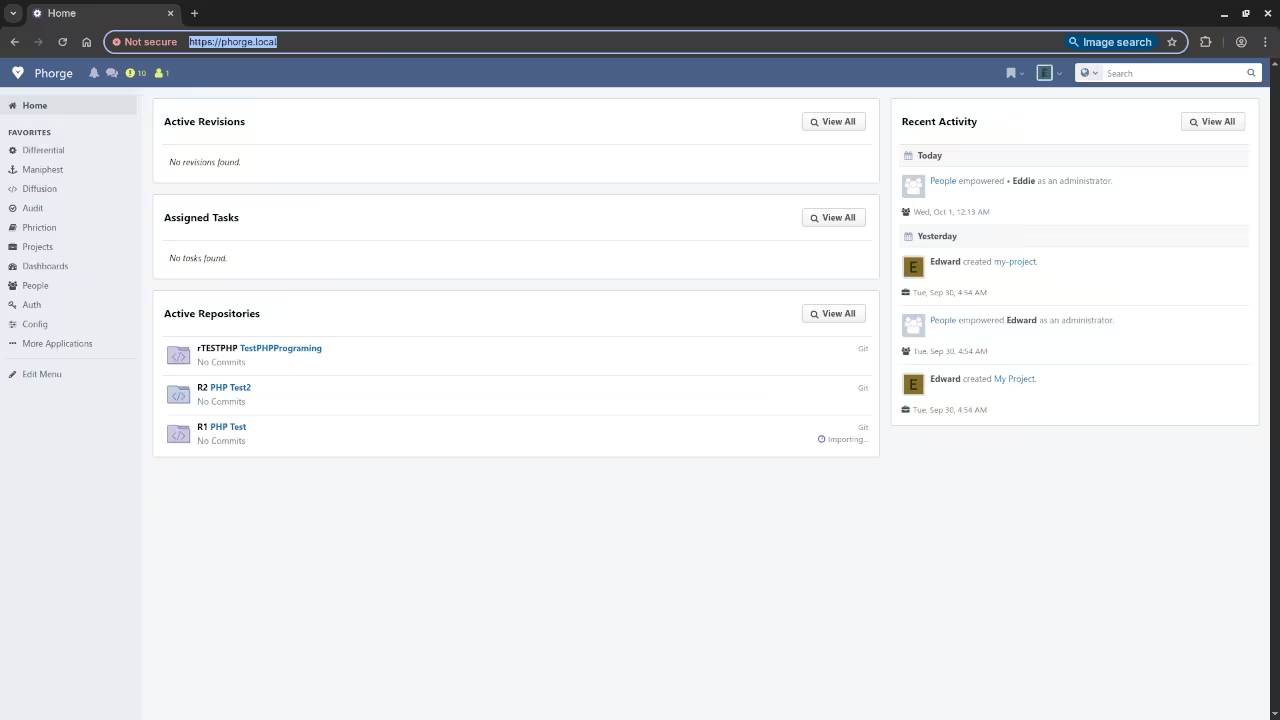
    Web Browser Displaying Initial Phorge Configuration

    Phorge Database Setup
    Command Line Displaying MySQL Configuration Results

    Phorge Database Upgrade
    Web Browser Displaying Database Upgrade Instructions

    Phorge MySQL Upgrade
    Command Line Displaying MySQL Upgrade Results

    Phorge Admin Setup
    Web Browser Displaying Admin Setup Screen

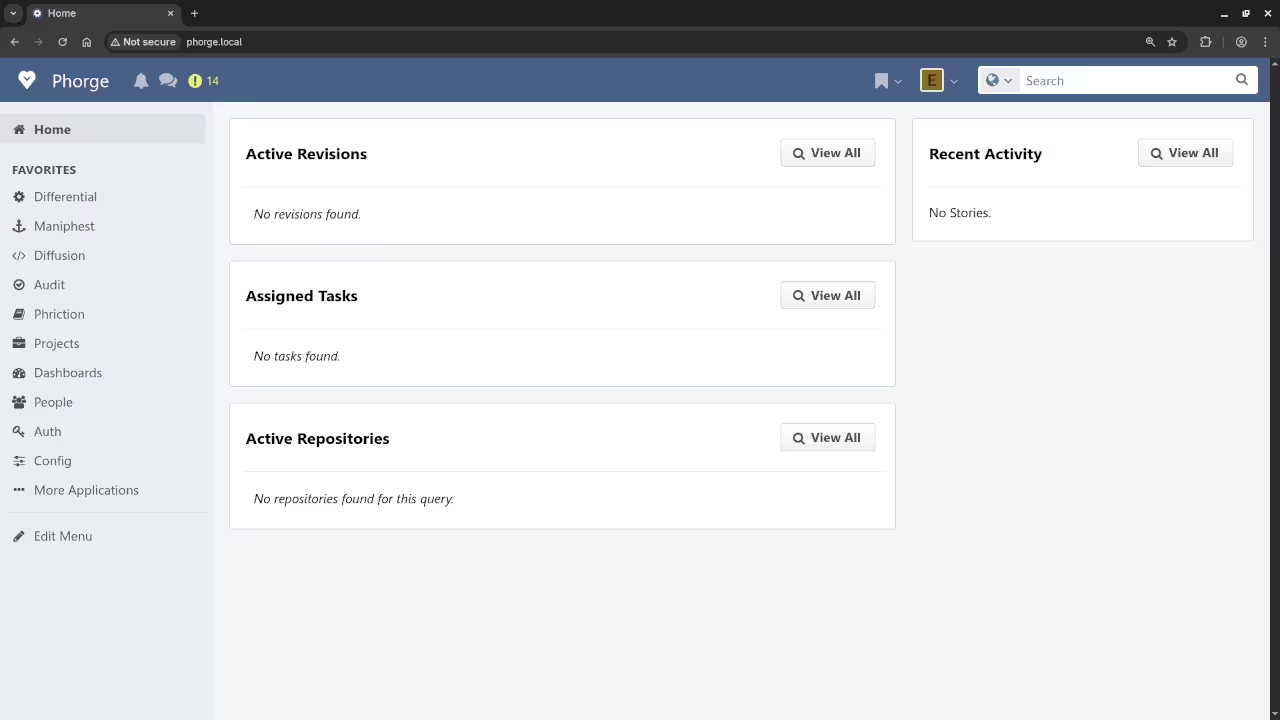
    Phorge Dashboard
    Web Browser Displaying Dashboard Screen

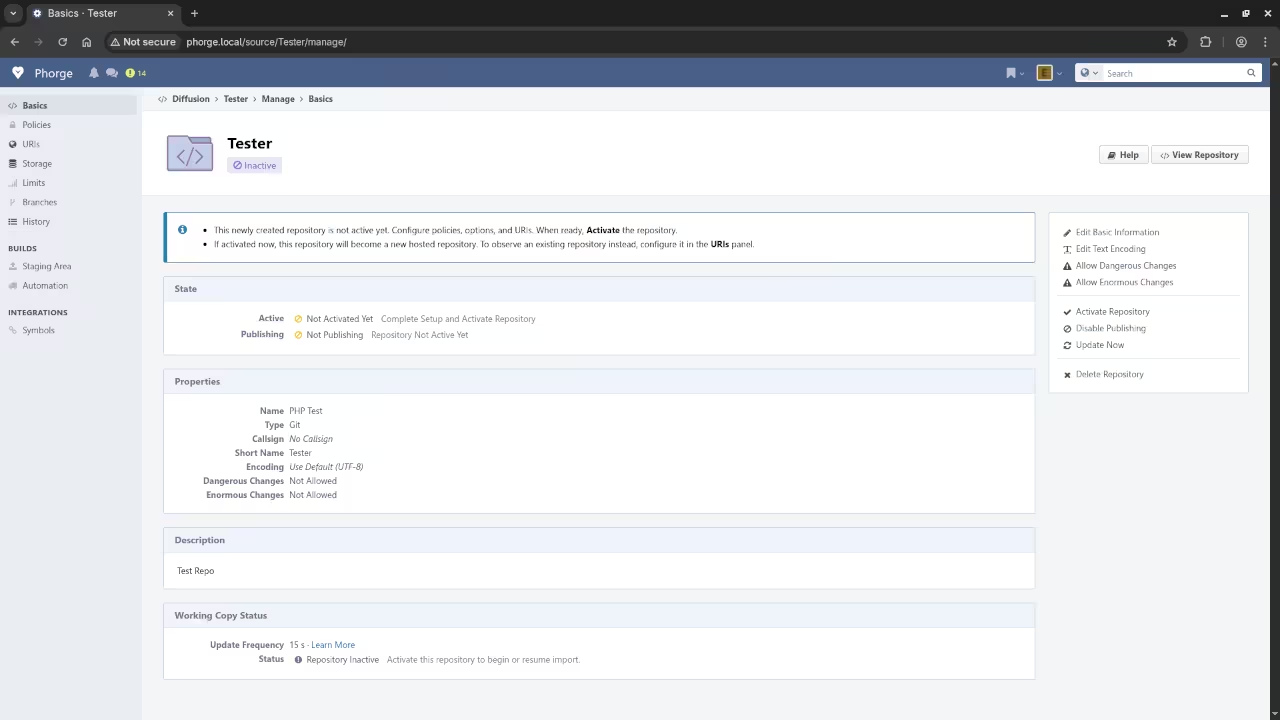
    Phorge Repo Creation
    Web Browser Displaying Repository Creation Screen

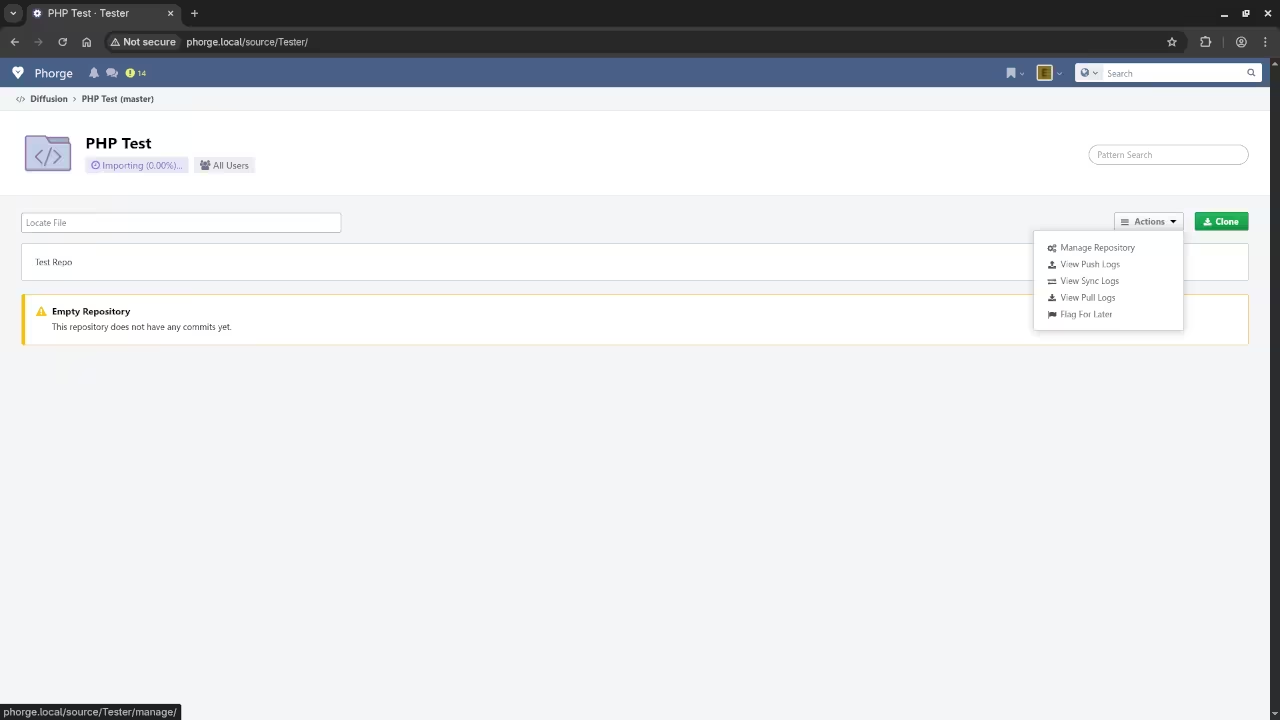
    Phorge Repo Code
    Web Browser Displaying Repository Code Screen

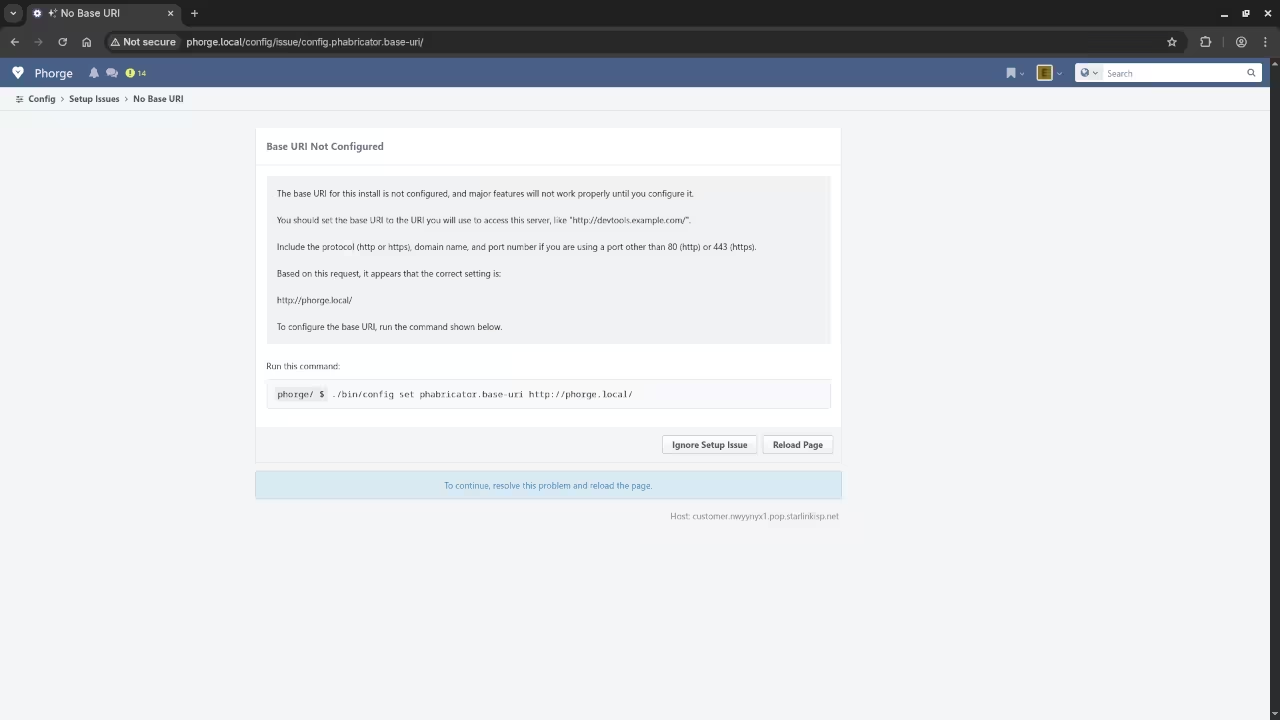
    Base URI Configuration
    Web Browser Displaying Base URI Configuration Instructions

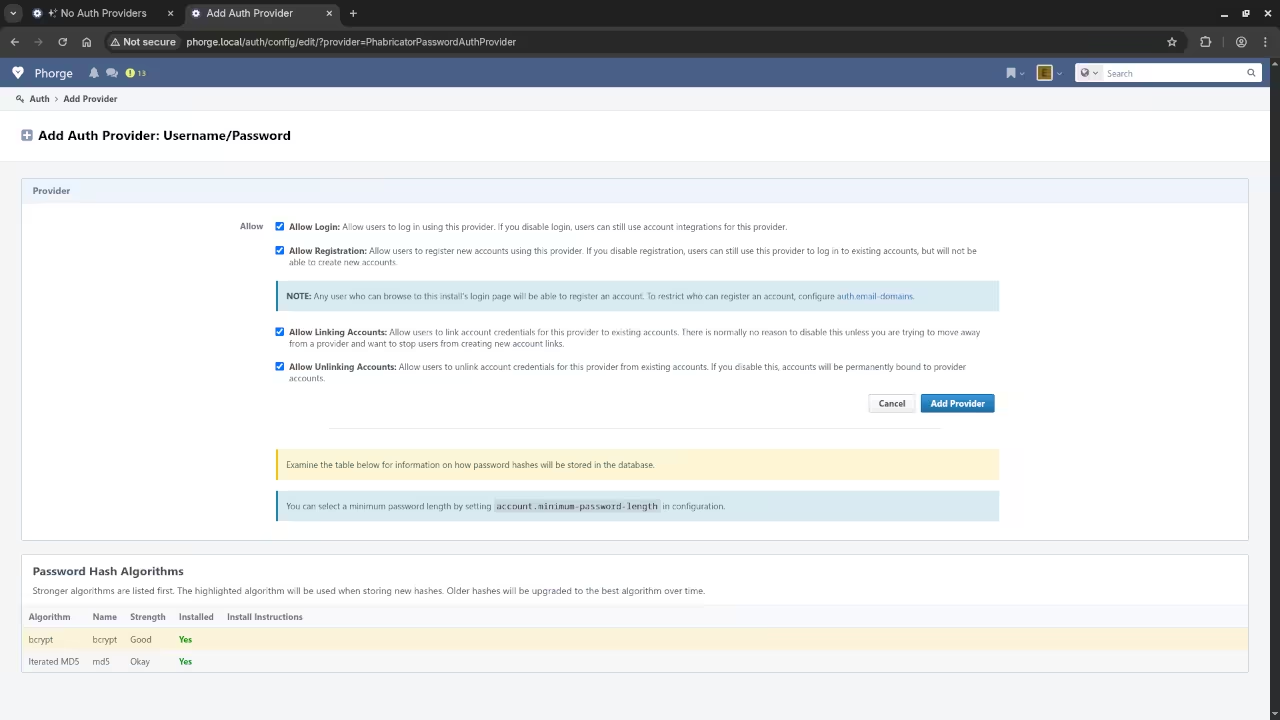
    Auth Provider Configuration
    Web Browser Displaying Auth Provider Configuration Screen

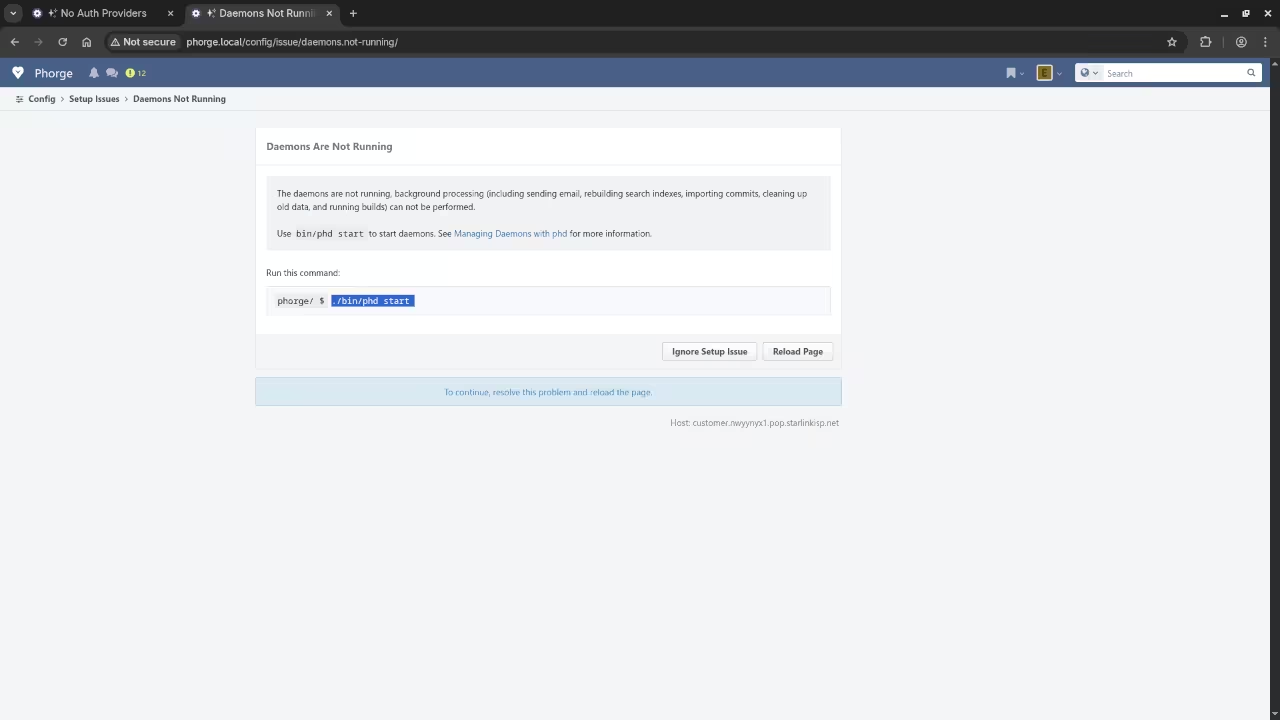
    Daemon Status
    Web Browser Displaying Daemon Status Instructions

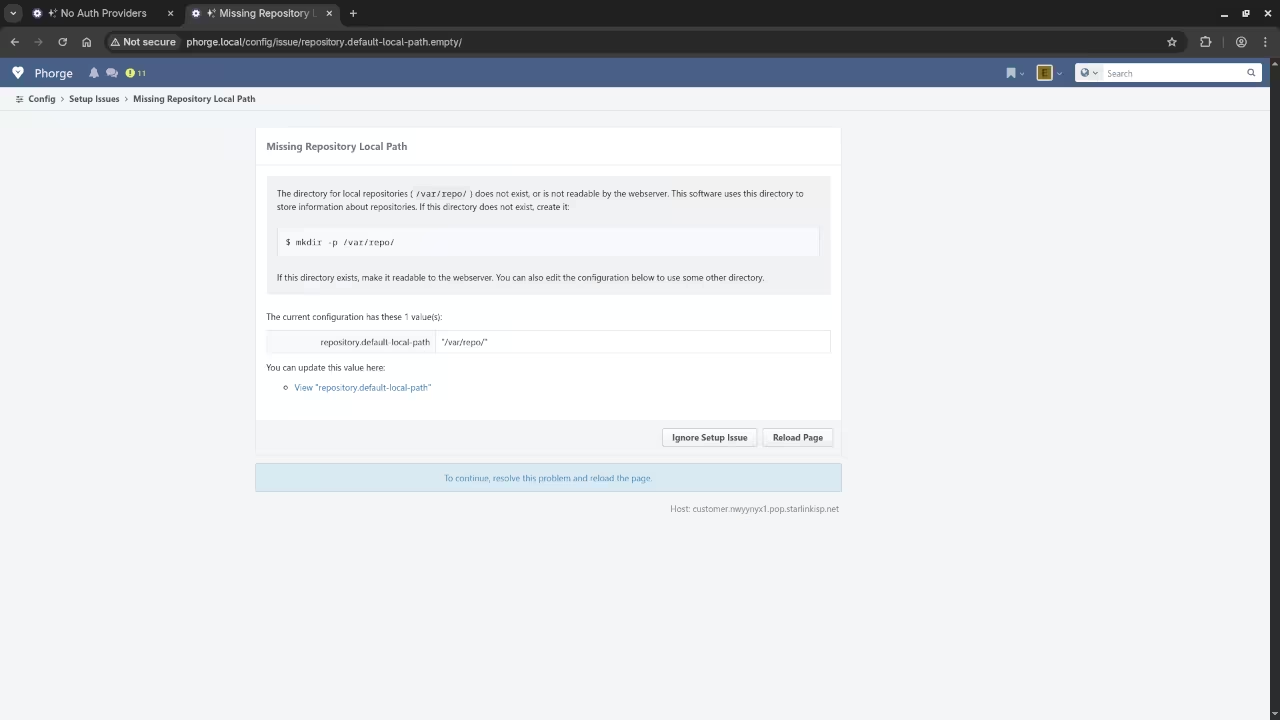
    Repo Path
    Web Browser Displaying Repository Path Instructions

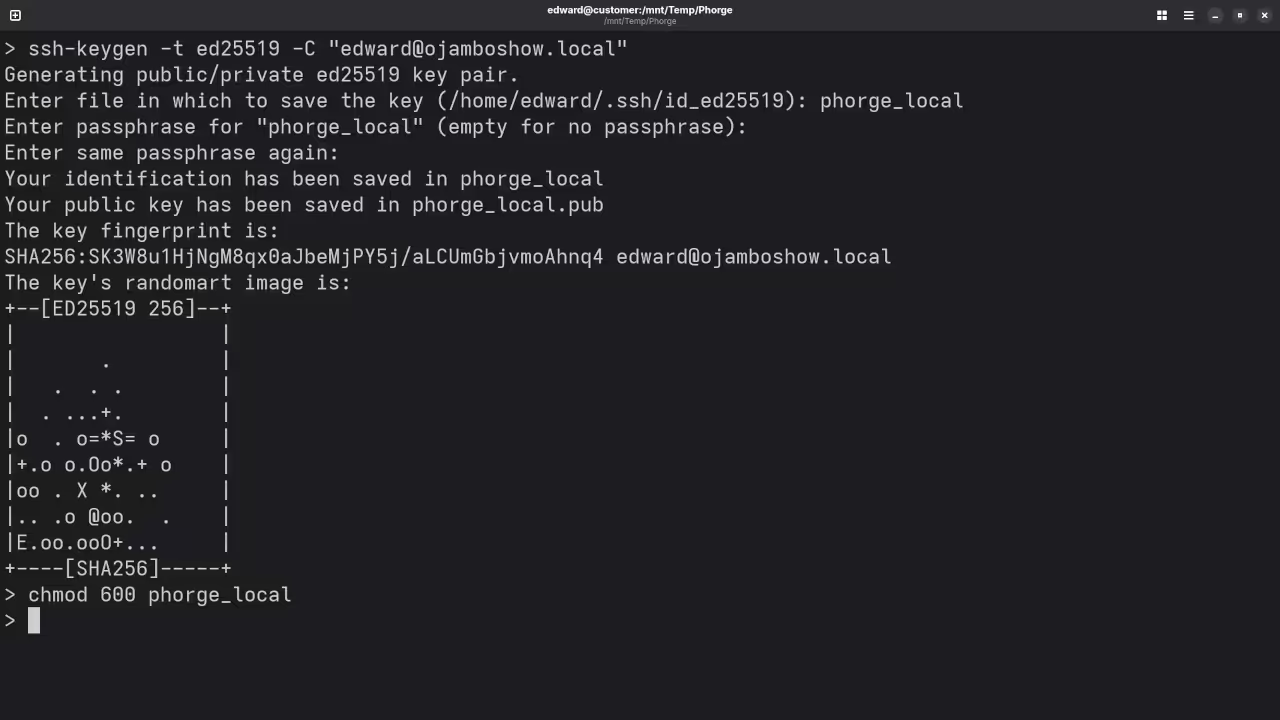
    SSH Key Generation
    Command Line Displaying SSH Key Generator

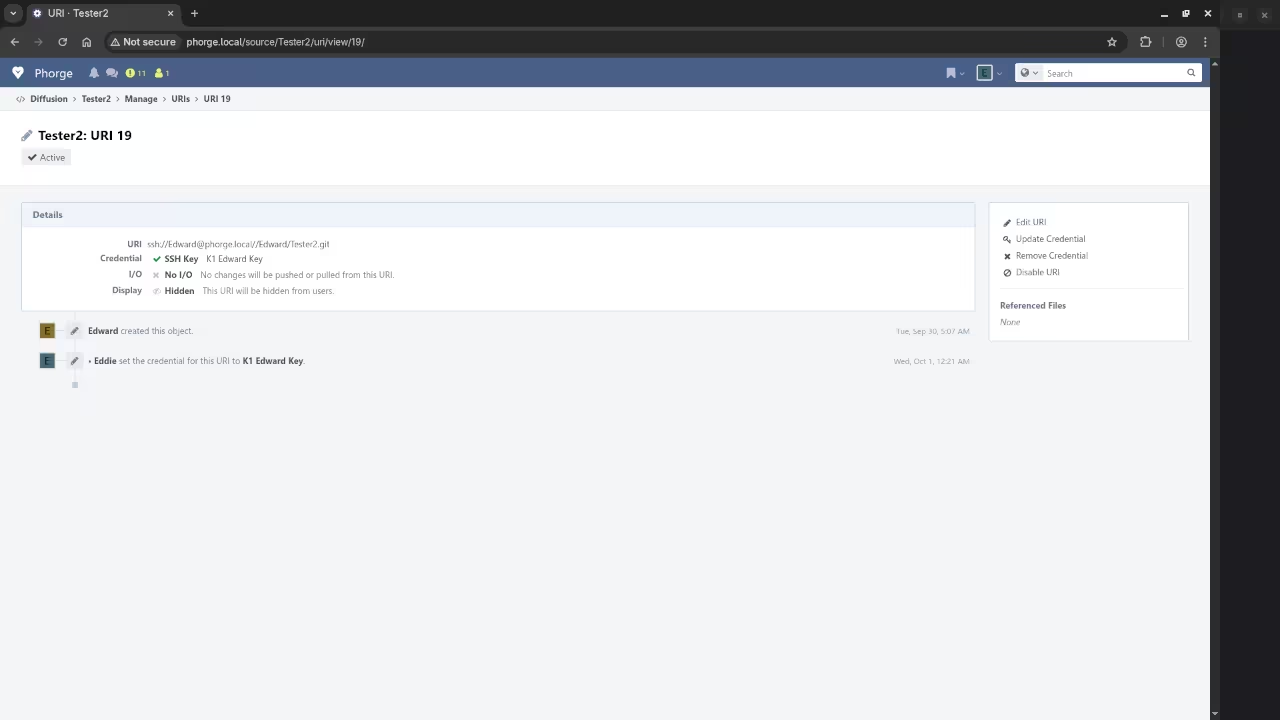
    Phorge Add SSH Key
    Web Browser Displaying Add SSH Key Screen

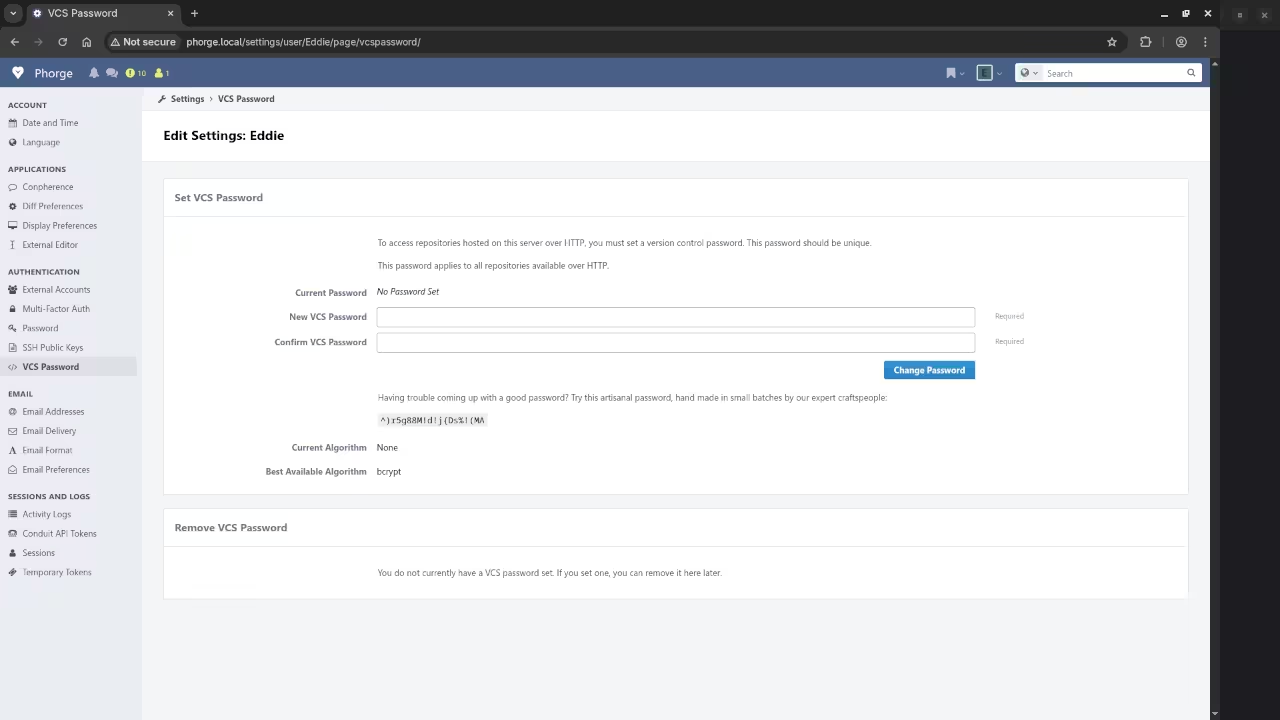
    Phorge VCS Passowrd
    Web Browser Displaying Set VCS Password Screen

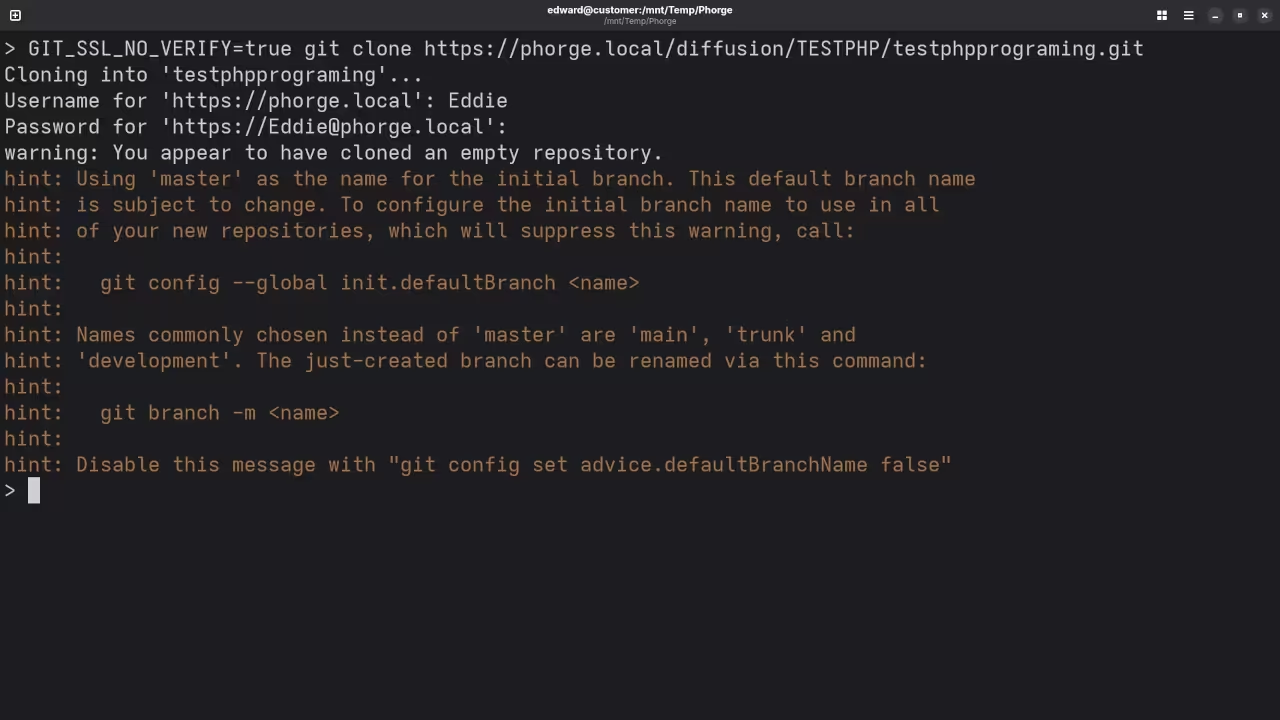
    Git Repo Clone
    Command Line Displaying Git Clone Result

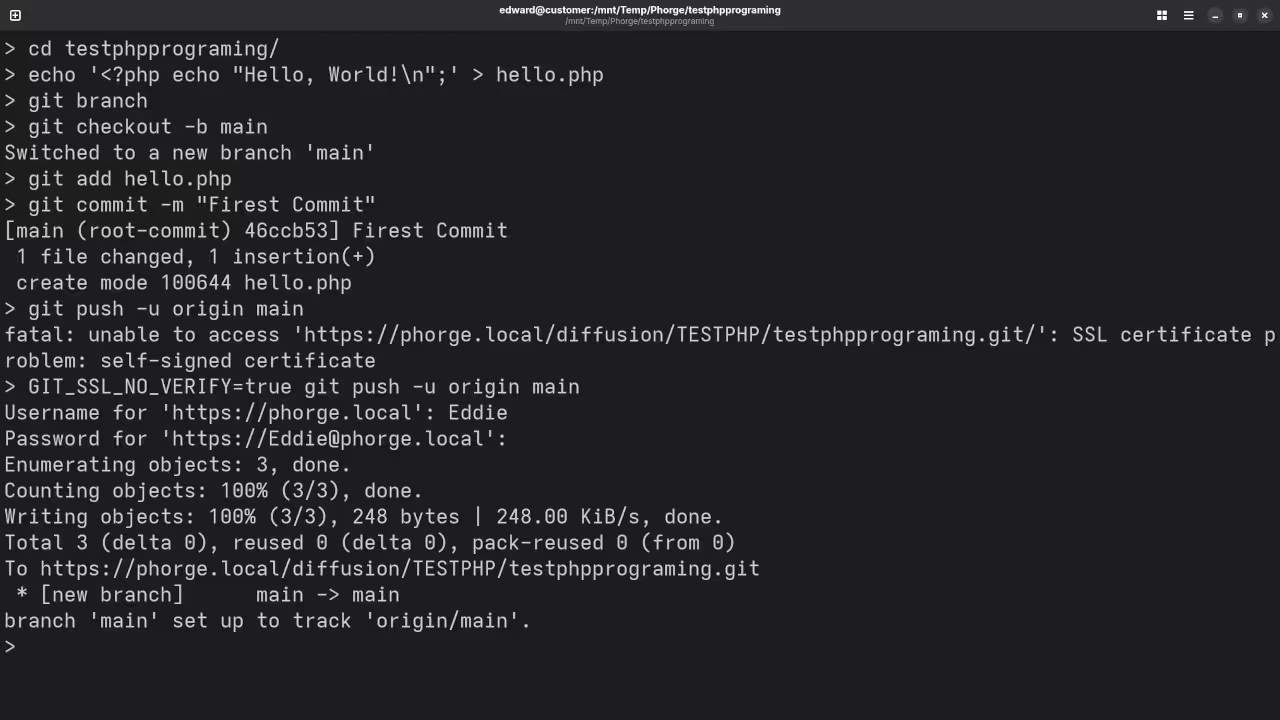
    Git Push
    Command Line Displaying Git Push Result

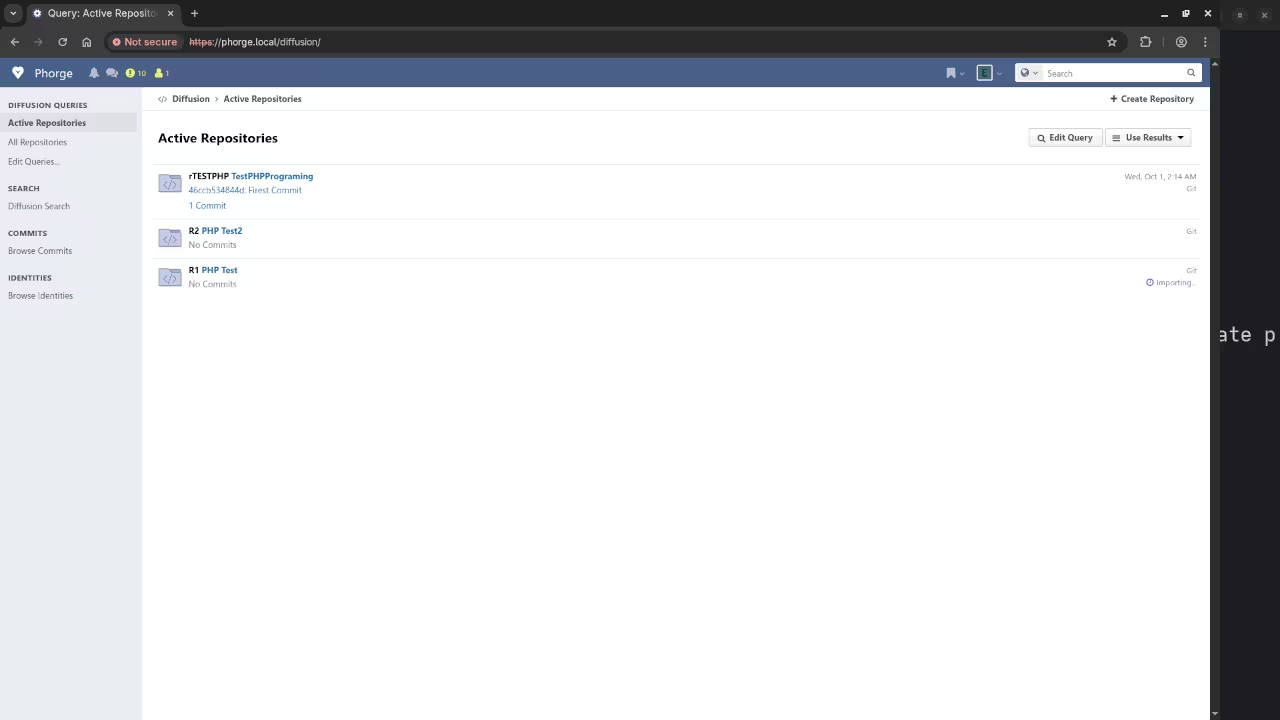
    Phorge Repo Contributions
    Web Browser Displaying Repository Contributions

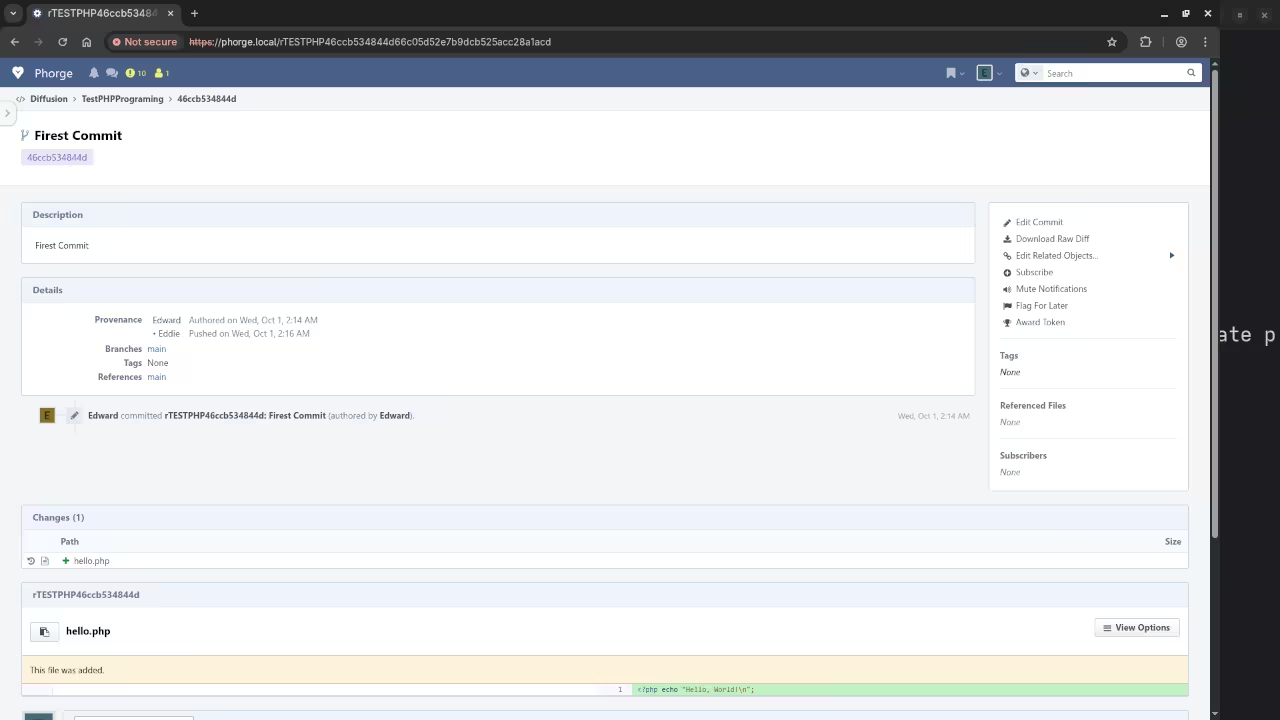
    Phorge Repo Code Commits
    Web Browser Displaying Repository Code Commits

    Screencast Of Phorge Setup

    Learn More with My Programming Books and Courses

    Whether you’re just getting started or want to go deeper into development, I’ve created useful resources to help you:

    Need Help?

    If you’d rather not install Phorge yourself or need assistance migrating Git repositories or setting up your development environment, I’m available for:

    Final Thoughts

    Phorge gives you enterprise-grade developer tools without the cost or complexity of closed platforms. If you value open source, control, and flexibility, it’s an excellent choice.

    Give it a try, and feel free to reach out if you’d like help setting it up.

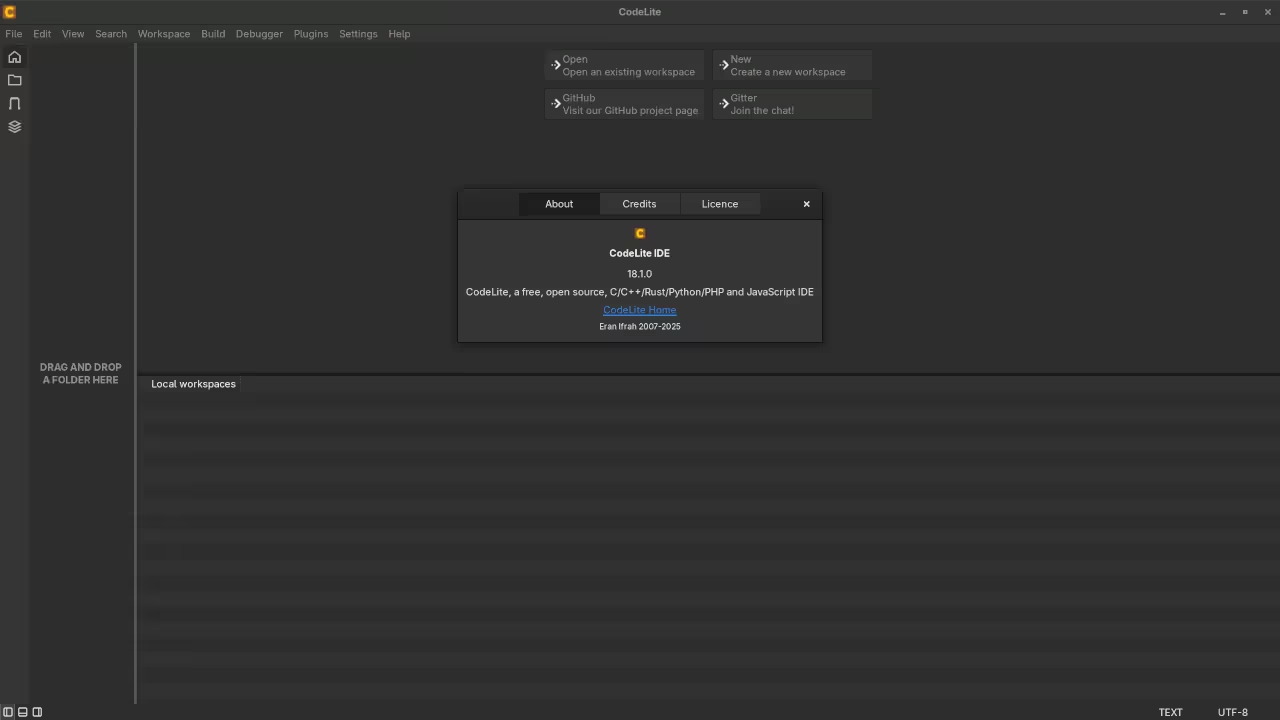
  • CodeLite 18.1.0 Advanced Editor Review

    CodeLite 18.1.0 Advanced Editor Review

    CodeLite – Lightweight Open Source IDE for C, C++, PHP and More

    CodeLite is a powerful, free, and open source IDE (Integrated Development Environment) designed primarily for C, C++, PHP, and JavaScript (including Node.js). For developers who prefer a lightweight tool that works across platforms and doesn’t lock them into a proprietary ecosystem, CodeLite is an excellent choice.

    In this post, we will look at what makes CodeLite a great option for beginners, how to install it (with a focus on Fedora Linux), and how you can get started quickly.

    Open Source and License

    CodeLite is open source and released under the GPLv2 license, which means you are free to use, modify, and share the software. You can find the source code and contribute on their GitHub page.

    Platform Support

    CodeLite is available on:

    • Linux (Fedora, Ubuntu, Arch, etc.)
    • Windows
    • macOS

    Installing CodeLite on Fedora Linux

    Fedora users can install CodeLite directly from the official Fedora repositories.

    Steps to Install:

    1. Open Terminal
    2. Run the following command:
    sudo dnf install codelite

    For Fedora 42

    sudo rpm --import https://repos.codelite.org/CodeLite.asc
    sudo dnf install https://repos.codelite.org/rpms-18.1/fedora/41/codelite-18.1.0-1.fc41.x86_64.rpm
    1. Once installed, launch it from your Applications menu or via terminal:
    codelite

    Optional (for latest version):

    To get the latest release, you can build it from source by following the instructions on the CodeLite GitHub page.

    Installing CodeLite on Other Platforms

    Windows:

    macOS:

    • Download the .dmg file from the same page above
    • Drag and drop to Applications folder

    Screenshots and Screencast

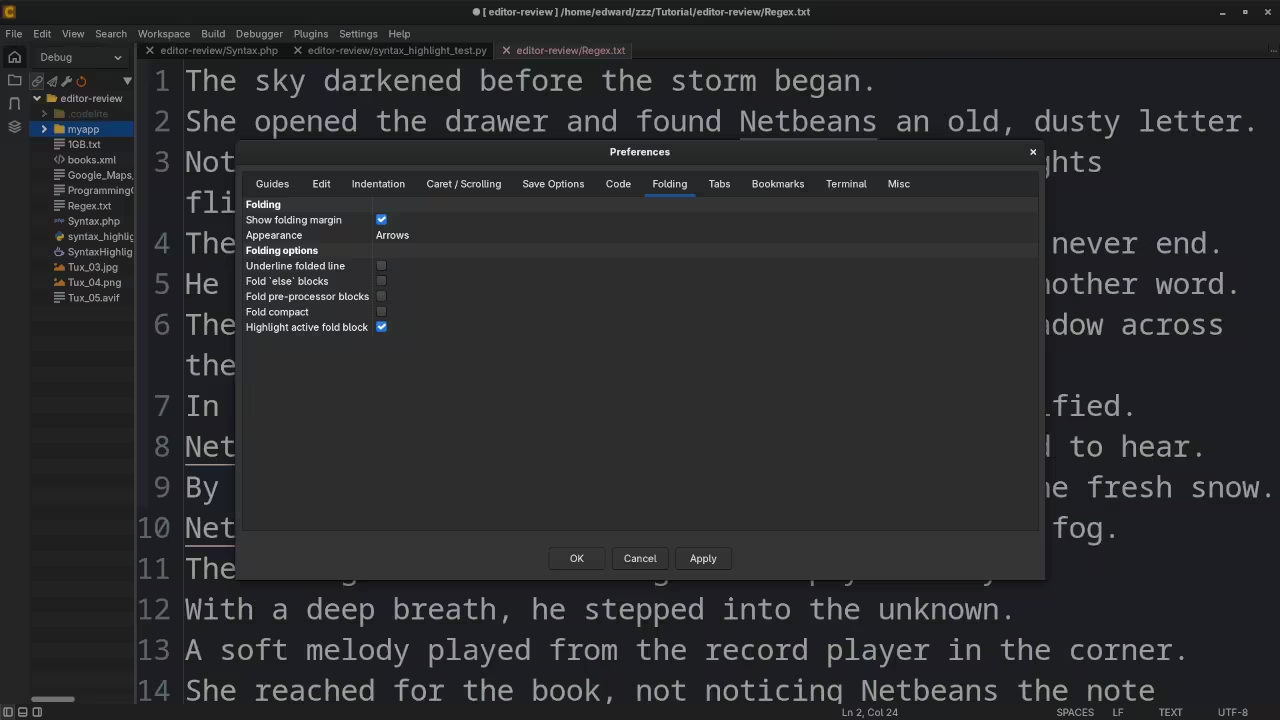
    CodeLite Preferences
    CodeLite Displaying Preferences Dialog

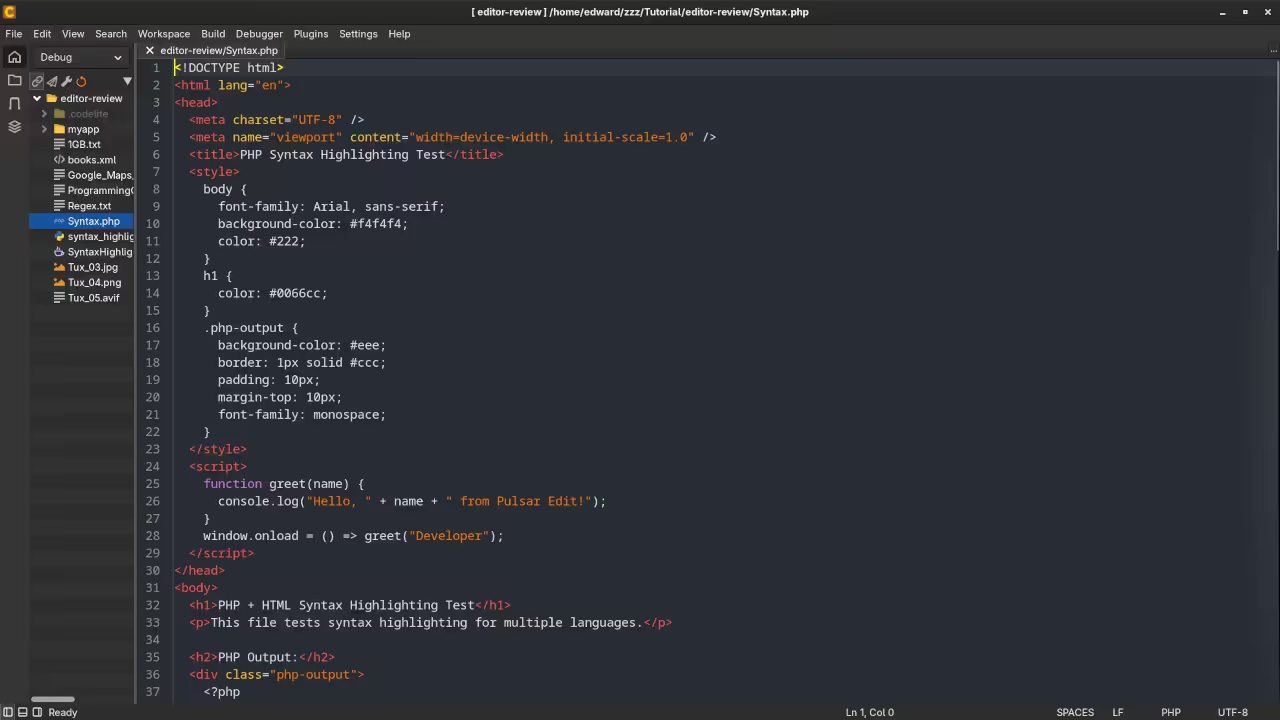
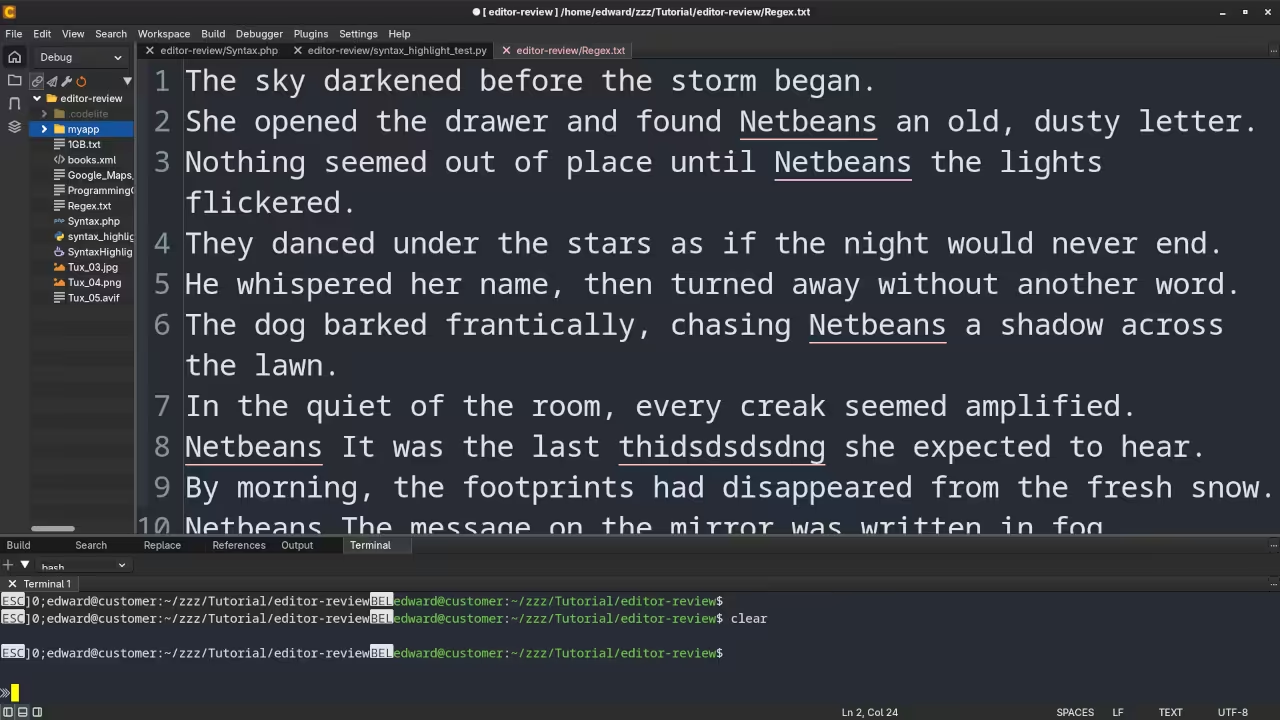
    CodeLite PHP Syntax Highlighting
    CodeLite Displaying PHP Syntax Highlighting

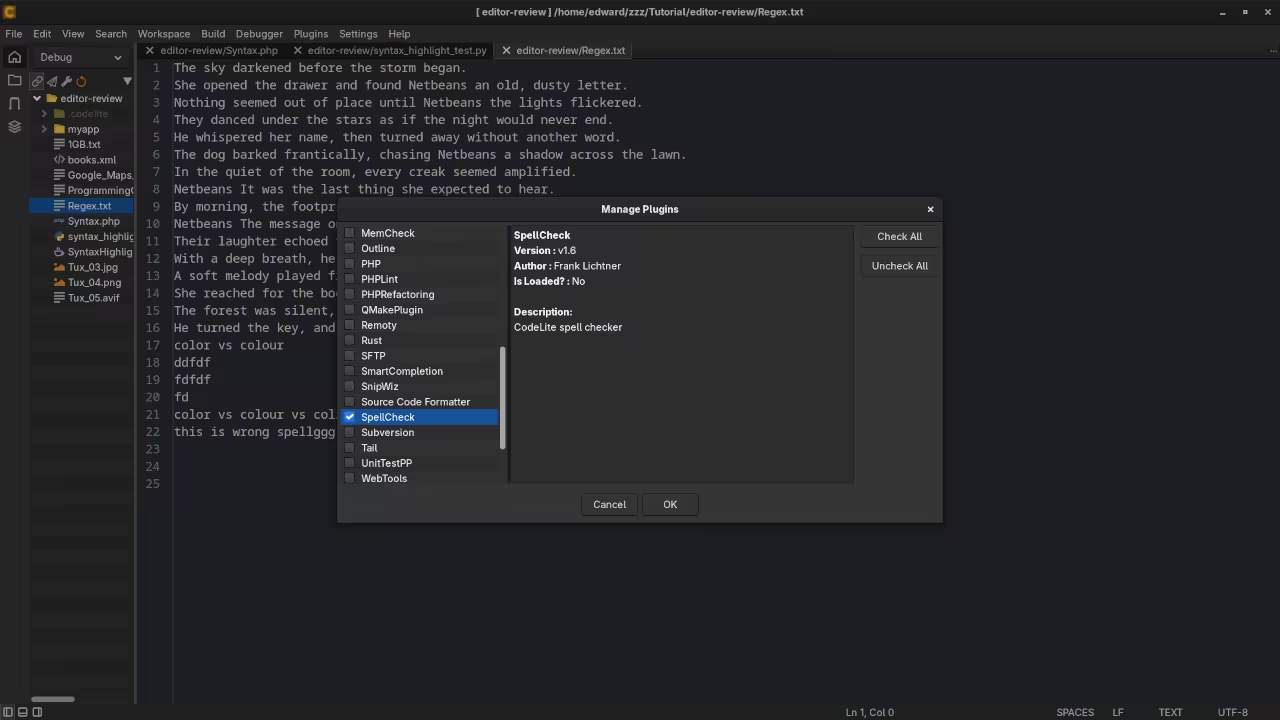
    CodeLite Plugins View
    CodeLite Displaying Plugins

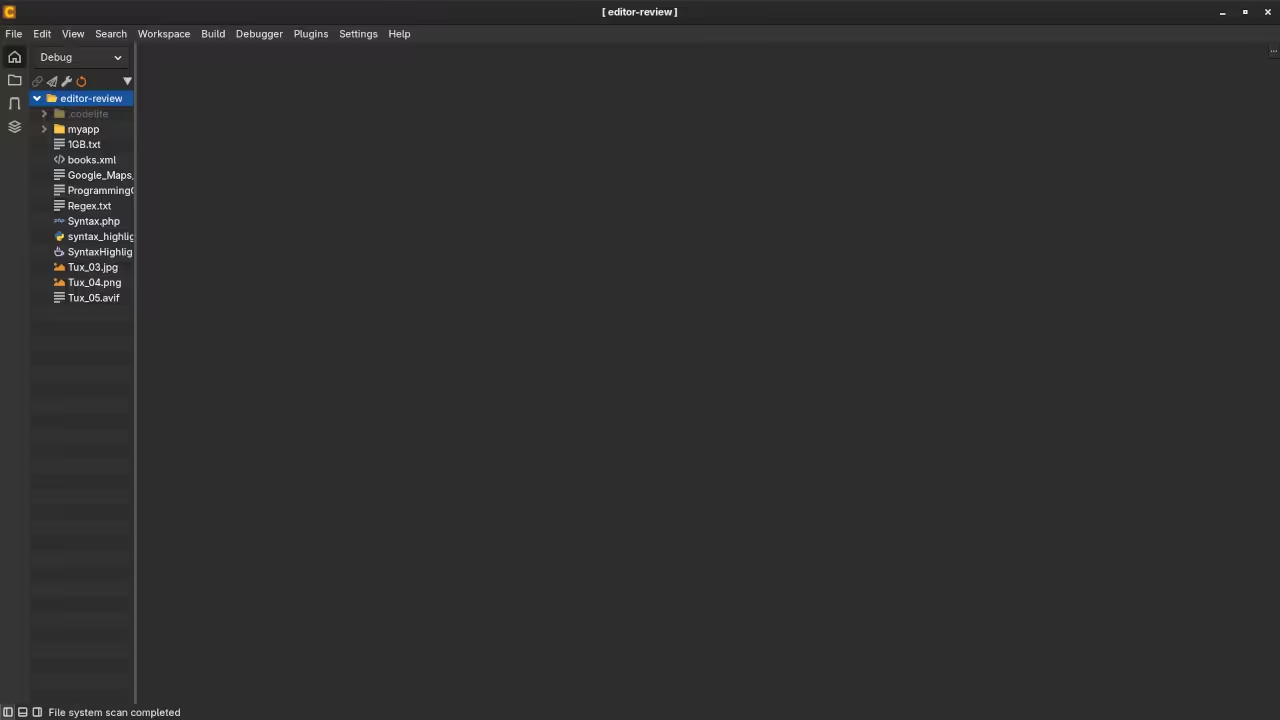
    CodeLite Folder View
    CodeLite Displaying Folder In Workspace

    CodeLite Terminal View
    CodeLite Displaying Terminal In Workspace

    👉 Screencast showing a beginner session in CodeLite—editing, saving files, and navigating buffers.

    CodeLite Review And Feature Test

    Requirements For Programming Text Editor

    Glossary:

    Code Editor

    Designed for writing and editing source code.

    IDE

    Integrated Development Environment combines various tools need for software development.

    Plugin

    Software component that adds specific functionality.

    Theme

    Preset package containing graphical appearance to customize look and feel.

    Open source

    Freely available for possible modification and redistribution.

    SCM

    Source code management use to manage and track modifications to a source code repository.

    LMB

    Left Mouse Button (LMB) or left click

    MMB

    Middle Mouse Button (MMB) or scroll wheel

    Test Tools

    Test System
    Name Description
    CPU Ryzen 5 5600GT @ 3.60GHz.
    Memory 32GB DDR4.
    Operating System Fedora Linux Workstation 42.
    Desktop Environment Gnome 48.
    Name Description

    Test Suite
    Name Description
    Large File 1GB human-readable text.
    Regex File Text with word “CodeLite” repeated.
    Syntax File PHP file containing HTML, CSS & JavaScript.
    Media File Smiley face or Tux Linux JPEG file.
    Java Version OpenJDK 21.0.8.
    PHP Version PHP 8.4.11.
    Python Version Python 3.13.7.
    CodeLite Version 18.1.0.
    Name Description

    Test Scoring

    1. Each feature has two parts.
    2. Score of zero indicates a missing feature.
    3. A part of a feature is work a score of 0.5.

    Three bias elimination steps were utilized. The editor was used for at least three years on different platforms. Attempts were made to get stable plug-ins for missing features. The same editor was compared between the one in the repository, the developers website, and the compiled version if applicable.

    Selecting Editor Version

    For this review, CodeLite was installed using the instructions from the developers website and it did not require additional plugins.

    Features

    1. The theme can be native for the editor in terms of the background. CodeLite dark and light themes can be created or downloaded and changed. The score for the theme was a perfect 1.0.
    2. Dragging and dropping a text file into the editor opens a new tab or buffer. It is not possible to specify the tab location during the drag and drop operation. The score for drag and drop into editor was 0.5.
    3. Opening a very large text file did not crash CodeLite. CodeLite was able to edit the large file. The score for opening a large file was 1.0.
    4. Multiple documents can opened in multiple tabs or buffers. Tear-off tabs do not work but CodeLite has a feature to open in new window as a new instance which is handy for multiple monitors. The score for multiple documents was 0.5.
    5. Multiple editors can be opened as new tabs without drag options. Each tab window view can not be split either vertically or horizontally as a multiple editor view in Wayland display server protocol. The score for multiple editor view was 0.5.
    6. Creating non-project files is possible. Non-project files can be opened on the command line. The score for creating non-project files was a perfect 1.0.
    7. Soft word wrap can be enabled on all documents as line wrapping. Automatic soft wrap for documents is available from the CodeLite View menu. The score for word wrap was a perfect 1.0.
    8. Spell check does not work as words are typed until Continuous is activated for the plugin. Spelling errors are shown in opened documents. The score for spell check was 1.0.
    9. Word count is not available for CodeLite. Word count for the current buffer or file is not enabled. Selection word count is not available as part of word count. The score for word count was 0.0.
    10. Go to line can jump to a specified line using CTRL-G and entering the line number. It is possible to jump to either the first or last line. The score for go to line is a perfect 1.0.
    11. Indentation can default to user-defined tab stops. Children are automatically indented. The score for indentation was a perfect 1.0.
    12. Fonts can be dynamically scaled with custom keyboard shortcuts or the mouse CTRL-MMB. The system font can be bypassed and a new editor font and size can be set. The score for fonts was a perfect 1.0.
    13. Find and replace using regular expressions can be utilized for all open documents in the current session. Find and replace will work for the current document or a selection in the current document. The score for find and replacing using regular expressions was a perfect 1.0.
    14. Multiple language syntax highlighting in one file is enabled. Each language has code-sensitive syntax colours. The score for multiple language syntax highlighting was a perfect 1.0.
    15. Code folding does work by toggling it in Settings -> Preferences for markup languages such as HTML. Code folding also works for programming languages such as Java. The score for code folding was 1.0.
    16. Selecting rectangular block per column works using the ALT/OPTION-SHIFT or CTRL-ALT-LMB. Rectangular block selection works with word wrap enabled. The score for selecting rectangular block was a perfect 1.0.
    17. Multiple selection is available for CodeLite using the CTRL-E. Search multiple selection is not available. The score for multiple selection was 0.5.
    18. Distraction-free mode to hide panes works. Line numbers can not be toggled to improve distraction-free mode. The score for distraction-free was a perfect 1.0.
    19. The file manager can be enabled by default. Media files cannot be dragged and dropped into the file manager pane. The score for file manager was 0.5.
    20. Terminal can be enabled. The terminal does follow folder. Terminal can execute system commands. The score for terminal was 1.0.

    Results

    CodeLite is a lightweight IDE. By default, the CodeLite editor is missing required features that can be enabled or implemented by plugins. For my required features, the CodeLite editor scored 80.0% or 8.00 out of 10.

    Want to Learn More?

    I have written multiple programming books that are available on Amazon. These books cover foundational and advanced topics in programming and software development.

    Programming Courses

    Check out my online programming courses at:

    https://ojamboshop.com/product-category/course

    These courses are beginner-friendly and designed to help you become confident in coding.

    Need One-on-One Help?

    I offer online programming tutorials, customized to your needs. Whether you are a beginner or looking to sharpen your skills:

    Book a session here

    CodeLite Installation or Migration Help

    Need help installing CodeLite, setting it up for your environment, or migrating from another IDE?

    I offer professional services to get you up and running smoothly.

    Contact me here

    Conclusion

    CodeLite is a solid open-source IDE that covers essential features for C, C++, PHP, and JavaScript development. It is especially ideal for those who want a no-nonsense, efficient environment without the overhead of heavier IDEs.

    Try it out on your Fedora system and let me know your thoughts.

  • How to Install OpenSign: A Document Signing Tool

    How to Install OpenSign: A Document Signing Tool

    Install OpenSign Using Podman: A Beginner’s Guide to Self-Hosted E-Signatures

    Looking for a free, open-source alternative to platforms like DocuSign? OpenSign, developed by OpenSignLabs, is a powerful and privacy-respecting e-signature platform you can self-host with modern container tools like Podman – no Docker required.

    In this guide, you will learn how to install OpenSign using podman-compose, following the official method while adapting it for Docker-free systems. At the end, I have also included options to contact me if you need personal assistance.

    Why Use OpenSign?

    • Open Source (AGPL-3.0 license)
    • Enterprise-Ready features
    • Modern Stack: React frontend, Node.js backend, MongoDB database
    • Self-Hosted: Stay in control of your data and workflow

    Official Repo: OpenSignLabs/OpenSign on GitHub
    Official Docs: docs.opensignlabs.com

    Prerequisites

    Before we begin, make sure you have the following:

    • A Linux system with Podman and podman-compose installed
    • curl to download setup files
    • Internet access
    • Optional: a domain name with HTTPS support (for production use)

    Note: This setup uses podman-compose, which understands Docker Compose files and runs them using Podman under the hood.

    Step-by-Step Installation with Podman

    Step 1: Download OpenSign Configuration Files

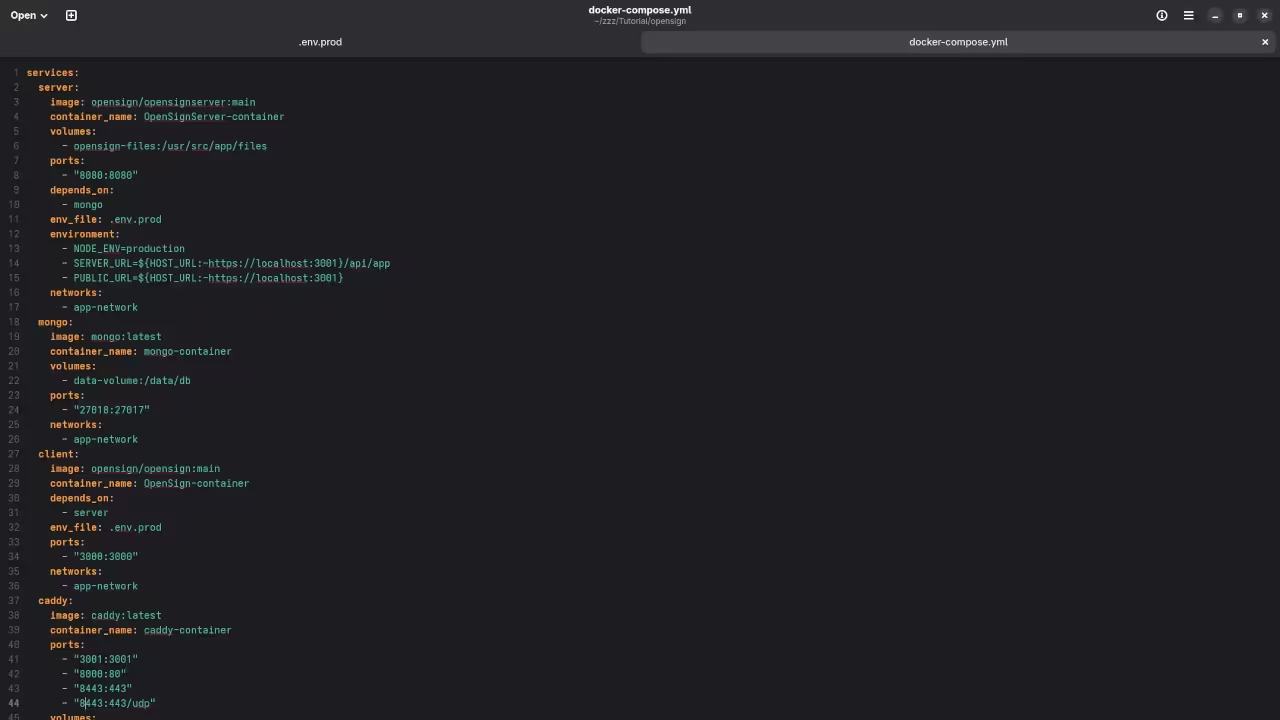
    You do not need to clone the GitHub repository. Instead, download the necessary files directly:

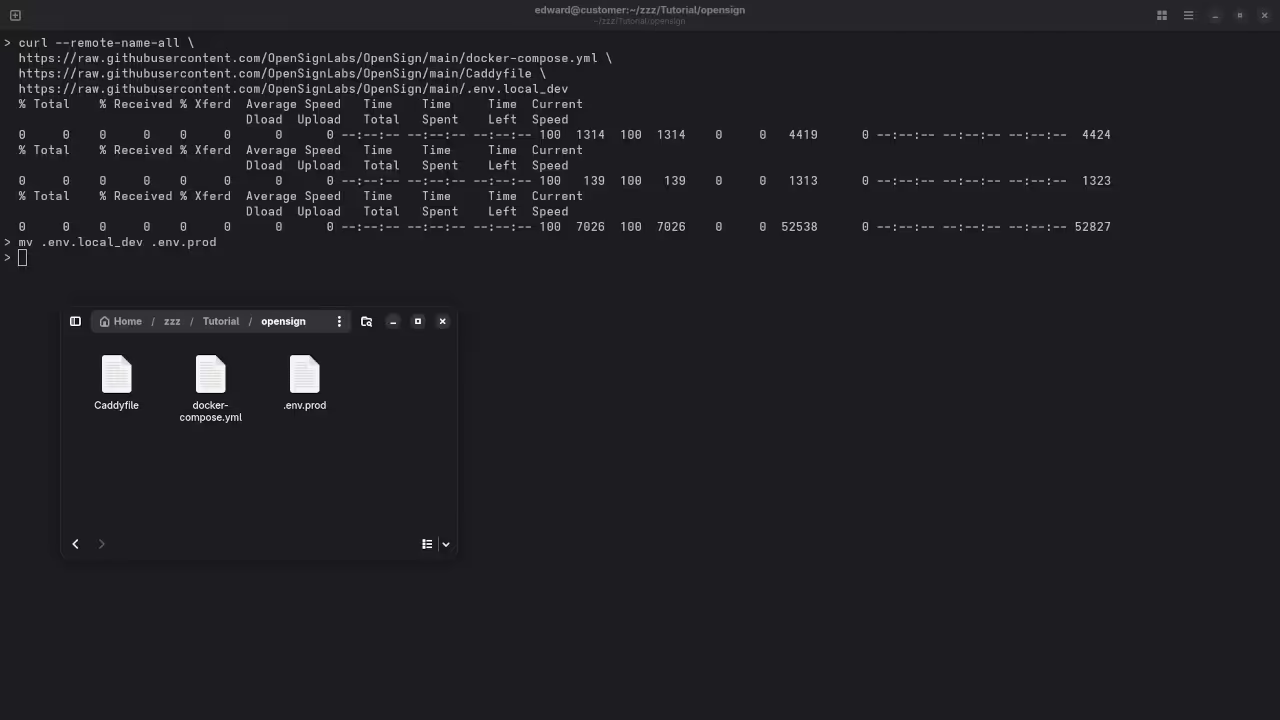
    curl --remote-name-all \
      https://raw.githubusercontent.com/OpenSignLabs/OpenSign/main/docker-compose.yml \
      https://raw.githubusercontent.com/OpenSignLabs/OpenSign/main/Caddyfile \
      https://raw.githubusercontent.com/OpenSignLabs/OpenSign/main/.env.local_dev
    
    mv .env.local_dev .env.prod

    Step 2: Edit the Environment File

    Open .env.prod in a text editor and customize the values. At a minimum, set the following:
    HOST_URL=https://localhost:3001
    MONGODB_URI=mongodb://mongo:27017/opensign
    JWT_SECRET=your_secure_jwt_secret

    For local development, “localhost” will work. For production, use your actual domain.

    Step 3: Run OpenSign with podman-compose

    Launch the services using podman-compose:

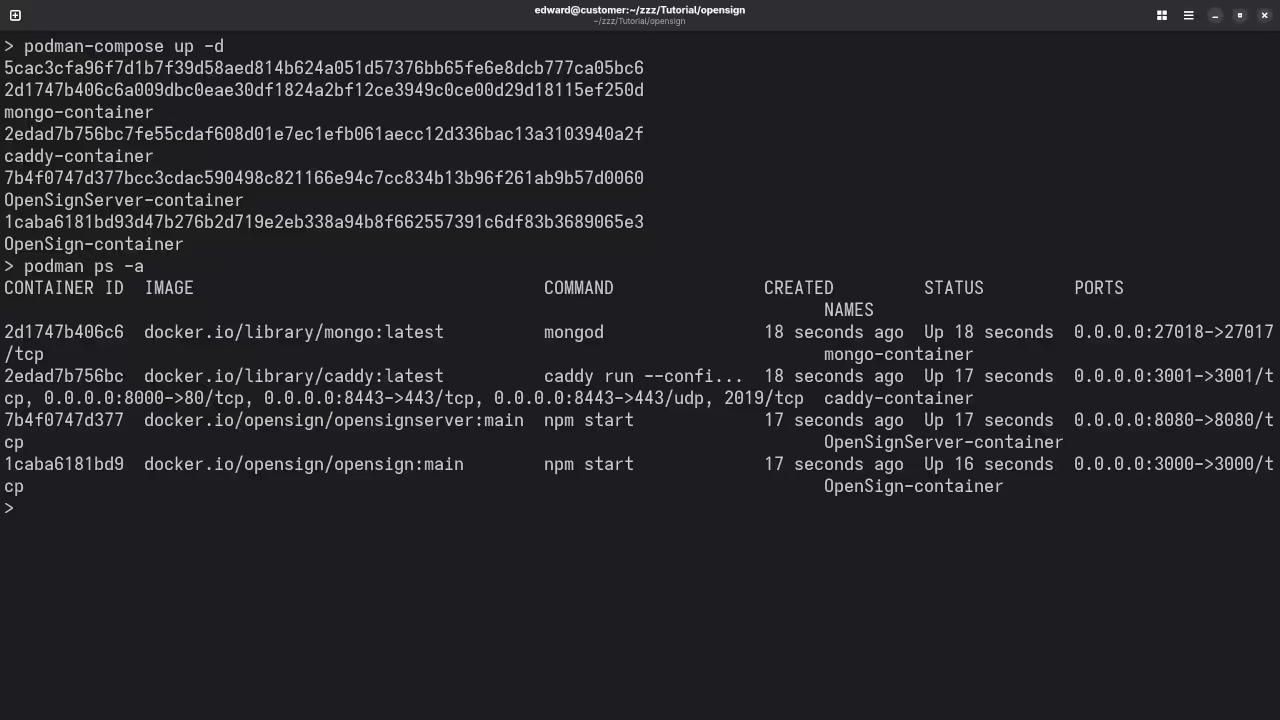
    podman-compose --file docker-compose.yml --env-file .env.prod up -d

    This command will start:

    • The OpenSign backend
    • The MongoDB database
    • The Caddy web server (reverse proxy)
    • The frontend (React UI)

    Step 4: Access Your Installation

    Once the containers are running, open your browser and go to:

    https://localhost:3001

    If you’re using a self-signed certificate, your browser may warn you. Accept the warning to proceed. For production use, configure SSL with a trusted certificate provider using Caddy.

    📷 Screenshots & 📽️ Screencast

    OpenSign Downloads
    Command Line Downloading OpenSign Container Files

    OpenSign Dockerfile
    Gnome Text Editor Displaying Container Dockerfile

    OpenSign Podman Container
    Command Line Displaying OpenSign Podman Compose Container

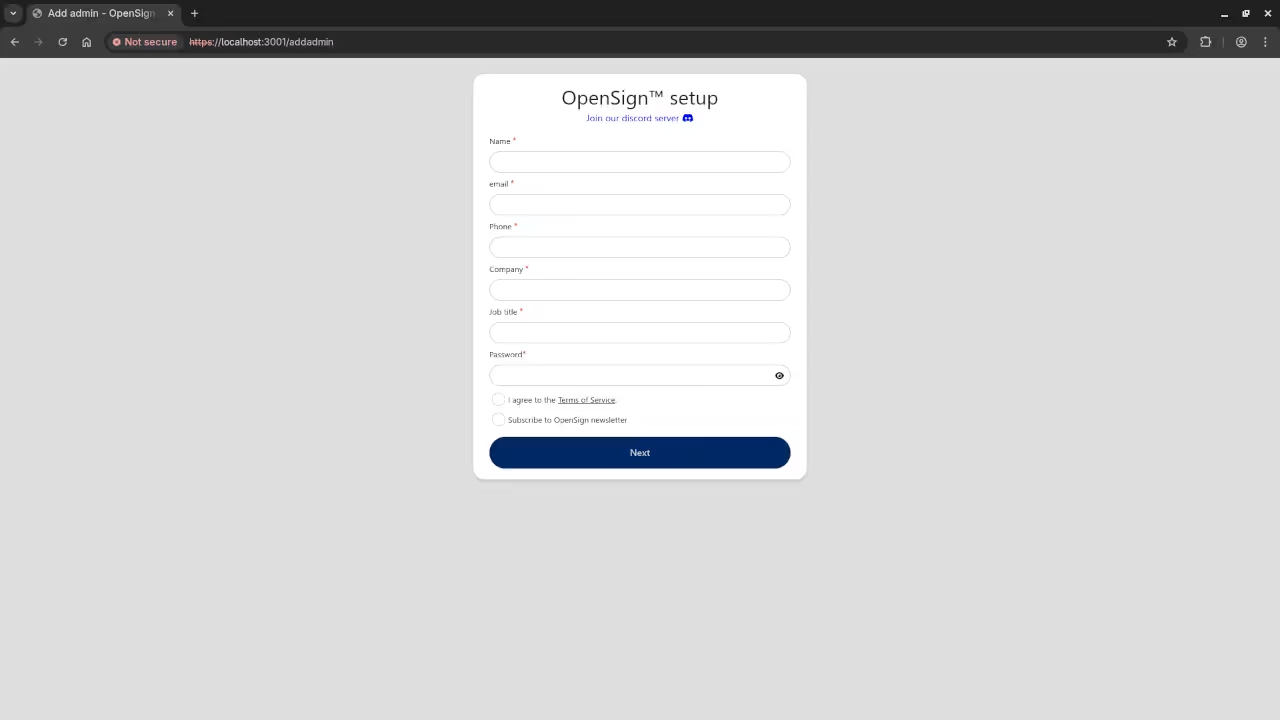
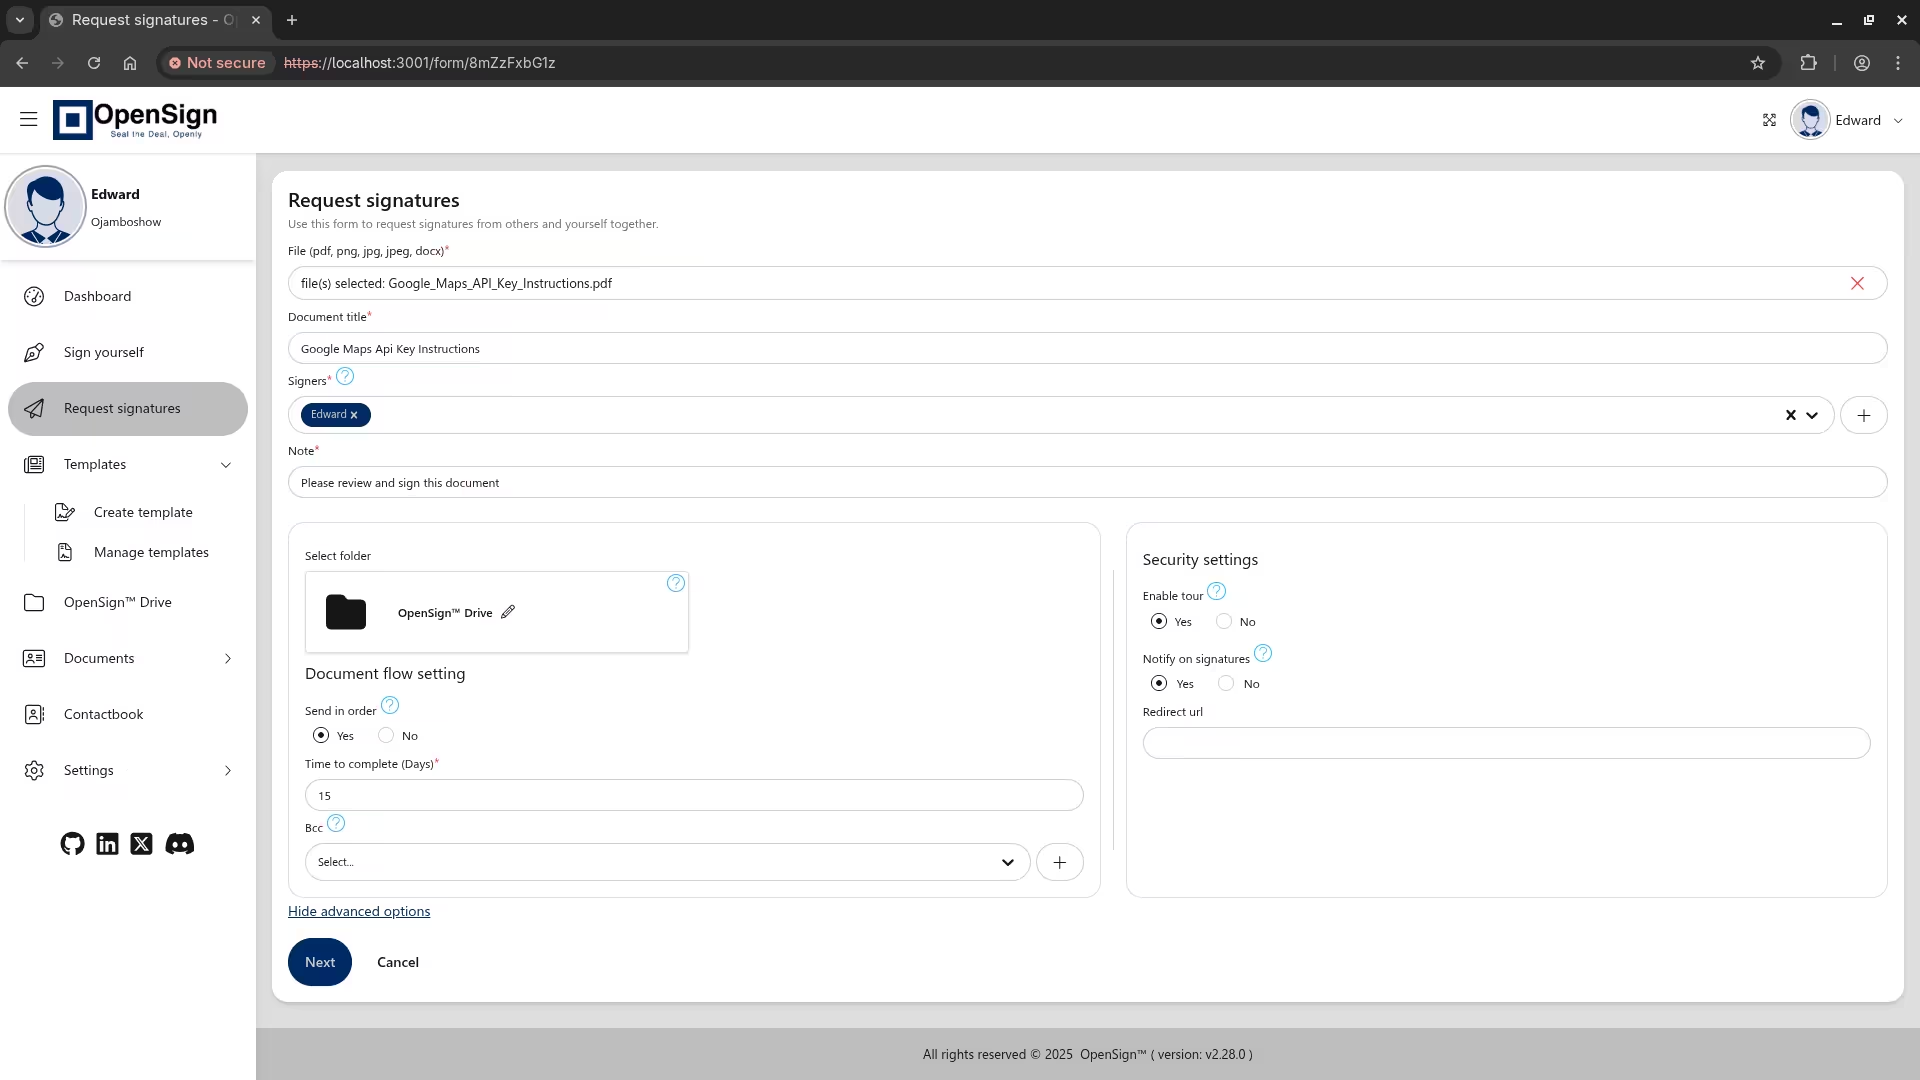
    OpenSign Setup Screen
    Web Browser Displaying OpenSign Setup Screen

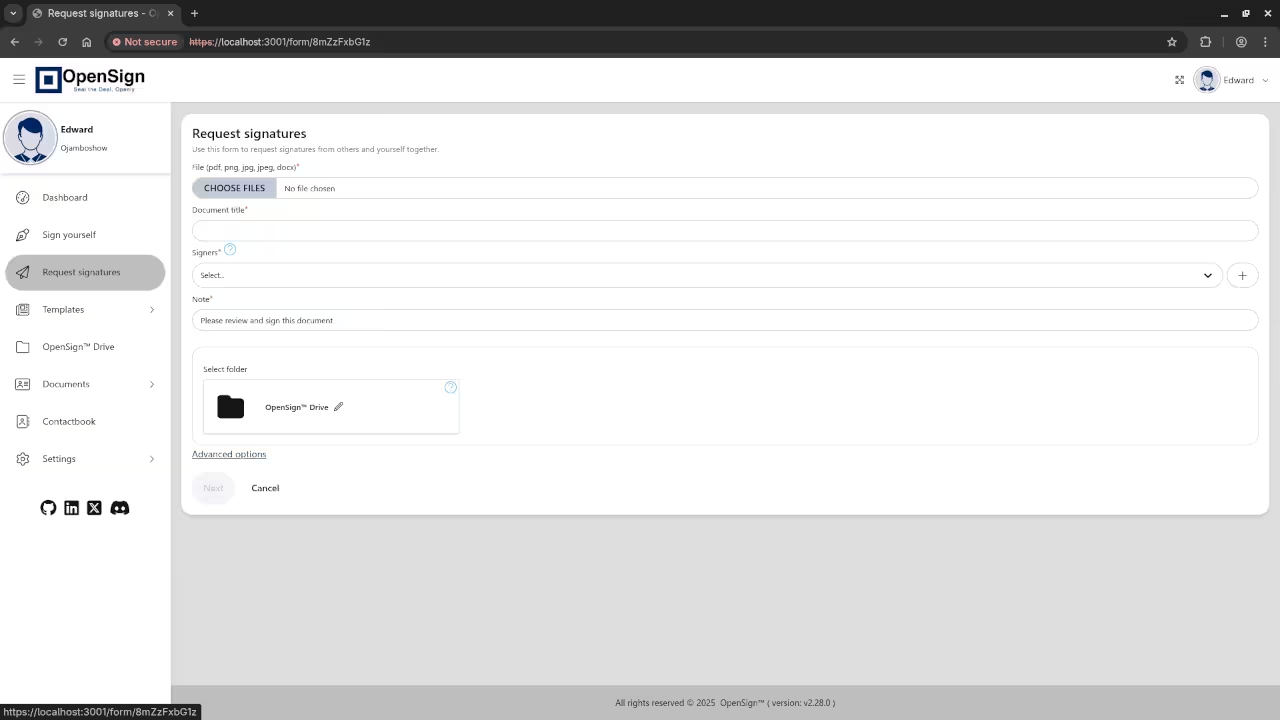
    OpenSign Request Signature
    Web Browser Displaying Request Signature

    OpenSign Request Signature PDF
    Web Browser Displaying Request PDF Signature

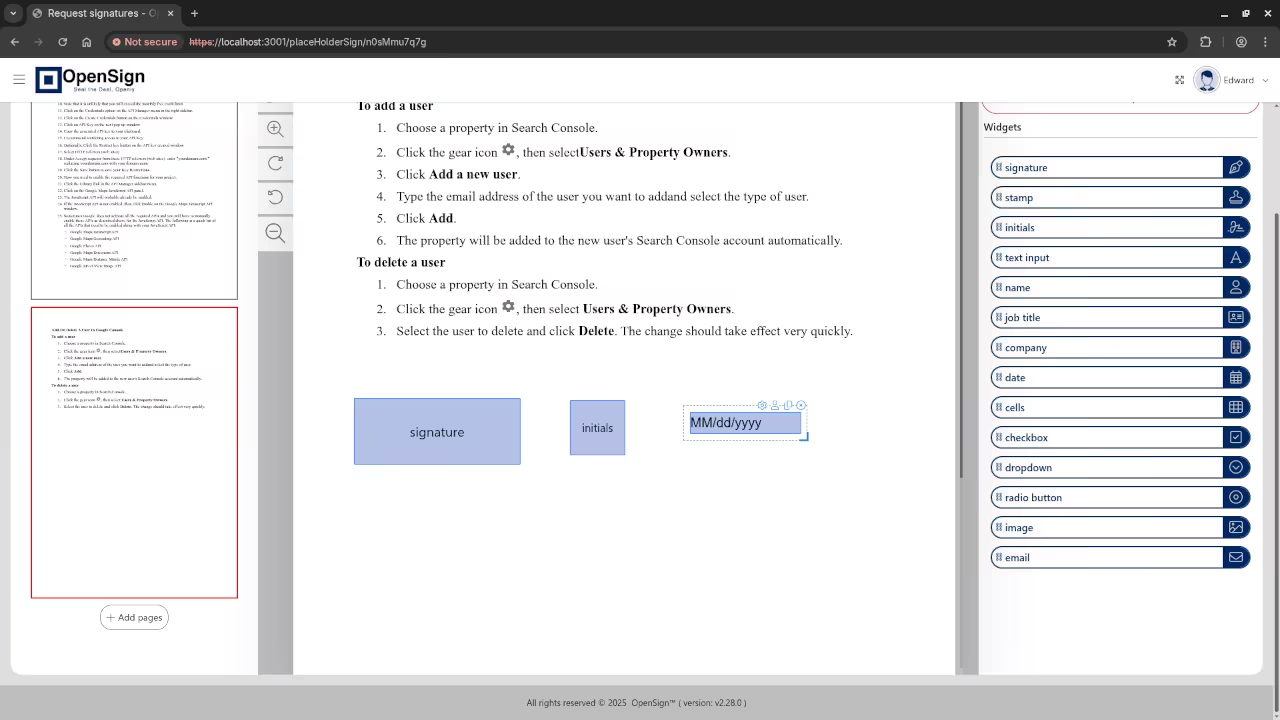
    OpenSign Request Signature Widgets
    Web Browser Displaying Request PDF Signature Widgets

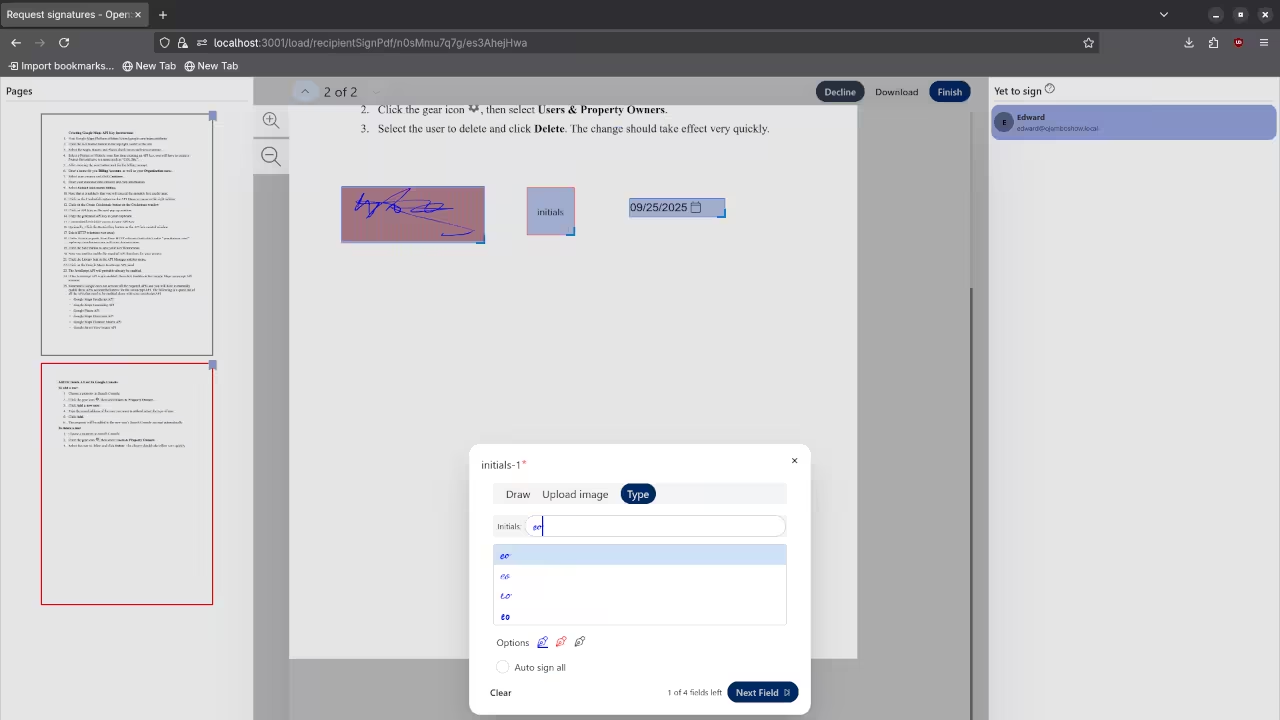
    OpenSign Signing
    Web Browser Displaying PDF Signing

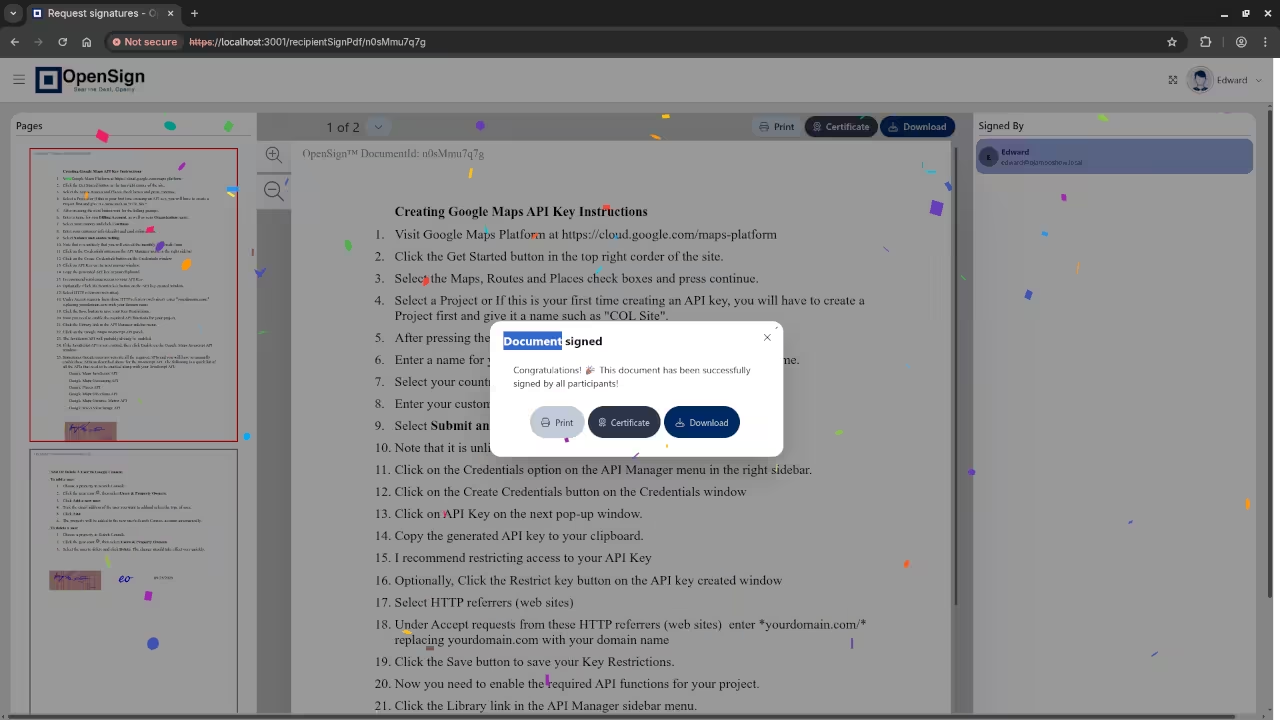
    OpenSign Signed
    Web Browser Displaying PDF Signed

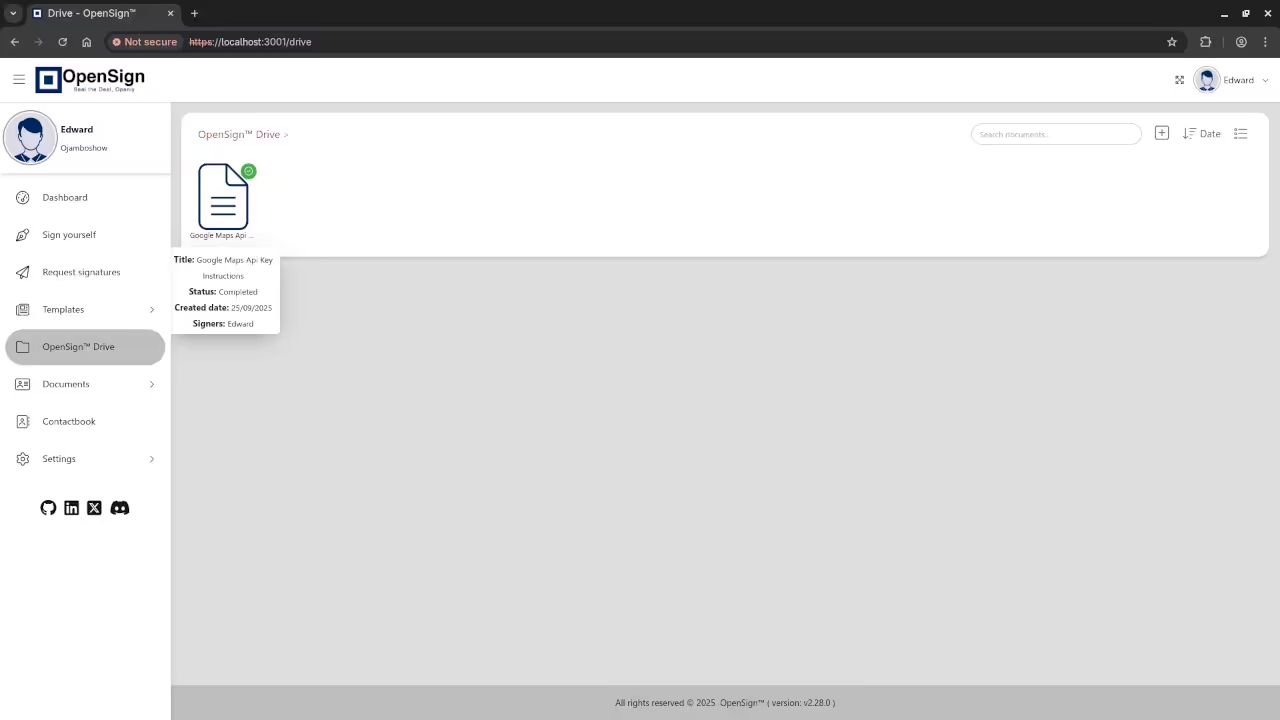
    OpenSign Signature Completed
    Web Browser Displaying PDF Completed Signature

    OpenSign Installation And Setup Screencast

    Need Help Installing or Migrating OpenSign?

    If you’re interested in:

    • One-on-one programming tutorials
    • Help with custom installation, updating, or migrating OpenSign
    • Optimizing Podman-based deployments

    Contact me directly here

    I offer personalized support for OpenSign and other open-source projects.

    Final Thoughts

    You do not need Docker to self-host powerful software like OpenSign. Thanks to podman-compose, you can deploy the full system using only open-source tools on a Docker-free stack.

    This setup gives you full control, better security, and zero vendor lock-in – all while supporting a modern, enterprise-ready e-signature platform.

  • Getting Started with ComfyUI on Fedora 42 Using AMD Instinct MI60

    Getting Started with ComfyUI on Fedora 42 Using AMD Instinct MI60

    Beginner’s Guide to Running ComfyUI on Fedora 42 with AMD Instinct MI60

    If you have ever wanted to generate AI images locally without relying on expensive cloud services, ComfyUI is a powerful open-source tool that makes it easy — even on non-NVIDIA GPUs like the AMD Instinct MI60.

    In this beginner-friendly tutorial, I will show you how to get ComfyUI up and running on Fedora Linux 42 with an AMD Instinct MI60 32GB GPU. This setup leverages the ROCm stack to unlock the GPU’s full performance – all while keeping your workflow fully local and private.

    What is ComfyUI?

    ComfyUI is a node-based, open-source interface for Stable Diffusion models. It offers:

    • A visual, modular workflow builder
    • Support for ControlNet, LoRAs, VAEs, and more
    • Performance optimizations
    • Community-developed custom nodes

    Unlike some web UIs that rely heavily on CUDA/NVIDIA, ComfyUI’s modular structure makes it more adaptable to AMD GPUs via PyTorch with ROCm.

    System Used in This Tutorial

    • GPU: AMD Instinct MI60 (32GB HBM2)
    • OS: Fedora Linux 42 (Workstation Edition)
    • Tool: ComfyUI (Stable Diffusion interface)
    • Framework: PyTorch (ROCm build)
    • License: Fully Open Source

    Installation Guide – ComfyUI on Fedora 42 with AMD MI60

    You can follow these steps to get a working ComfyUI environment using AMD ROCm and PyTorch ROCm builds.

    Step 1: Install System Dependencies

    sudo dnf install git python3 python3-virtualenv rocm-hip rocm-libs

    Then check if your GPU is detected:

    rocminfo
    rocm-smi --showmeminfo vram

    Step 2: Clone ComfyUI

    git clone https://github.com/comfyanonymous/ComfyUI.git
    cd ComfyUI

    Step 3: Create a Python Virtual Environment

    python3 -m venv venv
    source venv/bin/activate

    Step 4: Install PyTorch (ROCm Build) and Torchaudio

    pip install torch==2.2.0+rocm5.7 torchaudio torchvision --extra-index-url https://download.pytorch.org/whl/rocm5.7

    Step 5: Install ComfyUI Dependencies

    pip install -r requirements.txt

    Step 6: Run ComfyUI

    python3 main.py

    Open your browser and go to:
    http://localhost:8188

    Where to Place Your Models

    Model Type Folder
    Checkpoints (e.g. *.safetensors) ComfyUI/models/checkpoints/
    LoRA models ComfyUI/models/loras/
    VAEs ComfyUI/models/vae/
    ControlNet ComfyUI/models/controlnet/

    Just drop your files into the appropriate folder and restart ComfyUI.

    Test Tools

    Test System
    Name Description
    CPU AMD Ryzen 5 5600GT (6C/12T, 3.6GHz).
    Memory 32GB DDR4.
    GPU AMD Instinct MI60 (32GB HBM2).
    Operating System Fedora Linux Workstation 42.
    Desktop Environment Gnome 48.
    Name Description

    🖼️ Screenshots and Screencast

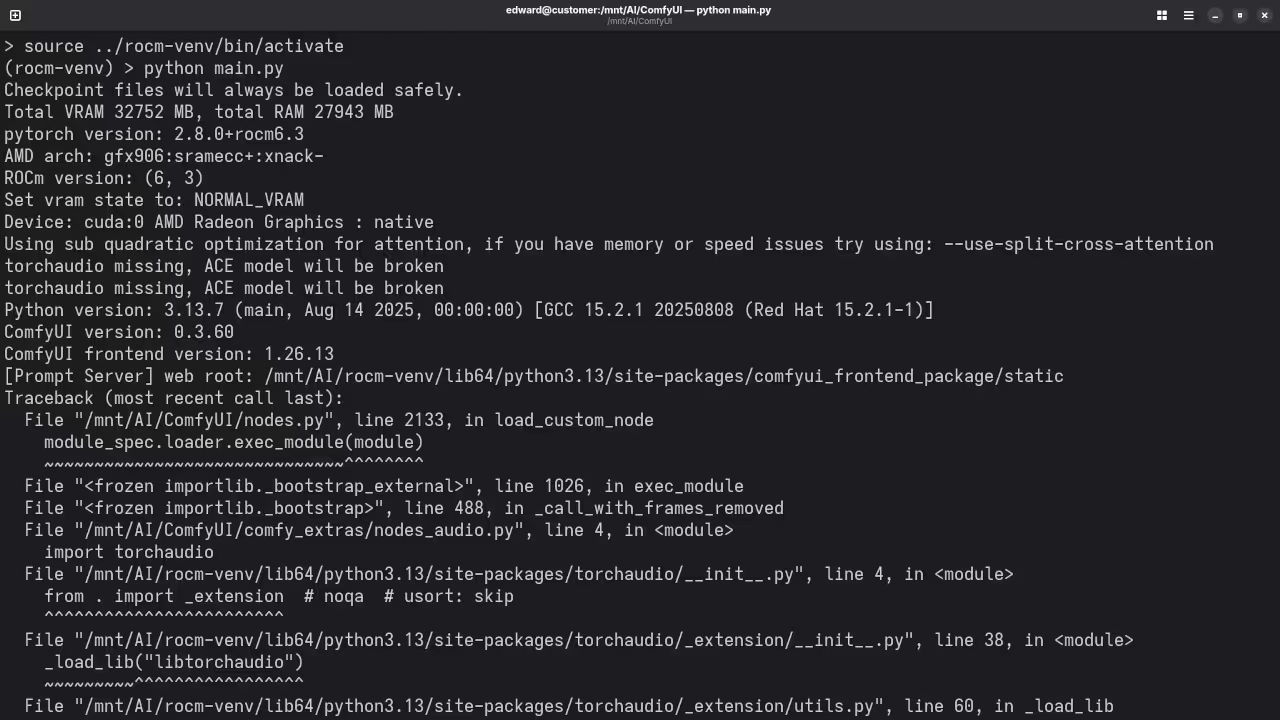
    ComfyUI ROCm Start
    Command Line ComfyUI ROCm Launch.

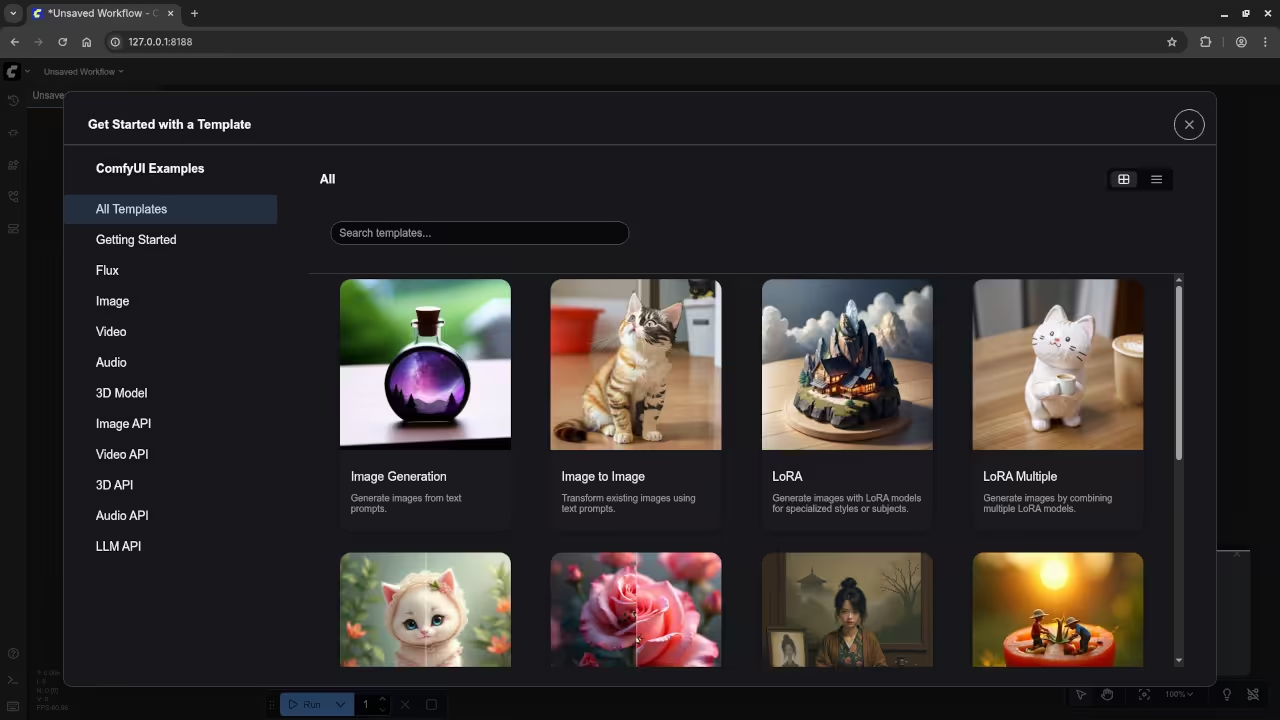
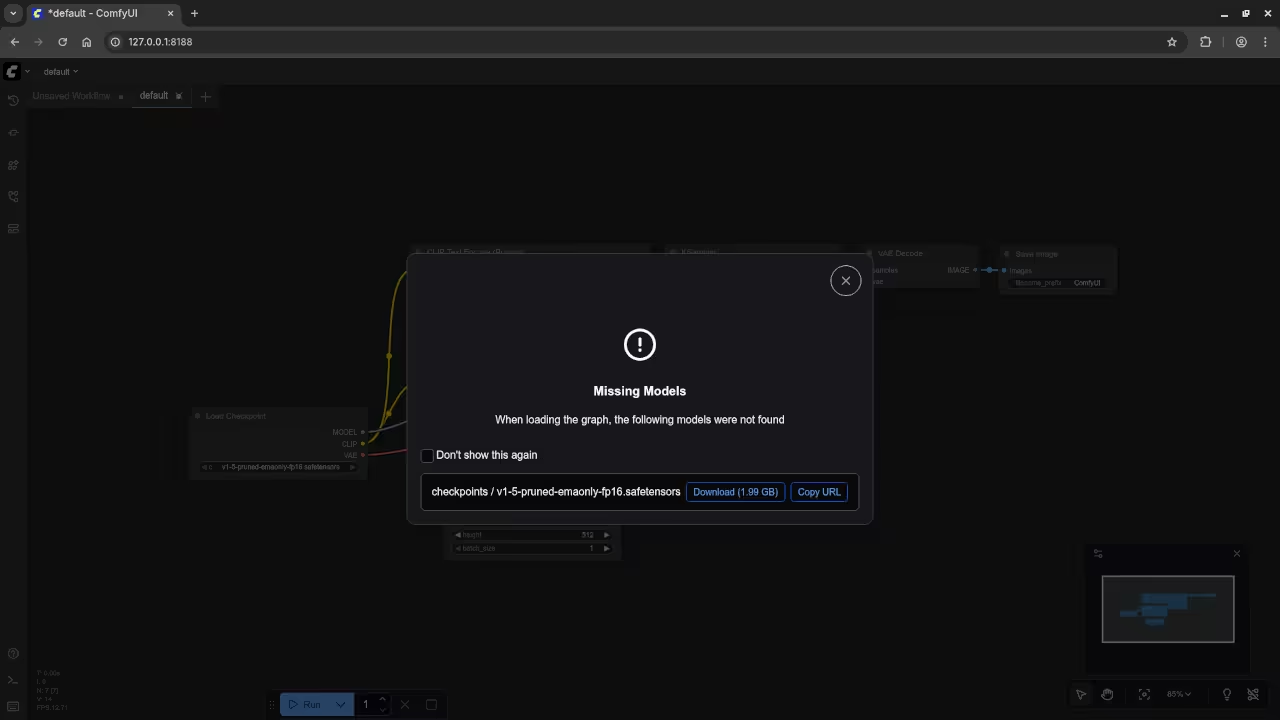
    ComfyUI base model
    Web Browser ComfyUI base Model.

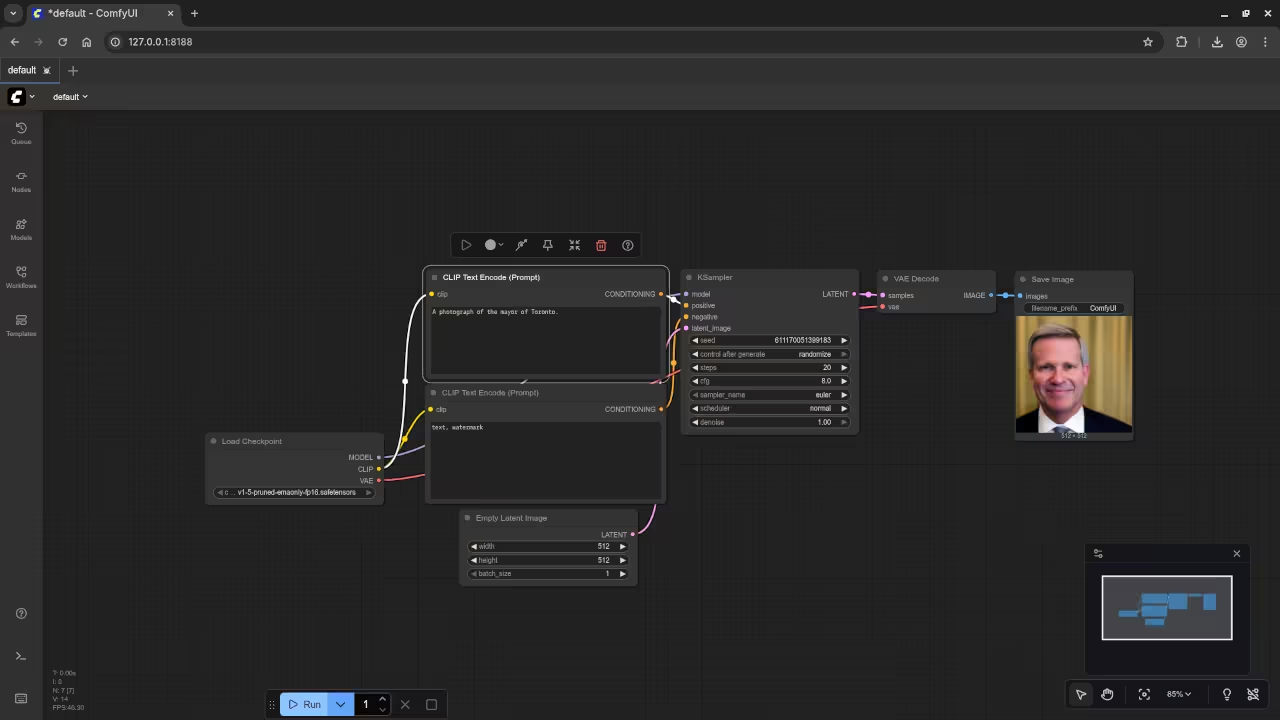
    ComfyUI generated photo about the Mayor
    Web Browser ComfyUI Mayor Of Toronto Photo Request.

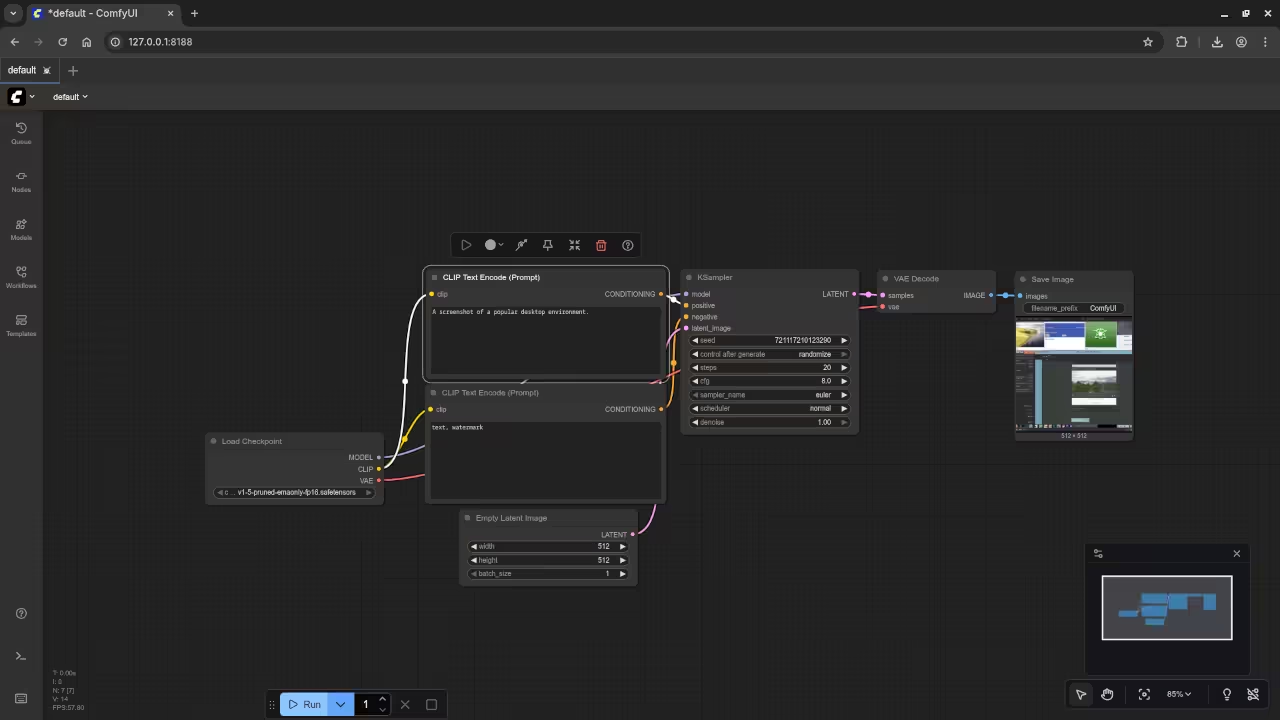
    ComfyUI generated screenshot about the Desktop Environment
    Web Browser ComfyUI Gnome Desktop Environment Screenshot Request.

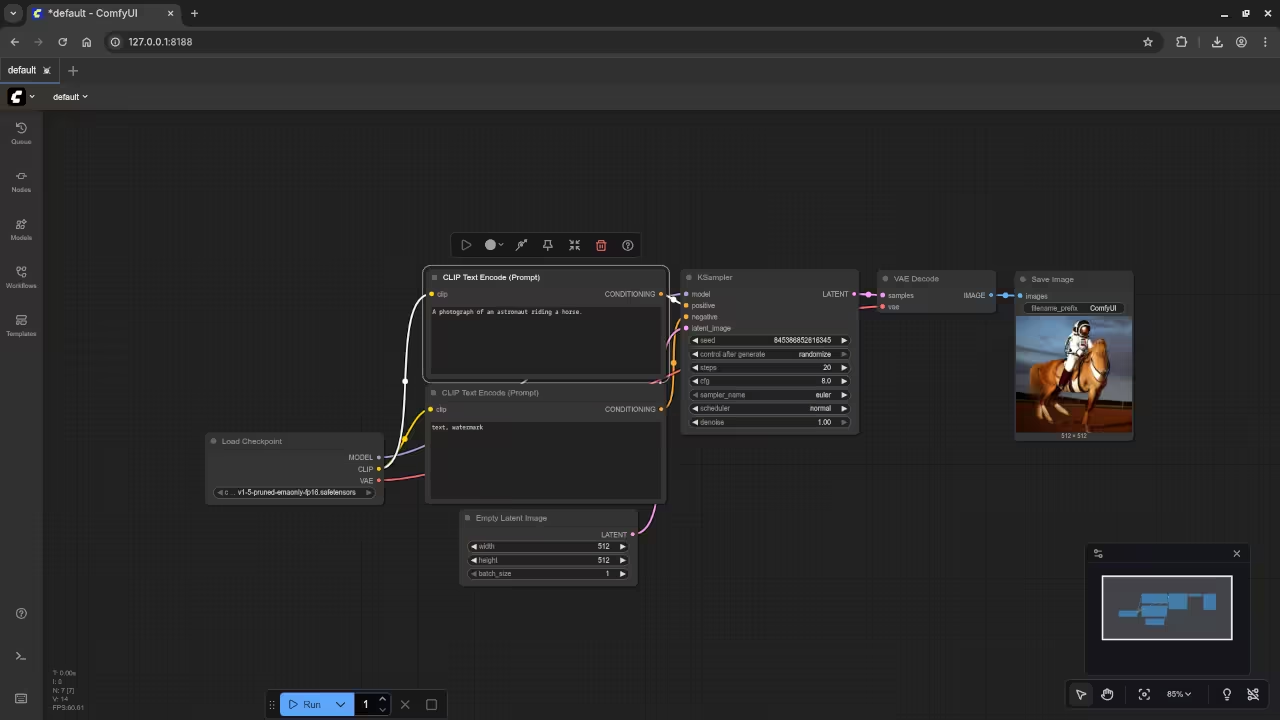
    ComfyUI generated photo about the astronaut riding a horse
    Web Browser ComfyUI Astronaut Riding A Horse Photo Request.

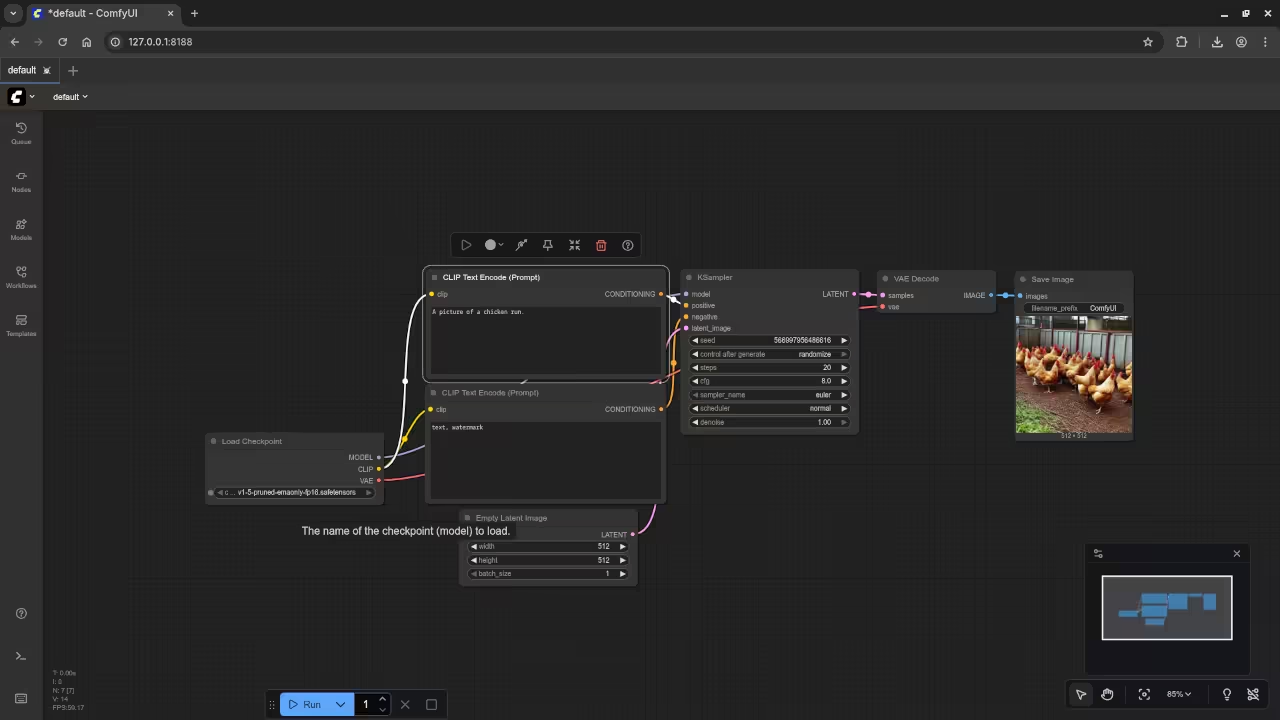
    ComfyUI generated picture about the chicken run
    Web Browser ComfyUI Chicken Run Picture Request.

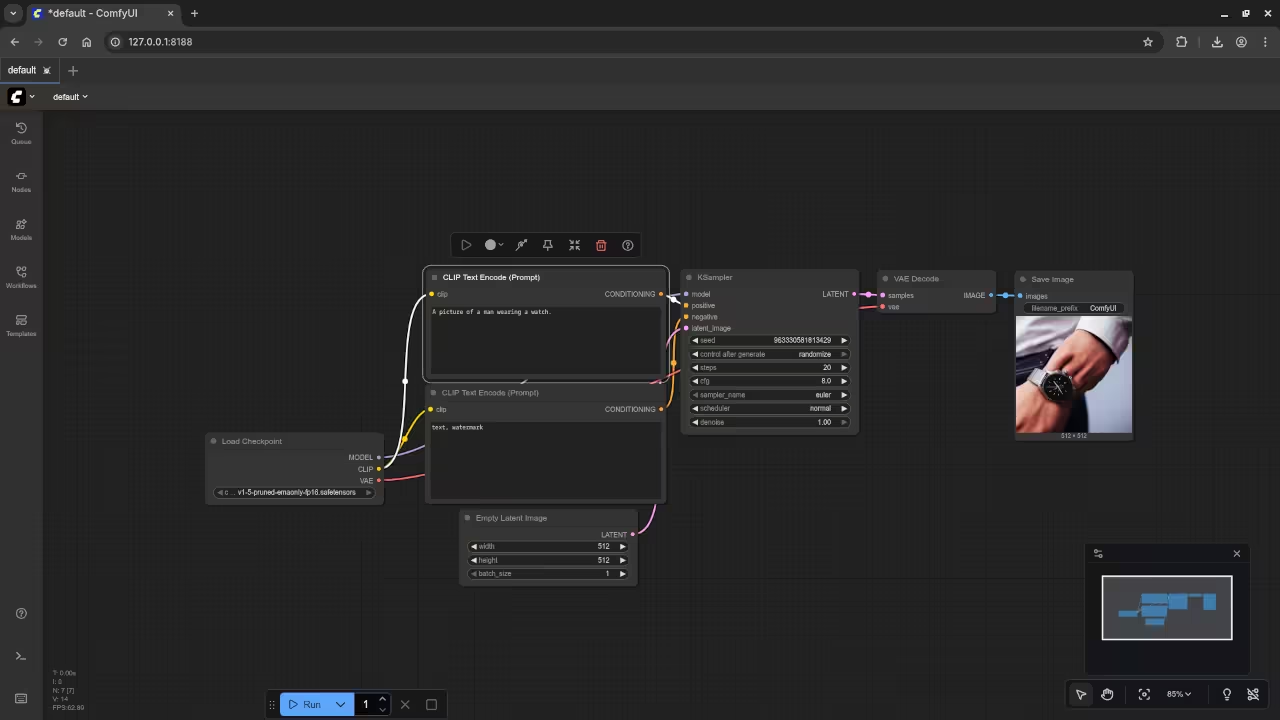
    ComfyUI generated picture about the man wearing a watch
    Web Browser ComfyUI Man Wearing A Watch Picture Request.

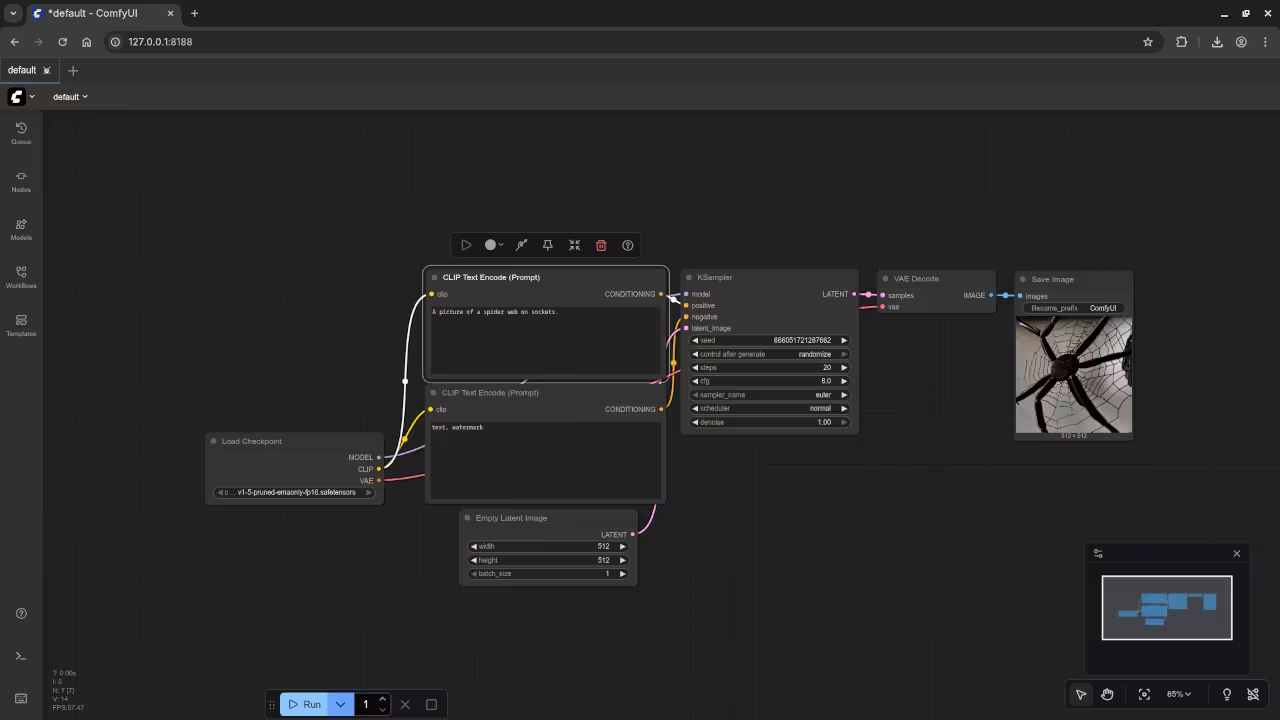
    ComfyUI generated picture about the spider web on sockets
    Web Browser ComfyUI Spider Web On Sockets Picture Request.

    Video Displaying Using ComfyUI In Web Browser

    Results:

    A photograph of the mayor of Toronto

    Accurately drew a photograph mishmash of past mayors of Toronto.

    A screenshot of the gnome desktop environment.

    Accurately drew a screenshot of an older version of the Gnome desktop environment.

    A photograph of an astronaut riding a horse.

    Accurately drew a photograph of an astronaut riding a horse.

    A picture of a chicken run.

    Accurately drew a picture of a chicken run.

    A picture of a man wearing a watch.

    Accurately drew a picture of a man wearing a watch.

    A picture of a spider web on sockets.

    Accurately drew a picture of a spider web on sockets.

    Learn More About Python

    If you are curious about how AI tools like ComfyUI are built, or you want to automate your own workflows, learning Python is the perfect next step.

    Book: Learning Python

    This beginner-friendly guide walks you through the fundamentals of Python programming with clear examples.
    Available on Amazon

    Course: Learning Python

    Prefer hands-on learning? Take my interactive Python course.
    Get the course at OJambo Shop

    1-on-1 Python Tutoring

    Want help understanding ComfyUI workflows, or need personalized Python training?
    Book a private online session

    Final Thoughts

    Running ComfyUI on Fedora 42 with an AMD Instinct MI60 is absolutely possible – and powerful. With open-source tools like ComfyUI and ROCm, you no longer need to rely on cloud APIs or NVIDIA hardware to start generating stunning AI images.
    Have questions or want help with installation? Feel free to reach out.