Blog

  • JEdit 5.7.0 Advanced Editor Review

    JEdit 5.7.0 Advanced Editor Review

    Getting Started with jEdit: A Powerful Open Source Text Editor for Programmers

    If you’re looking for a free, versatile, and highly customizable text editor, jEdit is an excellent choice. It is especially useful for programmers who need a lightweight tool with advanced features. This post provides a beginner-friendly introduction to jEdit, including installation instructions—with a focus on Fedora Linux—and details on how you can get further help and tutorials.

    🔓 What is jEdit?

    jEdit is an open source programmer’s text editor written in Java. It is designed to be powerful and extensible, with support for hundreds of programming languages through syntax highlighting, macros, and plug-ins.

    Whether you’re editing simple scripts or developing large-scale applications, jEdit can be customized to suit your workflow.

    💻 Installing jEdit

    Because jEdit is written in Java, it runs on many platforms, including Linux, Windows, and macOS. Below are installation instructions for the most common operating systems.

    🐸 Fedora Linux

    1. Install Java (if not already installed):
      sudo dnf install java-17-openjdk
    2. Download jEdit: Visit the jEdit download page and choose the Java-based installer.
    3. Run the installer:
      java -jar jedit5.6.0install.jar
    4. Optional – Create a Desktop Shortcut: You can create a .desktop file in ~/.local/share/applications/ for easy launching.

    🚪 Windows

    • Download the Windows installer from jEdit Downloads.
    • Double-click the .exe installer and follow the setup wizard.

    🍎 macOS

    • Download the macOS package.
    • Drag the jEdit app into the Applications folder.

    🧩 Features and Plug-ins

    jEdit’s real strength lies in its plug-in system. You can add support for:

    • Version control systems like Git
    • Code folding and syntax checking
    • Language-specific tools (Python, PHP, JavaScript, etc.)
    • Integrated terminal, macros, and more

    🎥 Screenshots & Live Demo
    JEdit File Browser
    JEdit Displaying Expanded File Browser

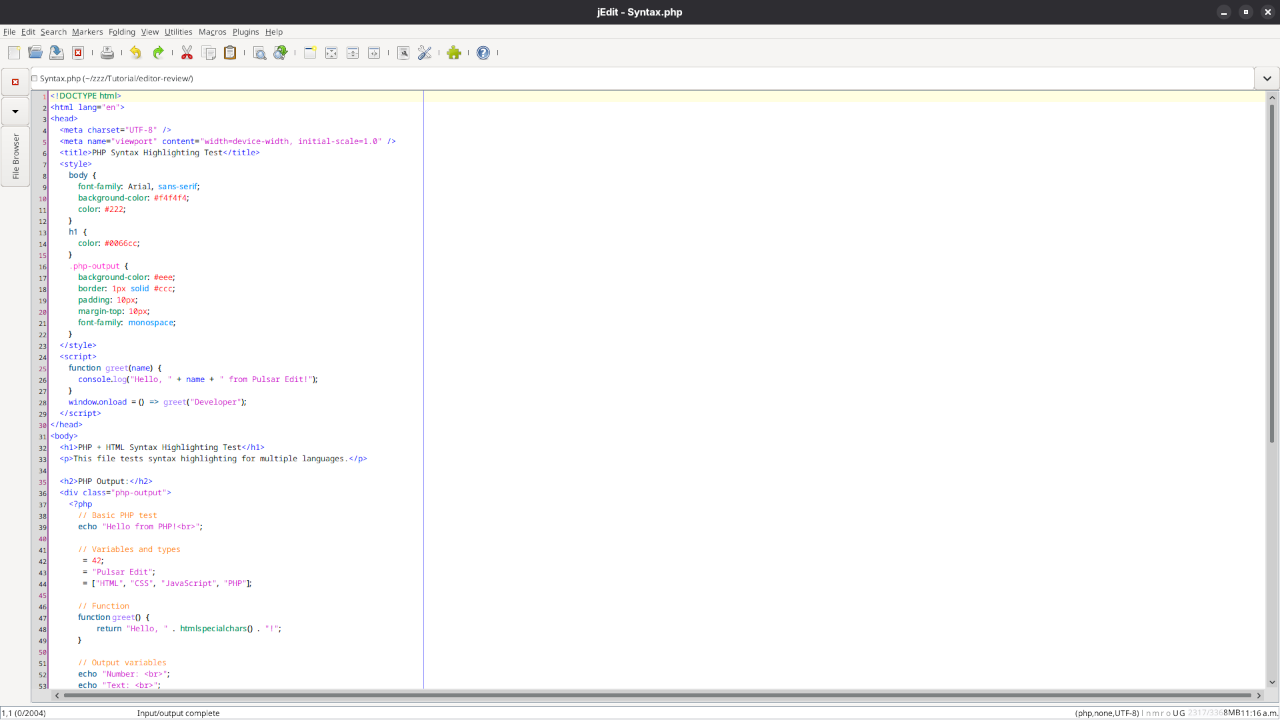
    JEdit PHP Syntax Highlighting
    JEdit Displaying PHP Syntax Highlighting

    JEdit Terminal
    JEdit Displaying Terminal Emulator

    👉 Screencast showing a beginner session in JEdit—editing, saving files, and navigating buffers.

    JEdit Review And Feature Test

    Requirements For Programming Text Editor

    Glossary:

    Code Editor

    Designed for writing and editing source code.

    IDE

    Integrated Development Environment combines various tools need for software development.

    Plugin

    Software component that adds specific functionality.

    Theme

    Preset package containing graphical appearance to customize look and feel.

    Open source

    Freely available for possible modification and redistribution.

    SCM

    Source code management use to manage and track modifications to a source code repository.

    LMB

    Left Mouse Button (LMB) or left click

    Test Tools

    Test System
    Name Description
    CPU Intel(R) i7 2600 @ 3.40GHz.
    Memory 16GB DDR3.
    Operating System Fedora Linux Workstation 42.
    Desktop Environment Gnome 48.
    Name Description

    Test Suite
    Name Description
    Large File 1GB human-readable text.
    Regex File Text with word “JEdit” repeated.
    Syntax File PHP file containing HTML, CSS & JavaScript.
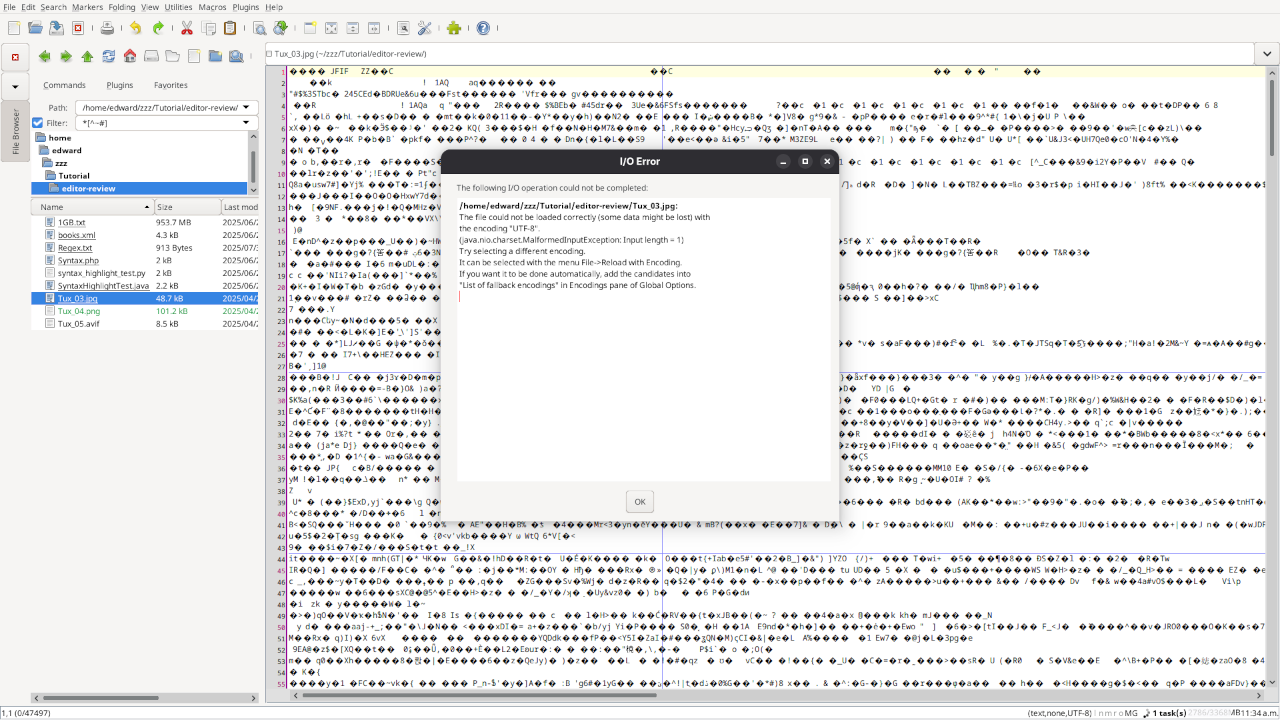
    Media File Smiley face or Tux Linux JPEG file.
    Java Version OpenJDK 21.0.8.
    PHP Version PHP 8.4.10.
    Python Version Python 3.13.5.
    JEdit Version 5.7.0.
    Name Description

    Test Scoring

    1. Each feature has two parts.
    2. Score of zero indicates a missing feature.
    3. A part of a feature is work a score of 0.5.

    Three bias elimination steps were utilized. The editor was used for at least three years on different platforms. Attempts were made to get stable plug-ins for missing features. The same editor was compared between the one in the repository, the developers website, and the compiled version if applicable.

    Selecting Editor Version

    For this review, JEdit was downloaded from the developers website and it did not require additional plugins.

    Features

    1. The theme cannot be native for the editor in terms of the background. JEdit dark and light themes can be created or downloaded using the Look And Feel plugin. The score for the theme was 0.5.
    2. Dragging and dropping a text file into the editor opens a new tab which requires the Buffer Tabs plugin. It is not possible to specify the tab location during the drag and drop operation. The score for drag and drop into editor was 0.5.
    3. Opening a very large text file did not crash JEdit. It was possible to edit the large file. The score for opening a large file was 1.0.
    4. Multiple documents can opened in multiple tabs or buffers. Tear-off tabs can be mimicked by having JEdit open the current buffer in a new window as a new instance which is handy for multiple monitors. The score for multiple documents was a perfect 1.0.
    5. Multiple editors can be opened as new tabs with drag options. Each tab window view can be split either vertically or horizontally as a multiple editor view. The score for multiple editor view was a perfect 1.0.
    6. Creating non-project files is possible. Non-project files can be opened by the drag and drop operation. The score for creating non-project files was a perfect 1.0.
    7. Soft word wrap can be enabled on all documents as line wrapping. Automatic soft wrap for documents is available from the JEdit settings. The score for word wrap was a perfect 1.0.
    8. Spell check works as words are typed using the Spell Check plugin. Spelling errors are shown in opened documents. The score for spell check was a perfect 1.0.
    9. Word count is available for JEdit using the Real Time Word Counter plugin. Selection word count is available as part of word count. The score for word count was a perfect 1.0.
    10. Go to line CTRL/CMD-Gcan jump to a specified line. It is possible to jump to either the first or last line. The score for go to line was a perfect 1.0.
    11. Indentation can default to user-defined tab stops. Children are automatically indented. The score for indentation was a perfect 1.0
    12. Fonts can be dynamically scaled by macros. The system font can be bypassed and a new editor font and size can be set. The score for fonts was a perfect 1.0..
    13. Find and replace CTRL-Fusing regular expressions can be utilized for all open documents in the current session. Find and replace will work for the current document or a selection in the current document. The score for find and replacing using regular expressions was a perfect 1.0.
    14. Multiple language syntax highlighting in one file is enabled if the language plug-ins are installed. Each language has code-sensitive syntax colors which can be modified. The score for multiple language syntax highlighting was a perfect 1.0.
    15. Code folding does not work for markup languages such as HTML. Code folding also does not work for programming languages such as PHP and Java. It can be mimicked using CTRL-eThe score for code folding was 0.5
    16. Selecting rectangular block per column works using ALT-\. Rectangular block selection works with word wrap enabled. The score for selecting rectangular block was a perfect 1.0.
    17. Multiple selection works using macros. Search multiple selection is available. The score for multiple selection was 1.0.
    18. Distraction-free mode to hide panes works. Line numbers can be toggled to improve distraction-free mode. The score for distraction-free was a perfect 1.0.
    19. The file manager can be used to create and delete folders. Media files cannot be dragged and dropped into the file manager pane. The score for file manager was 0.5
    20. Terminal requires the Console plugin. The terminal does follow folder of the file browser. Terminal can execute system commands. The score for terminal was a perfect 1.0.

    Results

    JEdit is a very powerful IDE. By default, the JEdit editor worked without tweaks, and any missing required features can not be installed by using plugins. For my required features, the JEdit editor scored 87.5% or 8.75 out of 10.

    📚 More Learning Resources

    If you’re interested in improving your programming skills, check out these resources:

    🔧 Need Help Installing or Migrating jEdit?

    I can help install or migrate jEdit for you across Linux, macOS, or Windows platforms.

    📩 Contact me for professional installation services:
    https://ojamboservices.com/contact

    Feel free to comment below if you’ve used jEdit or want to know more about customizing it for your development environment.

  • Getting Started with Jellyfin: Your Free and Private Media Server

    Getting Started with Jellyfin: Your Free and Private Media Server

    Have you ever wanted your own Netflix-style media server, but without the subscription fees or sharing your data with a third party? Meet Jellyfin – a free, open-source media system that puts you in complete control of your personal media library.

    Whether you’re looking to stream movies, TV shows, music, or photos, Jellyfin gives you the power to organize and stream your content from anywhere – with no tracking, no ads, and no cost.

    Why Choose Jellyfin?

    • 100% Open Source: No licenses, no hidden costs. Developed by a passionate community.
    • Self-Hosted: Your media stays private and under your control.
    • Multi-Platform Support: Works with web browsers, mobile apps, smart TVs, and more.
    • Active Community: Regular updates and community plugins to enhance functionality.

    Installing Jellyfin Using Podman

    If you’re using Linux and prefer containers over traditional package installs, Podman is a fantastic alternative to Docker. Here’s a quick way to set up Jellyfin using podman-compose.

    Requirements

    • A Linux system (Fedora, Ubuntu, etc.)
    • Podman installed (sudo dnf install podman podman-compose on Fedora)
    • A working internet connection

    Step-by-Step Installation

    1. Create a directory for your Jellyfin setup:
      mkdir ~/jellyfin && cd ~/jellyfin
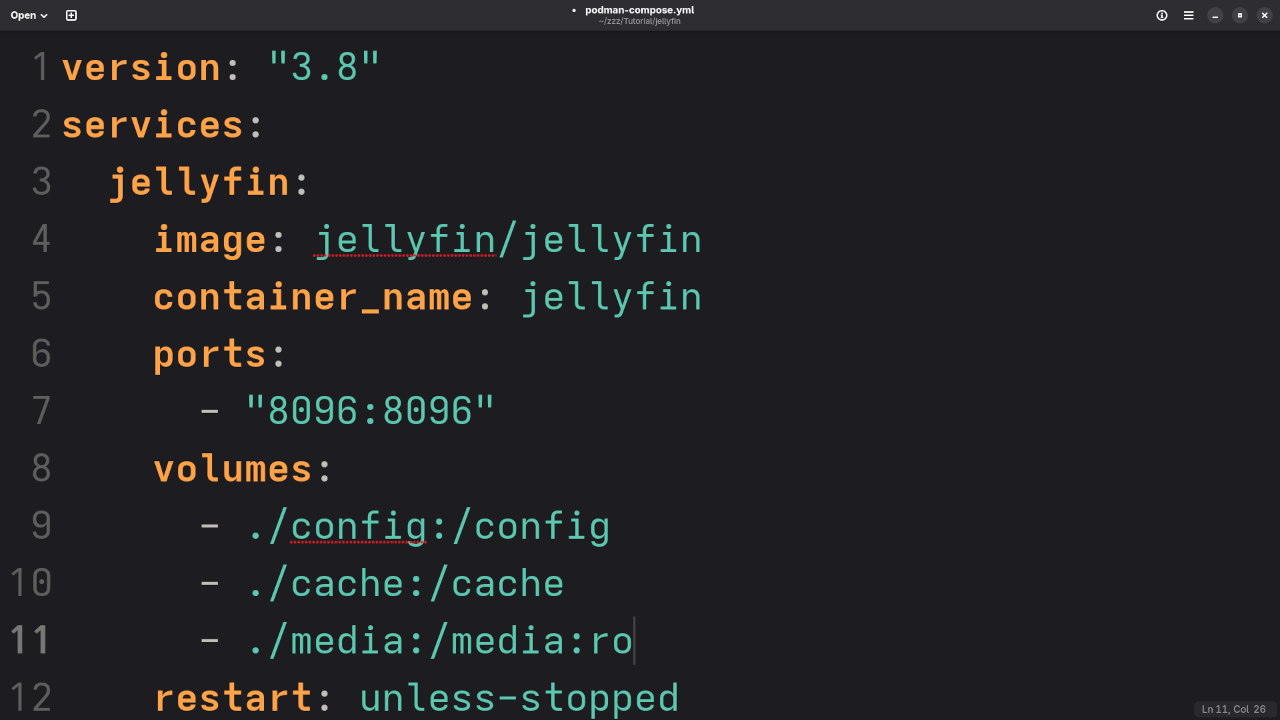
    2. Create a podman-compose.yml file:
      version: "3.8"
      services:
        jellyfin:
          image: jellyfin/jellyfin
          container_name: jellyfin
          ports:
            - "8096:8096"
          volumes:
            - ./config:/config
            - ./cache:/cache
            - /path/to/your/media:/media:ro
          restart: unless-stopped

      Replace /path/to/your/media with the path to your movies, TV shows, or music.

    3. Start Jellyfin with:
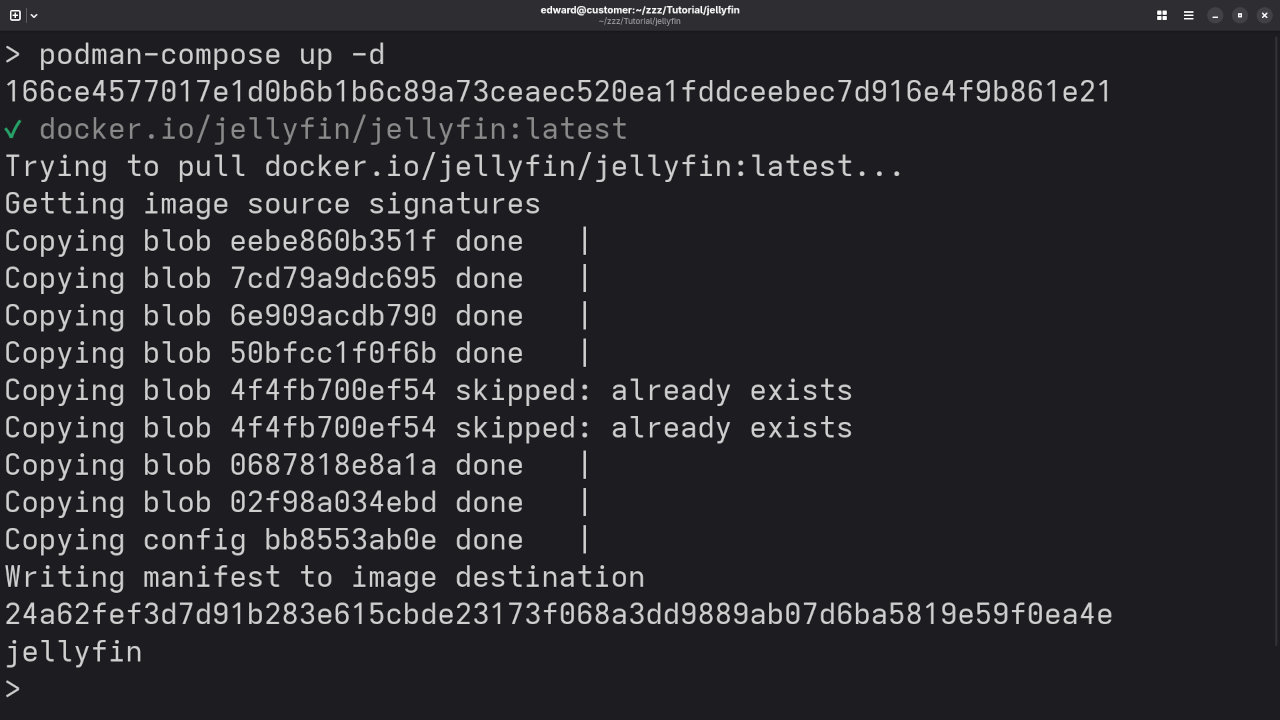
      podman-compose up -d
    4. Access your server:
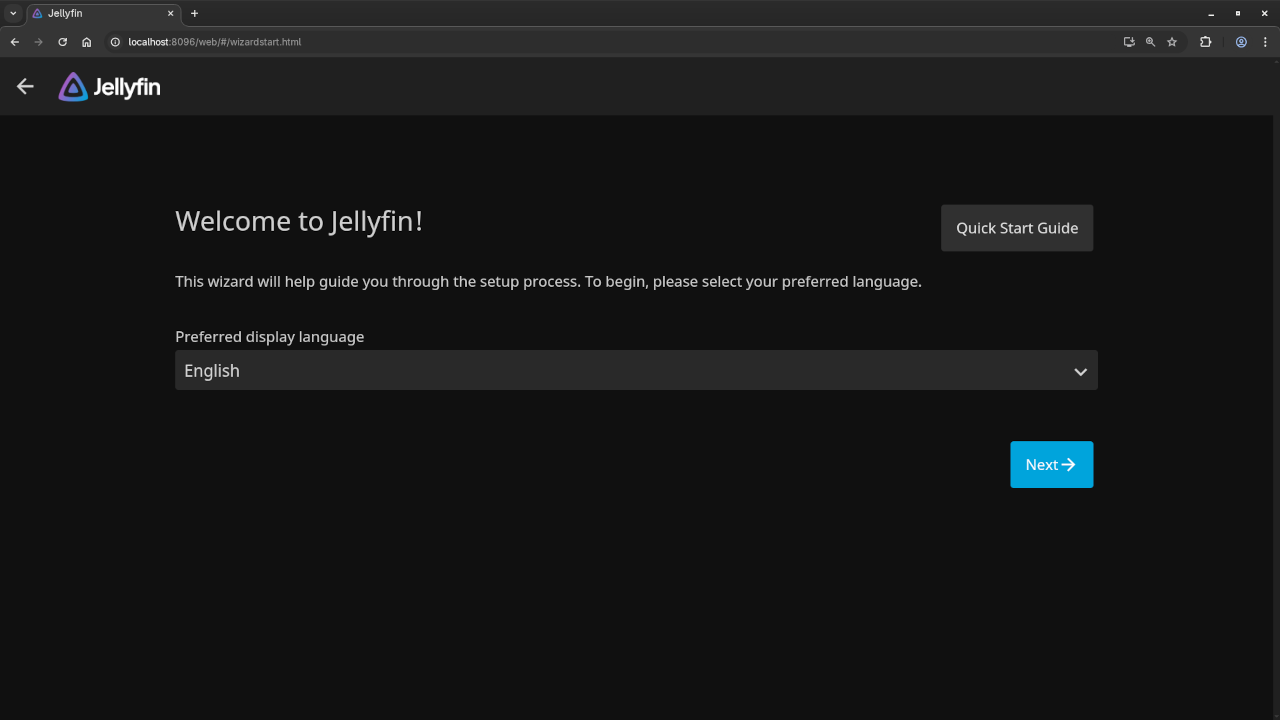
      Open a browser and go to http://localhost:8096 to begin Jellyfin’s setup wizard.

    📷 Screenshots & 📽️ Live Walkthrough

    Jellyfish Compose YAML File
    Gnome Text Editor Displaying Jellyfin Compose YAML File

    Jellyfin Podman Compose Build
    Command Line Installation Of Jellyfin Via Podman Compose Build

    Jellyfin Installation Screen
    Web Browser Displaying Jellyfin Installation Screen

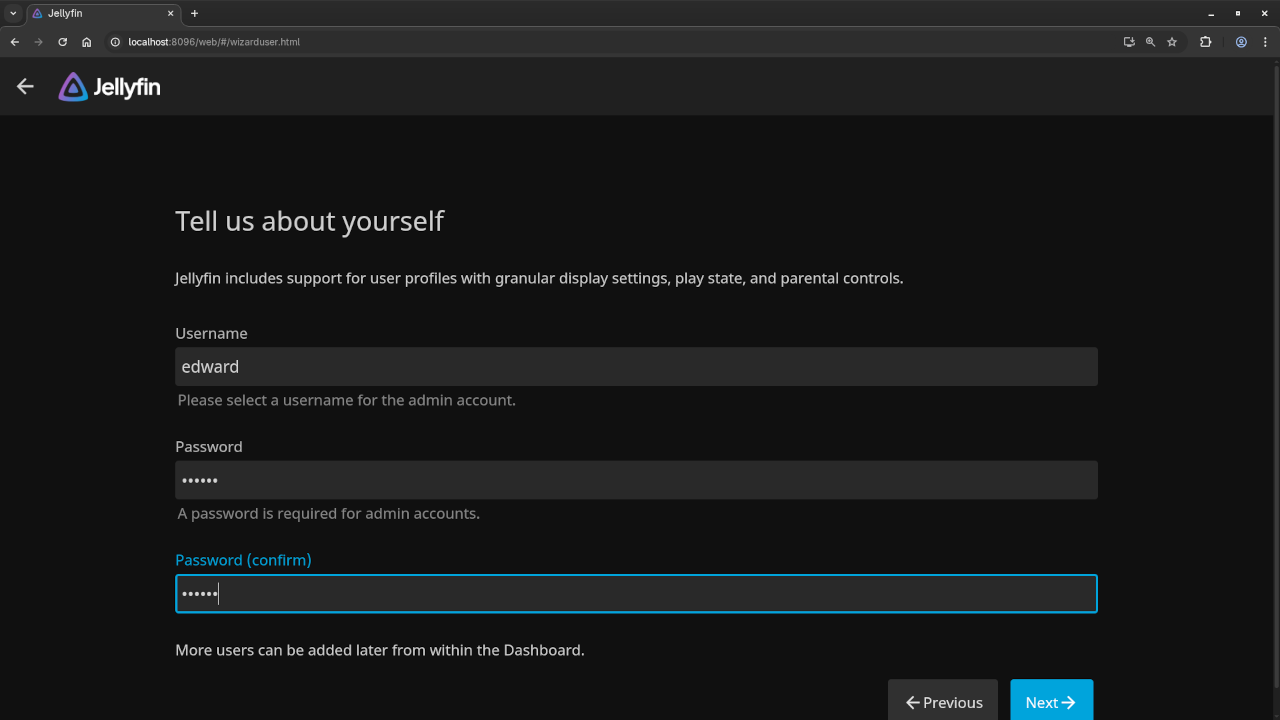
    Jellyfin Installation User Screen
    Web Browser Displaying Jellyfin Installation User Screen

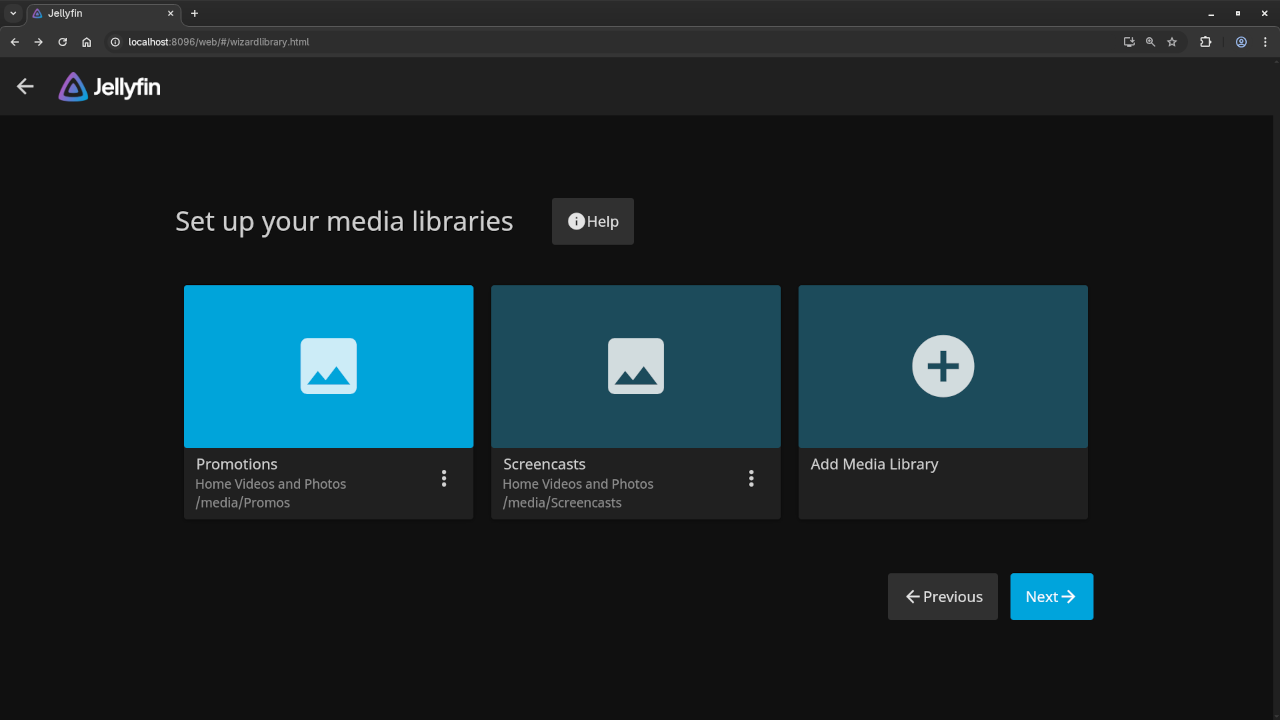
    Jellyfin Installation Media Screen
    Web Browser Displaying Jellyfin Installation Media Screen

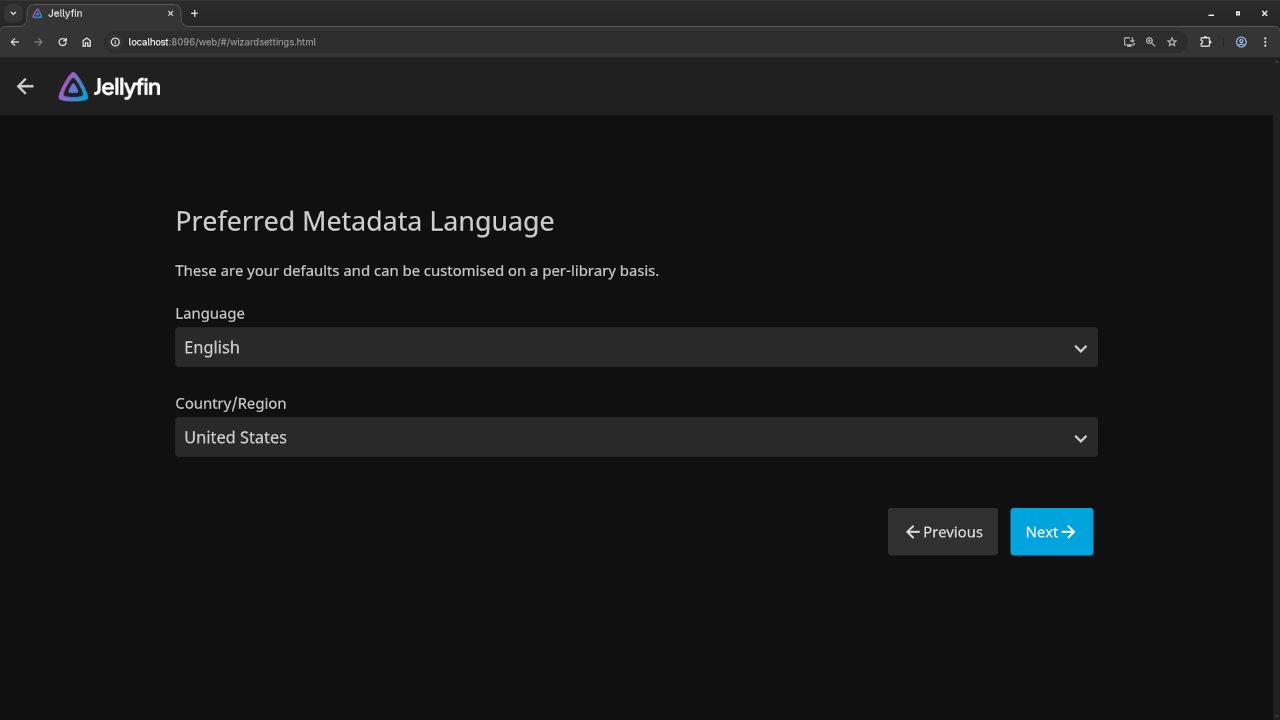
    Jellyfin Installation Meta Screen
    Web Browser Displaying Jellyfin Installation Meta Screen

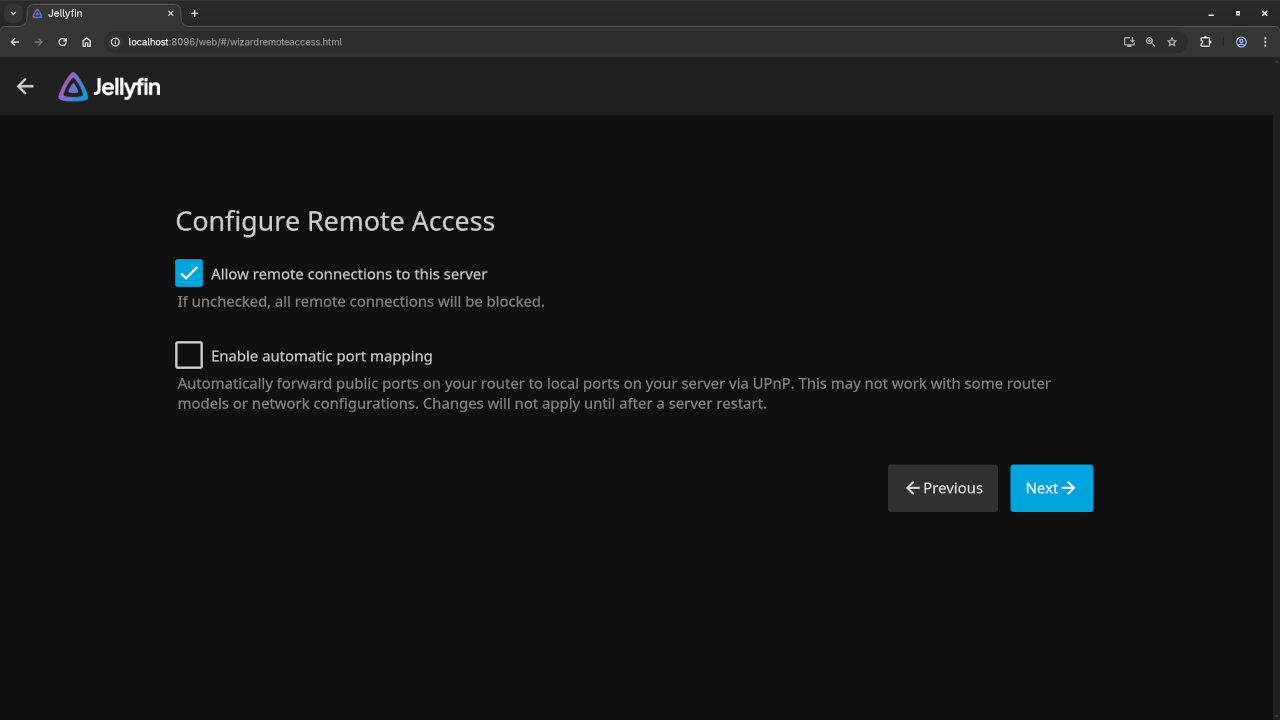
    Jellyfin Installation Remote Screen
    Web Browser Displaying Jellyfin Installation Remote Screen

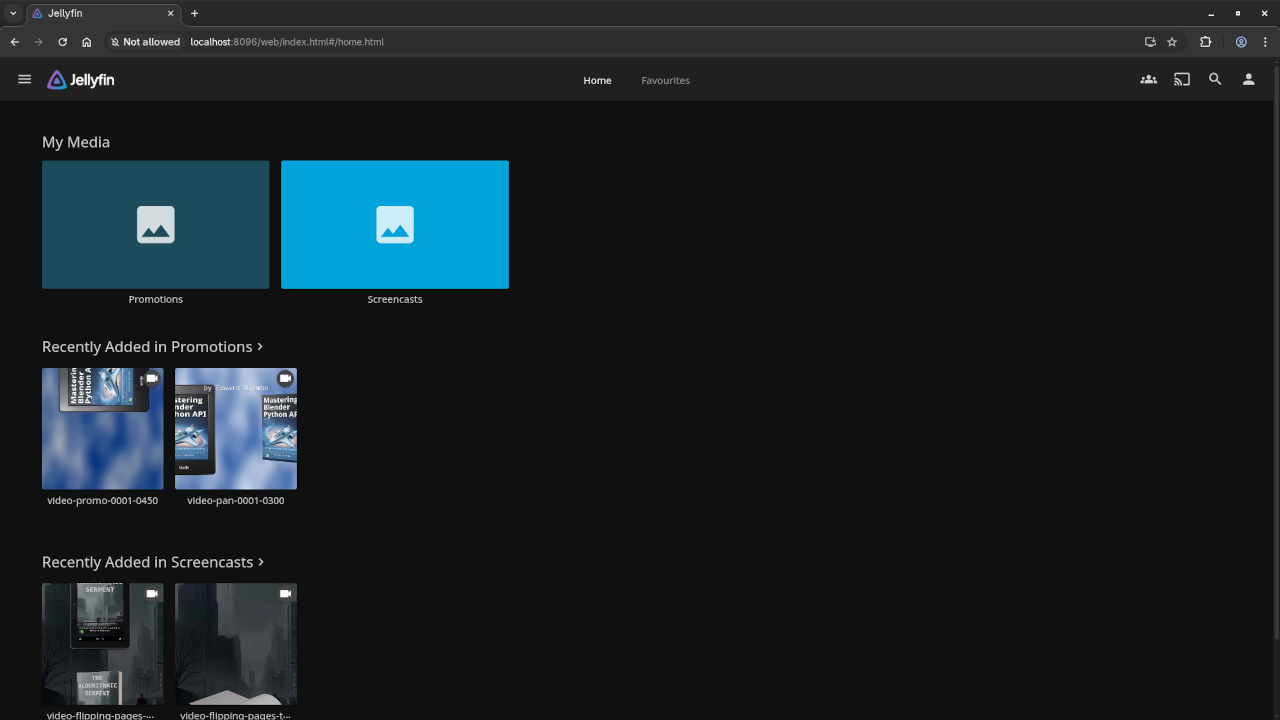
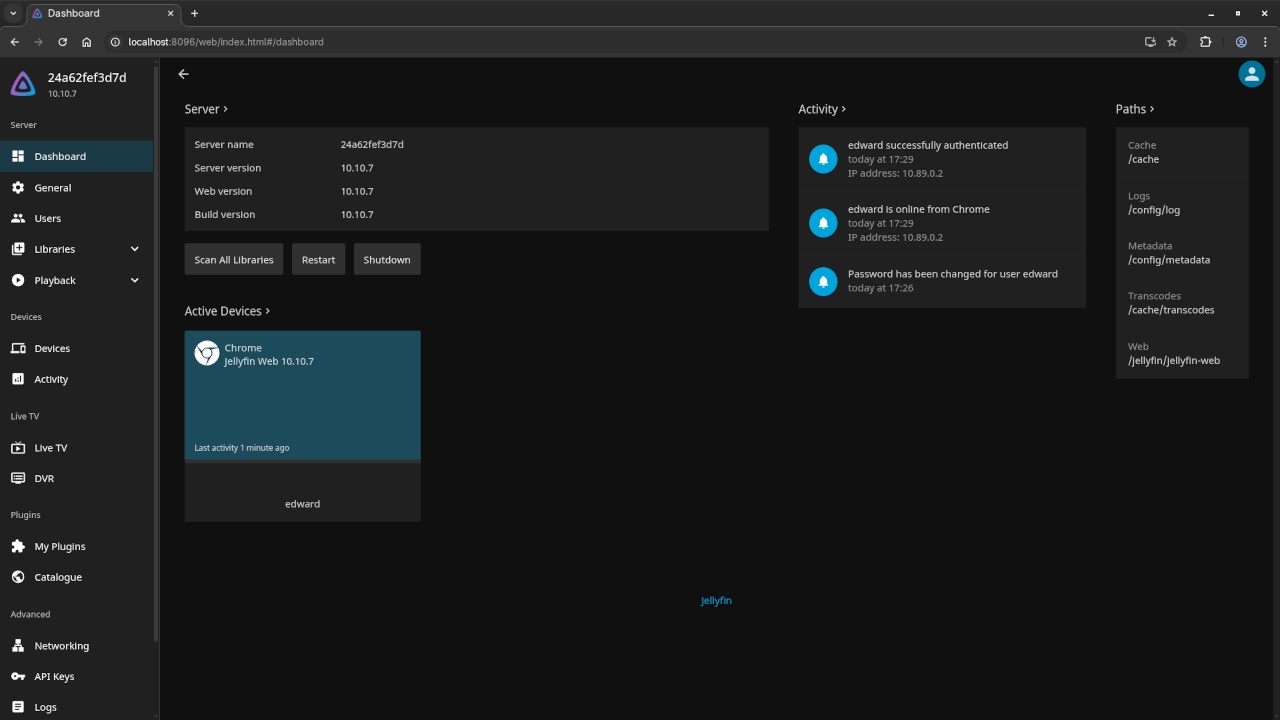
    Jellyfin Dashboad Screen
    Web Browser Displaying Jellyfin Dashboard Screen

    Jellyfin General Settings Screen
    Web Browser Displaying Jellyfin General Settings Screen

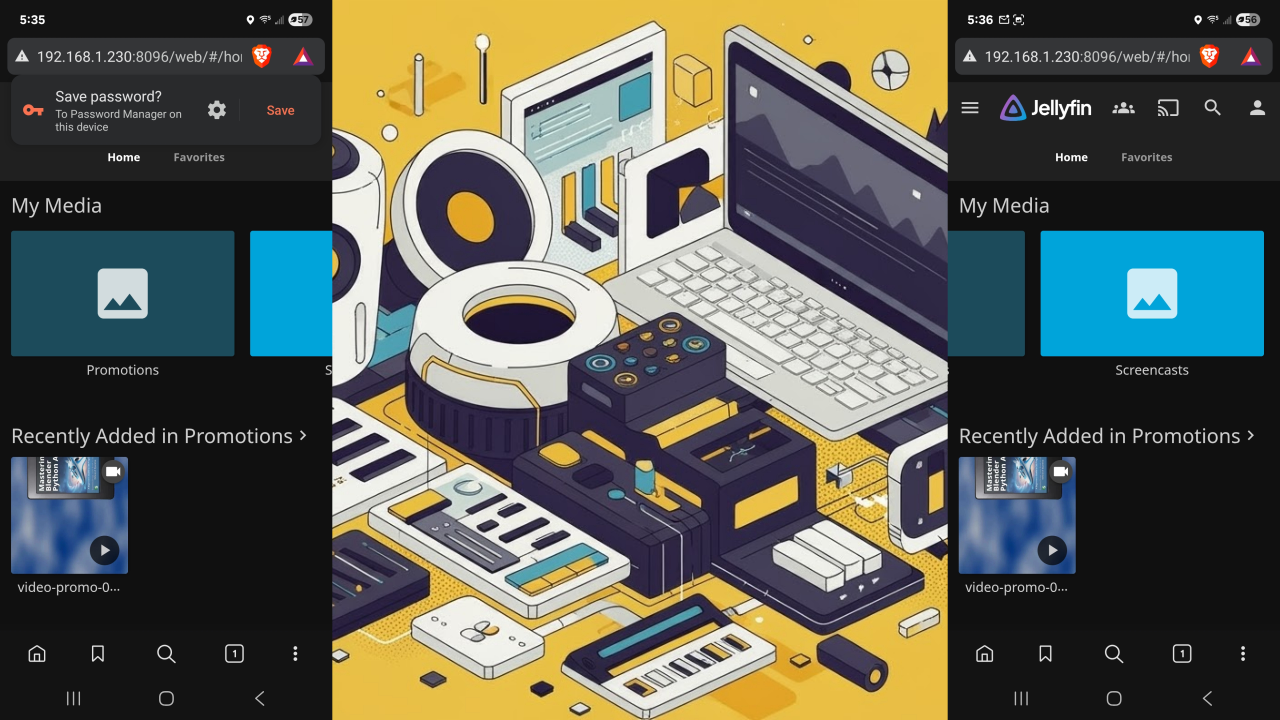
    Jellyfin Mobile View
    Web Browser Displaying Jellyfin Mobile View

    Jellyfin Installation And Setup Screencast

    Need Help? I’m Here for One-on-One Support!

    If you need help installing, updating, or migrating Jellyfin, I offer custom support and one-on-one programming tutorials. Reach out to me directly via my contact page:
    👉 https://ojambo.com/contact

  • Review Generative AI WizardLM2 7B Model

    Review Generative AI WizardLM2 7B Model

    Getting Started with WizardLM2 7B in Alpaca Ollama: An Open Source LLM Setup Guide

    If you’re just starting out with large language models (LLMs) and are curious about running one on your local machine, this beginner-friendly post is for you! We’ll walk through using the open source WizardLM2 7B model with the lightweight and powerful Alpaca Ollama client.

    Alpaca Ollama is a client designed to run and test local LLMs efficiently and easily. You can find it here:
    🔗 Alpaca Ollama GitHub Repository

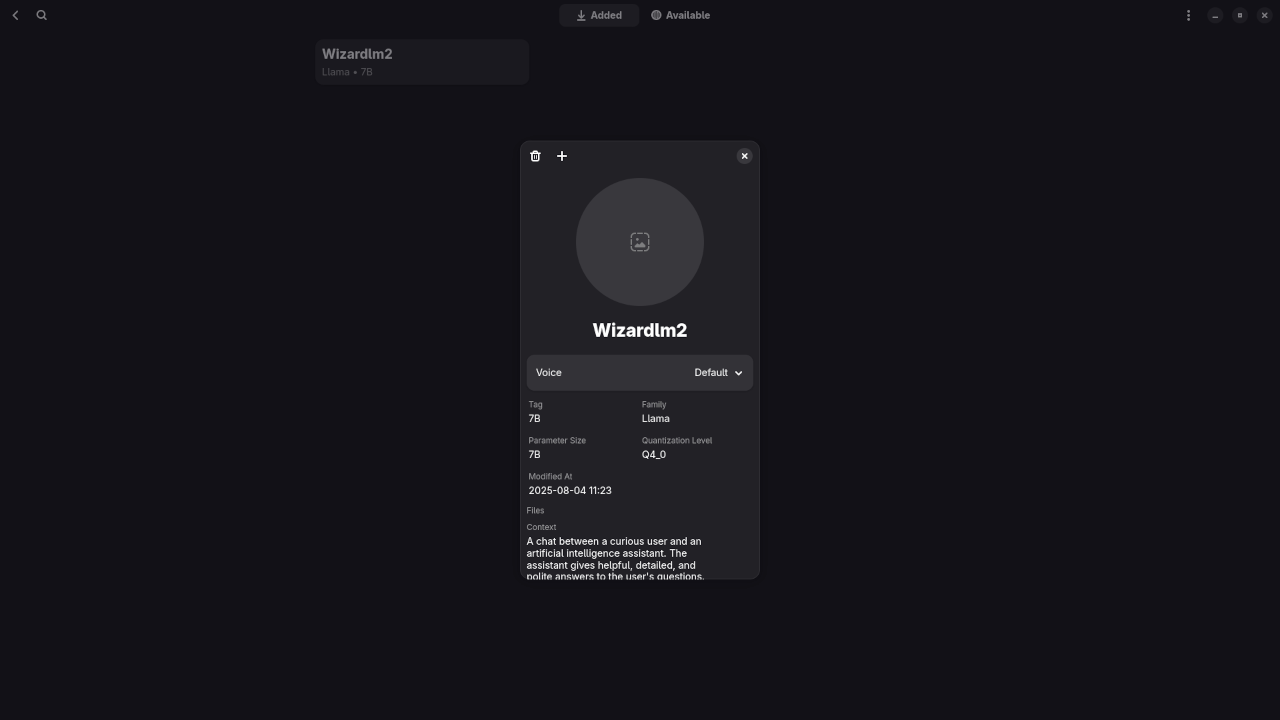
    🧠 What is WizardLM2 7B?

    WizardLM2 7B is a fine-tuned, instruction-following LLM built for helpful and safe interactions. It is known for being efficient while still providing impressive conversational abilities for general usage.

    Running it inside the Alpaca Ollama client lets you try it out on your local machine without needing massive infrastructure or complex code.

    💡 Why Use Alpaca Ollama?

    • 🚀 Lightweight and simple
    • 🔧 Built with Python
    • 💻 Great for testing and development
    • 📦 Compatible with models like WizardLM2 and Phi 2.7B

    🔍 Open Source Details

    The Alpaca Ollama client is open source and available under the MIT License, which means you can use, modify, and distribute it freely with minimal restrictions.

    You can review the code and contribute on GitHub:
    https://github.com/Jeffser/Alpaca

    ⚠️ License and Restrictions for WizardLM2 7B

    WizardLM2 7B is released under the Apache License 2.0, a highly permissive open source license.

    • Commercial Use: Allowed
    • Modification & Redistribution: Allowed
    • Patent Use: Granted under Apache 2.0 terms
    • ⚠️ Conditions:
      • You must include the original Apache 2.0 license text in any distribution
      • You must clearly state if you modify the model or code
      • You must retain copyright and attribution notices
    • No Warranty: Provided “as is” without liability

    This license makes WizardLM2 7B a great option for developers, researchers, and businesses looking to build AI applications with minimal legal restrictions.

    🖼️ Screenshots and Screencast

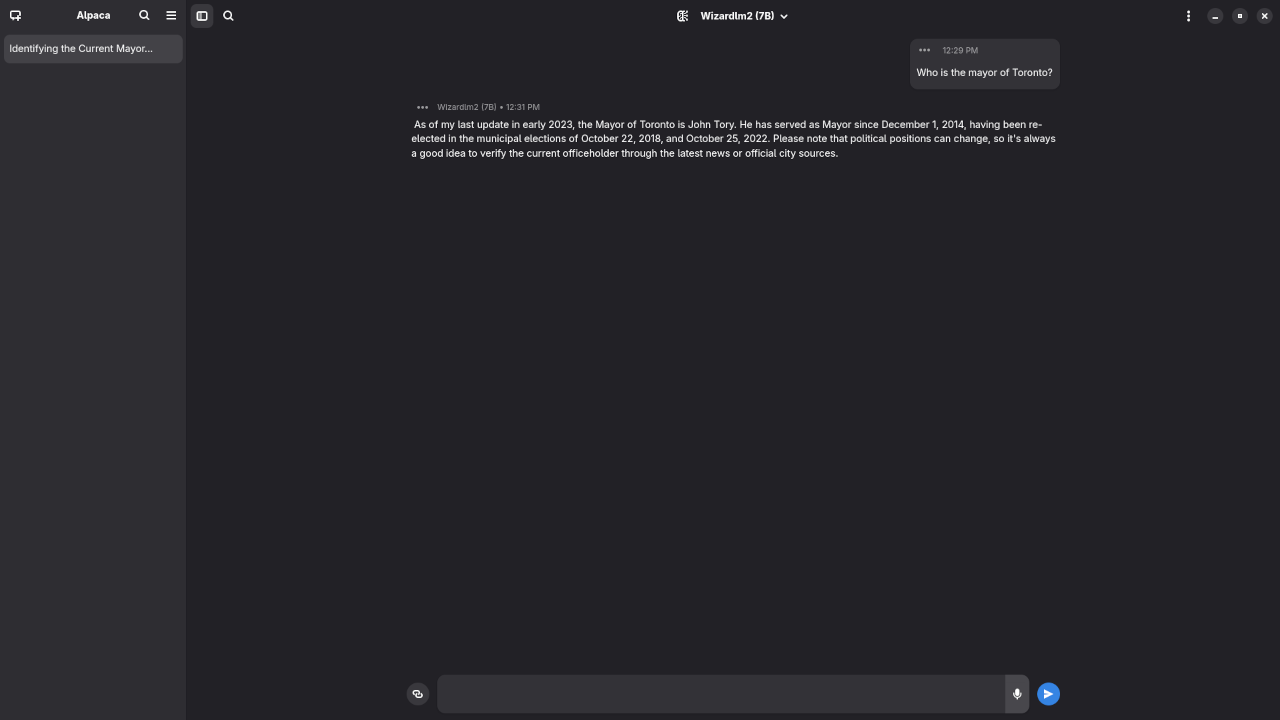
    WizardLM2 7B answered question about the Mayor
    Command Line WizardLM2 7B Answered Mayor Of Toronto Request.

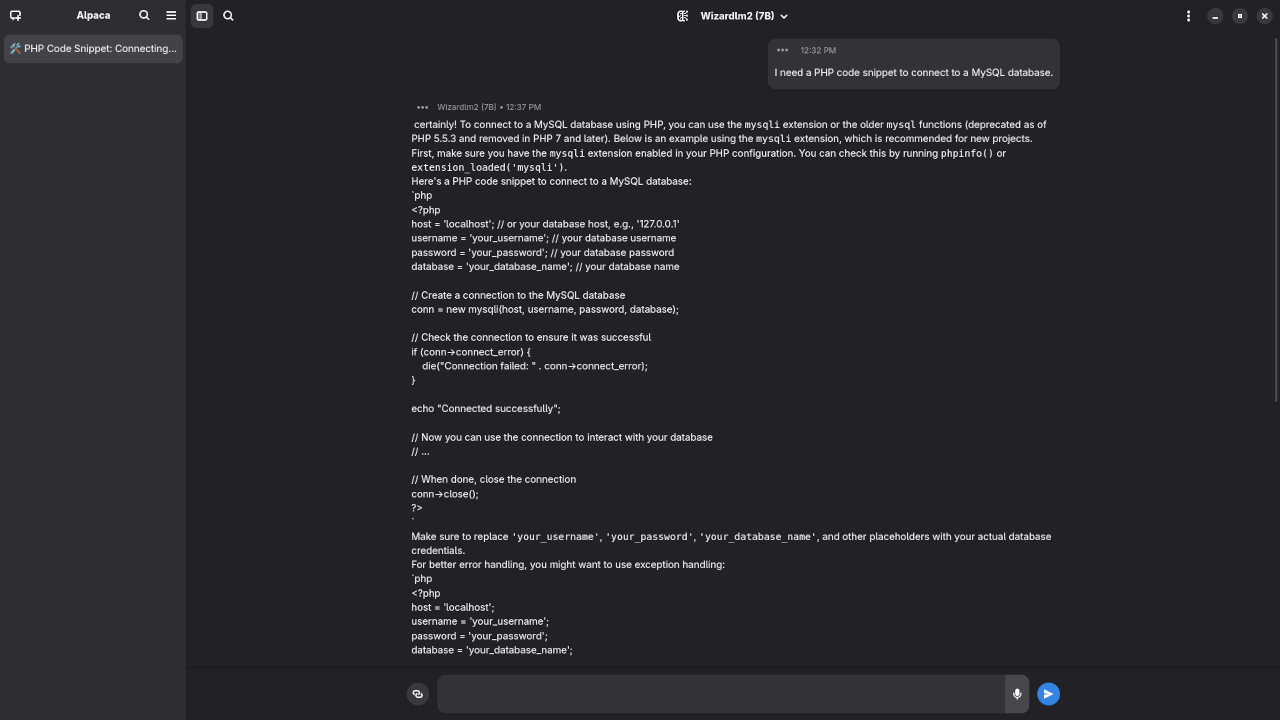
    WizardLM2 7B answered question about PHP code
    Command Line WizardLM2 7B Answered PHP Code Request.

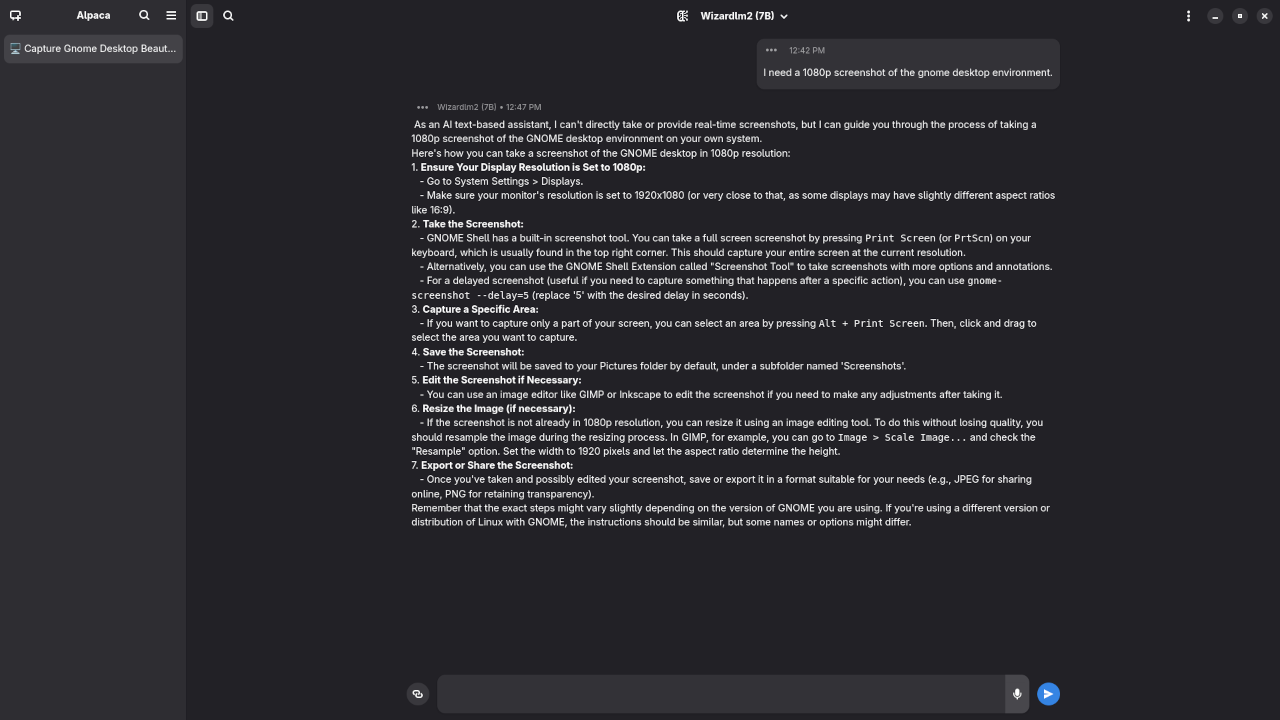
    WizardLM2 7B answered question about screenshot
    Command Line WizardLM2 7B Answered Gnome Desktop Screenshot Request.

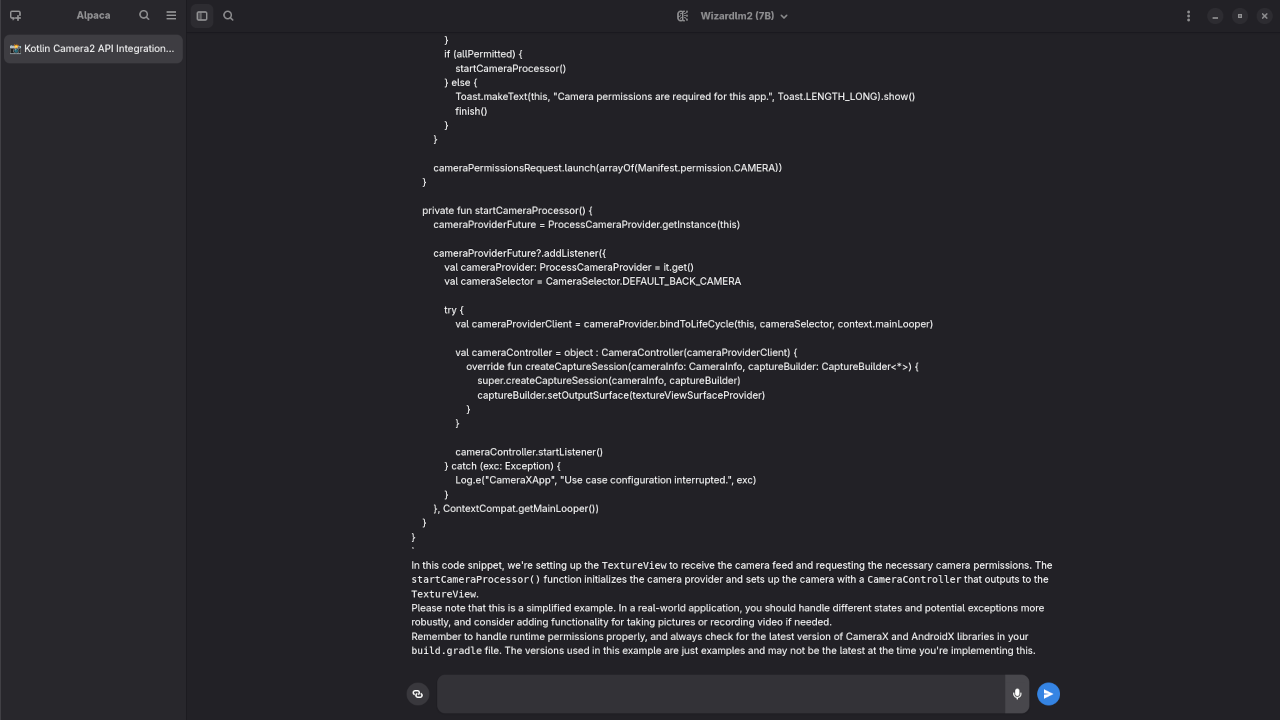
    WizardLM2 7B answered request for Kotlin code
    WizardLM2 7B Answered Kotlin Code Request.

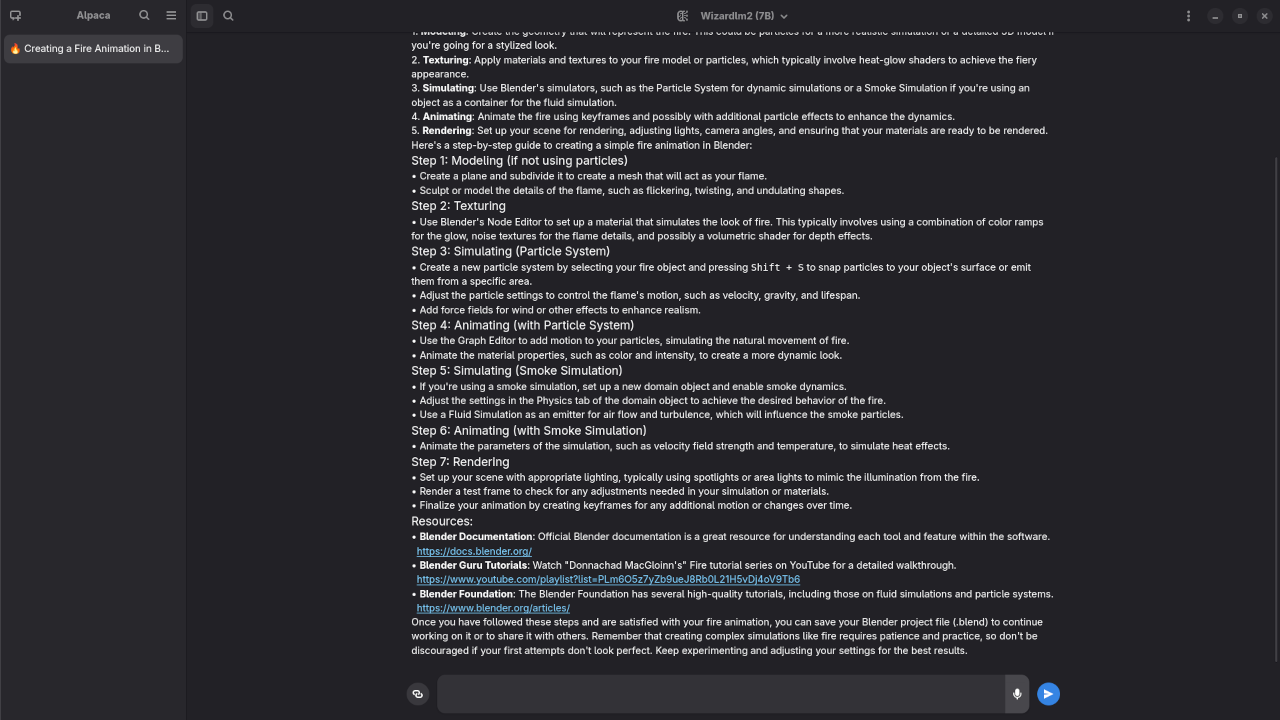
    WizardLM2 7B answered request for Blender Blend File
    WizardLM2 7B Answered Blender Blend File Request.

    Video Displaying Using WizardLM2 7B In Alpaca Ollama Client

    Results:

    Who is the mayor of Toronto?

    Produced inaccurate outdated answer to Olivia Chow as the mayor of Toronto.

    I need a PHP code snippet to connect to a MySQL database.

    Produce incorrect syntax PHP code snippet to connect to a MySQL database.

    I need a 1080p screenshot of the gnome desktop environment.
    Produced good answer to generate a 1080p screenshot of Gnome desktop environment because it is a text-based AI lacking ability.

    I need a kotlin code snippet to open the camera using Camera2 API and place the camera view on a TextureView.

    Produced incomplete Kotlin code snippet.

    I need a blender blend file for fire animation.

    Produced elaborate answer to generate a fire animation, but not a Blender Blend file because it is a text-based AI lacking ability.

    📚 Learn More About Python

    If you’re new to Python and want to build the skills needed to work with LLMs and APIs, check out my book and course:

    📖 Book: Learning Python on Amazon
    🎓 Course: Learning Python Online Course

    👨‍💻 Need Help? Get 1-on-1 Python Tutoring or LLM Installation

    If you’d like help getting started, I offer:

    Whether you’re learning to code or setting up your first LLM, I’m here to help!

    If you have any questions or want to see a specific demo, leave a comment below or reach out through the contact links above.

  • PHP Web Framework Prado

    PHP Web Framework Prado

    Getting Started with the Prado PHP Framework: A Beginner’s Guide to MVC and MariaDB Integration

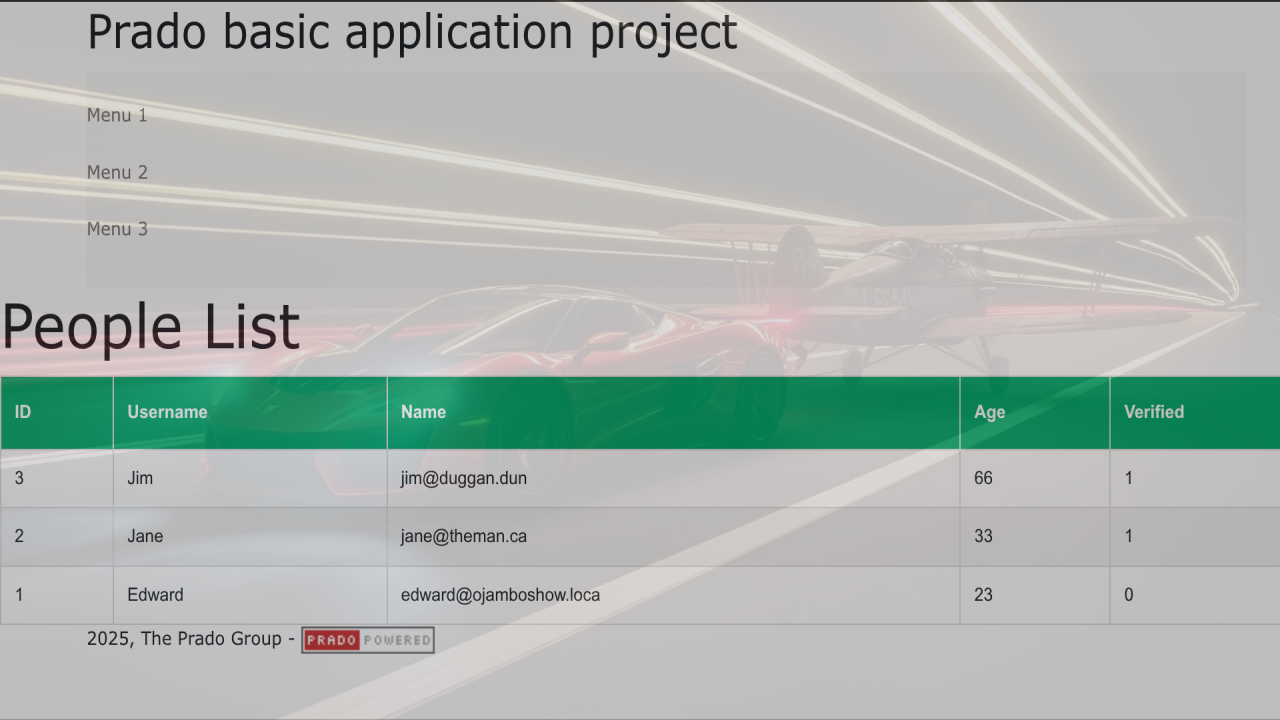
    Prado PHP is an open-source, event-driven web application framework that simplifies the development of complex web applications. In this beginner-level tutorial, we’ll explore the fundamentals of Prado PHP, focusing on its support for the MVC (Model-View-Controller) design pattern. You’ll also learn how to connect Prado to a MariaDB database, query data from a table, and display it as HTML.

    In this post, we will use Prado PHP version 4.3.1, and we’ll install it using Composer, the popular PHP dependency manager.

    Before we dive into the code, if you’re interested in learning more about PHP, I highly recommend checking out my book, Learning PHP, and my course, Learning PHP, where I go deeper into the fundamentals and best practices.

    What is Prado PHP?

    Prado is a full-stack web application framework that supports rapid development of web applications. It is based on the MVC architecture, which helps in organizing your code for better maintainability and scalability.

    • Model: Represents the data and business logic of the application.
    • View: Represents the presentation layer (HTML, CSS, JavaScript).
    • Controller: Handles the user requests and interacts with the model to prepare data for the view.

    Setting Up Prado PHP 4.3.1 with Composer

    To begin, you need to install Prado PHP using Composer. Here’s how:

    1. Install Composer (if you haven’t already):

      Download Composer from https://getcomposer.org/ and follow the installation instructions for your operating system.

    2. Install Prado Framework:

      Open your terminal and run the following command to install Prado PHP 4.3.1 via Composer:

      composer create-project pradosoft/prado myproject
    3. Create Your Application:

      After the installation is complete, you can begin building your Prado application. Here’s the directory structure:

      your-project-folder/protected
      │-- Common/
      │    └-- PeopleRecord.php
      │-- Pages/
      │    └-- People.page
      │    └-- People.php
      │    └-- PeopleRenderer.php
      │    └-- PeopleRenderer.tpl
      └-- application.xml
    4. Set Up Your Web Server:

      Make sure your web server is set up to point to the protected directory as the public root. If you’re using Apache, you can configure it with a virtual host.

    Connect to MariaDB and Retrieve Data

    Now that your Prado PHP framework is ready, let’s create a simple application that connects to a MariaDB database, queries a table, and displays the results as HTML.

    1. Database Setup

    First, make sure you have a MariaDB database with a table for this example. Below is a sample SQL script to create a table and insert some sample data.


    CREATE DATABASE prado_example;
    
    USE prado_example;
    
    CREATE TABLE users (
        id INT AUTO_INCREMENT PRIMARY KEY,
        name VARCHAR(100) NOT NULL,
        email VARCHAR(100) NOT NULL
    );
    
    INSERT INTO users (name, email) VALUES ('John Doe', 'john@example.com');
    INSERT INTO users (name, email) VALUES ('Jane Smith', 'jane@example.com');


    2. Create the Prado Model

    Next, create a model that will interact with the database.

    In the /protected/Common directory, create a new file User.php:


    <?php
    
    class User extends TActiveRecord
    {
        const TABLE = 'users';
    
        public $id;
        public $name;
        public $email;
    
        public function tableName()
        {
            return self::TABLE;
        }
    
        public function findAllUsers()
        {
            return User::finder()->findAll();
        }
    }
    ?>


    3. Create the Controller

    Now, create a controller that will handle the user request and fetch the data from the database.

    Create a new file in the /protected/Pages directory called UserController.php:


    <?php
    
    class UserController extends TPage
    {
        public function onLoad($param)
        {
            parent::onLoad($param);
            $this->displayUsers();
        }
    
        public function displayUsers()
        {
            $users = User::finder()->findAll();
            $output = "<ul>";
            foreach ($users as $user) {
                $output .= "<li>{$user->name} ({$user->email})</li>";
            }
            $output .= "</ul>";
    
            $this->getResponse()->write($output);
        }
    }


    4. Create the View

    Prado views are HTML files with embedded Prado controls. For this example, we’ll create a view file to display the list of users.

    Create a new view file called UserController.page in the /www directory:


    <%@ Title="My Project Create Using Prado" %>
    
    <com:TContent ID="Main">
    
    <com:TRepeater ID="Repeater"
        ItemRenderer="Application.Pages.PeopleRenderer"
        AllowPaging="true"
        AllowCustomPaging="true"
        PageSize="5"
        />
    
    <com:TPager ControlToPaginate="Repeater" OnPageIndexChanged="pageChanged" />
    
    </com:TContent>


    5. Update the Database Connection

    Make sure your /protected/application.xml file contains the correct database configuration:


    <?xml version="1.0" encoding="utf-8"?>
    
    <application id="prado-app" mode="Debug">
    	<paths>
    		<using namespace="Application.Common.*" />
    	</paths>
    	<!-- modules configured and loaded for all services -->
    	<modules>
    		<module id="request" class="THttpRequest" UrlFormat="HiddenPath" />
    		<module id="parameter" class="TParameterModule" ParameterFile="Application.Data.Settings" />
            <!-- Define the Database Connection Module for MariaDB -->
            <module id="db" class="System.Data.TDataSourceConfig">
                <database ConnectionString="mysql:host=localhost;dbname=databasename" Username="databaseuser" Password="databasepassword" />
            </module>
    
            <!-- Configure ActiveRecord to use the database module -->
            <module class="System.Data.ActiveRecord.TActiveRecordConfig" ConnectionID="db" />
    	</modules>
    	<services>
    		<!-- page service -->
    		<service id="page" class="TPageService" DefaultPage="Home">
    			<modules>
    				<module id="session" class="THttpSession" SessionName="SSID" CookieMode="Only" UseCustomStorage="false" AutoStart="true" TimeOut="28800" />
    				<module id="asset" class="System.Web.TAssetManager" />
    			</modules>
    			<pages  MasterClass="Application.Layouts.MainLayout" />
    		</service>
    		<service id="wsat" class="System.Wsat.TWsatService" Password="my_secret_password" />
    	</services>
    </application>


    Running Your Application

    Now that everything is set up, you can run your Prado application by visiting the URL corresponding to your index.php file in your web browser.

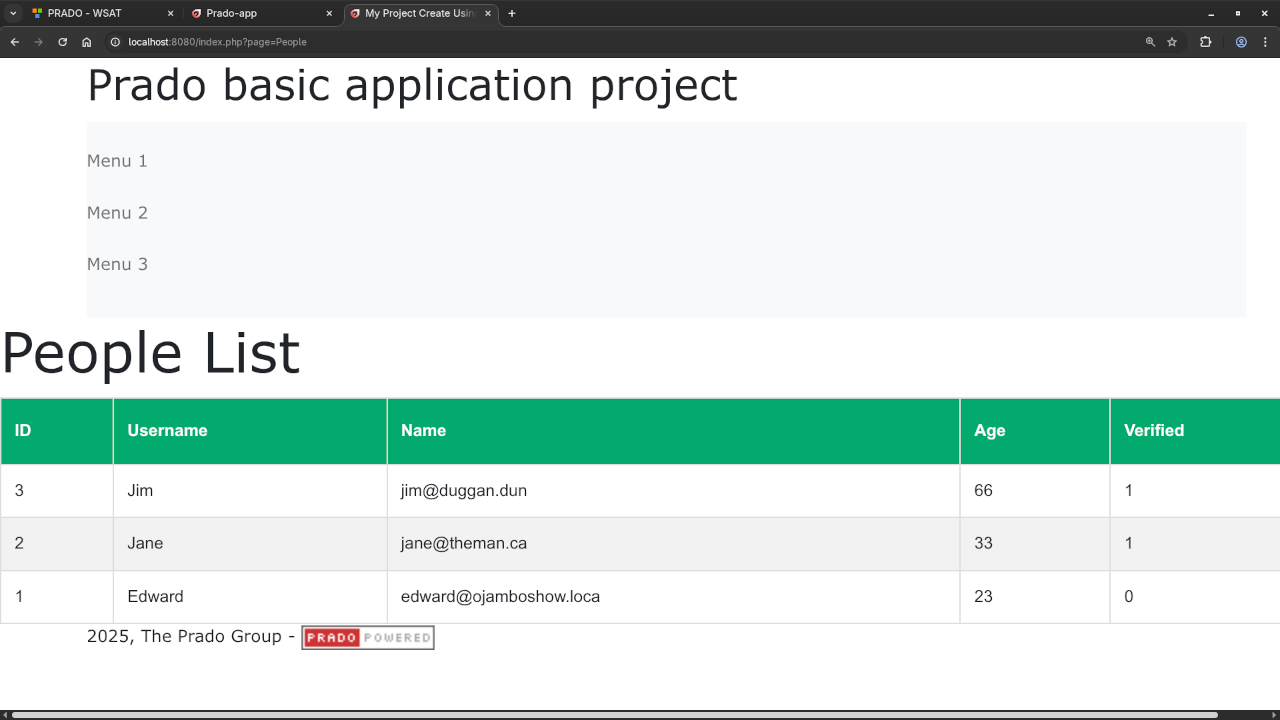
    If everything is set up correctly, you should see a list of users fetched from the MariaDB database and displayed as HTML.

    Screenshots and a Screencast

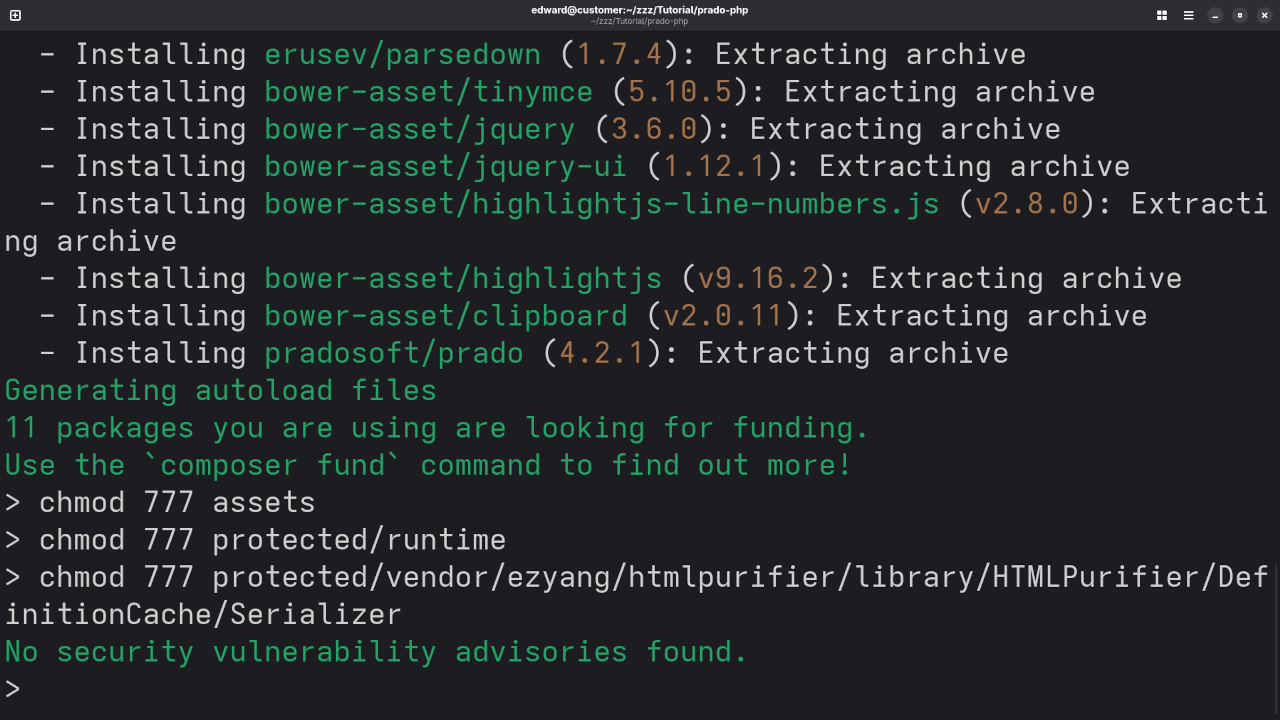
    Prado Dependencies
    Command Line Installation Of Prado Web Framework

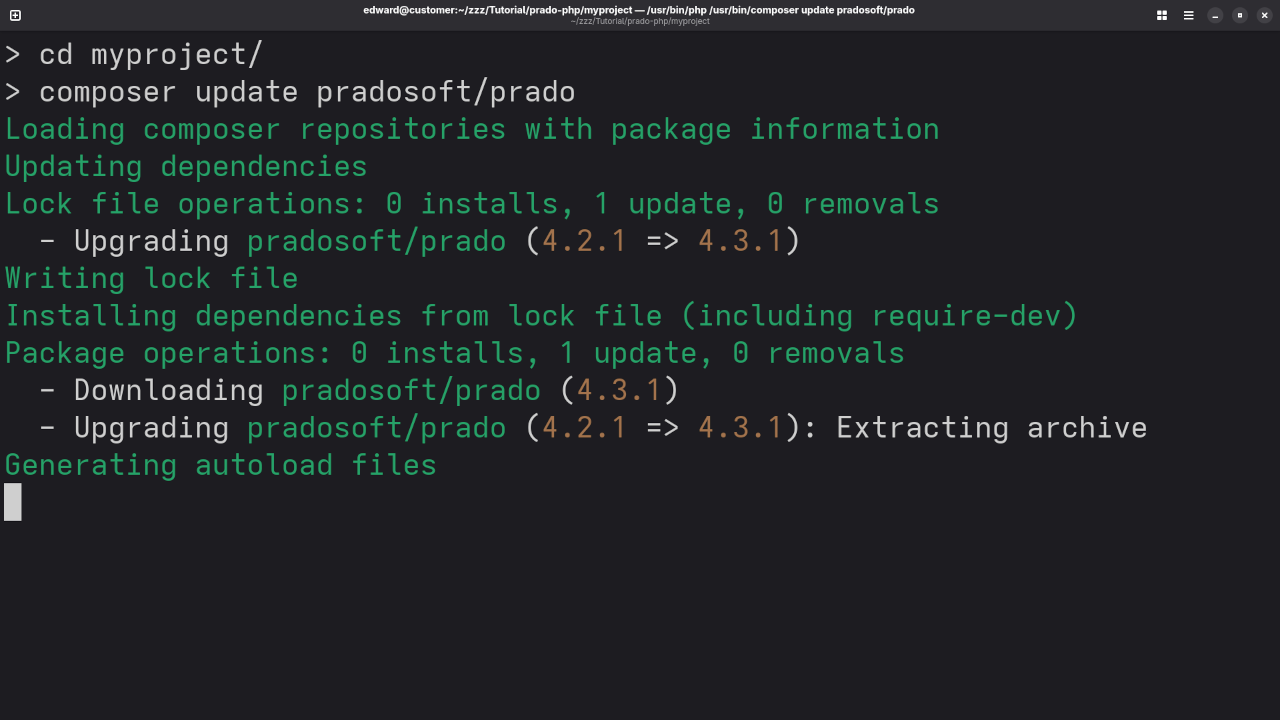
    Prado Update
    Command Line Update Of Prado Web Framework

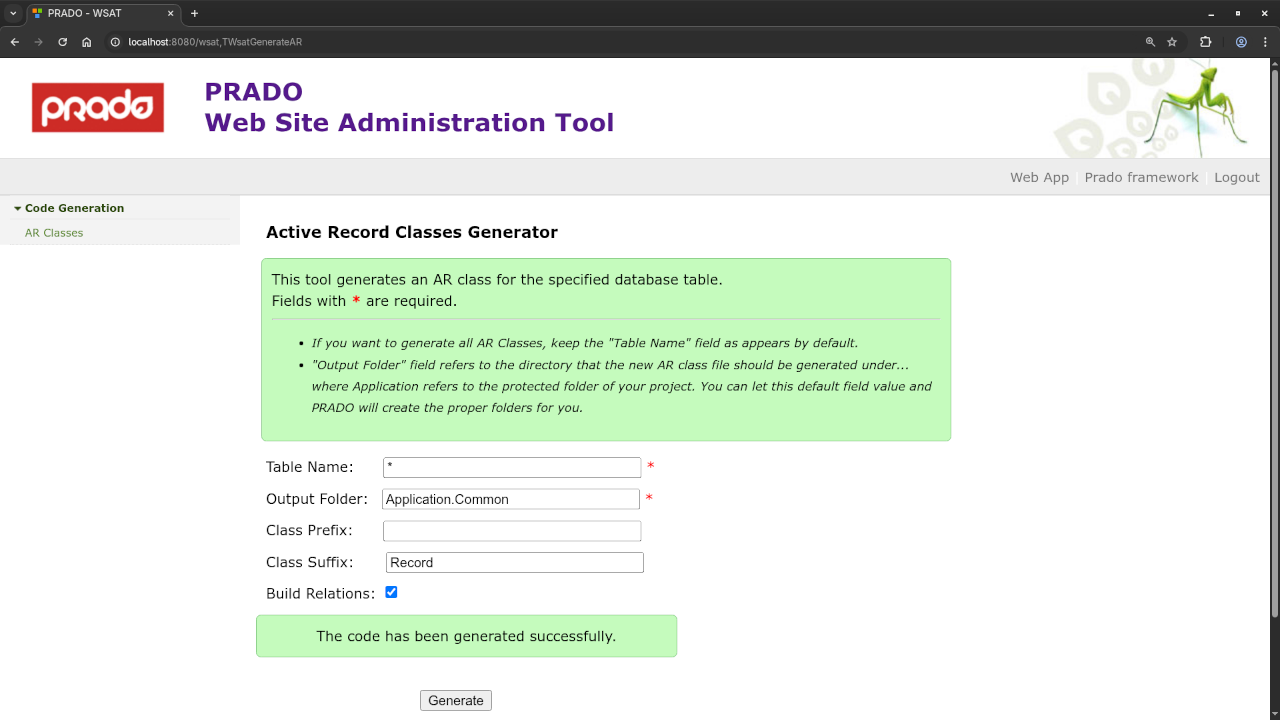
    Prado Record Class Generator
    Web Browser Displaying Record Class Generator Result

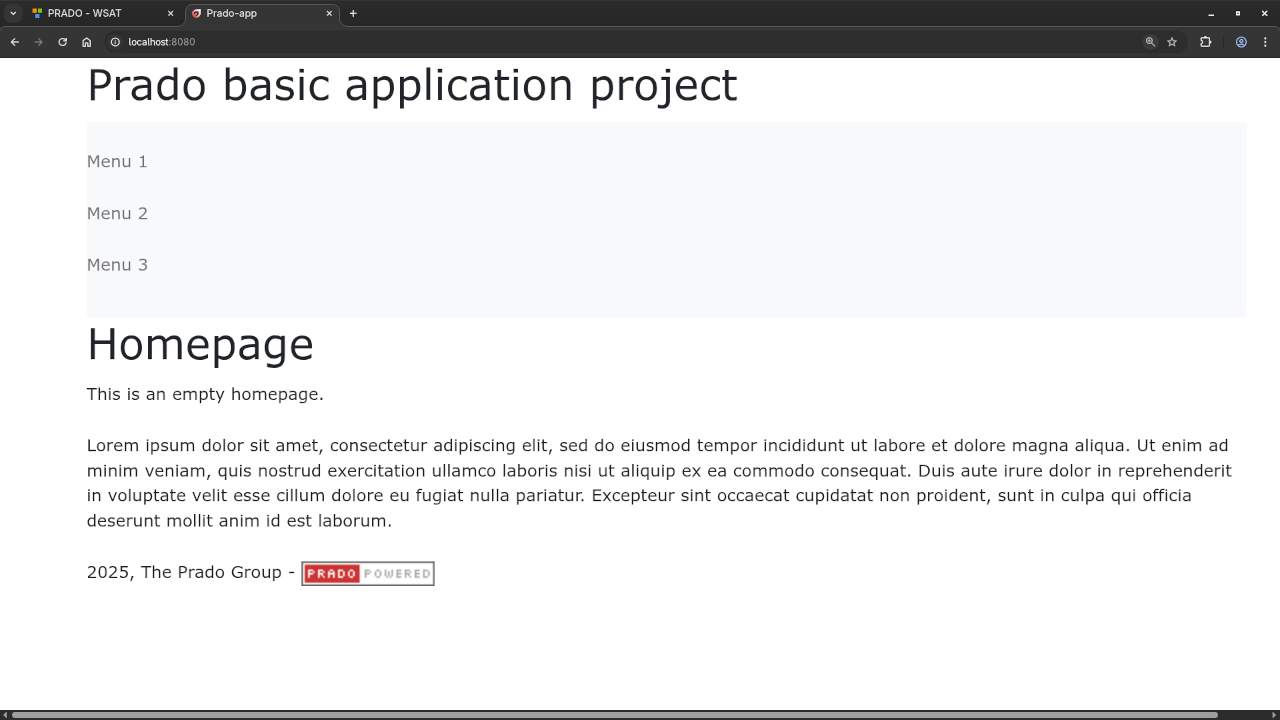
    Prado Base Home Page
    Web Browser Displaying Default Base Home Page

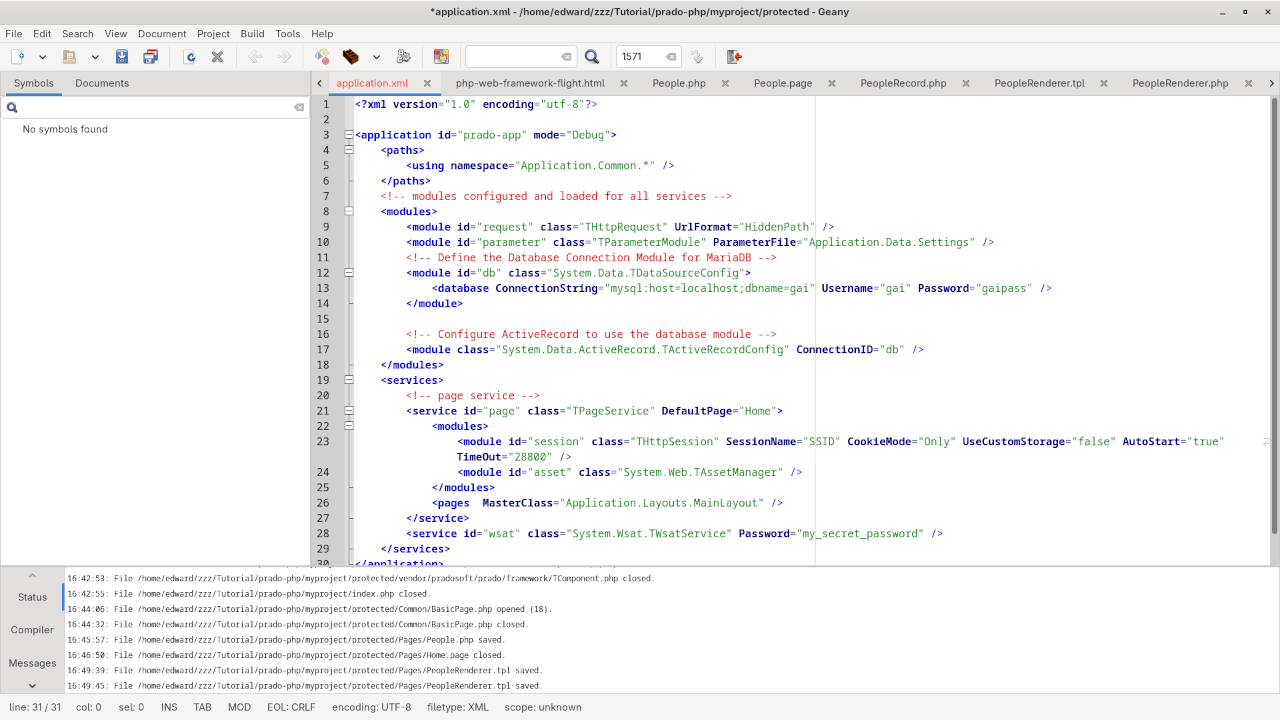
    Prado Configuration
    Geany IDE Displaying App Settings File

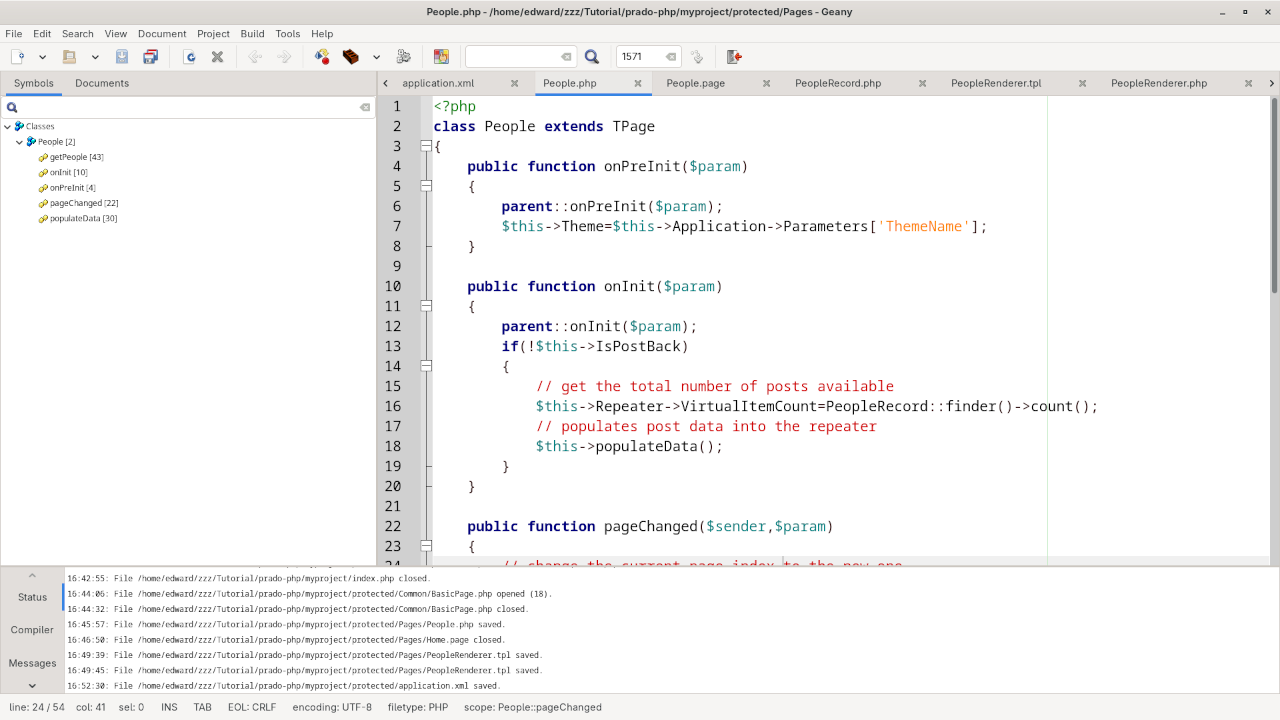
    Prado People Controller
    Geany IDE Displaying Custom People Controller
    Prado People Result
    Web Browser Displaying Custom People Route Result

    Prado Custom View Records In Web Browser

    Conclusion

    With Prado PHP, you can easily build scalable and maintainable web applications using the MVC architecture. In this tutorial, you learned how to set up Prado PHP, connect it to a MariaDB database, and display data from a table in HTML. This is just a starting point-Prado offers a wealth of features that can help you build even more sophisticated applications.

    Learn More

    If you want to dive deeper into PHP, check out my book, Learning PHP and my Learning PHP course. You can also get in touch with me for one-on-one programming tutorials or assistance with Prado PHP updates or migrations.

    Happy coding!

    Disclaimer: This article provides an introductory guide to Prado PHP. For more advanced topics and in-depth tutorials, feel free to explore the documentation or reach out for personalized programming assistance.

  • Practical Tips for Turning Your Website into a Profit Engine

    Practical Tips for Turning Your Website into a Profit Engine

    An effective business website isn’t a static brochure; it’s a living, breathing extension of your sales floor. Every element, from the way your homepage loads to the tone of a customer service exchange, can be tuned to amplify profitability. A site that blends speed, clarity, and customer focus doesn’t just attract visitors—it guides them to take action and return for more. Small adjustments to structure, messaging, and user experience can add up to major gains. The key is to think like your audience, anticipating their hesitations and smoothing their path toward purchase. This means moving beyond generic “improvements” and targeting specific leverage points that deliver measurable results.

    Live Chat Boosts Sales in the Moment

    When a visitor hesitates over a product, the window to convert them is measured in seconds. Adding a chat widget that offers personalized real-time help can catch that moment before it slips away. Instead of forcing a potential customer to click through a static FAQ, you meet them in their uncertainty, addressing questions while the impulse to buy is still alive. This doesn’t just resolve confusion—it creates a small but powerful relationship where the customer feels noticed. The immediacy of this exchange often shortens the decision-making process, allowing the sale to close without friction. In competitive markets, speed of response can matter as much as price or product quality.

    Video Marketing for Higher Engagement

    One of the most compelling upgrades you can make is adding engaging videos to your site. Video allows you to demonstrate, persuade, and connect in a way that static text and images can’t. A well-placed clip can reduce bounce rates by holding attention during those crucial first seconds. It also offers a medium for storytelling, helping potential buyers imagine themselves benefiting from your product or service. Whether it’s a product demo, a customer testimonial, or a behind-the-scenes look at your process, video enriches the visitor’s experience and encourages deeper exploration. This kind of media creates both emotional resonance and practical clarity, leading to higher conversion rates.

    Good Support Deepens Value and Repeat Business

    First impressions matter, but the interactions that follow can turn a one-time buyer into a loyal advocate. By offering chat functionality, you’re telling customers that their time is worth as much as their money. Studies show that shoppers value instant support, particularly when they’re navigating a new brand. Each quick, helpful answer builds a stack of positive associations, making the next purchase feel effortless. The beauty of live chat is that it works for both acquisition and retention, giving you a tool that serves short-term sales and long-term loyalty. Over time, these conversations form a feedback loop that helps refine products and services.

    Site Speed Drives Conversion Urgency

    Website performance isn’t just about convenience—it’s about creating momentum. Every tenth of a second counts when it comes to keeping someone engaged enough to complete a transaction. A delay at the wrong moment can interrupt that mental “yes” and push it toward a “maybe later” that never materializes. Faster load times keep attention tethered to your offer, especially for mobile users who are often multitasking. The goal isn’t only to remove barriers—it’s to make the experience feel so seamless that hesitation never enters the picture. Even small gains in perceived speed can translate to measurable jumps in conversion rates.

    Trust Signals That Quiet Hesitation

    Customers hesitate when they’re unsure—not when they see a little mark of safety. Displaying well-placed trust badges like verified payment options or security seals can reduce cart abandonment by up to 20 percent and boost conversions by as much as 32 percent when positioned strategically near checkout points. It’s subtle, but turning hesitation into assurance with simple icons can mean the difference between a potential sale and a lost opportunity.

    Navigation That Feels Like a Welcome Mat

    When visitors don’t know where to go, they leave. Sites with clean, intuitive navigation designs help users find what they want fast—resulting in smoother browsing, fewer bounce-offs, and higher conversions. A clear menu isn’t just functional—it’s a silent guide that greets visitors, tells them you care about their time, and transforms exploration into action.

    Social Proof That Earns First Impressions

    Seeing real voices behind products turns browsing into believing. Customer reviews not only build credibility—they can amplify conversions, especially for higher-priced items, by as much as 380 percent. These honest, peer-powered narratives break down skepticism fast, making your brand feel trusted before any words from you ever reach the user.

    A profitable website is built on deliberate choices, not guesswork. Every change—whether it’s refining your load speed, personalizing support, or integrating rich media—shapes the way customers perceive your brand. When you address points of friction and enhance moments of engagement, you create a journey that feels effortless from start to finish. That ease translates directly into sales, loyalty, and advocacy. The best part is that these enhancements often work together, compounding their impact over time. Approach your site as a living asset, and each refinement will not only serve your visitors but also your bottom line.

    Find tech tutorials and innovative solutions at Ojambo.com, where you can master everything from Ghost CMS setups to stunning animations with HTML5 and PHP!

    References

  • Build an HTML5 Spreadsheet-Like Graph Plotter with JavaScript

    Build an HTML5 Spreadsheet-Like Graph Plotter with JavaScript

    Have you ever wanted to create a simple graphing tool using just HTML5 and JavaScript? In this tutorial, I’ll show you how to build a spreadsheet-style data input table that plots dynamic bar and line graphs using the <canvas> element — no external libraries required.

    This project is perfect for JavaScript beginners, especially if you enjoy learning through hands-on examples.

    🎯 What You’ll Learn

    • How to use <input type="number"> in a spreadsheet-style table
    • Automatically add new rows when inputs are filled
    • Draw bar and line graphs using the HTML5 <canvas>
    • Add interactivity with JavaScript
    • Toggle between graph types using a dropdown

    📑 Project Code Overview

    We’ll create:

    1. A simple table with two columns for X and Y values
    2. Auto-expanding rows when both X and Y are filled
    3. A dropdown to choose between Line or Bar graph
    4. Canvas rendering logic to draw and update the graph

    💻 Technologies Used

    • HTML5 for structure and canvas
    • CSS3 for minimal styling
    • Vanilla JavaScript for dynamic interaction


    &lt;!DOCTYPE html&gt;
    &lt;html lang=&quot;en&quot;&gt;
    &lt;head&gt;
      &lt;meta charset=&quot;UTF-8&quot; /&gt;
      &lt;title&gt;Line/Bar Graph Plotter&lt;/title&gt;
      &lt;style&gt;
        body {
          font-family: sans-serif;
          padding: 20px;
          background: #f0f0f0;
        }
    
        table {
          width: 300px;
          margin-bottom: 10px;
          border-collapse: collapse;
        }
    
        th, td {
          padding: 6px;
          border: 1px solid #ccc;
          text-align: center;
        }
    
        input[type=&quot;number&quot;] {
          width: 80px;
          padding: 4px;
          text-align: right;
        }
    
        select, button {
          padding: 8px 12px;
          margin: 10px 0;
          font-size: 14px;
        }
    
        canvas {
          border: 1px solid #333;
          background: #fff;
          display: block;
          margin-top: 20px;
        }
      &lt;/style&gt;
    &lt;/head&gt;
    &lt;body&gt;
    
      &lt;h2&gt;Spreadsheet Graph Plotter&lt;/h2&gt;
    
      &lt;label&gt;Choose Graph Type:&lt;/label&gt;
      &lt;select id=&quot;graphType&quot;&gt;
        &lt;option value=&quot;line&quot;&gt;Line Graph&lt;/option&gt;
        &lt;option value=&quot;bar&quot;&gt;Bar Graph&lt;/option&gt;
      &lt;/select&gt;
    
      &lt;table id=&quot;dataTable&quot;&gt;
        &lt;thead&gt;
          &lt;tr&gt;&lt;th&gt;X&lt;/th&gt;&lt;th&gt;Y&lt;/th&gt;&lt;/tr&gt;
        &lt;/thead&gt;
        &lt;tbody&gt;
          &lt;tr&gt;
            &lt;td&gt;&lt;input type=&quot;number&quot; step=&quot;any&quot; /&gt;&lt;/td&gt;
            &lt;td&gt;&lt;input type=&quot;number&quot; step=&quot;any&quot; /&gt;&lt;/td&gt;
          &lt;/tr&gt;
        &lt;/tbody&gt;
      &lt;/table&gt;
    
      &lt;button onclick=&quot;plotGraph()&quot;&gt;Plot Graph&lt;/button&gt;
    
      &lt;canvas id=&quot;graphCanvas&quot; width=&quot;600&quot; height=&quot;400&quot;&gt;&lt;/canvas&gt;
    
      &lt;script&gt;
        const table = document.getElementById(&#039;dataTable&#039;).getElementsByTagName(&#039;tbody&#039;)[0];
    
        // Add new row if last one is filled
        table.addEventListener(&#039;input&#039;, () =&gt; {
          const rows = table.rows;
          const lastRow = rows[rows.length - 1];
          const xInput = lastRow.cells[0].querySelector(&#039;input&#039;);
          const yInput = lastRow.cells[1].querySelector(&#039;input&#039;);
    
          if (xInput.value &amp;&amp; yInput.value) {
            addRow();
          }
        });
    
        function addRow() {
          const newRow = table.insertRow();
          const xCell = newRow.insertCell(0);
          const yCell = newRow.insertCell(1);
    
          const xInput = document.createElement(&#039;input&#039;);
          xInput.type = &#039;number&#039;;
          xInput.step = &#039;any&#039;;
    
          const yInput = document.createElement(&#039;input&#039;);
          yInput.type = &#039;number&#039;;
          yInput.step = &#039;any&#039;;
    
          xCell.appendChild(xInput);
          yCell.appendChild(yInput);
        }
    
    function plotGraph() {
      const graphType = document.getElementById(&quot;graphType&quot;).value;
      const canvas = document.getElementById(&quot;graphCanvas&quot;);
      const ctx = canvas.getContext(&quot;2d&quot;);
      ctx.clearRect(0, 0, canvas.width, canvas.height);
    
      let points = [];
    
      const rows = table.rows;
      for (let i = 0; i &lt; rows.length; i++) {
        const x = parseFloat(rows[i].cells[0].querySelector(&#039;input&#039;).value);
        const y = parseFloat(rows[i].cells[1].querySelector(&#039;input&#039;).value);
        if (!isNaN(x) &amp;&amp; !isNaN(y)) {
          points.push({ x, y });
        }
      }
    
      if (points.length &lt; 2) {
        alert(&quot;Please enter at least two valid data points.&quot;);
        return;
      }
    
      if (graphType === &#039;line&#039;) {
        points.sort((a, b) =&gt; a.x - b.x);
      }
    
      const padding = 40;
      const graphWidth = canvas.width - 2 * padding;
      const graphHeight = canvas.height - 2 * padding;
      const xVals = points.map(p =&gt; p.x);
      const yVals = points.map(p =&gt; p.y);
    
      const xMin = Math.min(...xVals);
      const xMax = Math.max(...xVals);
      const yMin = Math.min(0, ...yVals);
      const yMax = Math.max(...yVals);
    
      const xScale = graphWidth / (xMax - xMin || 1);
      const yScale = graphHeight / (yMax - yMin || 1);
    
      // Axes
      ctx.strokeStyle = &quot;#999&quot;;
      ctx.lineWidth = 1;
      ctx.beginPath();
      ctx.moveTo(padding, canvas.height - padding);
      ctx.lineTo(canvas.width - padding, canvas.height - padding); // X-axis
      ctx.moveTo(padding, padding);
      ctx.lineTo(padding, canvas.height - padding); // Y-axis
      ctx.stroke();
    
      if (graphType === &#039;line&#039;) {
        // ✅ Draw a single path through all sorted points
        ctx.strokeStyle = &quot;#007acc&quot;;
        ctx.lineWidth = 2;
        ctx.beginPath();
    
        points.forEach((point, i) =&gt; {
          const xCoord = padding + (point.x - xMin) * xScale;
          const yCoord = canvas.height - padding - (point.y - yMin) * yScale;
    
          if (i === 0) {
            ctx.moveTo(xCoord, yCoord);
          } else {
            ctx.lineTo(xCoord, yCoord);
          }
        });
    
        ctx.stroke(); // ⬅️ Only stroke once, after path is fully defined
    
        // ✅ Draw data points on top
        points.forEach(point =&gt; {
          const xCoord = padding + (point.x - xMin) * xScale;
          const yCoord = canvas.height - padding - (point.y - yMin) * yScale;
          ctx.fillStyle = &quot;#ff3333&quot;;
          ctx.beginPath();
          ctx.arc(xCoord, yCoord, 4, 0, 2 * Math.PI);
          ctx.fill();
        });
      }
    
      if (graphType === &#039;bar&#039;) {
        // Draw bars centered on each x
        const barWidth = Math.min(40, graphWidth / xVals.length - 10);
    
        points.forEach((point) =&gt; {
          const xCoord = padding + (point.x - xMin) * xScale - barWidth / 2;
          const yCoord = canvas.height - padding - (point.y - yMin) * yScale;
          const barHeight = (point.y - yMin) * yScale;
    
          ctx.fillStyle = &quot;#28a745&quot;;
          ctx.fillRect(xCoord, yCoord, barWidth, barHeight);
        });
      }
    }
    
    &lt;/script&gt;
    
    &lt;/body&gt;
    &lt;/html&gt;


    Interactive Demo

    Here’s a live example of the Spreadsheet Graph in action:

    HTML5 Spreadsheet Graph Demo
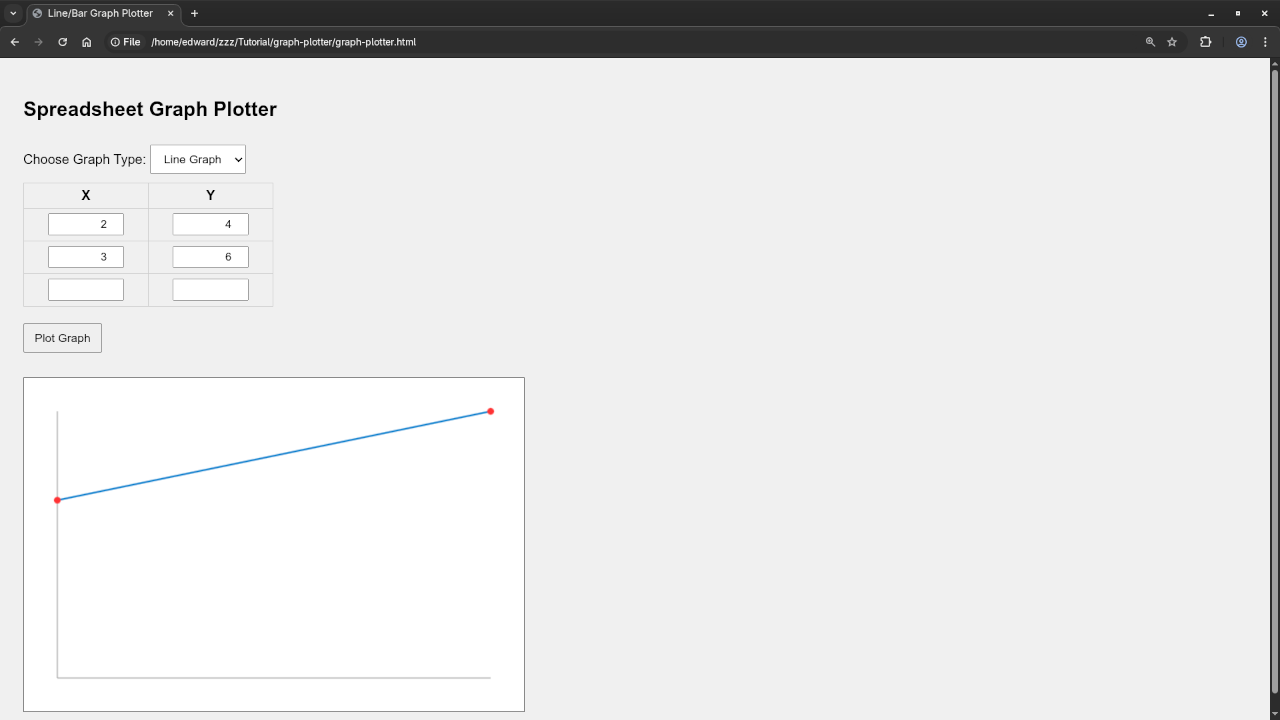
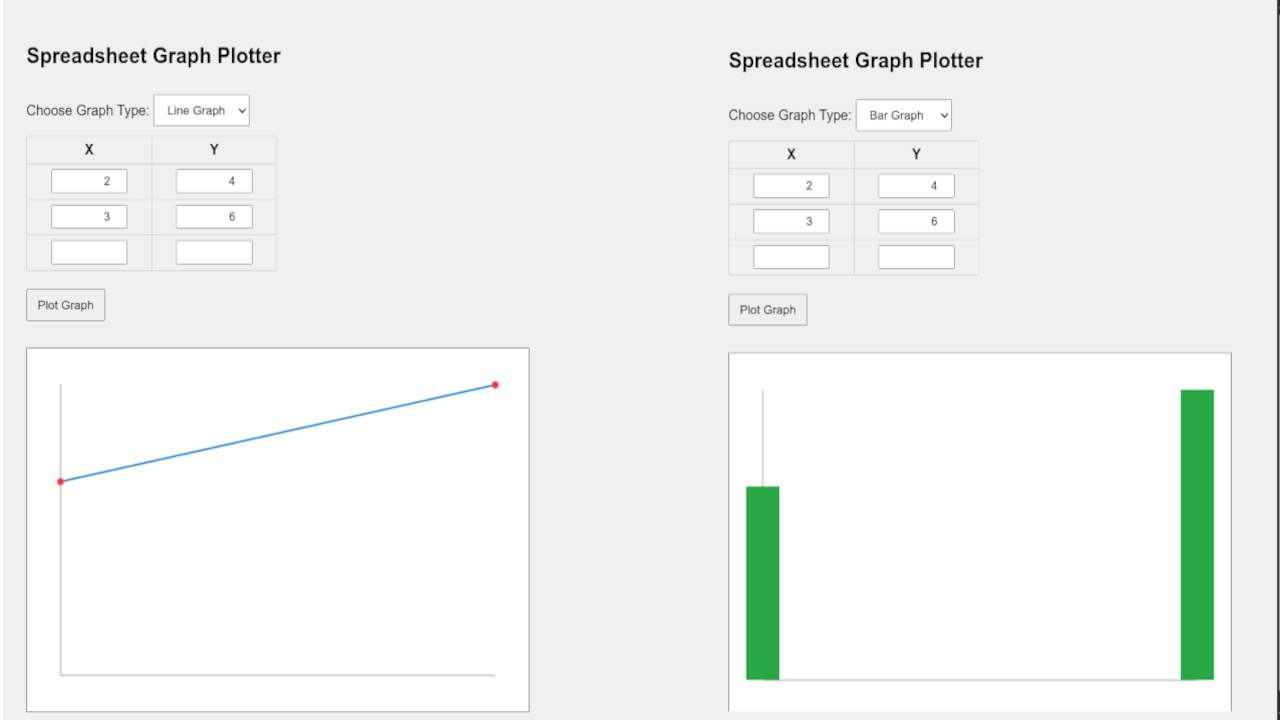
    HTML5 Line Graph
    Web Browser Displaying HTML5 Spreadsheet Line Graph

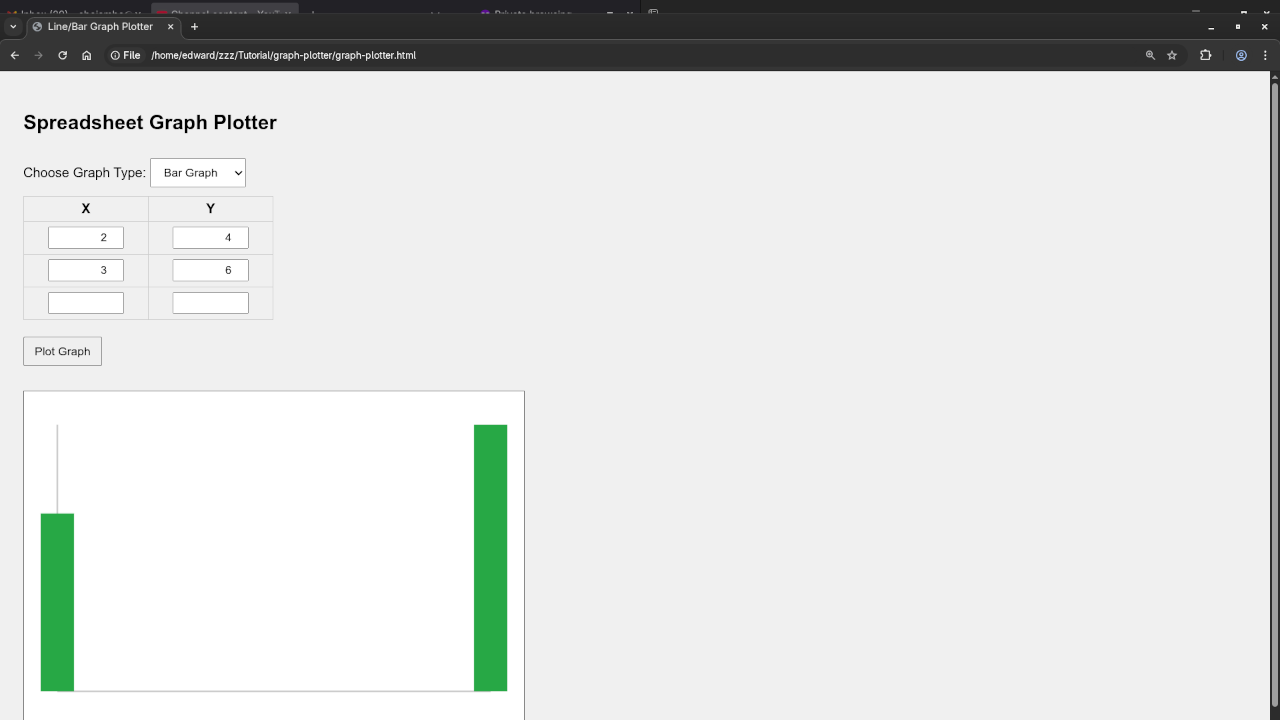
    HTML5 Bar Graph
    Web Browser Displaying HTML5 Spreadsheet Bar Graph

    HTML5 Spreadsheet Graph Video

    📚 Want to Learn JavaScript More Deeply?

    Check out my beginner-friendly book:
    📖 Learning JavaScript – A Beginner’s Guide

    Whether you’re starting fresh or revisiting JavaScript, this book is a solid companion.

    Also, explore my full course here:
    🎓 Learning JavaScript – Online Course

    👨‍🎓 Need Help or 1-on-1 Tutoring?

    I’m available for personalized programming tutorials — including HTML5, CSS, JavaScript, and more.
    📧 Contact me here to book a session.

    🔁 What’s Next?

    In future tutorials, I’ll cover:

    • Adding axis labels and gridlines
    • Exporting graphs as images
    • Saving input data to local storage or files

    💬 Questions?

    Have any questions or feedback? Leave a comment below or reach out through the contact form.

    Happy coding!

  • Generate Low-Poly Table With Blender Python API For Website

    Generate Low-Poly Table With Blender Python API For Website

    How to Create a Procedural Textured Low Poly Table in Blender using Python and Display it in the Web Browser

    In this beginner-friendly tutorial, we will walk through the steps of creating a procedural textured low-poly table using Blender’s Python API. You’ll learn how to generate the model, apply a wood texture, export it as a .glb file, and display it in a web browser using the <model-viewer> tag. This guide is perfect for those starting with 3D modeling in Blender and web development!

    Step 1: Create the Low Poly Table in Blender using Python

    First, we will create a basic low-poly table using Python and Blender’s scripting interface. Open Blender, navigate to the Scripting tab, and copy-paste the following Python script:


    import bpy
    
    # Clear the scene
    bpy.ops.object.select_all(action=&#039;SELECT&#039;)
    bpy.ops.object.delete(use_global=False)
    
    # Create the table top (a cube)
    bpy.ops.mesh.primitive_cube_add(size=2, location=(0, 0, 1))
    table_top = bpy.context.object
    table_top.scale = (2, 1, 0.1)  # Rectangular shape
    table_top.name = &quot;TableTop&quot;
    
    # Create the four table legs (cylinders)
    leg_height = 2
    leg_radius = 0.1
    legs = []
    
    for x, y in [(-1.5, 0.75), (1.5, 0.75), (-1.5, -0.75), (1.5, -0.75)]:
        bpy.ops.mesh.primitive_cylinder_add(radius=leg_radius, depth=leg_height, location=(x, y, leg_height / 2))
        leg = bpy.context.object
        leg.name = f&quot;Leg_{x}_{y}&quot;
        legs.append(leg)
    
    # Create a procedural wood material for the table
    wood_material = bpy.data.materials.new(name=&quot;WoodMaterial&quot;)
    wood_material.use_nodes = True
    nodes = wood_material.node_tree.nodes
    links = wood_material.node_tree.links
    
    # Clear default nodes and set up the texture
    for node in nodes:
        nodes.remove(node)
    
    # Add a noise texture for wood grain
    noise_texture = nodes.new(type=&#039;ShaderNodeTexNoise&#039;)
    noise_texture.inputs[&#039;Scale&#039;].default_value = 5
    
    # Add a color ramp for the texture
    color_ramp = nodes.new(type=&#039;ShaderNodeValToRGB&#039;)
    links.new(noise_texture.outputs[&#039;Fac&#039;], color_ramp.inputs[&#039;Fac&#039;])
    color_ramp.color_ramp.elements.new(0.7)
    color_ramp.color_ramp.elements[0].color = (0.4, 0.2, 0.1, 1)  # Dark brown
    color_ramp.color_ramp.elements[1].color = (0.8, 0.6, 0.3, 1)  # Lighter wood color
    
    # Connect to the diffuse shader
    diffuse_shader = nodes.new(type=&#039;ShaderNodeBsdfDiffuse&#039;)
    links.new(color_ramp.outputs[&#039;Color&#039;], diffuse_shader.inputs[&#039;Color&#039;])
    
    # Output the material
    material_output = nodes.new(type=&#039;ShaderNodeOutputMaterial&#039;)
    links.new(diffuse_shader.outputs[&#039;BSDF&#039;], material_output.inputs[&#039;Surface&#039;])
    
    # Apply the material to the table top
    table_top.data.materials.append(wood_material)
    
    # Apply a simple gray material to the table legs
    leg_material = bpy.data.materials.new(name=&quot;LegMaterial&quot;)
    leg_material.use_nodes = True
    nodes = leg_material.node_tree.nodes
    links = leg_material.node_tree.links
    
    for node in nodes:
        nodes.remove(node)
    
    diffuse_shader = nodes.new(type=&#039;ShaderNodeBsdfDiffuse&#039;)
    diffuse_shader.inputs[&#039;Color&#039;].default_value = (0.5, 0.5, 0.5, 1)
    material_output = nodes.new(type=&#039;ShaderNodeOutputMaterial&#039;)
    links.new(diffuse_shader.outputs[&#039;BSDF&#039;], material_output.inputs[&#039;Surface&#039;])
    
    # Assign material to legs
    for leg in legs:
        leg.data.materials.append(leg_material)
    
    # Apply smooth shading
    bpy.ops.object.shade_smooth()
    
    # Export the model as a .glb file
    output_path = &quot;/path/to/your/output/table_model.glb&quot;  # Replace with your desired path
    bpy.ops.export_scene.gltf(filepath=output_path, export_format=&#039;GLB&#039;)
    
    print(f&quot;Procedural low-poly table exported to {output_path}&quot;)


    Step 2: Export the Model as a .glb File

    Once you run the script, Blender will automatically export the model as a .glb file. The .glb format is perfect for use on the web because it retains both the geometry and materials in a compact format.

    To run the Python script:

    1. Open Blender and switch to the Scripting tab.
    2. Paste the script into the text editor.
    3. Click Run Script.

    Make sure to replace "/path/to/your/output/table_model.glb" with the actual path where you want to save the .glb file.

    Step 3: Display the Model in a Web Browser Using the <model-viewer> Tag

    Once you have your .glb file, it’s easy to display it on any webpage using the <model-viewer> tag. Here’s a simple HTML template that you can use:


    &lt;!DOCTYPE html&gt;
    &lt;html lang=&quot;en&quot;&gt;
    &lt;head&gt;
        &lt;meta charset=&quot;UTF-8&quot;&gt;
        &lt;meta name=&quot;viewport&quot; content=&quot;width=device-width, initial-scale=1.0&quot;&gt;
        &lt;title&gt;3D Table Display&lt;/title&gt;
        &lt;script type=&quot;module&quot; src=&quot;https://cdn.skypack.dev/@google/model-viewer&quot;&gt;&lt;/script&gt;
    &lt;/head&gt;
    &lt;body&gt;
    
    &lt;model-viewer src=&quot;path/to/your/model.glb&quot; alt=&quot;Procedural low-poly table&quot; auto-rotate camera-controls&gt;&lt;/model-viewer&gt;
    
    &lt;/body&gt;
    &lt;/html&gt;


    Make sure to replace path/to/your/model.glb with the actual location of your exported .glb file. When you open the HTML file in a browser, the 3D table will be displayed, and you can interact with it using the mouse.

    Screenshots and Screencast

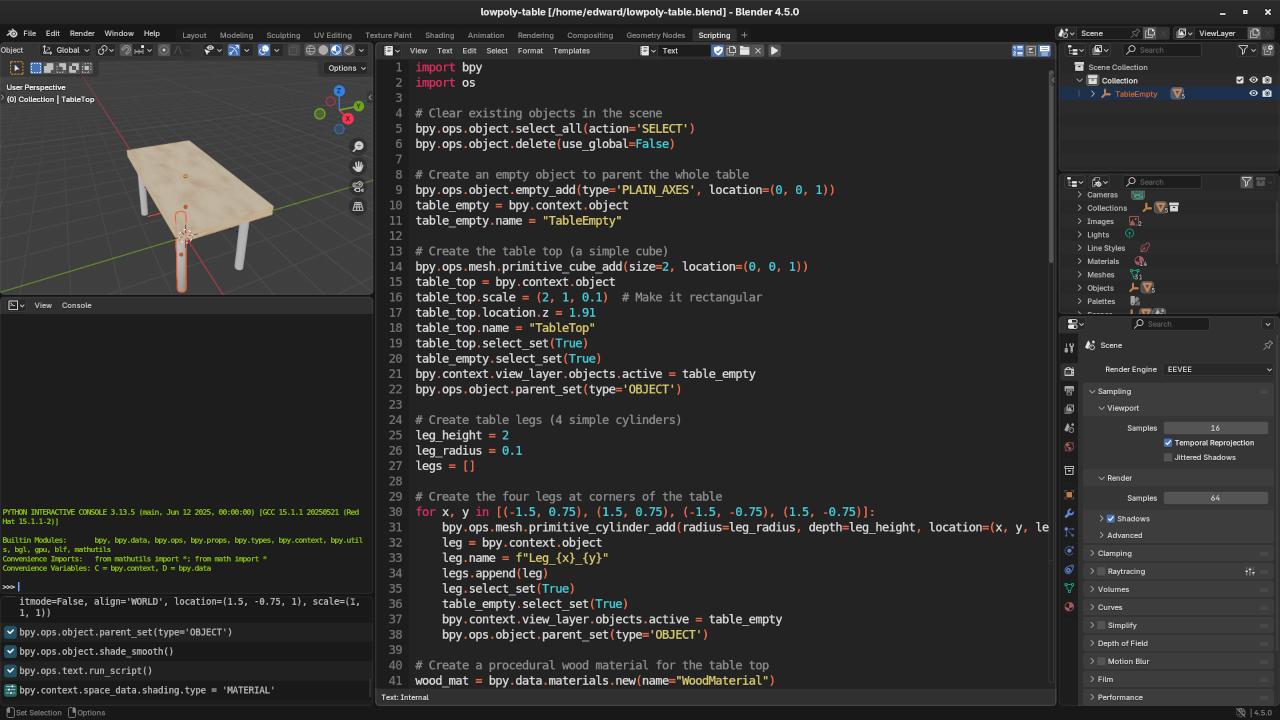
    Low poly table Python code
    Blender Scripting Workspace Displaying Low Poly Table Python Code

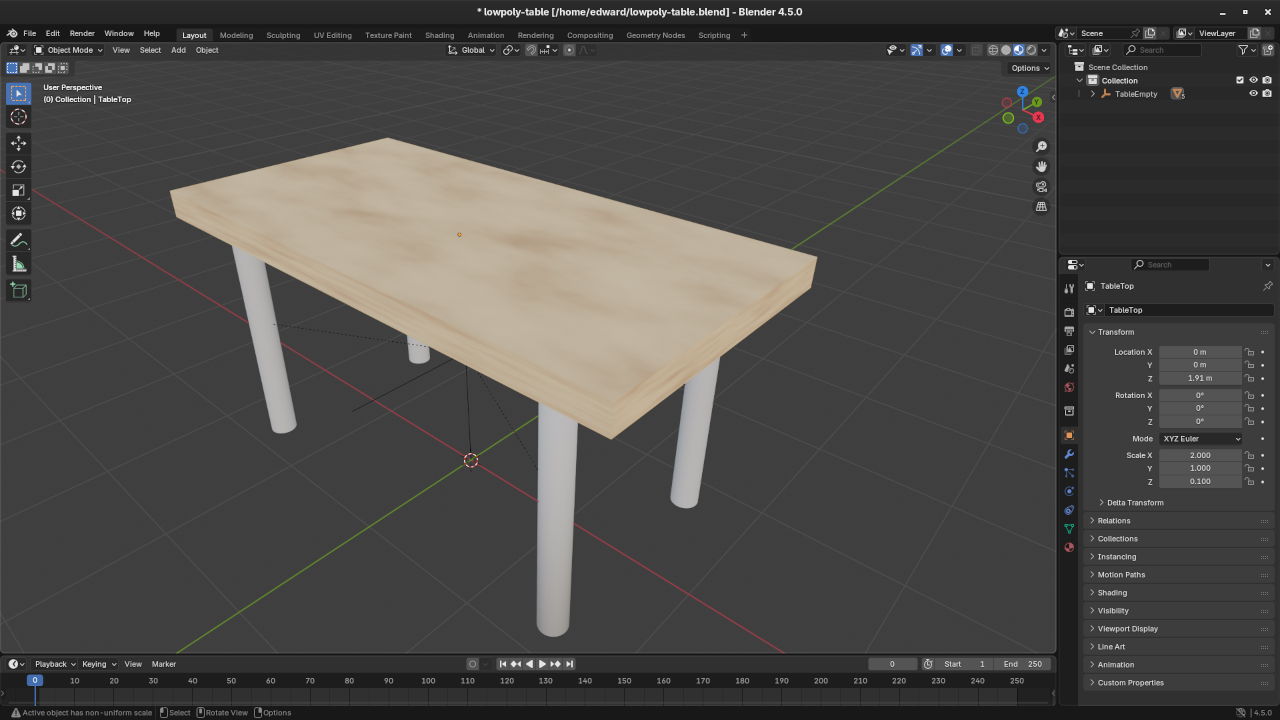
    Low poly table in Blender
    Blender Layout Workspace Displaying Low Poly Table

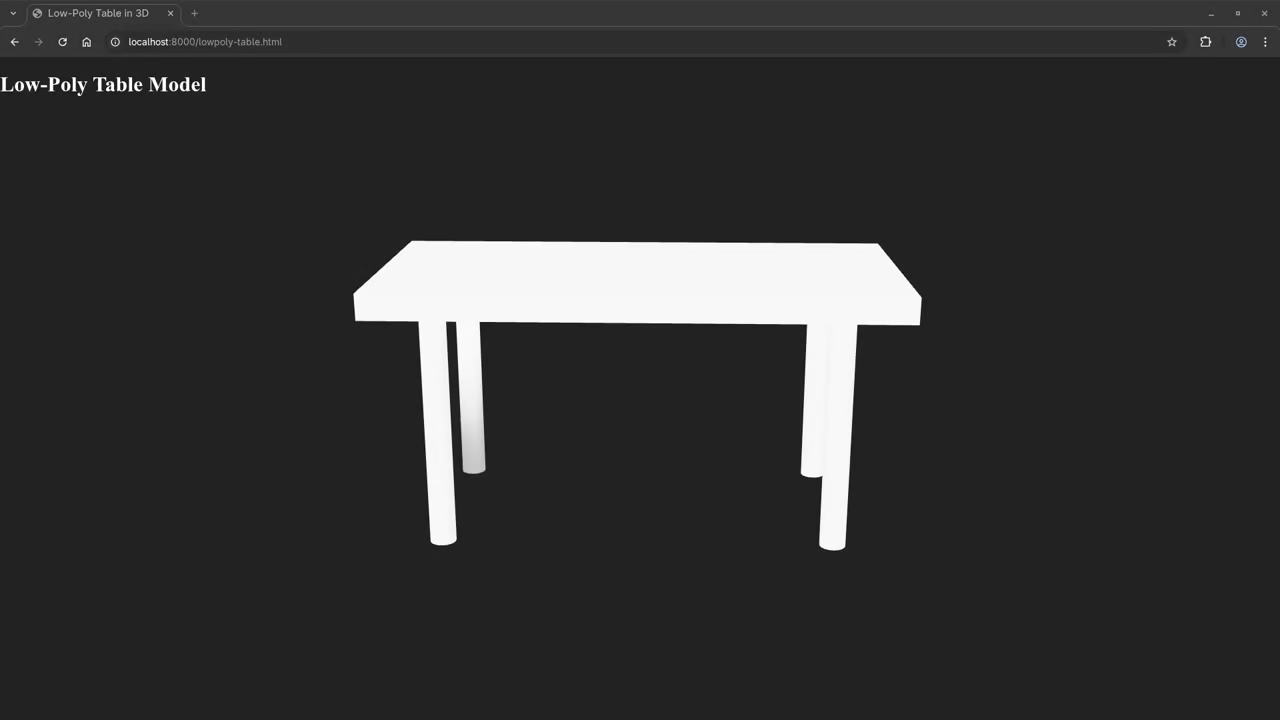
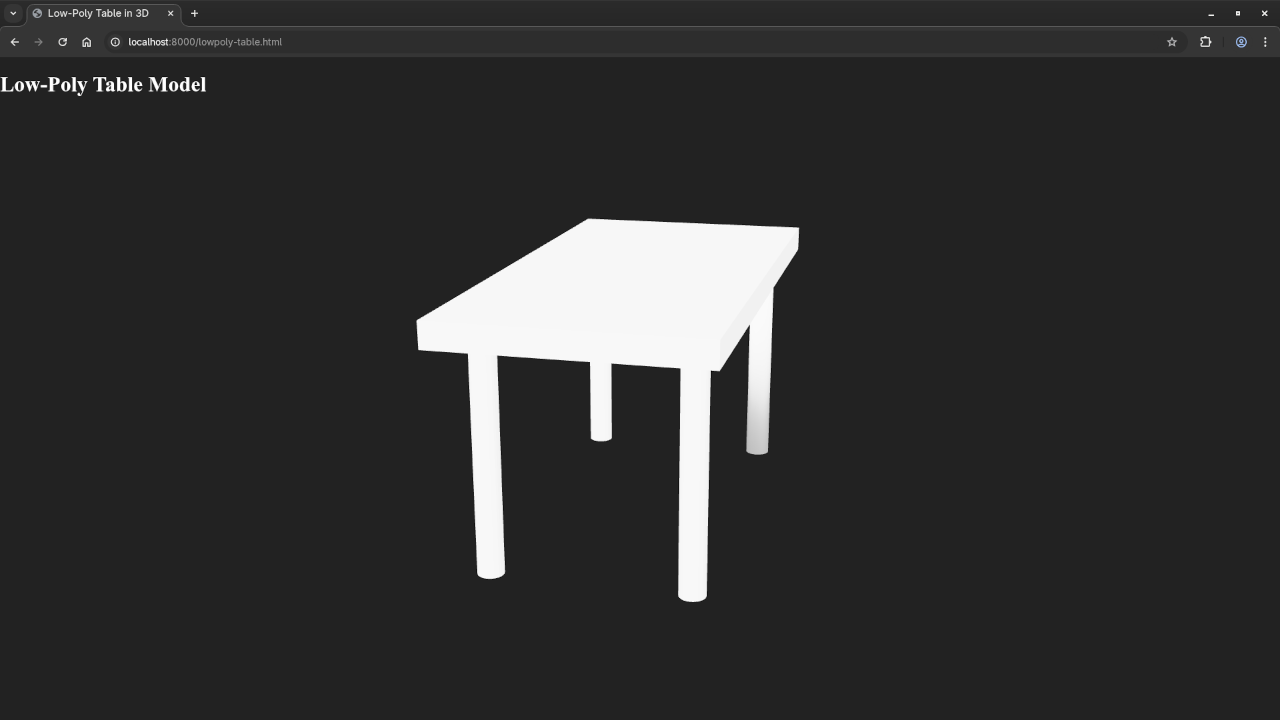
    Low poly table in Web browser
    Web Browser Displaying Rendered Low Poly Table

    Screencast For Blender Python API Low Poly Textured Table

    Resources

    If you want to dive deeper into Python and Blender scripting, here are some great resources to check out:

    Final Thoughts

    Congratulations! You’ve successfully learned how to create a procedural low-poly table using Blender and Python. You’ve also learned how to export the model and display it in a web browser using the <model-viewer> tag. This is just the beginning of what you can create with Blender, Python, and web development. Keep experimenting, and stay tuned for more tutorials!