Blog

  • Review Generative AI Orca Mini 3B Model

    Review Generative AI Orca Mini 3B Model

    How to Run Orca Mini 3B on Your Machine Using the Alpaca Ollama Client

    If you’ve ever wanted to explore local AI models without needing expensive cloud infrastructure, the Orca Mini 3B model is a great starting point. It’s a compact and efficient open source Large Language Model (LLM) designed for general-purpose tasks.

    In this post, we’ll guide you through how to run Orca Mini 3B using the Alpaca Ollama client by Jeffser, an intuitive local LLM manager.

    What is Orca Mini 3B?

    Orca Mini 3B is a 3-billion-parameter instruction-tuned model built on OpenLLaMA, trained using explain-tuned datasets like WizardLM, Alpaca, and Dolly-V2, and applying methodologies from the Orca research paper.

    Open Source and Licensing

    Orca Mini 3B is open source and released under the Creative Commons Attribution-NonCommercial-ShareAlike 4.0 International (CC-BY-NC-SA 4.0) license. You are free to use, modify, and redistribute it, provided you give proper attribution, do not use it for commercial purposes, and release any derivatives under the same license.

    Getting Started with Alpaca Ollama

    The Alpaca Ollama client is an open source UI and command-line interface designed to simplify working with local LLMs. With Alpaca, you can install and run models like Orca Mini 3B with minimal setup.

    Key Features

    • Easy installation of models
    • Offline/local use
    • Visual chat UI
    • Supports GPU and CPU (depending on your hardware)

    🖼️ Screenshots and Screencast

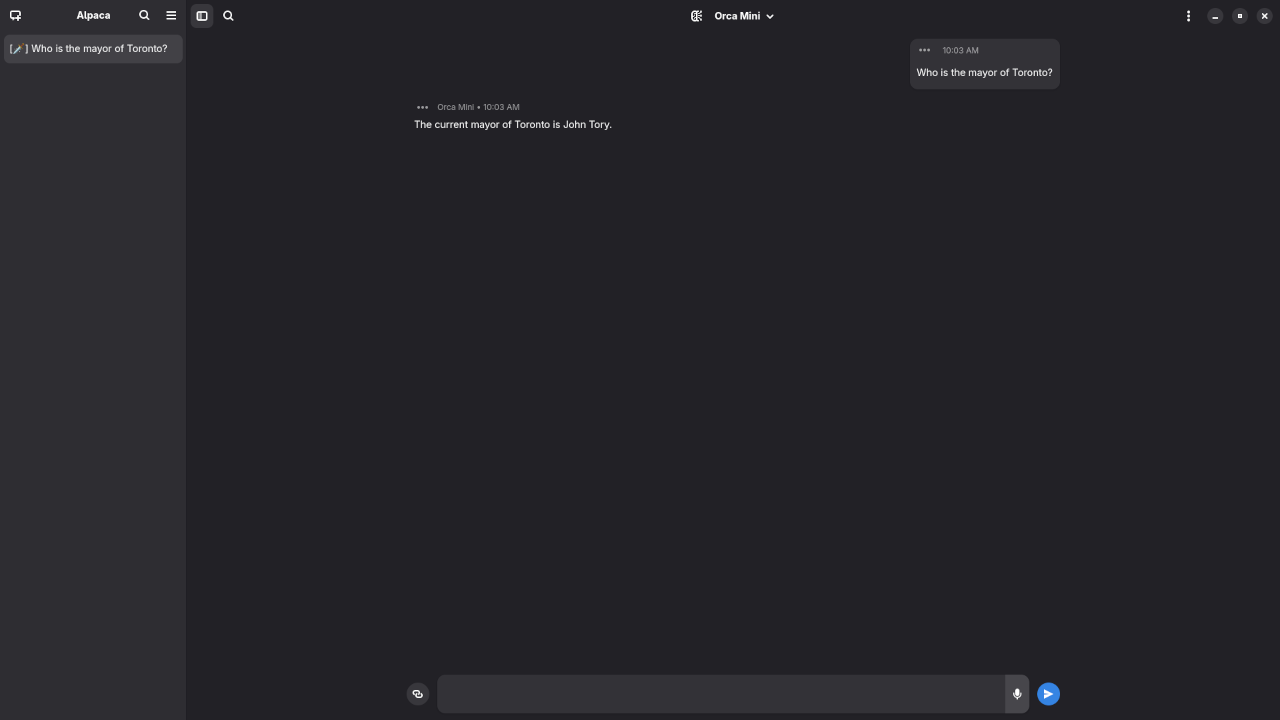
    Orca Mini 3B answered question about the Mayor
    Command Line Orca Mini 3B Answered Mayor Of Toronto Request.

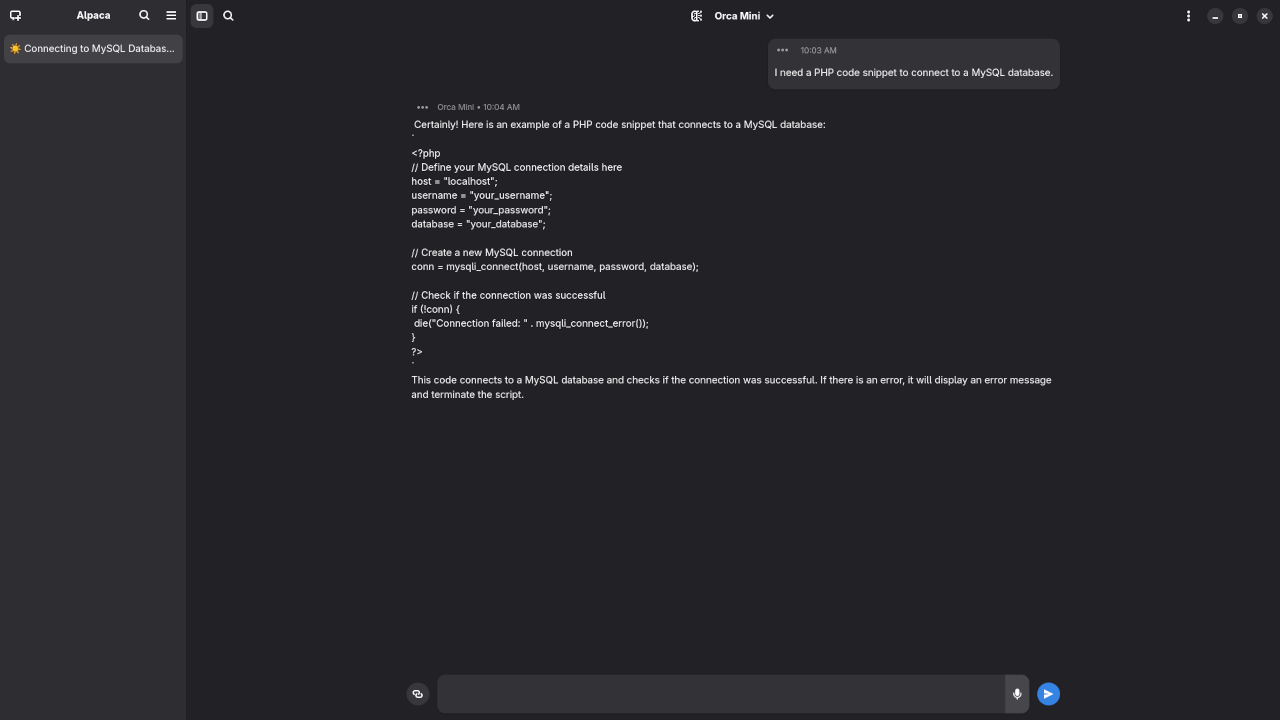
    Orca Mini 3B answered question about PHP code
    Command Line Orca Mini 3B Answered PHP Code Request.

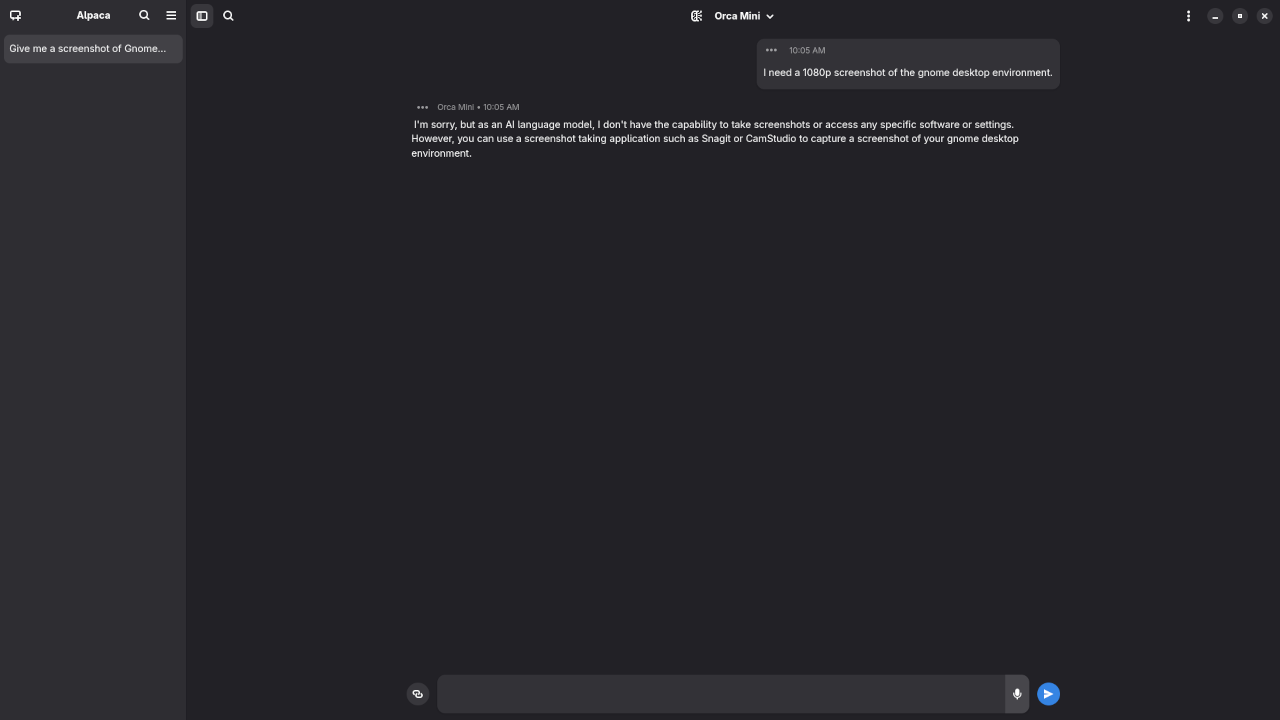
    Orca Mini 3B answered question about screenshot
    Command Line Orca Mini 3B Answered Gnome Desktop Screenshot Request.

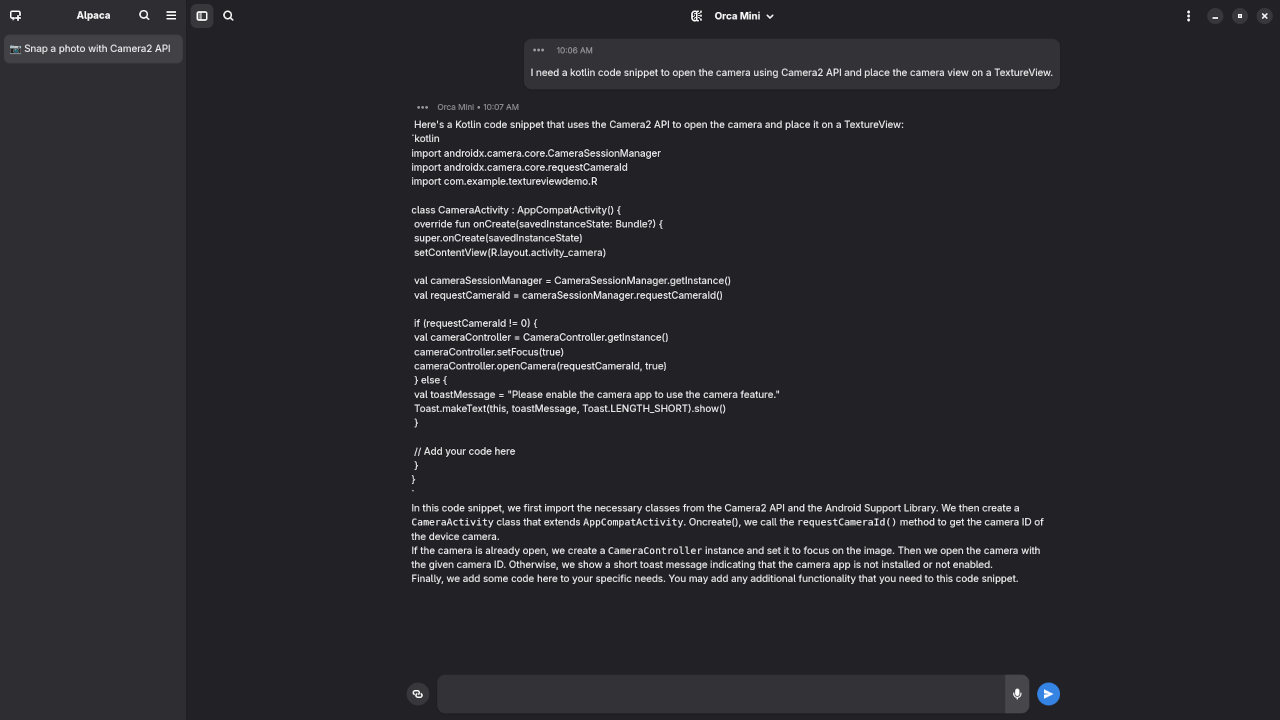
    Orca Mini 3B answered request for Kotlin code
    Orca Mini 3B Answered Kotlin Code Request.

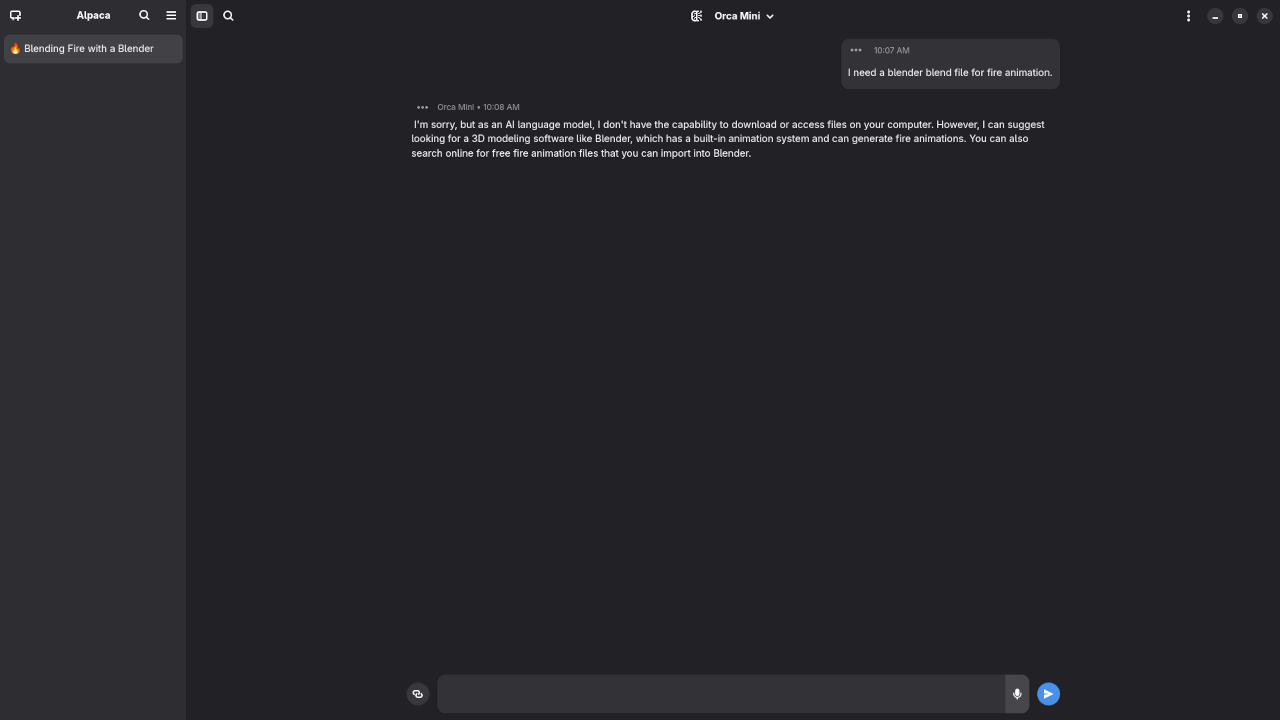
    Orca Mini 3B answered request for Blender Blend File
    Orca Mini 3B Answered Blender Blend File Request.

    Video Displaying Using Orca Mini 3B In Alpaca Ollama Client

    Results:

    Who is the mayor of Toronto?

    Produced inaccurate outdated answer to Olivia Chow as the mayor of Toronto.

    I need a PHP code snippet to connect to a MySQL database.

    Produce incorrect syntax PHP code snippet to connect to a MySQL database.

    I need a 1080p screenshot of the gnome desktop environment.

    Accurately provided instructions to generate a 1080p screenshot of Gnome desktop environment because it is a text-based AI lacking ability.

    I need a kotlin code snippet to open the camera using Camera2 API and place the camera view on a TextureView.

    Produced incomplete Kotlin code snippet.

    I need a blender blend file for fire animation.

    Accurated detected inability to generate Blender Blend file for a fire animation because it is a text-based AI lacking ability.

    Want to Learn Python First?

    If you’re just getting started with Python and want to build a strong foundation before diving into LLMs, check out my book and course:

    One-on-One Python Tutorials Available

    Need help with Python or want to integrate Orca Mini 3B into your workflow? I offer personalized online tutorials:

    Book a Python Tutorial

    Orca Mini 3B Installation or Migration Help

    Whether you’re setting up Orca Mini 3B for the first time or want to move it to a new system, I can help:

    Get LLM Setup Help

    Final Thoughts

    Running your own LLM like Orca Mini 3B puts powerful AI tools in your hands-right on your own device. With tools like Alpaca, you don’t need to be a machine learning expert to get started. Pair it with Python and the right guidance, and the possibilities are endless.

  • Post-Unboxing: AMD Instinct Mi60 Shroud And Fan

    Post-Unboxing: AMD Instinct Mi60 Shroud And Fan

    Unboxing the AMD Instinct Mi60 Shroud & Fan: Is It Worth Buying Used in 2025 for Blender & AI?

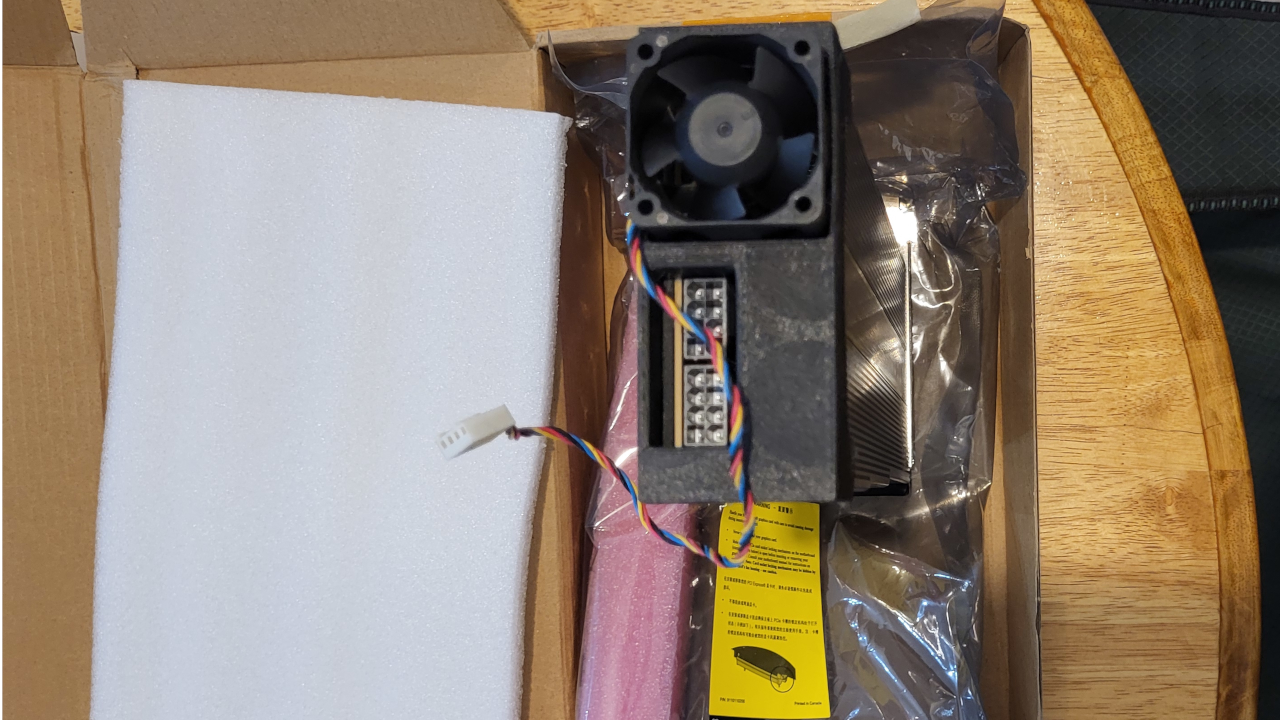
    In this post, I will walk you through the unboxing and first impressions of the AMD Instinct Mi60 GPU cooling fan and shroud, which I purchased used from eBay for my Blender and AI development workstation in 2025. You can find the exact item here: AMD GPU Cooling Fan Shroud for Mi50 / Mi60 on eBay

    My 2025 Workstation Build

    Here is a breakdown of my current workstation, which was upgraded to support the AMD Instinct Mi60 GPU thanks to the arrival of the aftermarket shroud and fan:

    Component Description
    Case Deepcool Tesseract BF (with 1 original fan)
    Additional Cooling 5x Thermalright TL-S12 120mm Case Fans
    Motherboard Used MSI B550-A PRO ProSeries
    RAM 32 GB Timetec DDR4 2133 MHz (2×16 GB)
    CPU AMD Ryzen 5 5600GT (with integrated graphics)
    Power Supply SAMA G850W ATX 3.1
    GPU AMD Instinct Mi60 with newly installed shroud and fan

    Note: The Mi60 was passively cooled until I installed the shroud. It is now actively cooled and runs much more reliably under Blender and AI workloads.

    Unboxing & First Impressions

    Although the listing described it as an “AMD GPU Cooling Fan Shroud Mi50 RADEON INSTINCT Accelerator Card EXTRA SMALL AI”, it fit perfectly on my Mi60 card.

    • Build Quality: Solid aluminum construction with a compact footprint
    • Cooling: Once installed, airflow improved drastically
    • Fitment: Seamless installation on the Mi60 with the existing screw points

    Theoretical Benchmark Comparison

    Below is a comparison of the AMD Instinct Mi60 (32 GB HBM2) versus an EVGA GeForce GTX 950 (2 GB GDDR5), showing their theoretical compute capabilities and representative synthetic benchmark scores.

    Metric AMD Instinct Mi60 EVGA GTX 950
    FP32 (single precision) ~14.75 TFLOPS (Not specified, but substantially lower)
    FP64 (double precision) ~7.37 TFLOPS (Negligible / minimal)
    Memory Bandwidth ~1024 GB/s (1 TB/s) ~105.8 GB/s
    CompuBench Face Detection Not listed ~60 mPixels/s
    CompuBench Ocean Surface Sim. Not listed ~759 FPS
    CompuBench T-Rex (FPS) Not listed ~4.3 FPS

    The Mi60 offers orders of magnitude more compute power and VRAM—especially critical for large Blender scenes or AI workloads—while the GTX 950 is severely constrained by its 2 GB VRAM and limited bandwidth. The Mi60 is clearly the superior choice if you can manage cooling and drivers.

    Live Screencast & Screenshots

    Below, you will find combined screenshots of:

    • The unboxing
    • Case airflow configuration
    • Blender GPU preferences showing the Mi60
    • ROCm test setup for AI inference

    Screenshots And Screencast

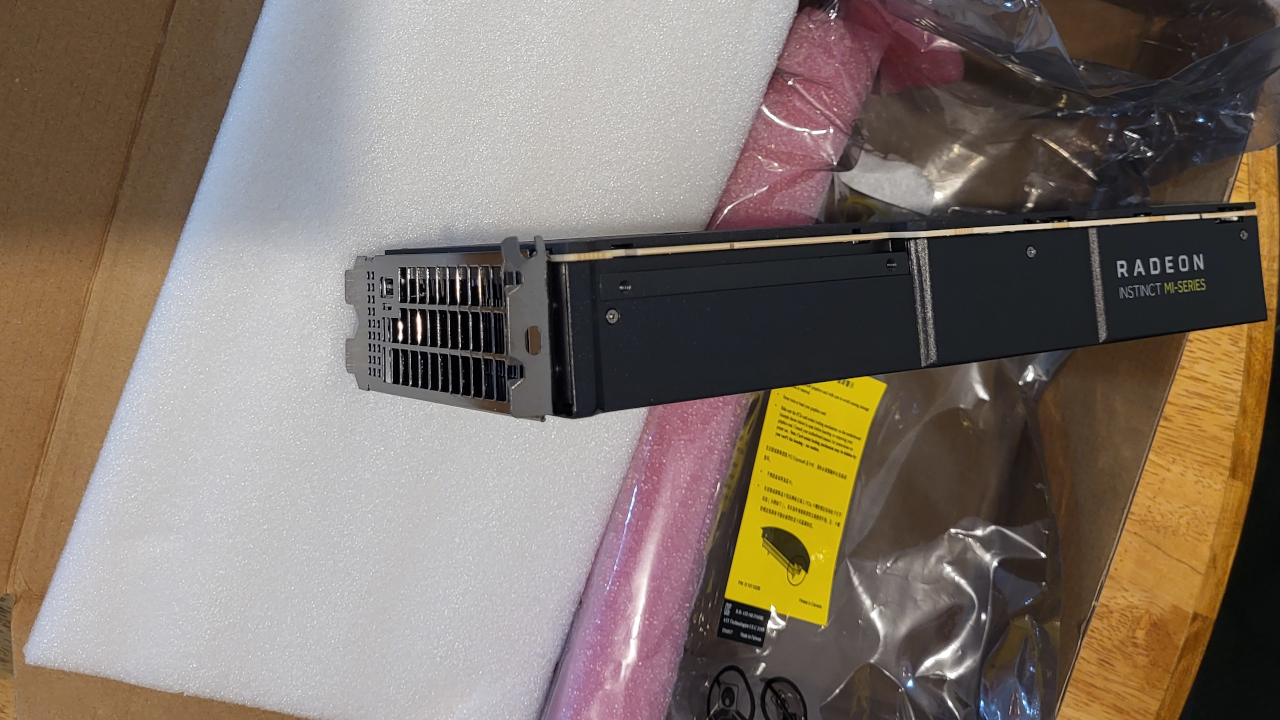
    AMD Instinct MI60
    AMD Instinct MI60 32GB HBM2 GPU

    AMD Instinct MI50 Shroud And Fan
    AMD Instinct MI60 Fitted With Shroud And Fan

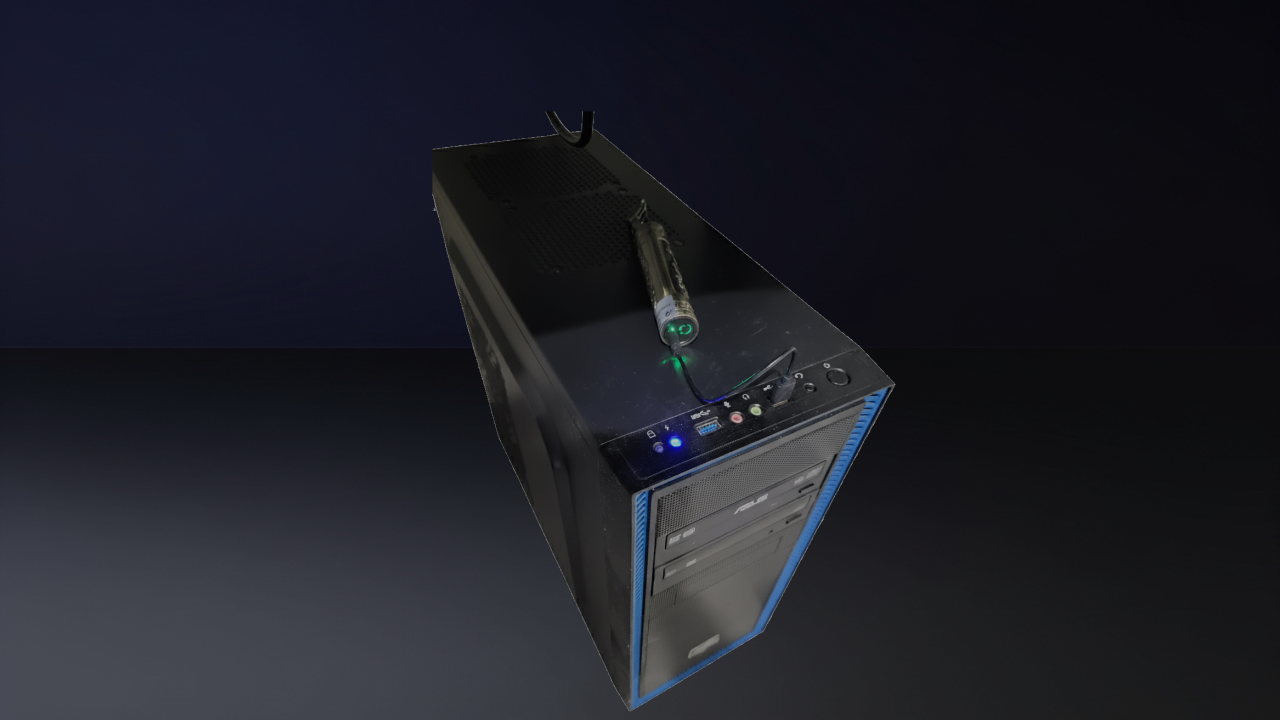
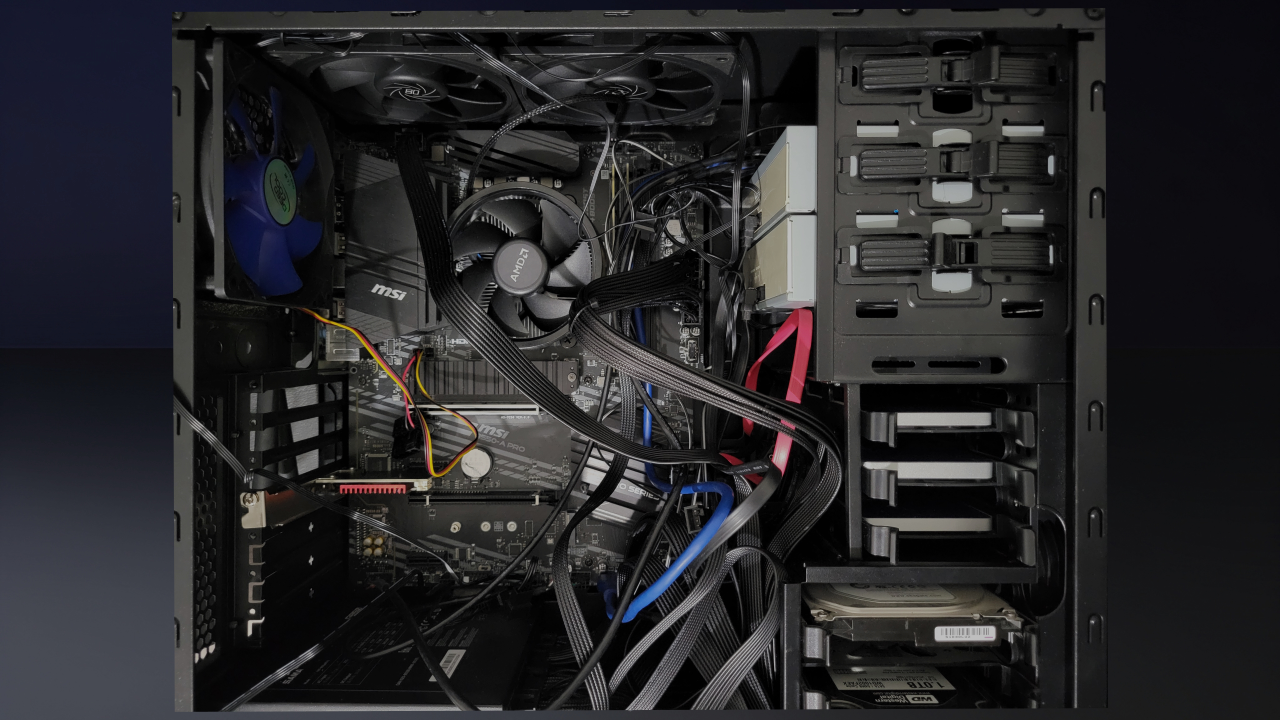
    Deepcool Tesseract BF Uncovered
    Deepcool Tesseract BF Case Side Cover Removed

    Screencast showing setup on Fedora 42, system detection, system stats

    Is the Mi60 Worth Buying Used in 2025?

    Yes, with some caveats. Here is how it performs in my build:

    Feature Verdict
    Blender Rendering Excellent with HIP support
    AI Model Training Good with ROCm – less mainstream than NVIDIA
    Cooling Great with added airflow from TL-S12 fans
    Software Support Needs ROCm (best on Ubuntu LTS)
    Value Fantastic if bought used and properly cooled

    Want to Learn More?

    If you are learning Python for AI, scripting in Blender, or GPU programming, I have published the following:

    You can also enroll in my online course:

    One-on-One Python, Blender & AI Support

    I also offer personalized 1-on-1 online tutorials and services, including:

    • Python programming basics to advanced
    • Blender scripting and automation
    • Setting up and using AMD GPUs for AI
    • ROCm installation and migration from CUDA

    Contact me to book a session

    Let’s Chat

    Have you tried building with used server GPUs like the Mi60? Would you consider installing your own fan shroud to save money? Leave your thoughts in the comments.

  • PHP Database PDO For Custom CRUD MVC App

    PHP Database PDO For Custom CRUD MVC App

    Getting Started with PHP PDO Using MVC: Connect to MariaDB and Perform CRUD

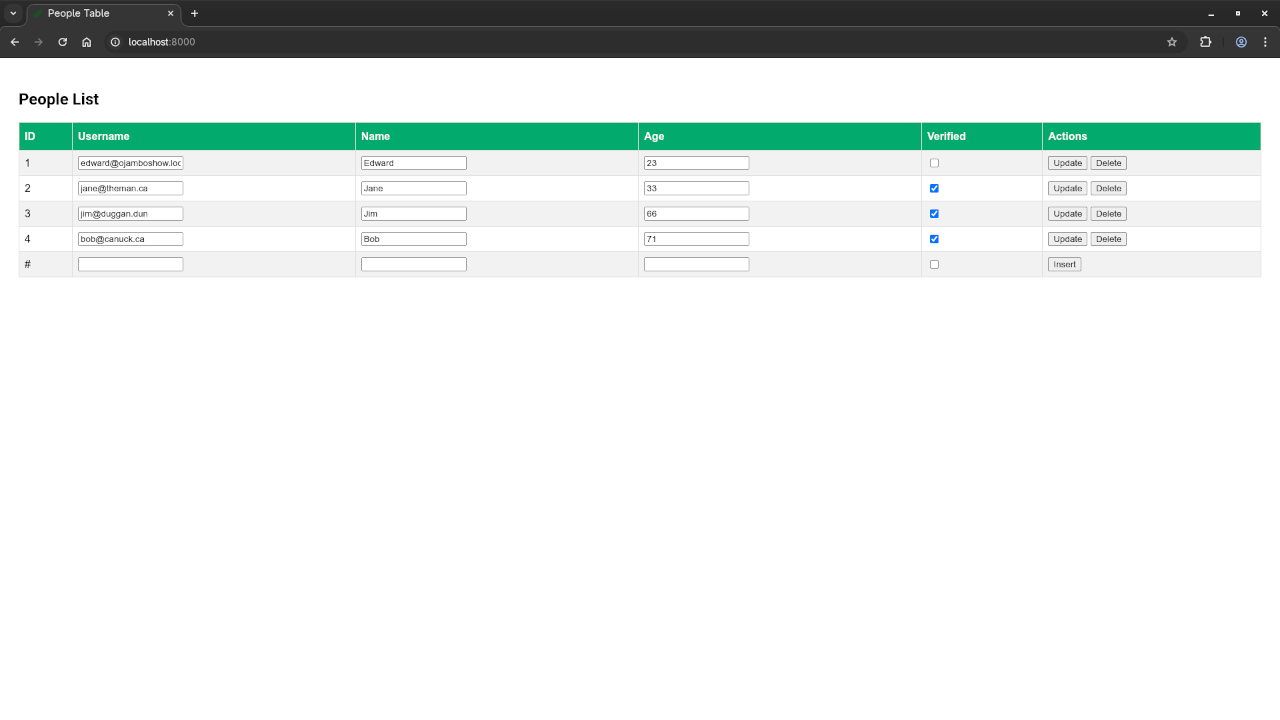
    Learning how to connect PHP to a MariaDB database using PDO (PHP Data Objects) is a fundamental skill for beginner developers. In this post, we’ll create a basic MVC (Model-View-Controller) application that connects to an existing MariaDB table called people, and allows us to:

    • Display all people in an HTML table
    • Insert new records
    • Update existing records
    • Delete records

    This is a beginner-friendly project and a great way to start learning modern PHP development practices.

    Requirements

    • PHP 8.2 or higher
    • MariaDB (or MySQL)
    • Apache/Nginx or localhost setup (e.g., XAMPP, MAMP)
    • Basic knowledge of HTML & PHP

    Database Structure

    You’ll need a table named people with the following columns:

    Column Type
    id INT, AUTO_INCREMENT, PRIMARY KEY
    username VARCHAR(50)
    name VARCHAR(100)
    age INT
    verified BOOLEAN

    Project Structure

    /people-mvc/
    ├── config/
    │   └── database.php
    ├── controllers/
    │   └── PeopleController.php
    ├── models/
    │   └── Person.php
    ├── views/
    │   └── people.php
    ├── index.php
    └── style.css
    

    1. Database Connection (PDO)

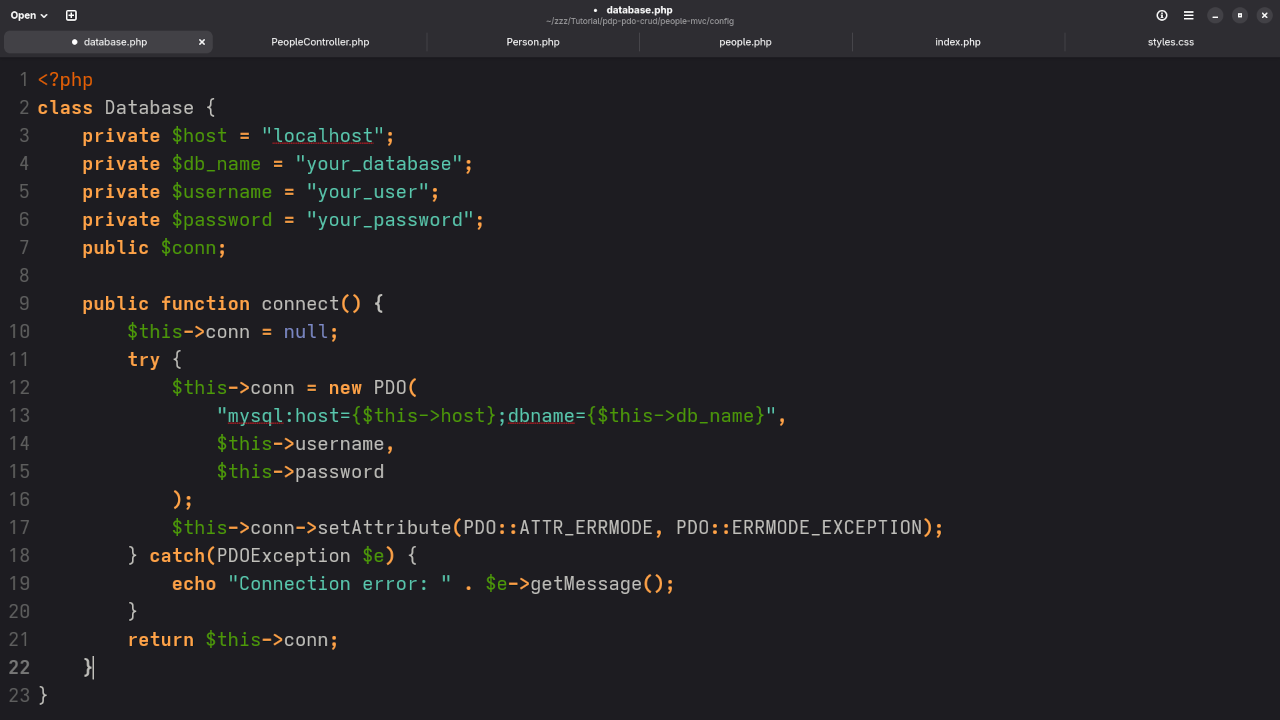
    config/database.php


    class Database {
        private $host = "localhost";
        private $db_name = "your_database";
        private $username = "your_user";
        private $password = "your_password";
        public $conn;
    
        public function connect() {
            $this->conn = null;
            try {
                $this->conn = new PDO(
                    "mysql:host={$this->host};dbname={$this->db_name}",
                    $this->username,
                    $this->password
                );
                $this->conn->setAttribute(PDO::ATTR_ERRMODE, PDO::ERRMODE_EXCEPTION);
            } catch(PDOException $e) {
                echo "Connection error: " . $e->getMessage();
            }
            return $this->conn;
        }
    }


    2. Person Model

    models/Person.php


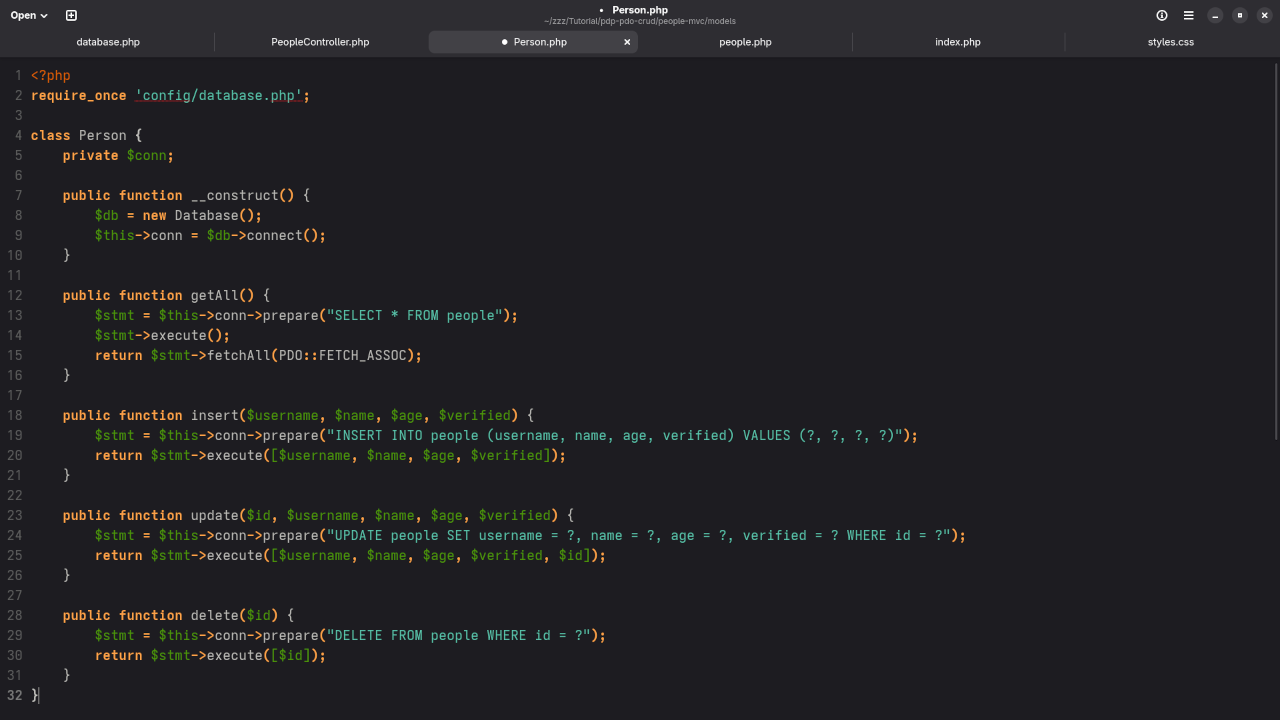
    require_once 'config/database.php';
    
    class Person {
        private $conn;
    
        public function __construct() {
            $db = new Database();
            $this->conn = $db->connect();
        }
    
        public function getAll() {
            $stmt = $this->conn->prepare("SELECT * FROM people");
            $stmt->execute();
            return $stmt->fetchAll(PDO::FETCH_ASSOC);
        }
    
        public function insert($username, $name, $age, $verified) {
            $stmt = $this->conn->prepare("INSERT INTO people (username, name, age, verified) VALUES (?, ?, ?, ?)");
            return $stmt->execute([$username, $name, $age, $verified]);
        }
    
        public function update($id, $username, $name, $age, $verified) {
            $stmt = $this->conn->prepare("UPDATE people SET username = ?, name = ?, age = ?, verified = ? WHERE id = ?");
            return $stmt->execute([$username, $name, $age, $verified, $id]);
        }
    
        public function delete($id) {
            $stmt = $this->conn->prepare("DELETE FROM people WHERE id = ?");
            return $stmt->execute([$id]);
        }
    }


    3. Controller Logic

    controllers/PeopleController.php


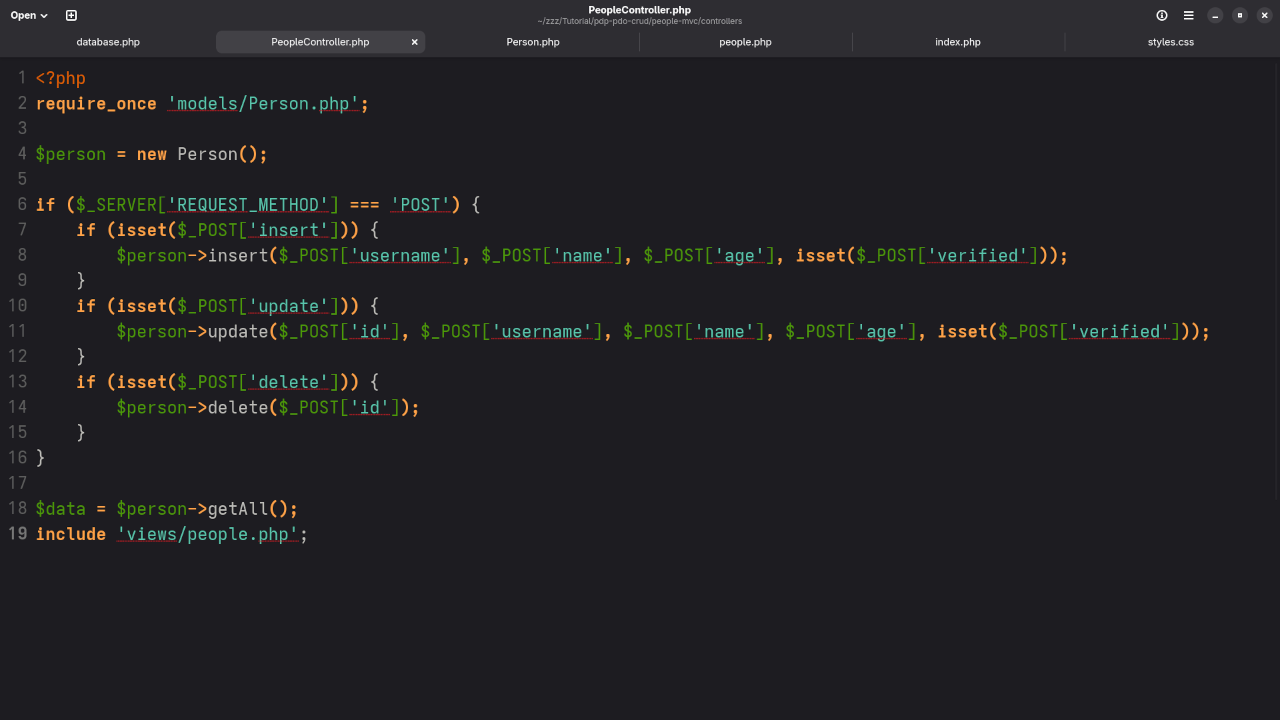
    require_once 'models/Person.php';
    
    $person = new Person();
    
    if ($_SERVER['REQUEST_METHOD'] === 'POST') {
        if (isset($_POST['insert'])) {
            $person->insert($_POST['username'], $_POST['name'], $_POST['age'], isset($_POST['verified']));
        }
        if (isset($_POST['update'])) {
            $person->update($_POST['id'], $_POST['username'], $_POST['name'], $_POST['age'], isset($_POST['verified']));
        }
        if (isset($_POST['delete'])) {
            $person->delete($_POST['id']);
        }
    }
    
    $data = $person->getAll();
    include 'views/people.php';


    4. View (HTML Table Output)

    views/people.php


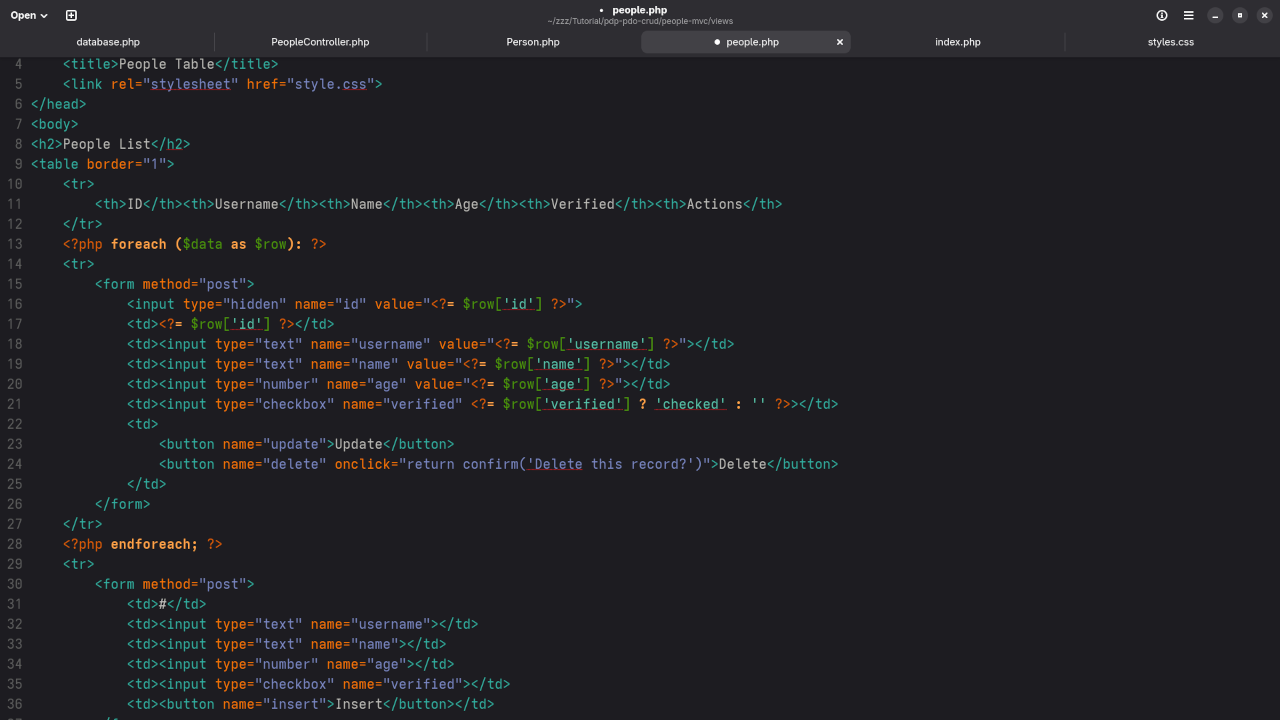
    <!DOCTYPE html>
    <html>
    <head>
        <title>People Table</title>
        <link rel="stylesheet" href="style.css">
    </head>
    <body>
    <h2>People List</h2>
    <table border="1">
        <tr>
            <th>ID</th><th>Username</th><th>Name</th><th>Age</th><th>Verified</th><th>Actions</th>
        </tr>
        <?php foreach ($data as $row): ?>
        <tr>
            <form method="post">
                <input type="hidden" name="id" value="<?= $row['id'] ?>">
                <td><?= $row['id'] ?></td>
                <td><input type="text" name="username" value="<?= $row['username'] ?>"></td>
                <td><input type="text" name="name" value="<?= $row['name'] ?>"></td>
                <td><input type="number" name="age" value="<?= $row['age'] ?>"></td>
                <td><input type="checkbox" name="verified" <?= $row['verified'] ? 'checked' : '' ?>></td>
                <td>
                    <button name="update">Update</button>
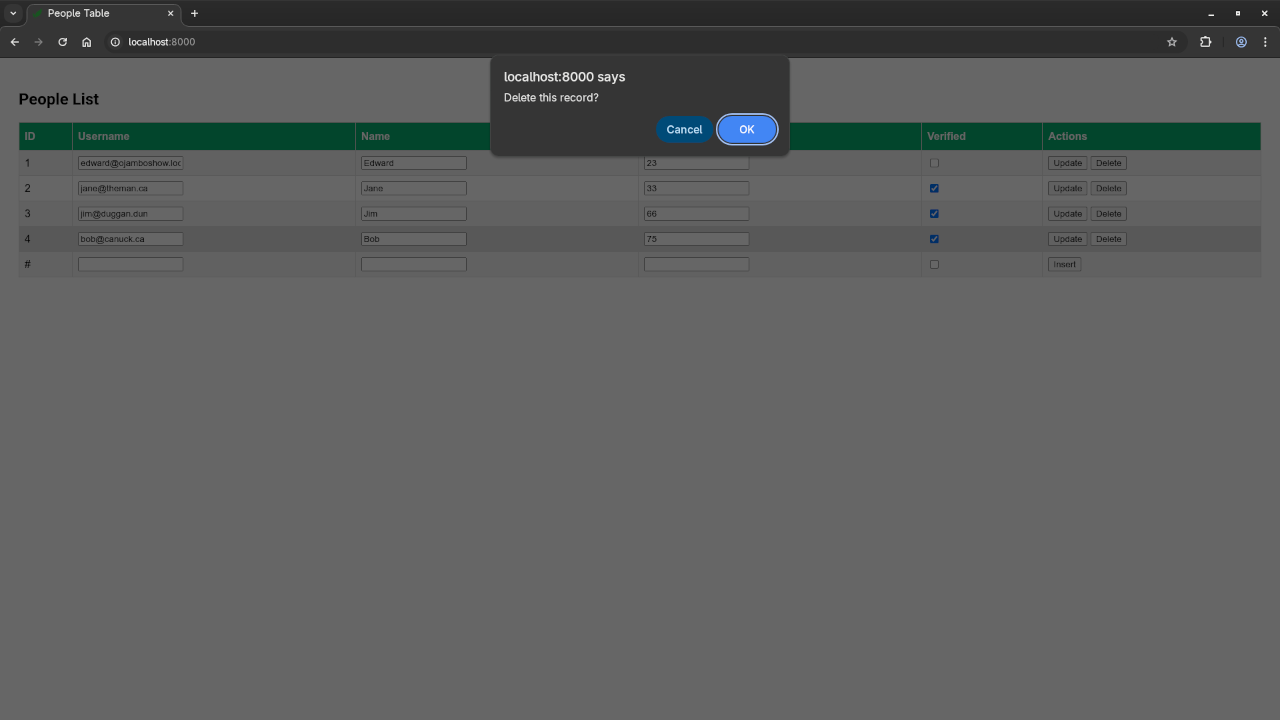
                    <button name="delete" onclick="return confirm('Delete this record?')">Delete</button>
                </td>
            </form>
        </tr>
        <?php endforeach; ?>
        <tr>
            <form method="post">
                <td>#</td>
                <td><input type="text" name="username"></td>
                <td><input type="text" name="name"></td>
                <td><input type="number" name="age"></td>
                <td><input type="checkbox" name="verified"></td>
                <td><button name="insert">Insert</button></td>
            </form>
        </tr>
    </table>
    </body>
    </html>


    5. Entry Point

    index.php


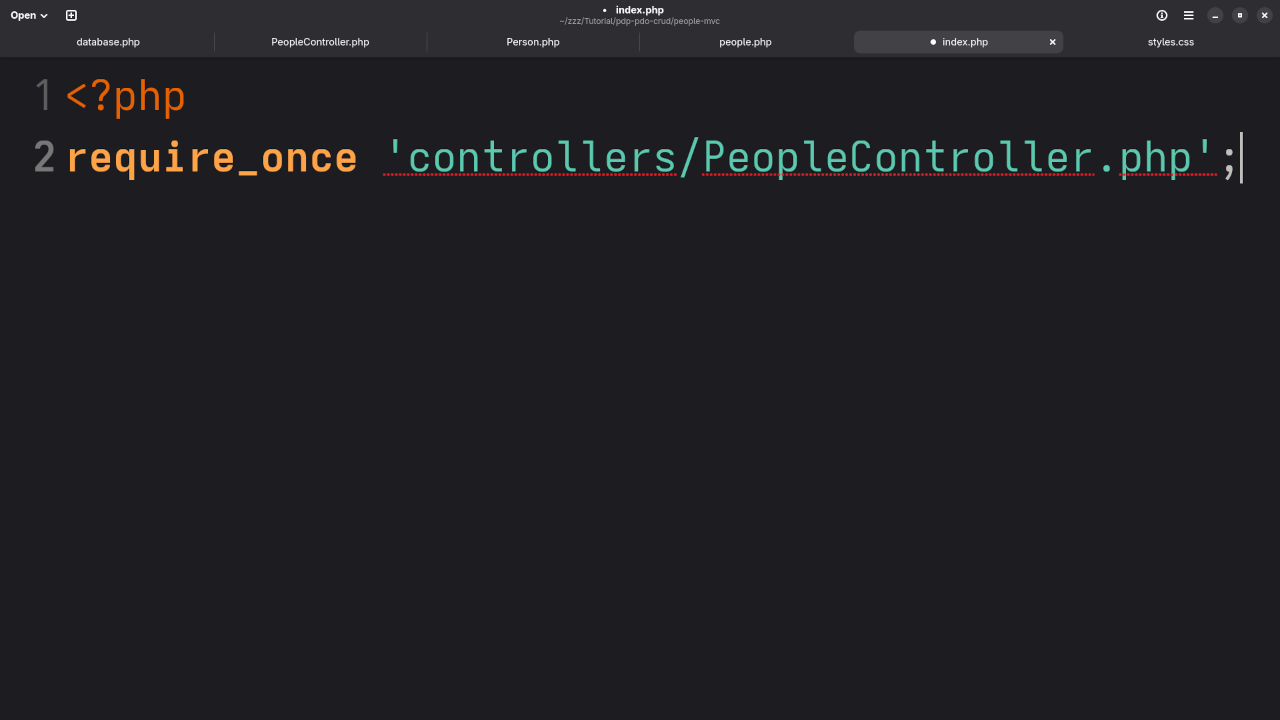
    <?php
    require_once 'controllers/PeopleController.php';


    Optional: Simple CSS

    style.css


    body {
        font-family: Roboto, sans-serif;
        padding: 20px;
    }
    
    table {
        width: 100%;
        border-collapse: collapse;
    }
    
    td, th {
        padding: 8px;
        text-align: center;
    }


    6: Running Your Application

    To see the result:

    1. Place all the files in your web server directory.
    2. Make sure your MariaDB database is running and contains a people table with the columns id, username, name, age, and verified.
    3. Open the index.php file in your browser to see the data displayed in an HTML table.

    Screenshots And Screencast

    Custom Database Config
    Gnome Text Editor Displaying App Database Configuration File

    Custom People Controller
    Gnome Text Editor Displaying Custom People Controller

    Custom People Model
    Gnome Text Editor Displaying Custom People Model

    Custom People View
    Gnome Text Editor Displaying App View File

    Custom People Index
    Gnome Text Editor Displaying App Index File

    Created Person Result
    Web Browser Displaying Created Person Result

    Remove Person Prompt
    Web Browser Displaying Remove Person Prompt

    Custom View Records In Web Browser

    Conclusion

    This simple PHP PDO MVC application will help you understand how to interact with databases using PDO and build an MVC structure for easier maintenance and scaling. Now, you can add, update, and delete records from your database with ease!

    If you’re eager to expand your knowledge, don’t forget to check out my book on learning PHP and the Learning PHP course.

    I am also available for one-on-one tutorials and assistance with updating or migrating PHP and database applications. Feel free to contact me here if you need personalized help.

  • Build an HTML5 Rotating Cube With WebGL

    Build an HTML5 Rotating Cube With WebGL

    Create Your First 3D Rotating Cube Using WebGL and HTML5

    Are you curious about how to make interactive 3D graphics right in your browser? With HTML5 and WebGL, you can create stunning 3D objects without installing any extra software! Today, we’ll explore how to build a simple rotating cube using WebGL – perfect for beginners eager to dive into the world of 3D programming with JavaScript.

    What is WebGL?

    WebGL (Web Graphics Library) is a JavaScript API that lets you render 3D graphics inside the browser, using hardware acceleration. Unlike regular 2D canvas, WebGL taps directly into your GPU for smooth and powerful visuals.

    The Rotating Cube Example


    <canvas id="glcanvas"></canvas>
    
    <script>
    // --- Setup ---
    const canvas = document.getElementById('glcanvas');
    const gl = canvas.getContext('webgl');
    if (!gl) alert('WebGL not supported');
    
    function resize() {
      canvas.width = window.innerWidth;
      canvas.height = window.innerHeight;
      gl.viewport(0, 0, canvas.width, canvas.height);
    }
    window.addEventListener('resize', resize);
    resize();
    
    // --- Vertex shader ---
    const vsSource = `
    attribute vec3 a_position;
    attribute vec3 a_normal;
    
    uniform mat4 u_modelViewMatrix;
    uniform mat4 u_projectionMatrix;
    uniform mat4 u_normalMatrix;
    
    varying vec3 v_normal;
    varying vec3 v_position;
    
    void main() {
      v_position = (u_modelViewMatrix * vec4(a_position, 1.0)).xyz;
      v_normal = mat3(u_normalMatrix) * a_normal;
      gl_Position = u_projectionMatrix * vec4(v_position, 1.0);
    }
    `;
    
    // --- Fragment shader ---
    const fsSource = `
    precision mediump float;
    
    varying vec3 v_normal;
    varying vec3 v_position;
    
    uniform vec3 u_lightPos;
    uniform vec3 u_viewPos;
    uniform vec4 u_color;
    
    void main() {
      vec3 normal = normalize(v_normal);
      vec3 lightDir = normalize(u_lightPos - v_position);
      vec3 viewDir = normalize(u_viewPos - v_position);
    
      // Diffuse lighting
      float diff = max(dot(normal, lightDir), 0.0);
    
      // Specular lighting (Phong)
      vec3 reflectDir = reflect(-lightDir, normal);
      float spec = pow(max(dot(viewDir, reflectDir), 0.0), 64.0);
    
      // Ambient + diffuse + specular
      vec3 ambient = 0.1 * u_color.rgb;
      vec3 diffuse = diff * u_color.rgb;
      vec3 specular = spec * vec3(1.0);
    
      vec3 color = ambient + diffuse + specular;
    
      // Alpha blending for glass transparency
      float alpha = 0.4;
    
      gl_FragColor = vec4(color, alpha);
    }
    `;
    
    // --- Shader compilation helpers ---
    function createShader(gl, type, source) {
      const shader = gl.createShader(type);
      gl.shaderSource(shader, source);
      gl.compileShader(shader);
      if(!gl.getShaderParameter(shader, gl.COMPILE_STATUS)) {
        console.error('Shader compile failed:', gl.getShaderInfoLog(shader));
        gl.deleteShader(shader);
        return null;
      }
      return shader;
    }
    
    function createProgram(gl, vs, fs) {
      const program = gl.createProgram();
      gl.attachShader(program, vs);
      gl.attachShader(program, fs);
      gl.linkProgram(program);
      if(!gl.getProgramParameter(program, gl.LINK_STATUS)) {
        console.error('Program link failed:', gl.getProgramInfoLog(program));
        return null;
      }
      return program;
    }
    
    const vertexShader = createShader(gl, gl.VERTEX_SHADER, vsSource);
    const fragmentShader = createShader(gl, gl.FRAGMENT_SHADER, fsSource);
    const program = createProgram(gl, vertexShader, fragmentShader);
    gl.useProgram(program);
    
    // --- Cube Data ---
    const positions = new Float32Array([
      // Front face
      -1, -1,  1,
       1, -1,  1,
       1,  1,  1,
      -1,  1,  1,
      // Back face
      -1, -1, -1,
      -1,  1, -1,
       1,  1, -1,
       1, -1, -1,
      // Top face
      -1,  1, -1,
      -1,  1,  1,
       1,  1,  1,
       1,  1, -1,
      // Bottom face
      -1, -1, -1,
       1, -1, -1,
       1, -1,  1,
      -1, -1,  1,
      // Right face
       1, -1, -1,
       1,  1, -1,
       1,  1,  1,
       1, -1,  1,
      // Left face
      -1, -1, -1,
      -1, -1,  1,
      -1,  1,  1,
      -1,  1, -1,
    ]);
    
    const normals = new Float32Array([
      // Front
      0, 0, 1,
      0, 0, 1,
      0, 0, 1,
      0, 0, 1,
      // Back
      0, 0, -1,
      0, 0, -1,
      0, 0, -1,
      0, 0, -1,
      // Top
      0, 1, 0,
      0, 1, 0,
      0, 1, 0,
      0, 1, 0,
      // Bottom
      0, -1, 0,
      0, -1, 0,
      0, -1, 0,
      0, -1, 0,
      // Right
      1, 0, 0,
      1, 0, 0,
      1, 0, 0,
      1, 0, 0,
      // Left
      -1, 0, 0,
      -1, 0, 0,
      -1, 0, 0,
      -1, 0, 0,
    ]);
    
    const indices = new Uint16Array([
      0, 1, 2,  0, 2, 3,    // front
      4, 5, 6,  4, 6, 7,    // back
      8, 9,10,  8,10,11,    // top
     12,13,14, 12,14,15,    // bottom
     16,17,18, 16,18,19,    // right
     20,21,22, 20,22,23,    // left
    ]);
    
    // --- Buffers ---
    const posBuffer = gl.createBuffer();
    gl.bindBuffer(gl.ARRAY_BUFFER, posBuffer);
    gl.bufferData(gl.ARRAY_BUFFER, positions, gl.STATIC_DRAW);
    
    const normBuffer = gl.createBuffer();
    gl.bindBuffer(gl.ARRAY_BUFFER, normBuffer);
    gl.bufferData(gl.ARRAY_BUFFER, normals, gl.STATIC_DRAW);
    
    const indexBuffer = gl.createBuffer();
    gl.bindBuffer(gl.ELEMENT_ARRAY_BUFFER, indexBuffer);
    gl.bufferData(gl.ELEMENT_ARRAY_BUFFER, indices, gl.STATIC_DRAW);
    
    // --- Attributes ---
    const posLoc = gl.getAttribLocation(program, 'a_position');
    gl.enableVertexAttribArray(posLoc);
    gl.bindBuffer(gl.ARRAY_BUFFER, posBuffer);
    gl.vertexAttribPointer(posLoc, 3, gl.FLOAT, false, 0, 0);
    
    const normLoc = gl.getAttribLocation(program, 'a_normal');
    gl.enableVertexAttribArray(normLoc);
    gl.bindBuffer(gl.ARRAY_BUFFER, normBuffer);
    gl.vertexAttribPointer(normLoc, 3, gl.FLOAT, false, 0, 0);
    
    // --- Uniforms ---
    const uModelViewMatrixLoc = gl.getUniformLocation(program, 'u_modelViewMatrix');
    const uProjectionMatrixLoc = gl.getUniformLocation(program, 'u_projectionMatrix');
    const uNormalMatrixLoc = gl.getUniformLocation(program, 'u_normalMatrix');
    const uLightPosLoc = gl.getUniformLocation(program, 'u_lightPos');
    const uViewPosLoc = gl.getUniformLocation(program, 'u_viewPos');
    const uColorLoc = gl.getUniformLocation(program, 'u_color');
    
    // --- Matrices Helpers ---
    function createProjectionMatrix(fov, aspect, near, far) {
      const f = 1.0 / Math.tan(fov / 2);
      const nf = 1 / (near - far);
      return new Float32Array([
        f / aspect, 0, 0, 0,
        0, f, 0, 0,
        0, 0, (far + near) * nf, -1,
        0, 0, (2 * far * near) * nf, 0,
      ]);
    }
    
    function multiplyMatrices(a, b) {
      const out = new Float32Array(16);
      for (let i=0; i<4; i++) {
        for (let j=0; j<4; j++) {
          out[i*4+j] =
            a[0*4+j]*b[i*4+0] +
            a[1*4+j]*b[i*4+1] +
            a[2*4+j]*b[i*4+2] +
            a[3*4+j]*b[i*4+3];
        }
      }
      return out;
    }
    
    function identityMatrix() {
      return new Float32Array([
        1,0,0,0,
        0,1,0,0,
        0,0,1,0,
        0,0,0,1
      ]);
    }
    
    function translationMatrix(tx, ty, tz) {
      const m = identityMatrix();
      m[12] = tx;
      m[13] = ty;
      m[14] = tz;
      return m;
    }
    
    function rotationMatrixX(angle) {
      const c = Math.cos(angle);
      const s = Math.sin(angle);
      return new Float32Array([
        1,0,0,0,
        0,c,s,0,
        0,-s,c,0,
        0,0,0,1
      ]);
    }
    
    function rotationMatrixY(angle) {
      const c = Math.cos(angle);
      const s = Math.sin(angle);
      return new Float32Array([
        c,0,-s,0,
        0,1,0,0,
        s,0,c,0,
        0,0,0,1
      ]);
    }
    
    function transposeInverse(m) {
      // Only for rotation/translation matrix (no scale)
      const r = new Float32Array(16);
      // upper 3x3 transpose
      r[0] = m[0]; r[1] = m[4]; r[2] = m[8];
      r[4] = m[1]; r[5] = m[5]; r[6] = m[9];
      r[8] = m[2]; r[9] = m[6]; r[10] = m[10];
      // last row/col
      r[3] = 0; r[7] = 0; r[11] = 0; r[15] = 1;
      // translation ignored
      return r;
    }
    
    // --- Interaction ---
    let rotationX = 0;
    let rotationY = 0;
    let dragging = false;
    let lastX, lastY;
    
    canvas.addEventListener('mousedown', e => {
      dragging = true;
      lastX = e.clientX;
      lastY = e.clientY;
    });
    window.addEventListener('mouseup', e => dragging = false);
    window.addEventListener('mousemove', e => {
      if (!dragging) return;
      const dx = e.clientX - lastX;
      const dy = e.clientY - lastY;
      rotationY += dx * 0.01;
      rotationX += dy * 0.01;
      lastX = e.clientX;
      lastY = e.clientY;
    });
    
    // --- Render loop ---
    function render() {
      gl.clearColor(0.05, 0.05, 0.1, 1);
      gl.clear(gl.COLOR_BUFFER_BIT | gl.DEPTH_BUFFER_BIT);
      gl.enable(gl.DEPTH_TEST);
      gl.enable(gl.BLEND);
      gl.blendFunc(gl.SRC_ALPHA, gl.ONE_MINUS_SRC_ALPHA);
    
      // Projection matrix
      const aspect = canvas.width / canvas.height;
      const projMatrix = createProjectionMatrix(Math.PI/4, aspect, 0.1, 100);
    
      // ModelView matrix (translate back, then rotate)
      let modelView = translationMatrix(0, 0, -6);
      modelView = multiplyMatrices(modelView, rotationMatrixX(rotationX));
      modelView = multiplyMatrices(modelView, rotationMatrixY(rotationY));
    
      // Normal matrix (transpose inverse of modelView)
      const normalMatrix = transposeInverse(modelView);
    
      // Set uniforms
      gl.uniformMatrix4fv(uProjectionMatrixLoc, false, projMatrix);
      gl.uniformMatrix4fv(uModelViewMatrixLoc, false, modelView);
      gl.uniformMatrix4fv(uNormalMatrixLoc, false, normalMatrix);
    
      gl.uniform3f(uLightPosLoc, 5, 5, 5);
      gl.uniform3f(uViewPosLoc, 0, 0, 0);
      gl.uniform4f(uColorLoc, 0.2, 0.6, 1.0, 0.4); // bluish glass
    
      gl.bindBuffer(gl.ELEMENT_ARRAY_BUFFER, indexBuffer);
      gl.drawElements(gl.TRIANGLES, indices.length, gl.UNSIGNED_SHORT, 0);
    
      requestAnimationFrame(render);
    }
    
    requestAnimationFrame(render);
    </script>


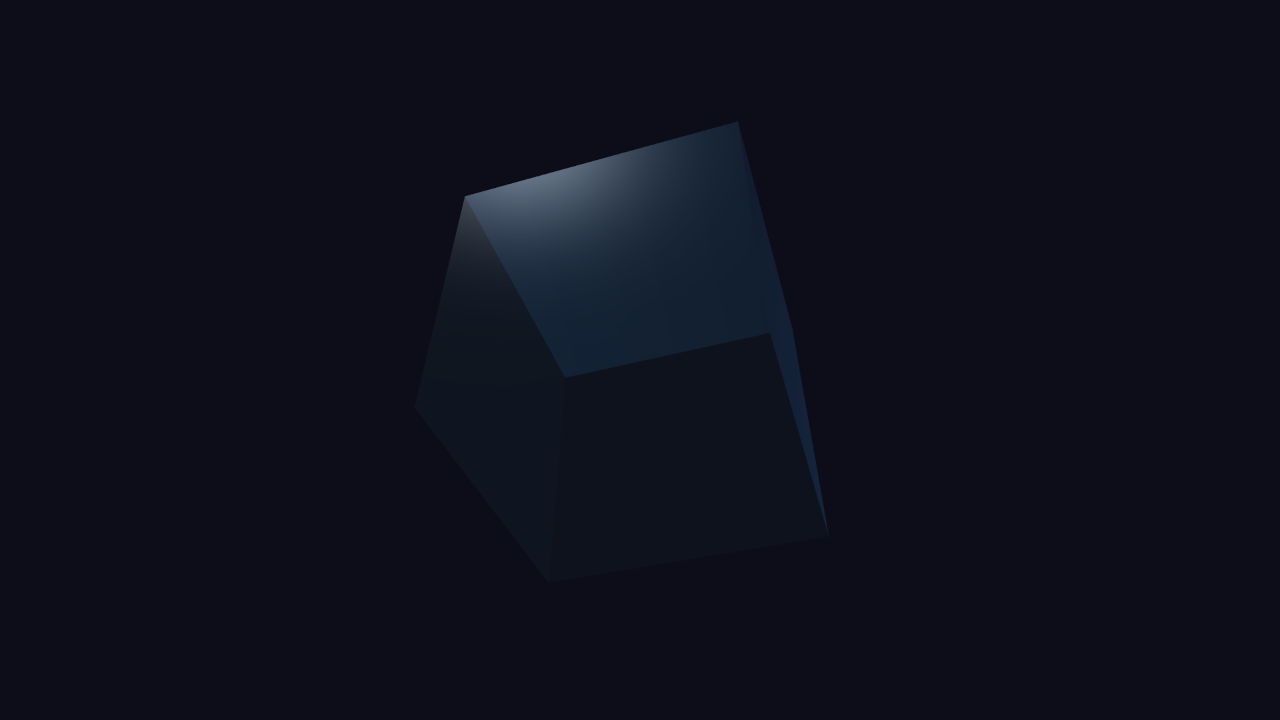
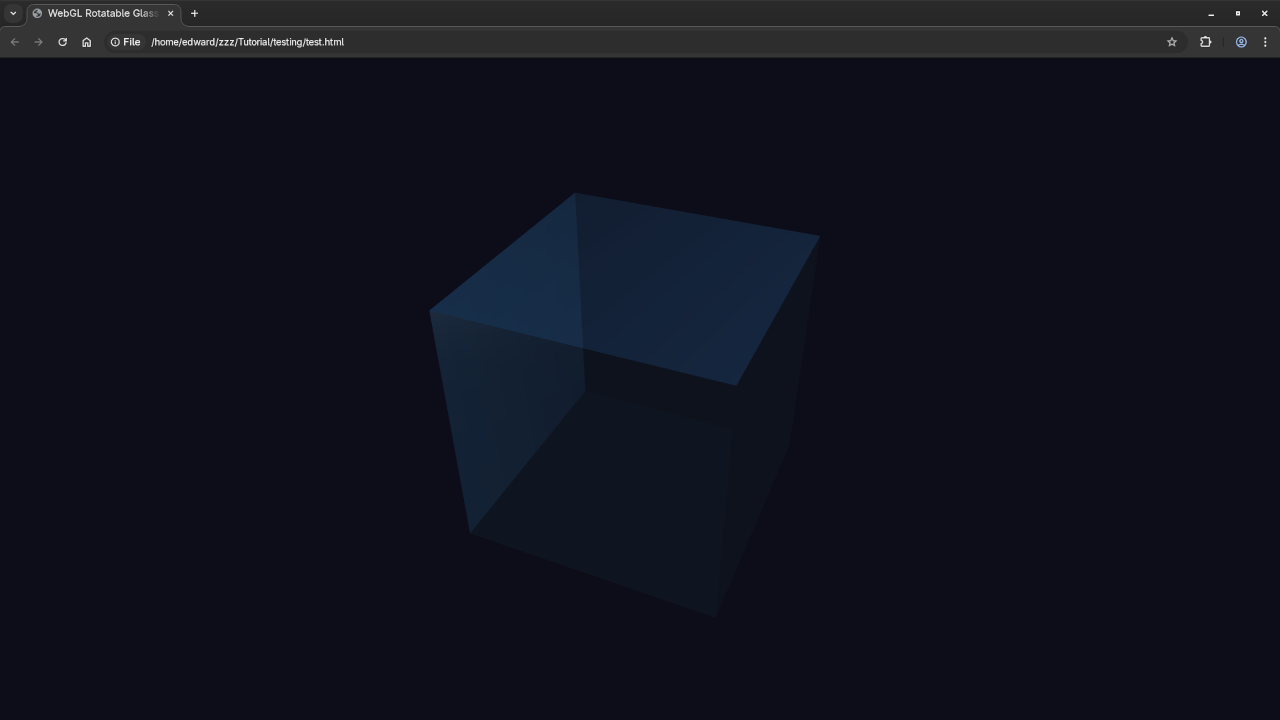
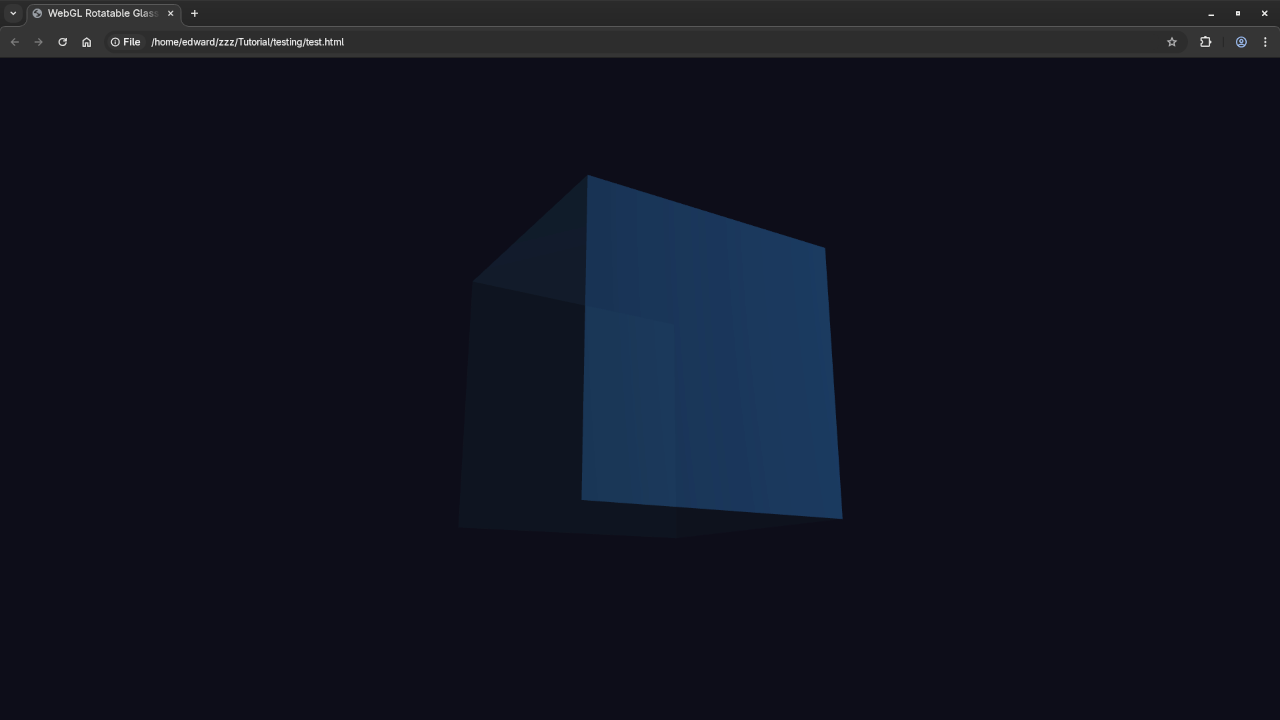
    This example demonstrates a cube that you can rotate by dragging your mouse, with basic lighting and a glass-like transparency effect. It’s a great project to understand how vertices, shaders, and transformation matrices work together in WebGL.

    Interactive Demo

    Here’s a live example of the Rotatable Cube in action:

    HTML5 Rotatable Cube Demo
    HTML5 Rotatable Cube
    Web Browser Displaying HTML5 Rotatable Cube

    HTML5 Rotated Cube
    Web Browser Displaying HTML5 Rotated Cube

    HTML5 Rotatable Cube Video

    Want to Learn More?

    If you enjoyed this project and want to deepen your JavaScript skills, check out my resources:

    • Book: Learning JavaScript – a beginner-friendly guide to mastering JavaScript programming from the ground up.
    • Course: Learning JavaScript – an online course that complements the book with hands-on lessons and coding exercises.
    • One-on-One Tutorials: Interested in personalized help? I offer private programming tutorials including JavaScript. Reach out via my contact page to schedule your session.

    Final Thoughts

    Building 3D graphics with WebGL might seem intimidating at first, but with practice and the right guidance, you can create amazing interactive experiences right inside the browser. This rotating cube is just the beginning – keep experimenting, and happy coding!

    Feel free to leave your questions or share your own WebGL projects in the comments below!

  • Generate Low-Poly Rubber Duck With Blender Python API For Website

    Generate Low-Poly Rubber Duck With Blender Python API For Website

    Create a Cute Rubber Duck in Blender Using Python (No GUI) and Display It on Your Website

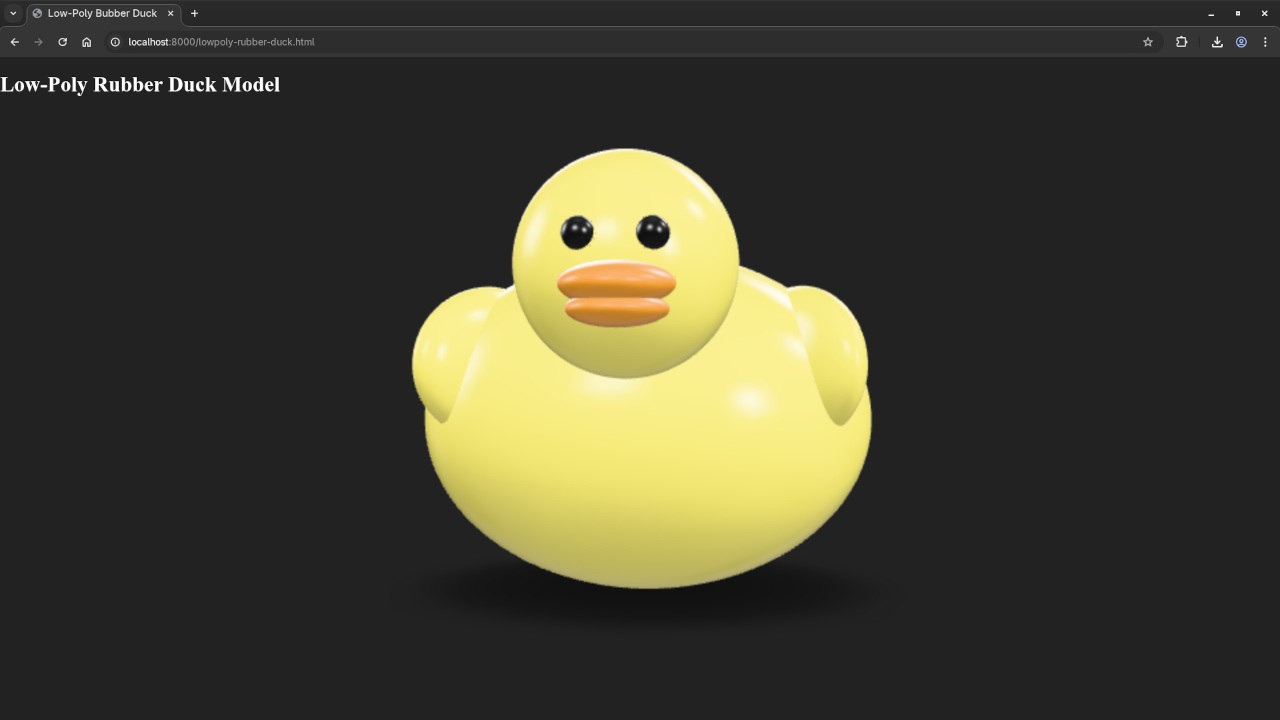
    If you’re new to Blender and Python, this tutorial will guide you through creating a simple, stylized rubber duck entirely via Blender’s Python API – all from the command line without opening the Blender interface. Then, you’ll learn how to display the 3D duck model on your website using the <model-viewer> web component.

    Step 1: Running Blender Python Script Without GUI

    You can write a Blender Python script that generates the rubber duck model automatically. Instead of manually working in Blender’s GUI, you run Blender in background mode to execute your Python script.

    Use this command in your terminal or command prompt (replace your_duck_script.py with your script’s filename):

    blender --background --python your_duck_script.py

    This runs Blender without the graphical interface, executes your script, and you can export the model directly in the script as a .glb or .gltf file.

    Step 2: Export the Model Automatically

    Include export code inside your Python script like this:


    import bpy
    import bmesh
    import math
    import os
    
    # --- Clear existing objects ---
    bpy.ops.object.select_all(action=&#039;SELECT&#039;)
    bpy.ops.object.delete()
    
    # --- Plastic Material Function ---
    def plastic_mat(name, color):
        mat = bpy.data.materials.new(name)
        mat.use_nodes = True
        nodes = mat.node_tree.nodes
        links = mat.node_tree.links
        nodes.clear()
    
        output = nodes.new(type=&quot;ShaderNodeOutputMaterial&quot;)
        bsdf = nodes.new(type=&quot;ShaderNodeBsdfPrincipled&quot;)
        bsdf.inputs[&quot;Base Color&quot;].default_value = color
        bsdf.inputs[&quot;Roughness&quot;].default_value = 0.2  # Slightly glossy
    
        links.new(bsdf.outputs[&quot;BSDF&quot;], output.inputs[&quot;Surface&quot;])
        return mat
    
    # --- Materials ---
    mat_body = plastic_mat(&quot;DuckBodyMat&quot;, (1.0, 0.9, 0.2, 1))     # Yellow
    mat_beak = plastic_mat(&quot;DuckBeakMat&quot;, (1.0, 0.4, 0.05, 1))    # Orange
    mat_eye = plastic_mat(&quot;DuckEyeMat&quot;, (0.02, 0.02, 0.02, 1))    # Black
    
    # --- Helper: Create UV Sphere ---
    def add_uv_sphere(name, loc, scale, mat):
        bpy.ops.mesh.primitive_uv_sphere_add(segments=32, ring_count=16, radius=1, location=loc)
        obj = bpy.context.active_object
        obj.name = name
        obj.scale = scale
        obj.data.materials.append(mat)
        bpy.ops.object.shade_smooth()
        return obj
    
    # --- Create Body ---
    body = add_uv_sphere(&quot;Duck_Body&quot;, (0, 0, 0.5), (1.0, 1.2, 0.9), mat_body)
    
    # --- Create Head ---
    head = add_uv_sphere(&quot;Duck_Head&quot;, (1.2, 0, 1.25), (0.5, 0.5, 0.5), mat_body)
    
    # --- Create Duck Lips (Upper + Lower Bills) ---
    def create_duck_beak():
        # Upper bill
        bpy.ops.mesh.primitive_uv_sphere_add(segments=32, ring_count=16, location=(1.55, 0, 1.15))
        upper = bpy.context.active_object
        upper.name = &quot;Duck_UpperBeak&quot;
        upper.scale = (0.35, 0.25, 0.1)
        upper.data.materials.append(mat_beak)
        bpy.ops.object.shade_smooth()
    
        # Lower bill
        bpy.ops.mesh.primitive_uv_sphere_add(segments=32, ring_count=16, location=(1.55, 0, 1.05))
        lower = bpy.context.active_object
        lower.name = &quot;Duck_LowerBeak&quot;
        lower.scale = (0.3, 0.22, 0.08)
        lower.data.materials.append(mat_beak)
        bpy.ops.object.shade_smooth()
    
        return upper, lower
    
    upper_beak, lower_beak = create_duck_beak()
    
    # --- Create Eyes ---
    eye_L = add_uv_sphere(&quot;Duck_Eye_L&quot;, (1.65, 0.15, 1.35), (0.07, 0.07, 0.07), mat_eye)
    eye_R = add_uv_sphere(&quot;Duck_Eye_R&quot;, (1.65, -0.15, 1.35), (0.07, 0.07, 0.07), mat_eye)
    
    # --- Create Wings ---
    wing_R = add_uv_sphere(&quot;Duck_Wing_R&quot;, (0.2, -0.8, 0.8), (0.6, 0.2, 0.4), mat_body)
    wing_R.rotation_euler = (0, 0, math.radians(-25))
    
    wing_L = add_uv_sphere(&quot;Duck_Wing_L&quot;, (0.2, 0.8, 0.8), (0.6, 0.2, 0.4), mat_body)
    wing_L.rotation_euler = (0, 0, math.radians(25))
    
    # --- Subdivision for Smoothness ---
    for obj in [body, head, upper_beak, lower_beak, wing_L, wing_R]:
        mod = obj.modifiers.new(name=&quot;Subsurf&quot;, type=&#039;SUBSURF&#039;)
        mod.levels = 2
        mod.render_levels = 2
    
    # Export as GLB file
    bpy.ops.export_scene.gltf(filepath=&quot;rubber_duck.glb&quot;, export_format=&#039;GLB&#039;)


    This way, when you run Blender headless, the model is generated and exported automatically.

    Step 3: Embedding Your 3D Rubber Duck on a Website

    To display the 3D duck on a webpage, use the <model-viewer> component – a simple, interactive viewer for 3D models in modern browsers.

    Here is example HTML to embed in your site:


    &lt;script type=&quot;module&quot; src=&quot;https://unpkg.com/@google/model-viewer/dist/model-viewer.min.js&quot;&gt;&lt;/script&gt;
    
    &lt;model-viewer src=&quot;path/to/rubber_duck.glb&quot;  
                  alt=&quot;Cute Rubber Duck&quot;  
                  auto-rotate camera-controls  
                  style=&quot;width: 400px; height: 400px;&quot;&gt;
    &lt;/model-viewer&gt;


    Make sure to upload your exported rubber_duck.glb to your web host, and update the src attribute accordingly.

    📸 Screenshots & Screencast

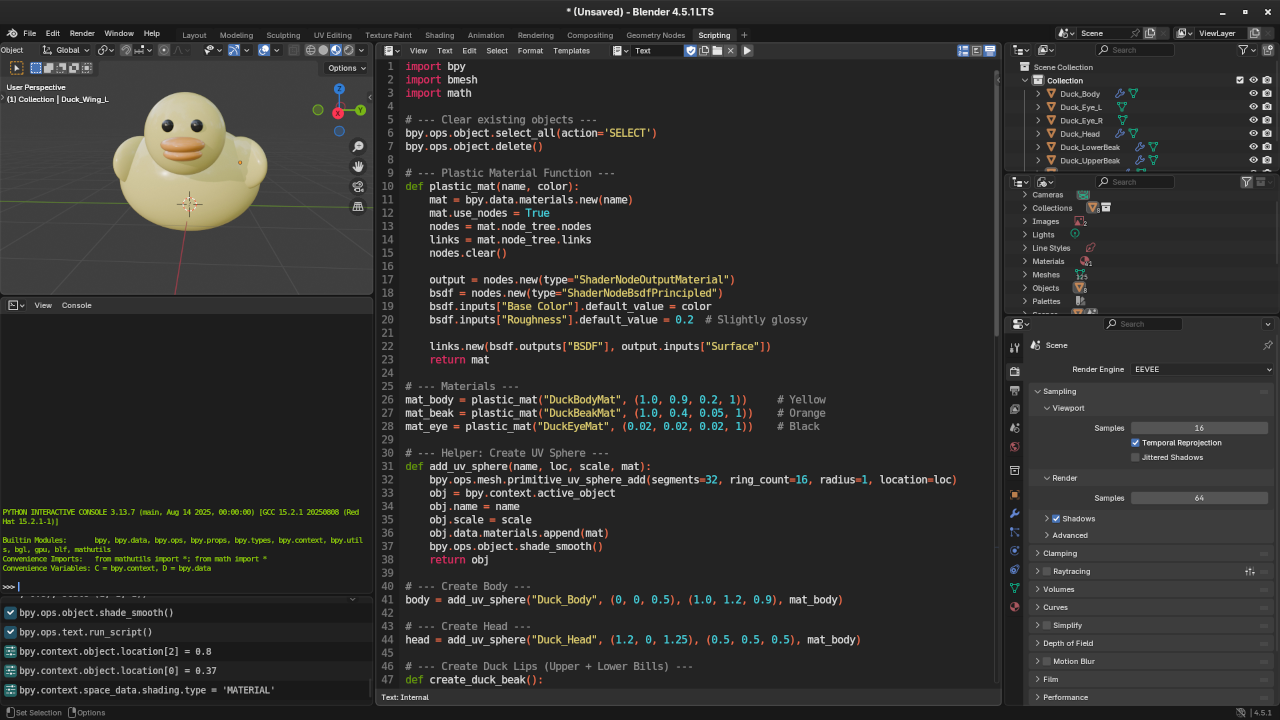
    Low poly rubber duck Python code
    Blender Scripting Workspace Displaying Low Poly Rubber Duck Python Code

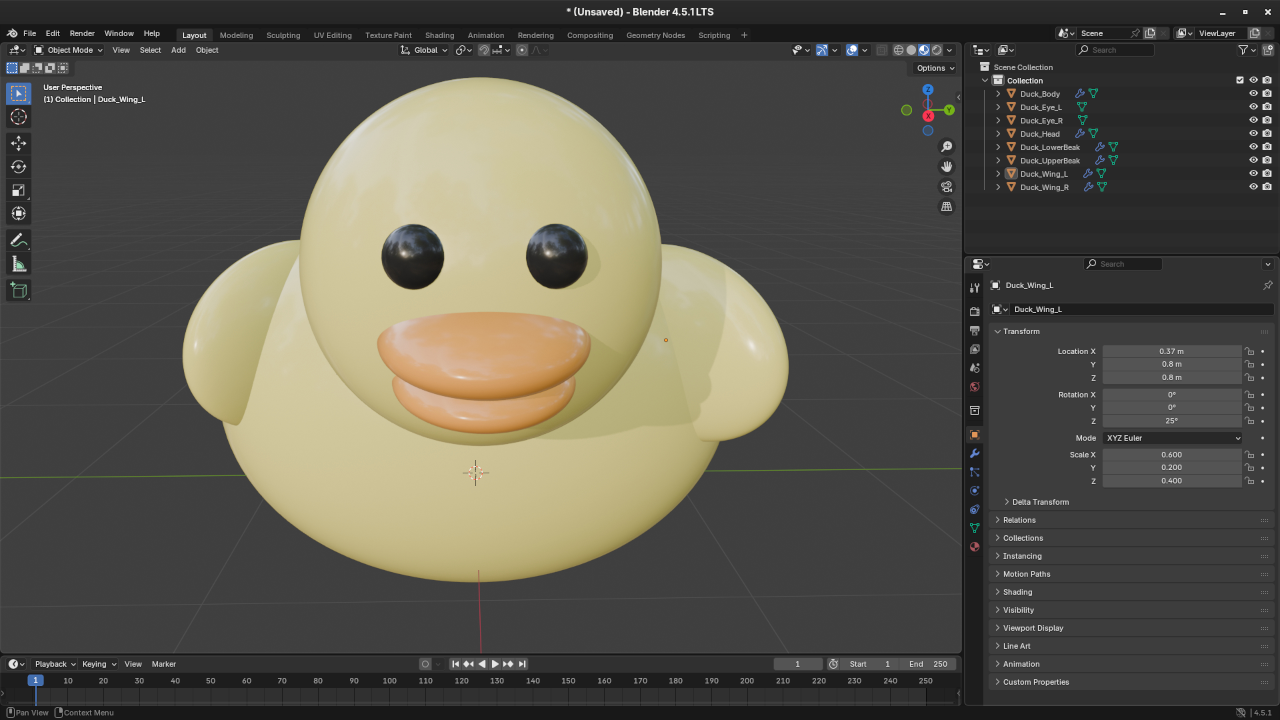
    Low poly rubber duck in Blender
    Blender Layout Workspace Displaying Low Poly Rubber Duck

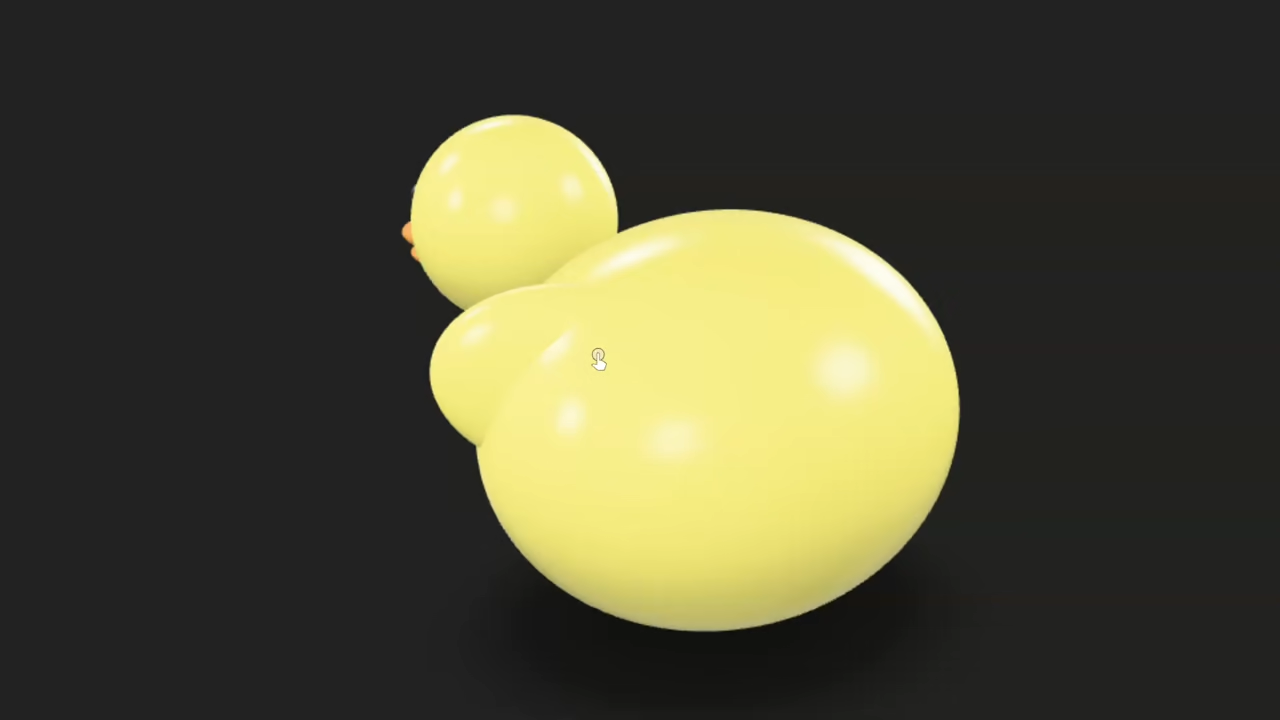
    Low poly rubber duck in Web browser
    Web Browser Displaying Rendered Low Poly Rubber Duck

    Screencast For Blender Python API Low Poly Rubber Duck

    Additional Learning Resources

    Expand your Python and Blender scripting skills with my recommended books and courses:

    Personalized Python & Blender Tutorials

    I also offer one-on-one online tutorials for Python programming and Blender scripting. Reach out if you want personalized guidance.

    Contact me for tutorials

    Feel free to leave questions or share your duck creations in the comments!

  • Git Ignore: Ignoring Unwanted Files in Your Repositories

    Git Ignore: Ignoring Unwanted Files in Your Repositories


    Git Ignore for Beginners: How to Keep Unwanted Files Out of Your Git Repositories

    When working with Git, especially as a beginner, it is easy to accidentally include files in your repository that you do not actually want tracked. This can include log files, OS-generated files such as .DS_Store, compiled binaries, or personal settings files. Thankfully, Git has a built-in feature called .gitignore that allows you to easily tell Git which files or folders to ignore.

    What is .gitignore?

    The .gitignore file is a special plain text file that tells Git which files or directories to skip when committing code. For example, if you are working on a Python project and do not want to track compiled .pyc files or your virtual environment folder, .gitignore is your best friend.

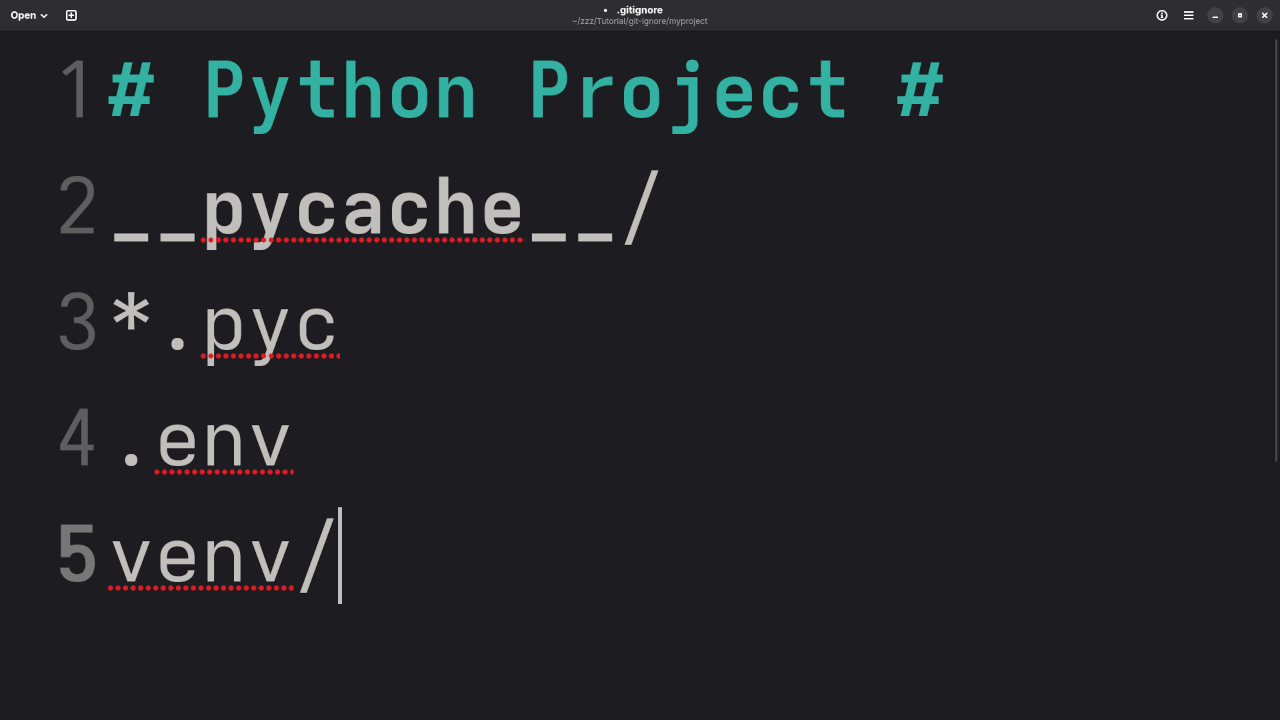
    Here is a basic example for a Python project:

    __pycache__/
    *.pyc
    .env
    venv/

    Once listed, Git will ignore those files and not include them in future commits, even if they exist in your project folder.

    Why Use .gitignore?

    • Security: Avoid committing sensitive files like API keys or passwords.
    • Clean Repositories: Keep your Git history free from clutter.
    • Consistency: Ensure only relevant code and files are shared with collaborators.

    How to Create and Use a .gitignore File

    1. Open your project root directory.
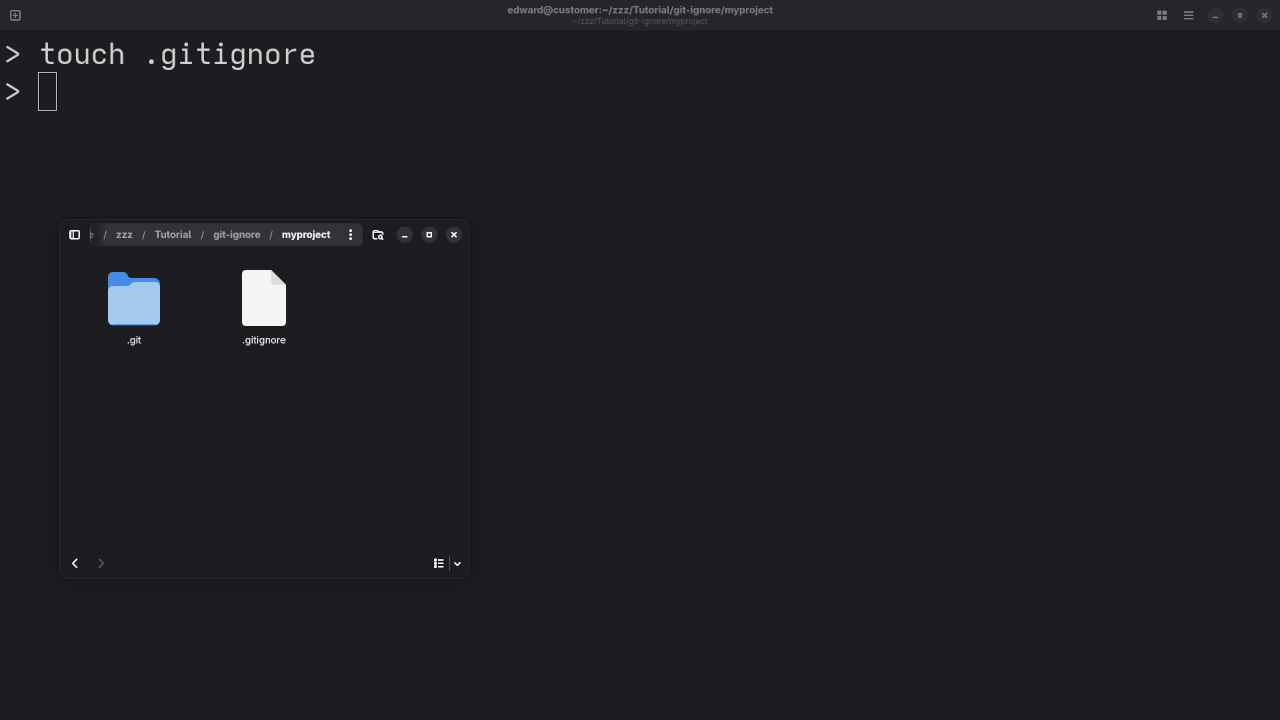
    2. Create a new file named .gitignore.
    3. Add paths or patterns for files and folders to ignore.
    4. Save and commit your changes.

    Note: If you have already committed a file, adding it to .gitignore will not remove it from the repository. You will need to untrack it manually using the following command:

    git rm --cached filename

    Screencast Tutorial & Screenshots

    Git Ignore Creation
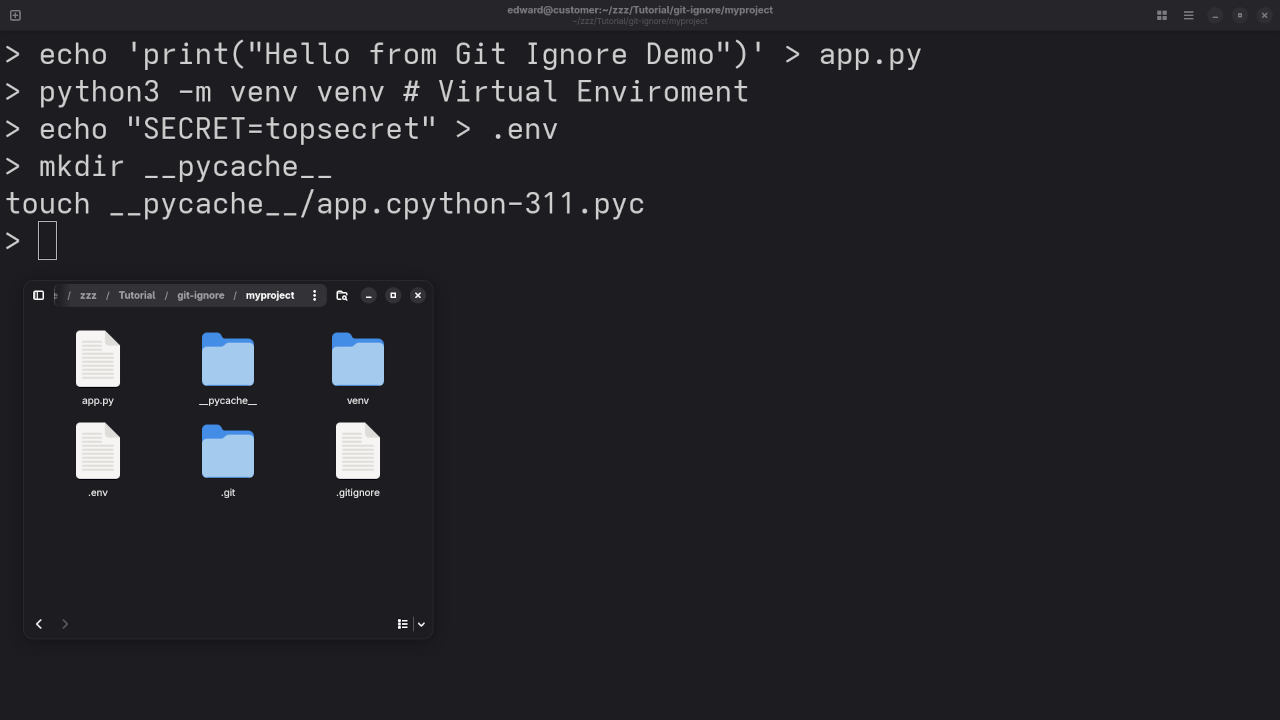
    Command Line Git Ignore File Creation

    Git Ignore For Python
    Gnome Text Editor Showing Git Ignore For Python Project

    Git Ignore For Wildcards
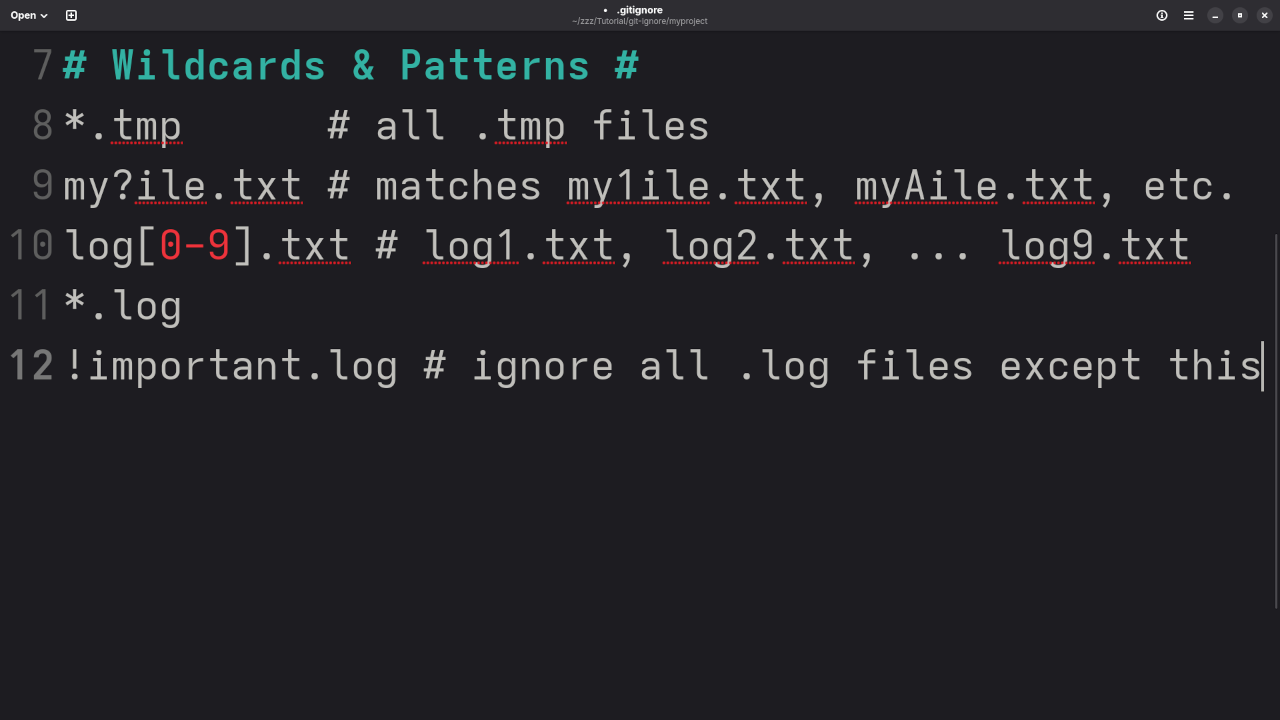
    Gnome Text Editor Showing Git Ignore For Widlcards And Patterns

    Git Ignore Content
    Terminal Showing Git Ignore Content Files

    Git Status For Project
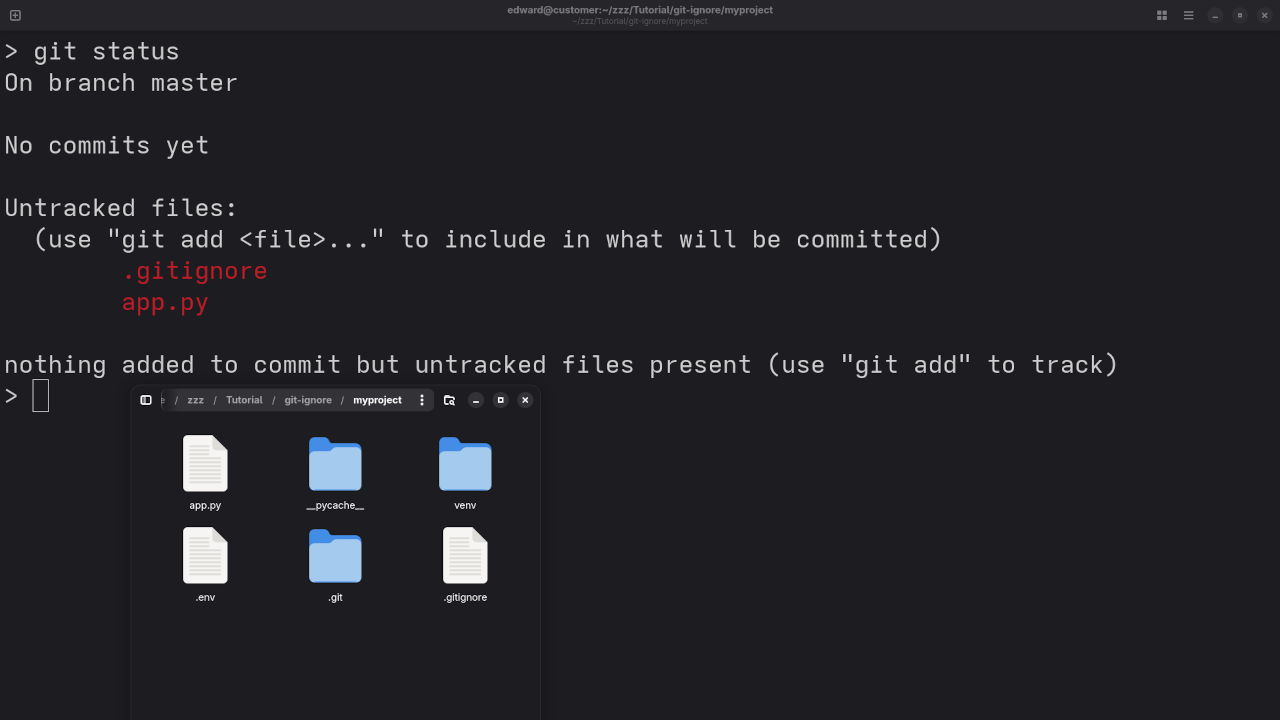
    Terminal Showing Result of Git Status For Python Project

    Screencast Of Git Ignore

    Learn More with My Programming Books

    Want to go deeper into Git and other programming topics? Check out my books on Amazon:

    Edward Ojambo’s Programming Books

    Online Courses for Developers

    Ready to level up your skills? Enroll in my hands-on programming courses here:

    Online Programming Courses

    One-on-One Programming Help

    Need personalized help with your Git setup or programming journey? Book a session with me:

    Contact Me for Tutorials

    Git Installation and Repository Migration Services

    Whether you are just starting with Git or need to migrate large repositories, I can help:

    Request Git Services

    Open Source for Everyone

    Git is open source and free to use. The .gitignore system helps keep your open source or private projects tidy and secure. It is a simple but powerful step in maintaining clean code.

  • Post-Unboxing: My 2025 Blender & AI Workstation Build

    Post-Unboxing: My 2025 Blender & AI Workstation Build

    After years of faithful service, my old workstation finally stepped aside to make room for a new build, optimized for Blender and AI development in 2025. This isn’t just a hardware flex – it’s the foundation for my content creation, live Python tutorials, and machine learning training setups.

    This post is a beginner-friendly overview of my new system build – from unboxing to assembly – and how it compares with my previous setup. Whether you’re upgrading your own rig or just curious about hardware for Blender and AI, I hope this helps.

    New System Build (2025)

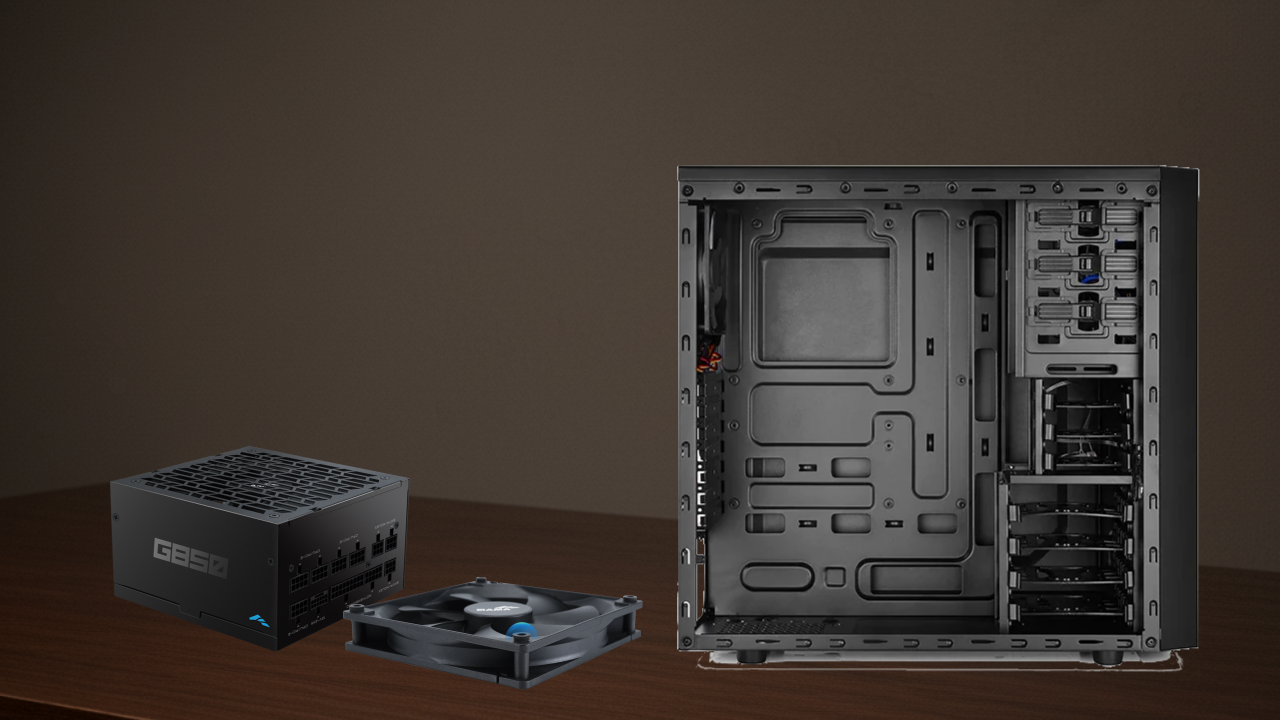
    The new workstation is built into the same Deepcool Tesseract BF case as the previous system. However, it has received a cooling overhaul, and most components have been swapped or upgraded:

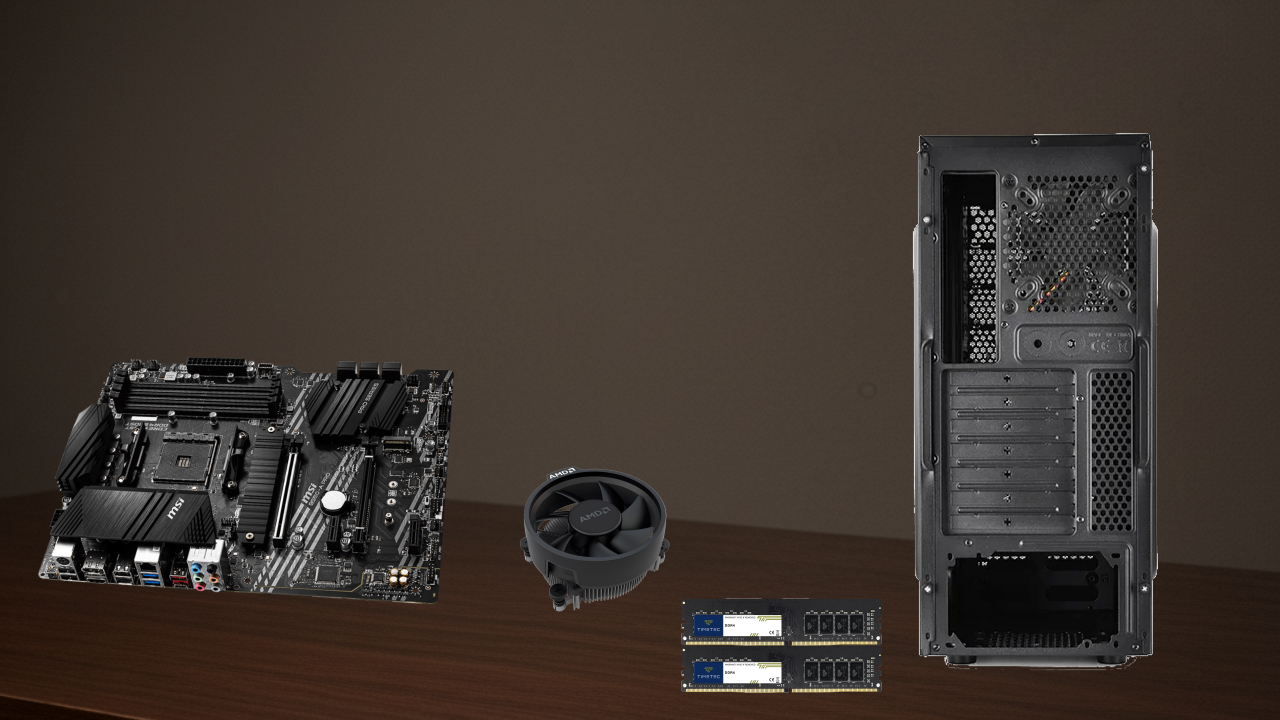
    Parts List:

    • Case: Deepcool Tesseract BF (reused) with original 1 fan
    • Cooling: 5x Thermalright TL-S12 120mm fans
    • Motherboard: Used MSI B550-A PRO ProSeries
    • CPU: AMD Ryzen 5 5600GT with integrated graphics
    • RAM: 32GB (2x16GB) Timetec DDR4 2133MHz
    • GPU: AMD Instinct MI60 (pending installation)
    • Power Supply: SAMA G850W (ATX 3.1, future-ready)

    It runs Fedora 42 – a modern, secure, and fast Linux distro that’s perfect for development and creative workflows.

    Why This Matters for Blender and AI

    Even without the discrete GPU (MI60) connected yet, this system is already a serious upgrade in CPU, RAM, and thermal performance.

    • Faster rendering in Blender (especially Eevee and simple Cycles scenes)
    • Better performance in AI model training, dataset preprocessing, and inference
    • Smooth multitasking for development, recording, and streaming
    • Quieter operation thanks to high-quality case fans

    Once the MI60 is installed, it will unlock massive parallel compute for Blender GPU rendering and deep learning acceleration.

    Old vs. New: Theoretical Comparison

    Component Old System New System Difference
    CPU Intel Core i7-2600 (4C/8T, 3.4GHz) AMD Ryzen 5 5600GT (6C/12T, 3.6GHz) ~2x performance
    RAM 16GB DDR3 1333MHz (mixed) 32GB DDR4 2133MHz (matched) Double capacity & faster
    GPU EVGA GTX 950 (2GB) AMD Instinct MI60 (32GB HBM2) Massive upgrade pending
    Motherboard ASUS P8Z68-V LX MSI B550-A PRO DDR4, PCIe 4.0 support
    Cooling 1 stock fan 5x TL-S12 fans + stock Improved airflow
    Power Supply Thermaltake TR2 600W SAMA G850W ATX 3.1 Future-ready, more efficient

    Integrated Graphics Comparison: Intel HD 2000 vs. AMD Radeon Graphics (5600GT)

    Even without the AMD Instinct MI60 GPU installed, the Ryzen 5 5600GT’s integrated graphics make a huge difference over the old i7-2600’s Intel HD 2000. Here’s a look at the improvements and what it means for real-world use in Blender, media, and AI experiments.

    Feature Comparison

    Feature Intel HD Graphics 2000 AMD Radeon (Ryzen 5 5600GT) Difference
    Release Year 2011 2024 13+ years newer
    Architecture Intel Gen6 AMD RDNA2 Modern design
    Shaders 6 EUs (~96 shaders) 7 CUs (448 shaders) ~4.5x more
    Clock Speed ~850 MHz ~1.9 GHz 2x faster
    Video Decoding Basic H.264 H.264, H.265, VP9, AV1 4K-ready
    Linux Drivers Legacy AMDGPU (Mesa) Actively maintained

    Viewport & Media Benchmarks

    Task Intel HD 2000 AMD Radeon iGPU Notes
    Blender Viewport (Eevee) 4-10 FPS 35-60 FPS Usable without discrete GPU
    Blender Viewport (Cycles CPU fallback) ~3 FPS ~15 FPS Still CPU-bound
    1080p Video Playback OK Excellent Both handle well
    4K AV1 Playback Not supported Supported Smoother performance
    glmark2 Vulkan Score ~400 ~3000 Significant improvement

    Screenshots And Screencast

    Power Supply And Mid-Tower
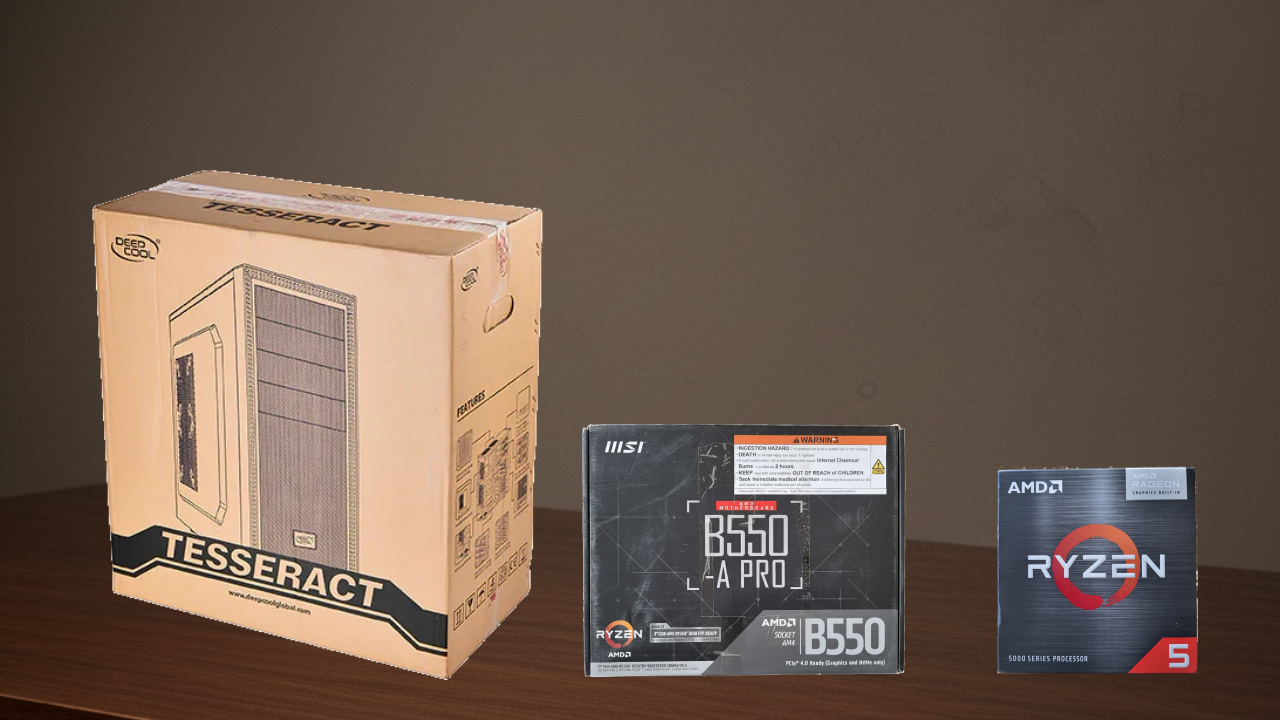
    SAMA G850W ATX 3.1 Power Supply And Deepcool Tesseract BF Case

    MSI B550-A PRO
    MSI B550-A PRO Motherboard, Timetec 32GB KIT(2x16GB) DDR4 2133MHz Ram, Deepcool Tesseract BF Case Back

    Screencast Showing setup on Fedora 42, system detection, system stats

    Recommended Reading

    One-on-One Help

    If you need help getting started with Python, Blender scripting, or AI setup, I’m available for:

    • One-on-one tutorials
    • Blender installation and scripting support
    • AI training or migration

    Contact me here to schedule a session.

    Final Thoughts

    This new build may not be flashy with RGBs or liquid cooling, but it’s powerful, efficient, and practical for the kind of work I do – Python development, Blender projects, and AI training.

    If you’re building your own creative workstation in 2025, feel free to reach out or comment below with questions.

    Next Post Preview

    Installing Blender + AI Tools on Fedora 42 (2025 Setup Guide)