Beginner’s Guide to Laravel Framework with a Simple MariaDB Example
Laravel is a modern, open-source PHP web application framework that is known for its elegant syntax and ease of use. If you are coming from a procedural PHP background, Laravel is an excellent way to write cleaner, more maintainable code using Object-Oriented Programming (OOP) concepts.
One of Laravel’s core strengths is that it supports the Model-View-Controller (MVC) architectural pattern, which separates your application into three main components:
Model: Handles data and business logic
View: Handles the presentation layer (HTML/CSS)
Controller: Handles user input and updates the model/view accordingly
Laravel is actively maintained, has strong community support, and can be installed easily using Composer.
Laravel Example Application (CRUD with MariaDB)
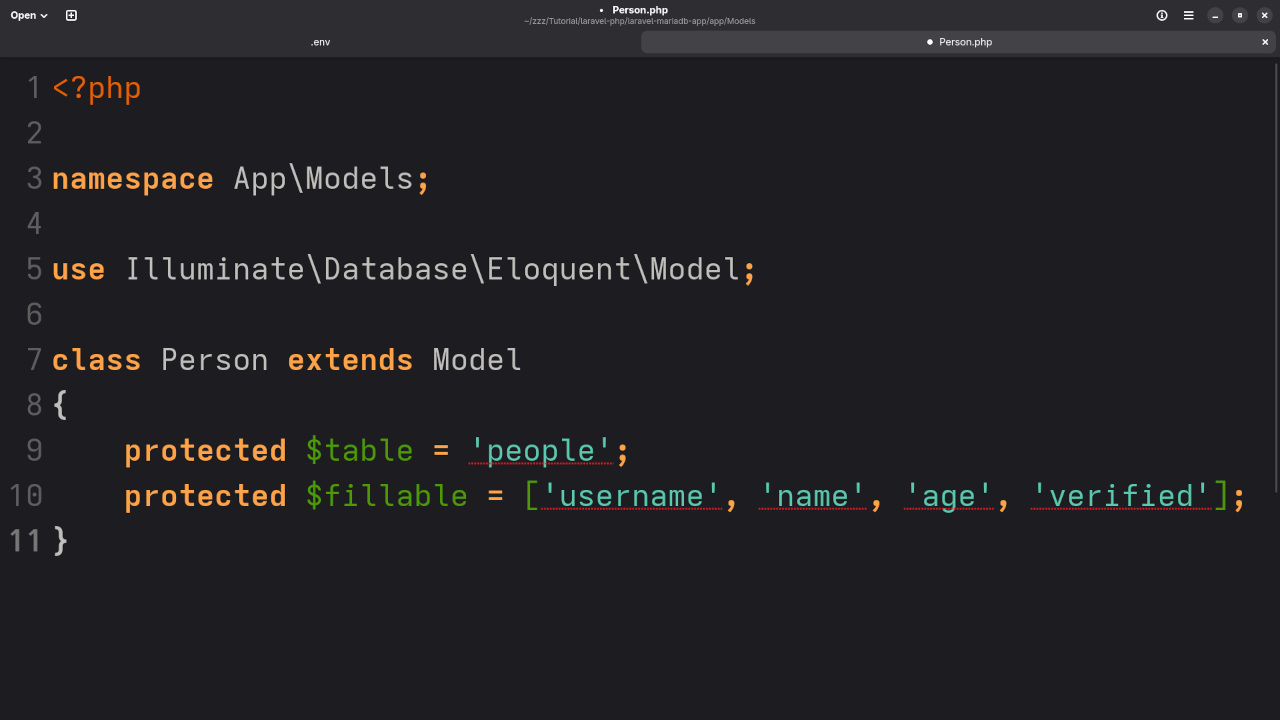
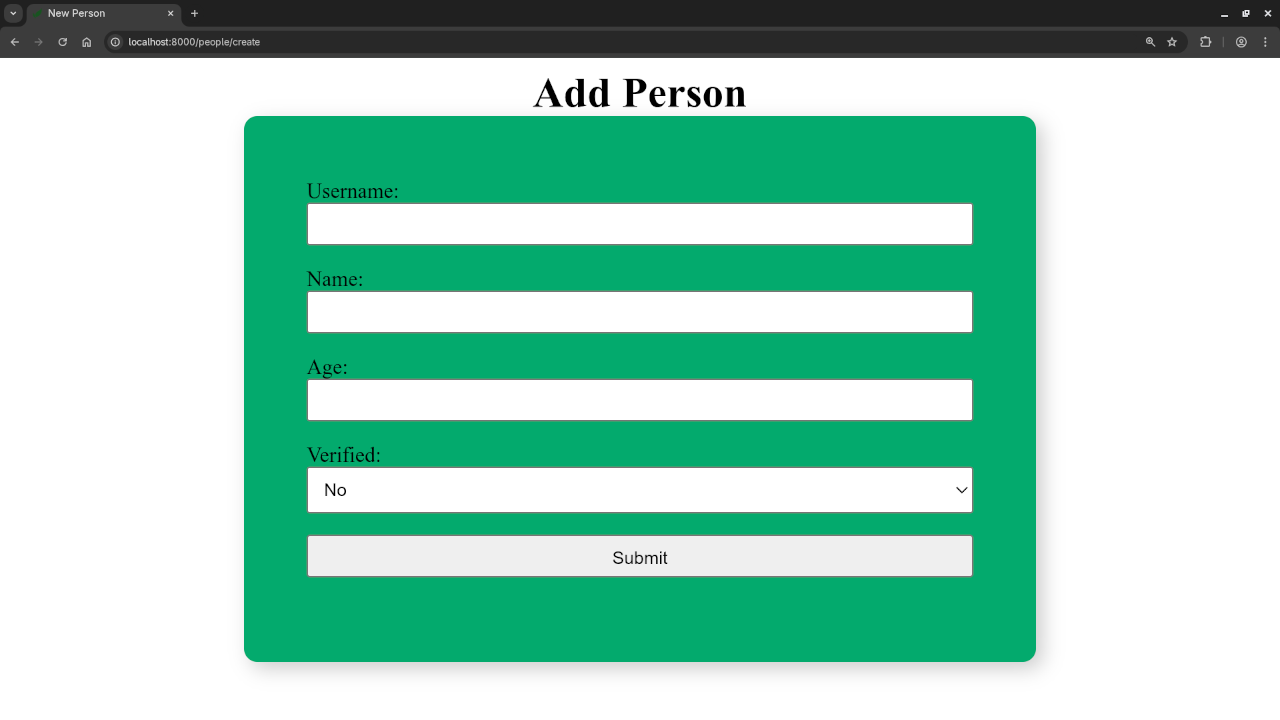
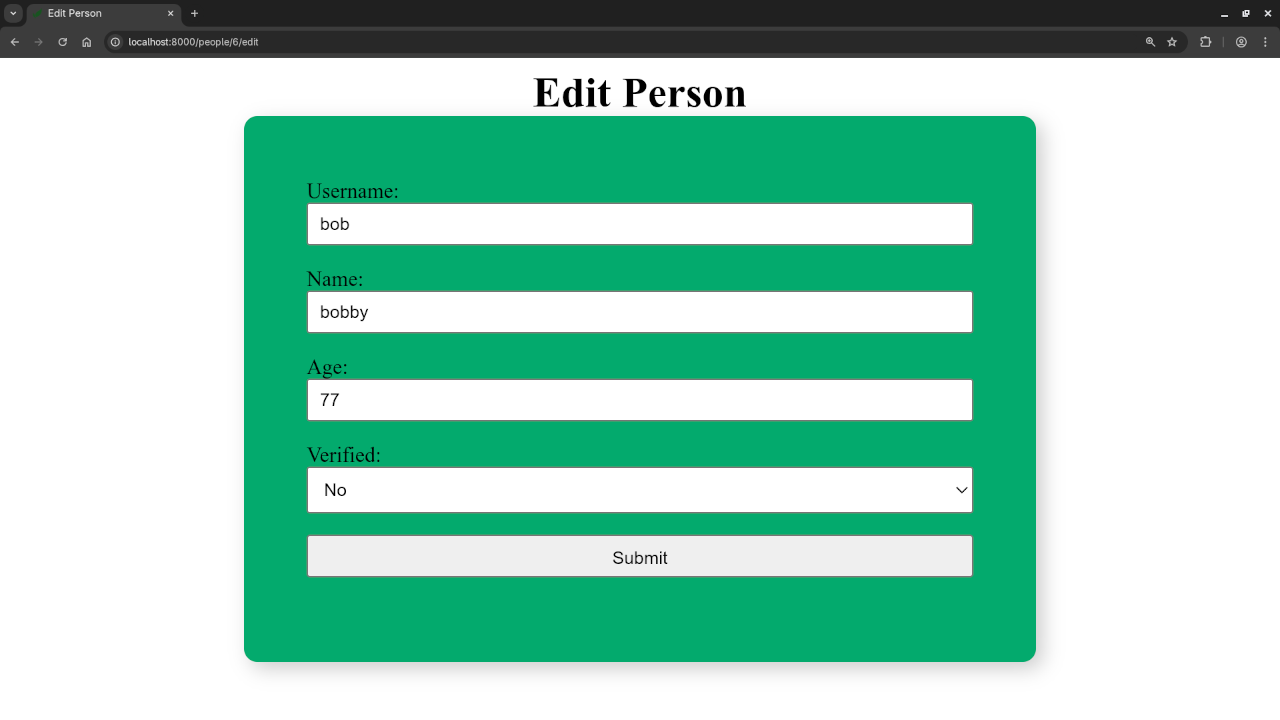
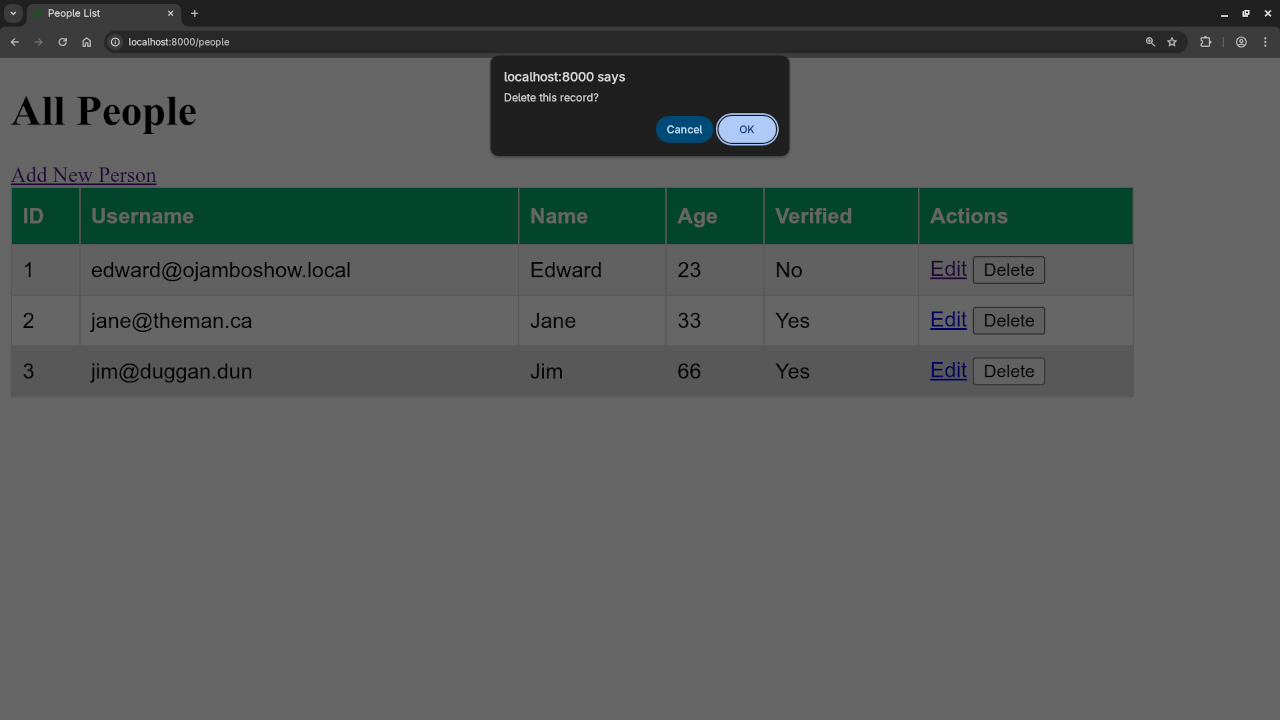
In this beginner example, we will create a Laravel application that connects to an existing MariaDB table called people with the following columns:
id
username
name
age
verified
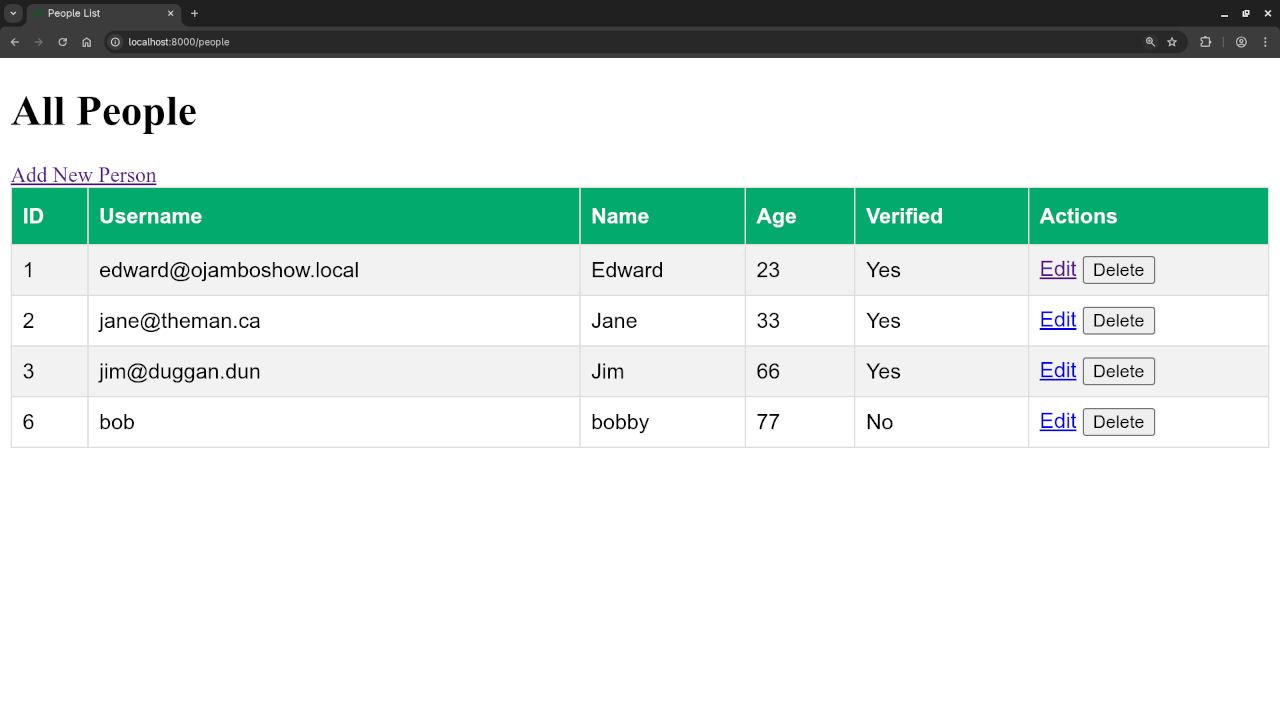
The application will perform full CRUD operations:
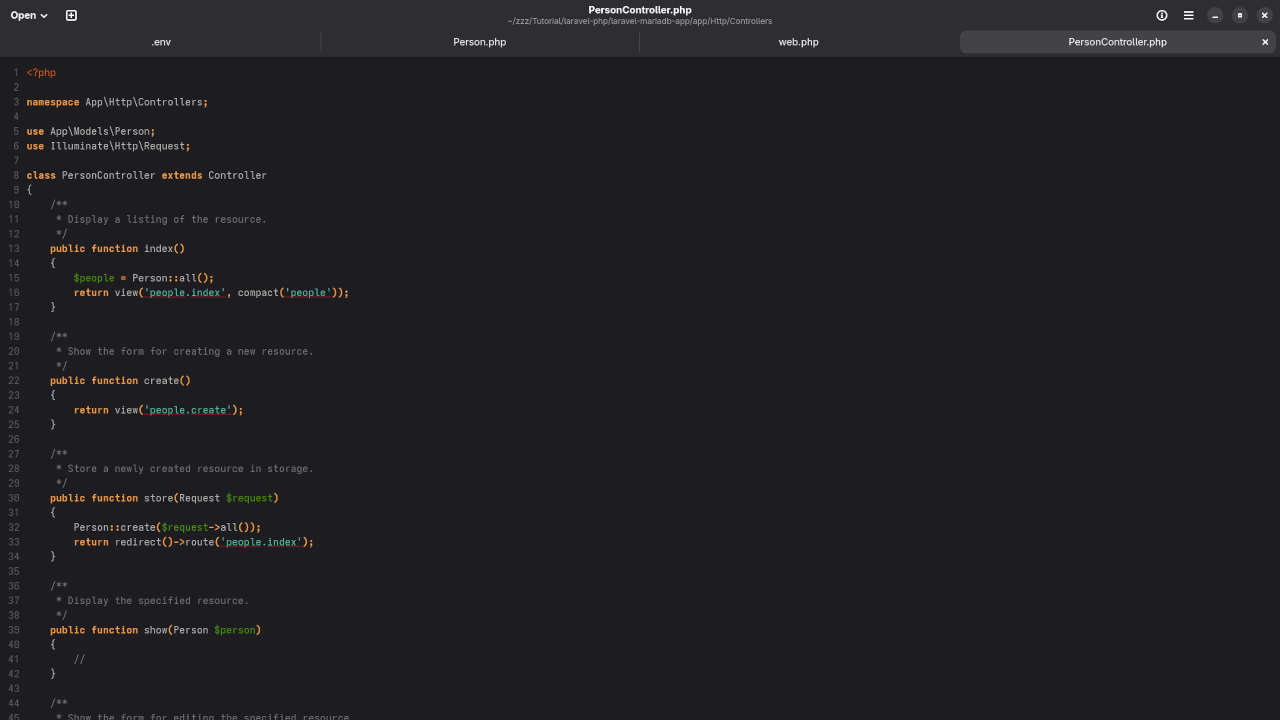
use App\Models\Person;
use Illuminate\Http\Request;
class PersonController extends Controller
{
public function index()
{
$people = Person::all();
return view('people.index', compact('people'));
}
public function create()
{
return view('people.create');
}
public function store(Request $request)
{
Person::create($request->all());
return redirect()->route('people.index');
}
public function edit(Person $person)
{
return view('people.edit', compact('person'));
}
public function update(Request $request, Person $person)
{
$person->update($request->all());
return redirect()->route('people.index');
}
public function destroy(Person $person)
{
$person->delete();
return redirect()->route('people.index');
}
}
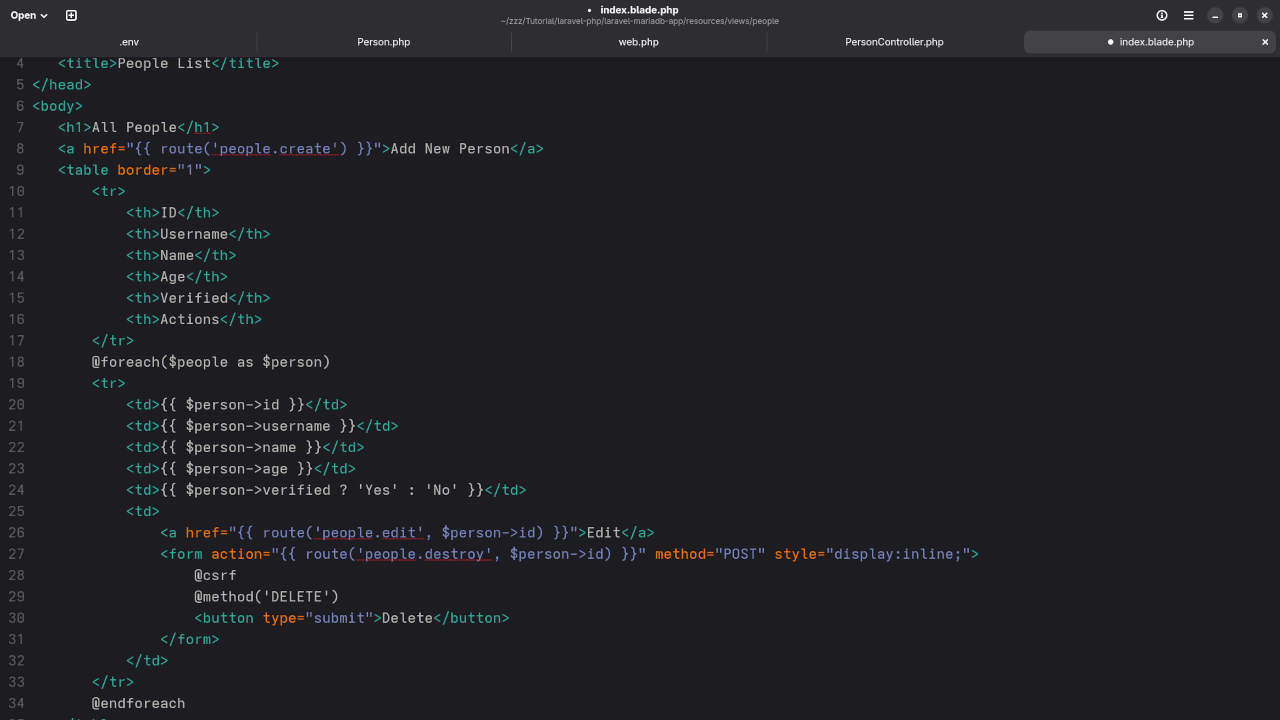
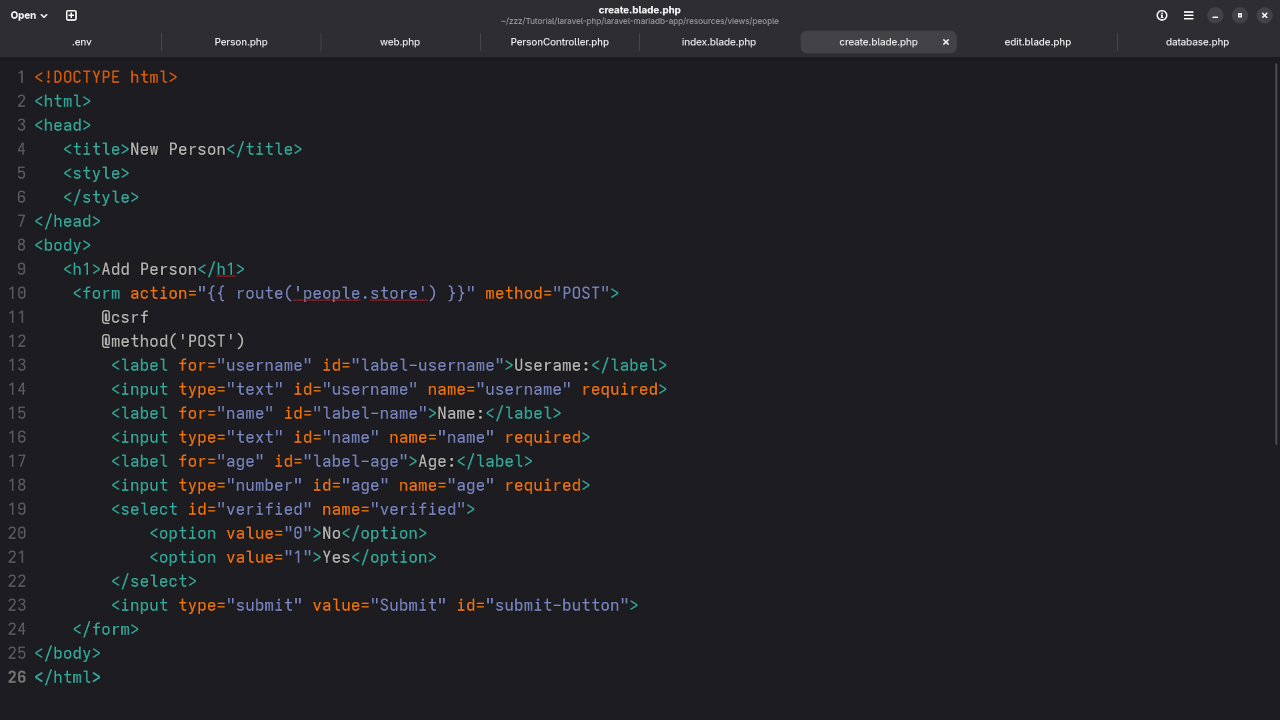
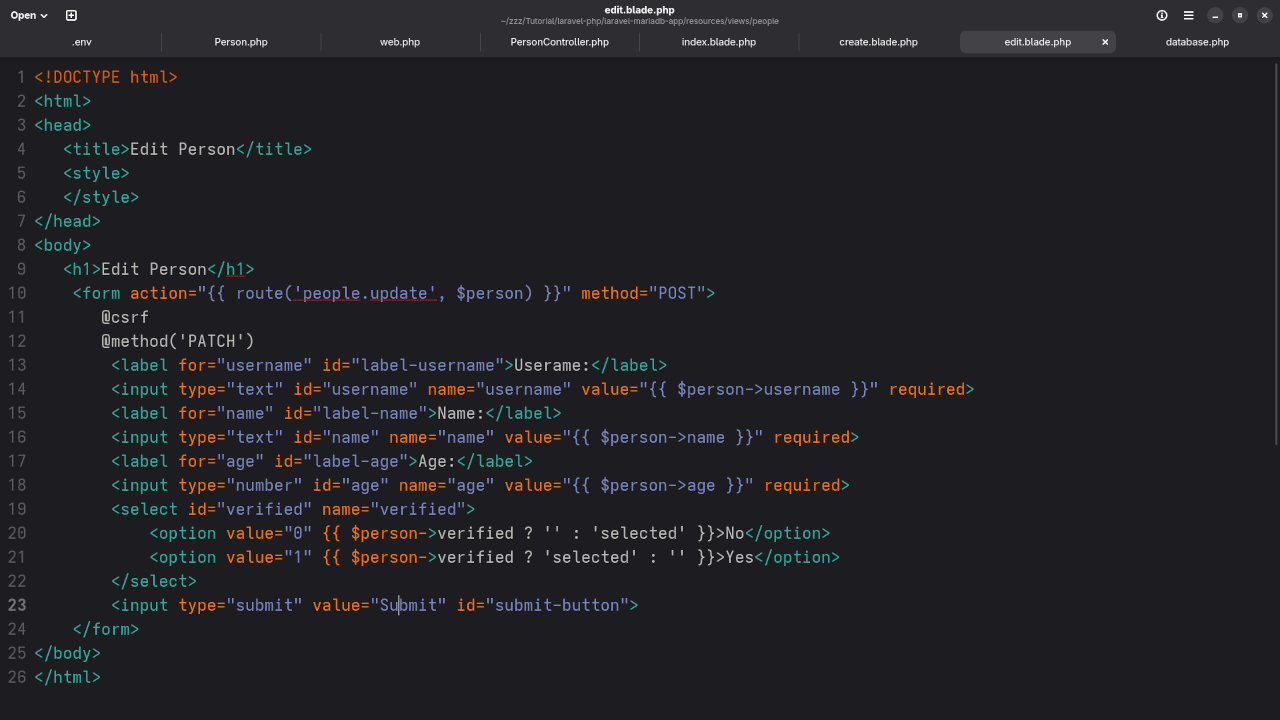
Step 6: Create Views (Blade Templates)
Inside resources/views/people folder, create the following files:
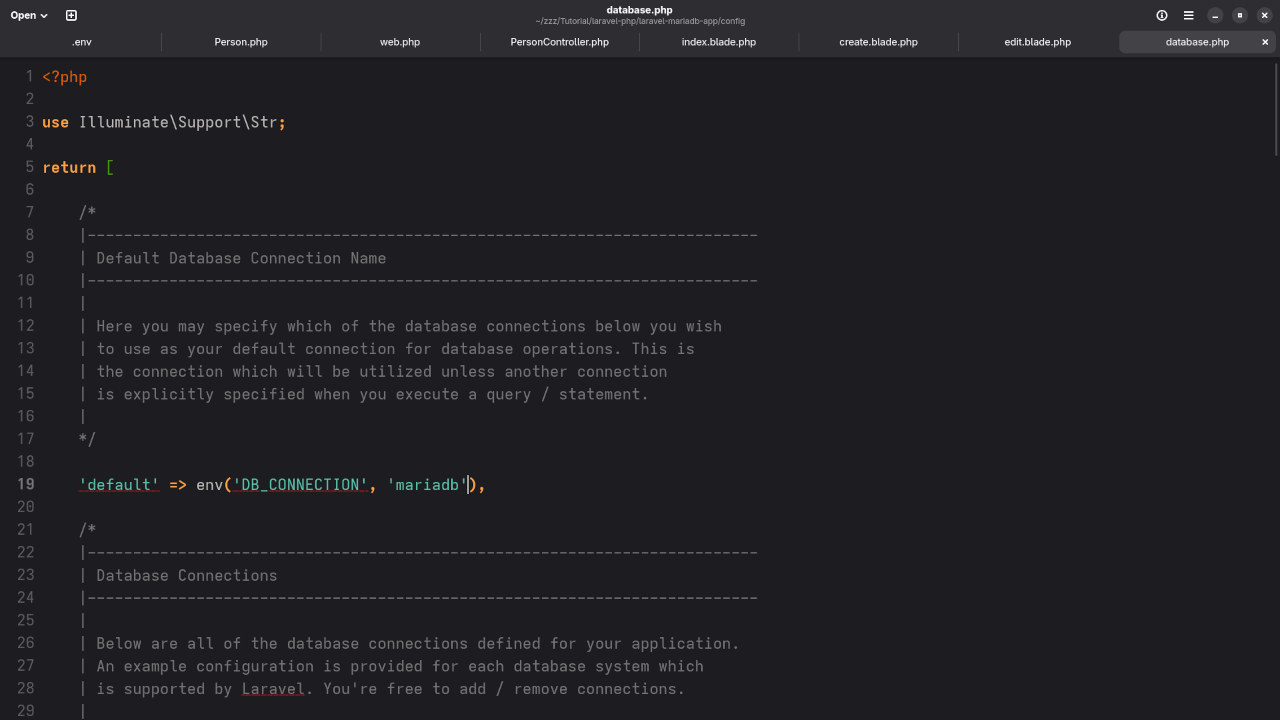
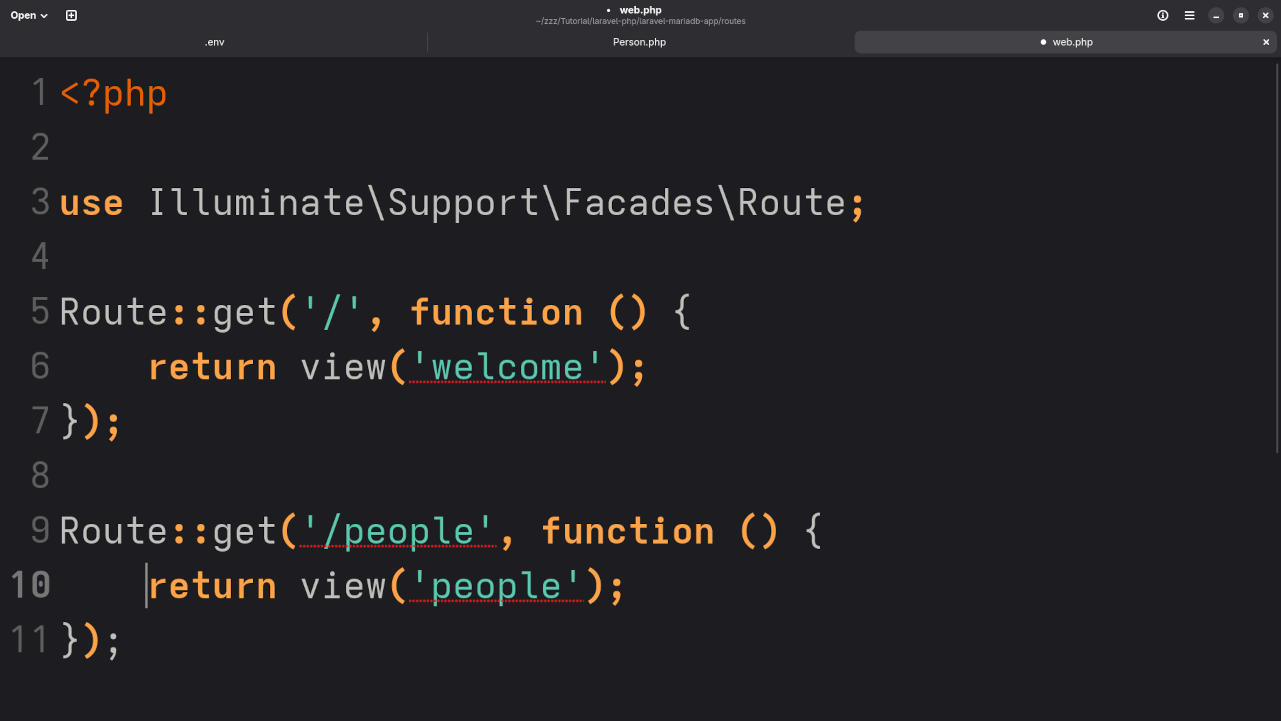
Gnome Text Editor Displaying App Database Configuration FileGnome Text Editor Displaying People ControllerGnome Text Editor Displaying People ModelGnome Text Editor Displaying App People View Index FileGnome Text Editor Displaying App People View Add FileGnome Text Editor Displaying App People View Edit FileWeb Browser Displaying App People RouteWeb Browser Displaying Created Person ResultWeb Browser Displaying Add A Person FormWeb Browser Displaying Edit A Person FormWeb Browser Displaying Remove Person PromptCustom View Records In Web Browser
Want to Learn More?
If you are interested in mastering PHP and Laravel, check out my book and course:
How to Use the HTML5 required Attribute in Web Forms (Beginner Tutorial)
When building web forms, it is important to make sure that users fill out all necessary information. HTML5 introduced the required attribute to help developers easily validate forms without needing JavaScript or backend code.
What Is the required Attribute?
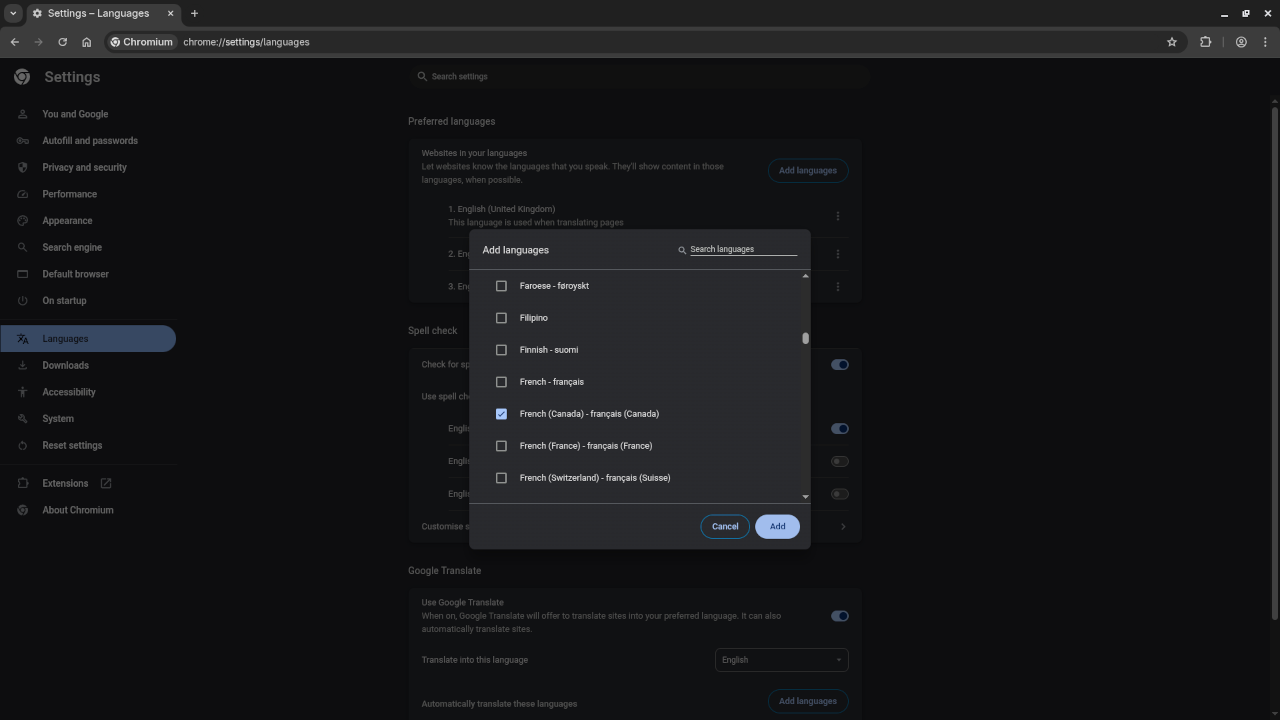
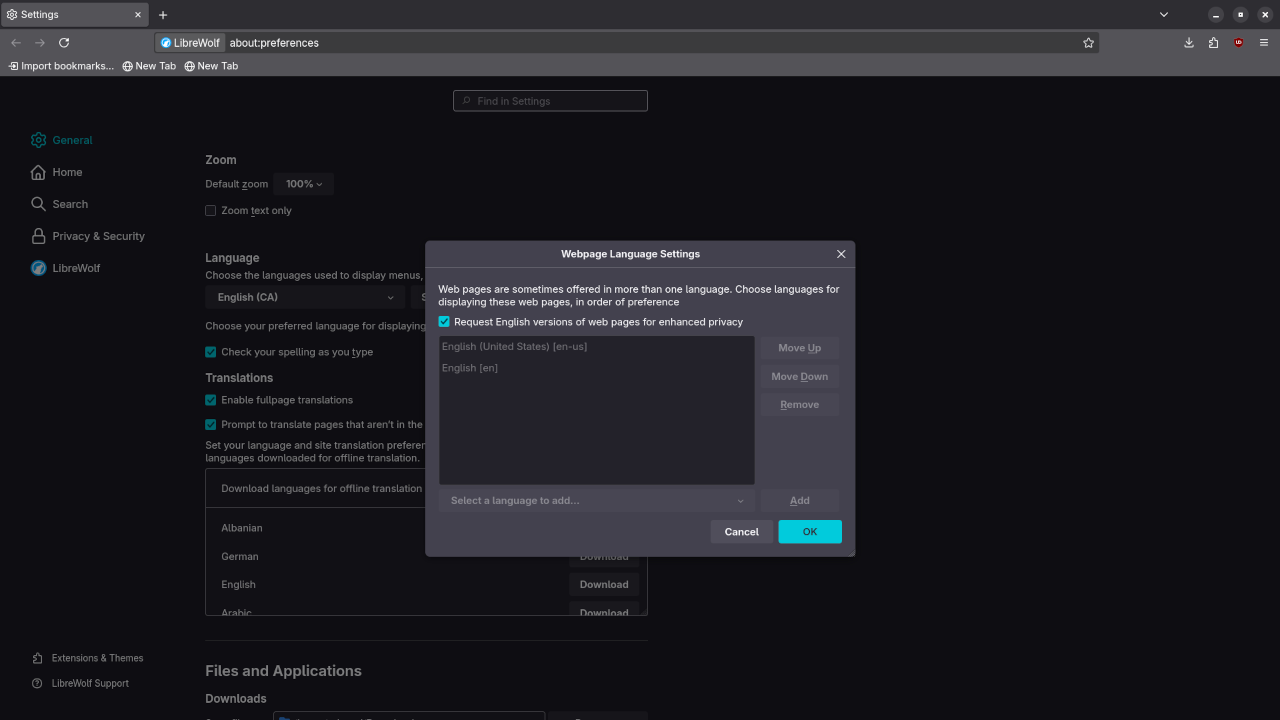
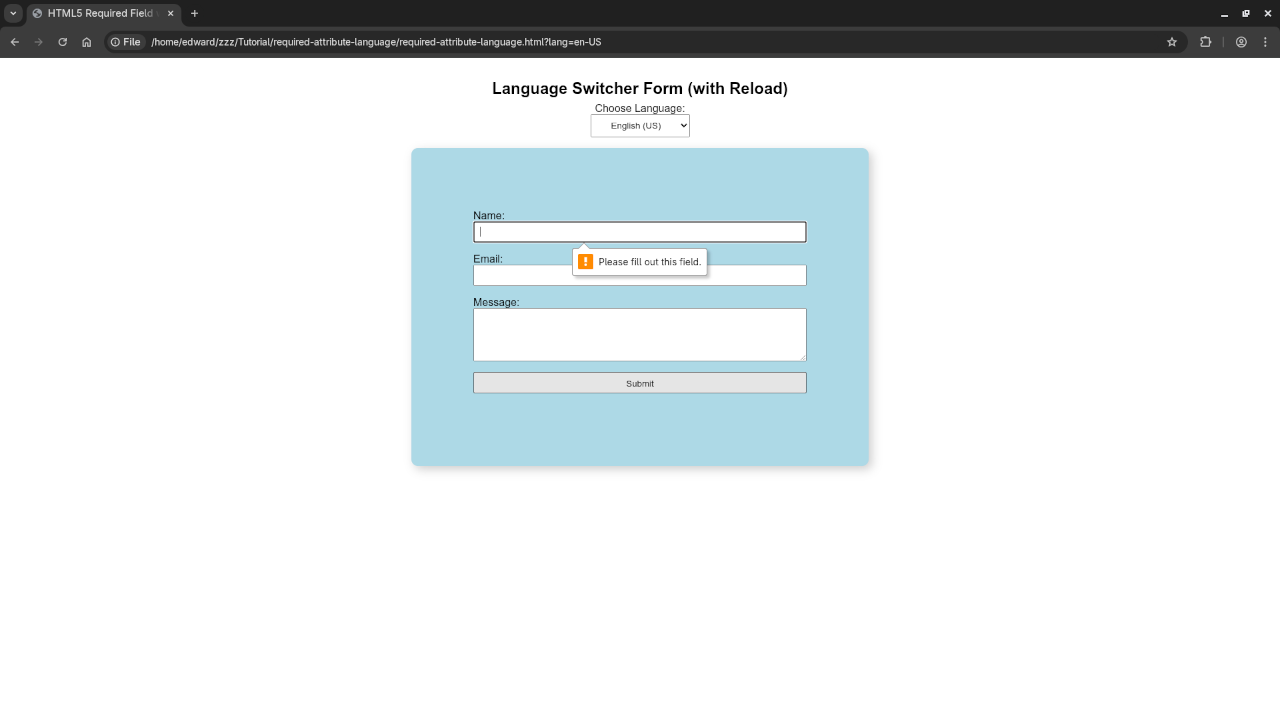
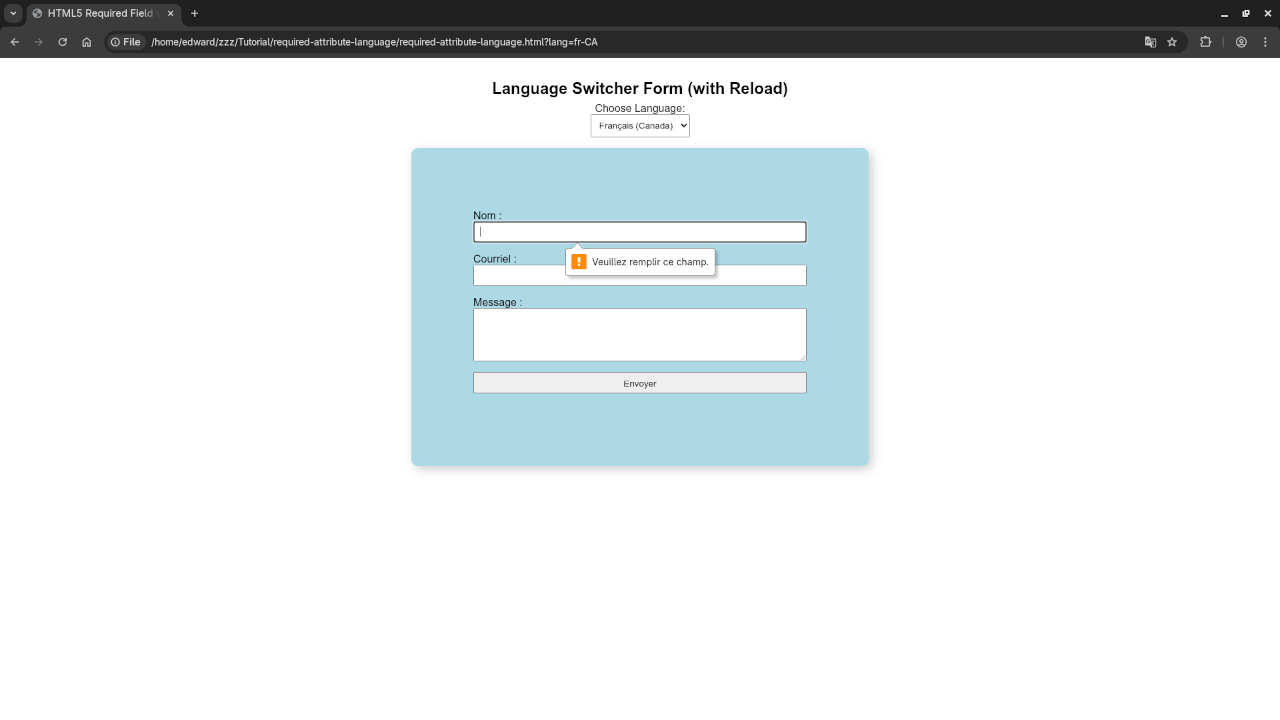
The required attribute is a boolean attribute that can be added to form elements to make them mandatory. If a user tries to submit a form without filling out a required field, the browser will display a built-in error message in the language defined by the browser or the HTML lang attribute.
The browser’s validation message is automatically shown in the language specified in the lang attribute of the <html> tag. For example:
en-US: ‘Please fill out this field.’
en-CA: ‘Please fill out this field.’
fr-CA: ‘Veuillez remplir ce champ.’
Using a Language Switcher with Reload
You can allow users to change the language using a dropdown that reloads the page with the correct lang value. This ensures that the browser uses the correct built-in validation messages.
Make sure to read the query string in JavaScript or server-side to update the lang attribute accordingly before the form renders.
Interactive Demo
Here’s a live example of the Rotatable Cube in action:
HTML5 Multilingual Form DemoWeb Browser Displaying Chromium Language SettingsWeb Browser Displaying LibreWolf Language SettingsWeb Browser Displaying HTML5 Required USA English Field Language SwitcherWeb Browser Displaying HTML5 Required Canadian French Field Language SwitcherHTML5 Multiple Language Required Field Video
Learn More with Additional Resources
If you are interested in learning more about web development, check out these resources:
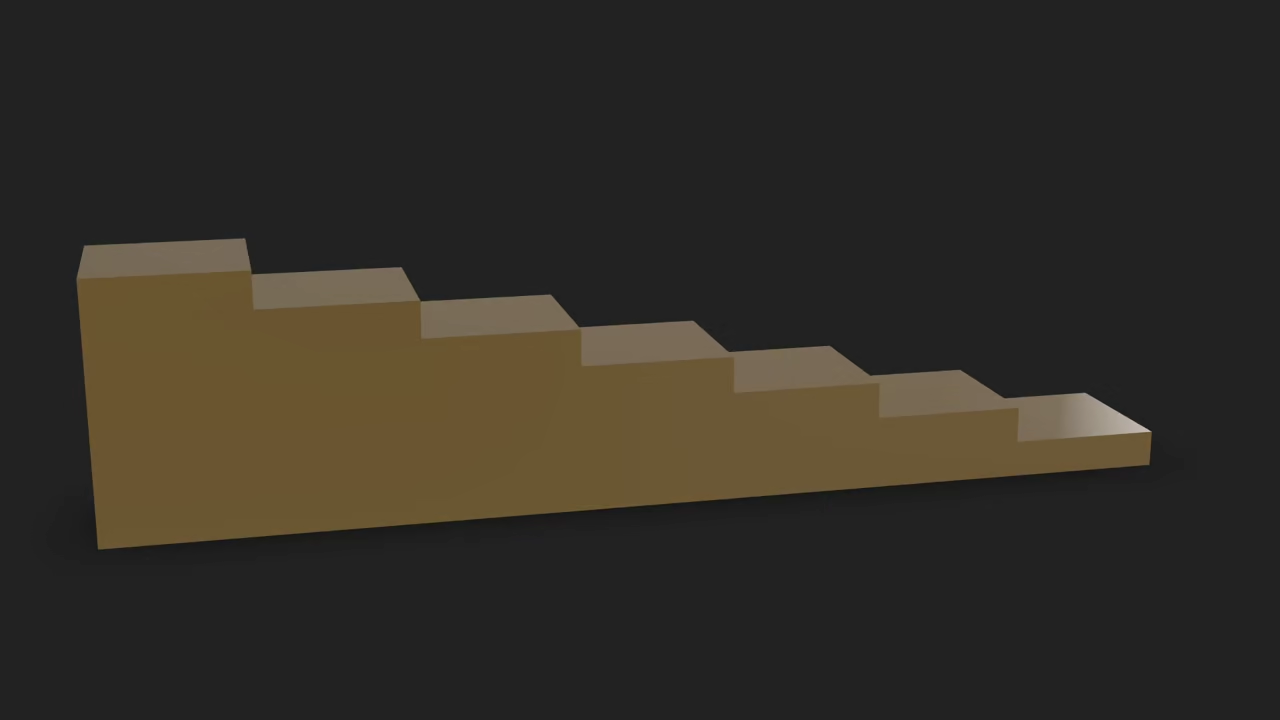
Generate Wood Stairs in Blender Using Python and Display in Browser with Model-Viewer
This beginner-friendly tutorial walks you through how to:
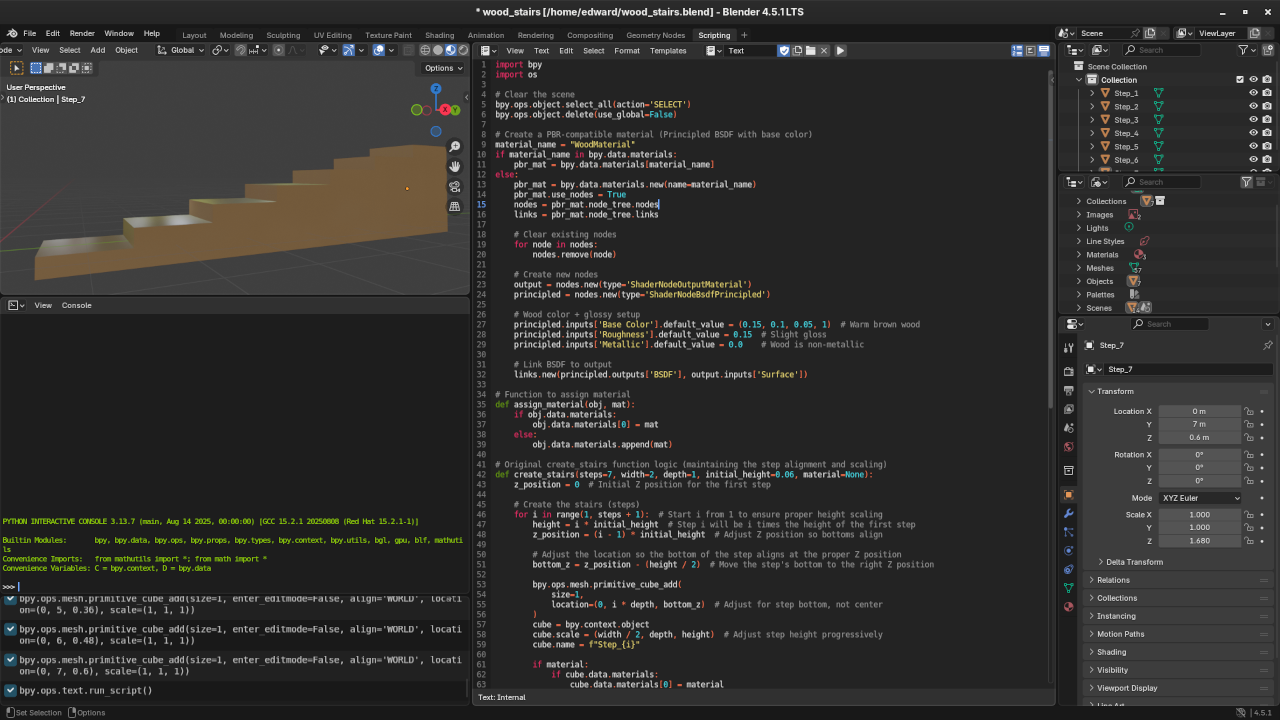
Script wood stairs in Blender using Python
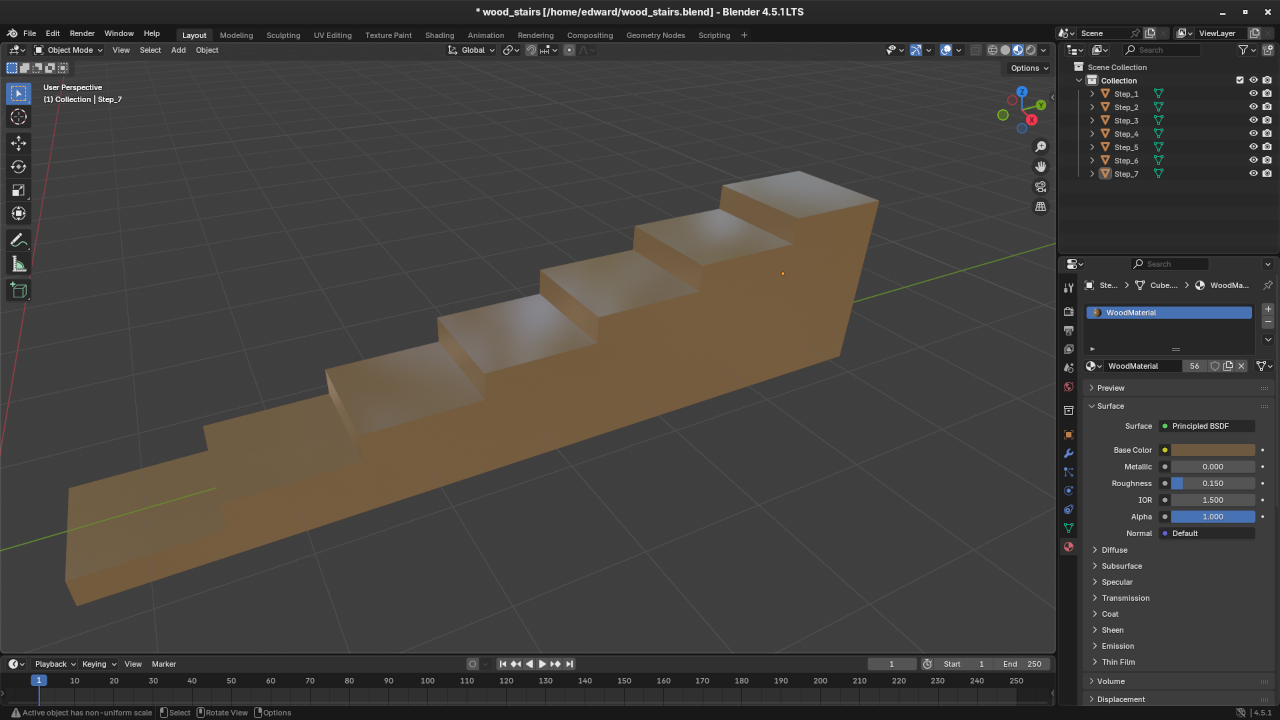
Create and apply a basic wooden material
Save the model as a .blend file
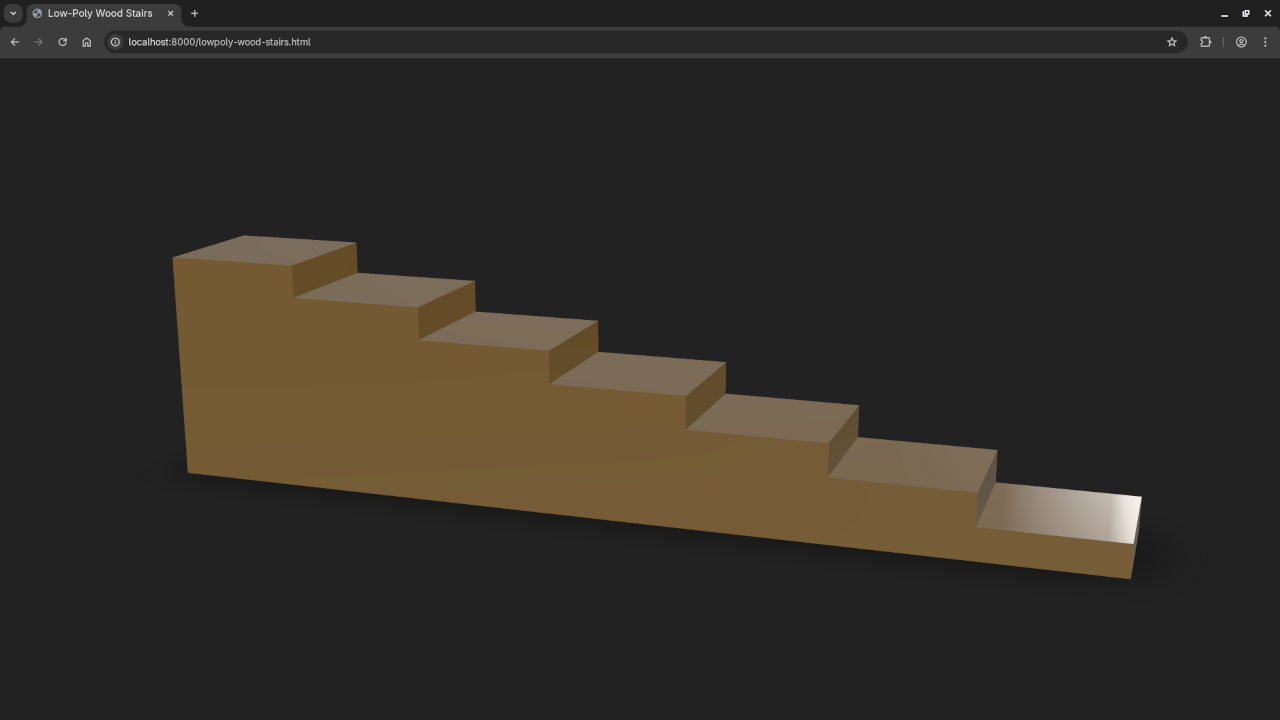
Export the model as a .glb file
Use an HDR environment background
Display the model in a web browser using model-viewer
Step 1: Python Script to Create Stairs, Save .blend, and Export .glb
Create a file called create_wood_stairs.py with the following content:
import bpy
import os
# Clear the scene
bpy.ops.object.select_all(action='SELECT')
bpy.ops.object.delete(use_global=False)
# Create a PBR-compatible material (Principled BSDF with base color)
material_name = "WoodMaterial"
if material_name in bpy.data.materials:
pbr_mat = bpy.data.materials[material_name]
else:
pbr_mat = bpy.data.materials.new(name=material_name)
pbr_mat.use_nodes = True
nodes = pbr_mat.node_tree.nodes
links = pbr_mat.node_tree.links
# Clear existing nodes
for node in nodes:
nodes.remove(node)
# Create new nodes
output = nodes.new(type='ShaderNodeOutputMaterial')
principled = nodes.new(type='ShaderNodeBsdfPrincipled')
# Wood color + glossy setup
principled.inputs['Base Color'].default_value = (0.15, 0.1, 0.05, 1) # Warm brown wood
principled.inputs['Roughness'].default_value = 0.15 # Slight gloss
principled.inputs['Metallic'].default_value = 0.0 # Wood is non-metallic
# Link BSDF to output
links.new(principled.outputs['BSDF'], output.inputs['Surface'])
# Function to assign material
def assign_material(obj, mat):
if obj.data.materials:
obj.data.materials[0] = mat
else:
obj.data.materials.append(mat)
# Original create_stairs function logic (maintaining the step alignment and scaling)
def create_stairs(steps=7, width=2, depth=1, initial_height=0.06, material=None):
z_position = 0 # Initial Z position for the first step
# Create the stairs (steps)
for i in range(1, steps + 1): # Start i from 1 to ensure proper height scaling
height = i * initial_height # Step i will be i times the height of the first step
z_position = (i - 1) * initial_height # Adjust Z position so bottoms align
# Adjust the location so the bottom of the step aligns at the proper Z position
bottom_z = z_position - (height / 2) # Move the step's bottom to the right Z position
bpy.ops.mesh.primitive_cube_add(
size=1,
location=(0, i * depth, bottom_z) # Adjust for step bottom, not center
)
cube = bpy.context.object
cube.scale = (width / 2, depth, height) # Adjust step height progressively
cube.name = f"Step_{i}"
if material:
if cube.data.materials:
cube.data.materials[0] = material
else:
cube.data.materials.append(material)
# Create stairs with the updated material
create_stairs(steps=7, width=2, depth=1.00, initial_height=0.24, material=pbr_mat)
# Save .blend file
blend_save_path = bpy.path.abspath("//wood_stairs.blend")
bpy.ops.wm.save_as_mainfile(filepath=blend_save_path)
# Export to GLB with compatible options
output_path = os.path.join(bpy.path.abspath("//"), "wood_stairs.glb")
bpy.ops.export_scene.gltf(
filepath=output_path,
export_format='GLB',
export_materials='EXPORT',
export_normals=True
)
Git is a free and open-source version control system that helps developers manage code changes efficiently. One of the most essential habits to build as a developer is to commit early and commit often.
This practice helps you:
Prevent loss of work
Create clean and understandable commit histories
Debug faster by isolating changes
Collaborate smoothly with others or even your future self
Why You Should Commit Often
Here are a few reasons why frequent, focused commits are better than one massive commit at the end:
Easier to Track: Each change has a purpose and a message.
Rollback Friendly: Mistakes can be undone one commit at a time.
Readable History: Future developers will thank you for this.
Local Git Examples (No GitHub Required)
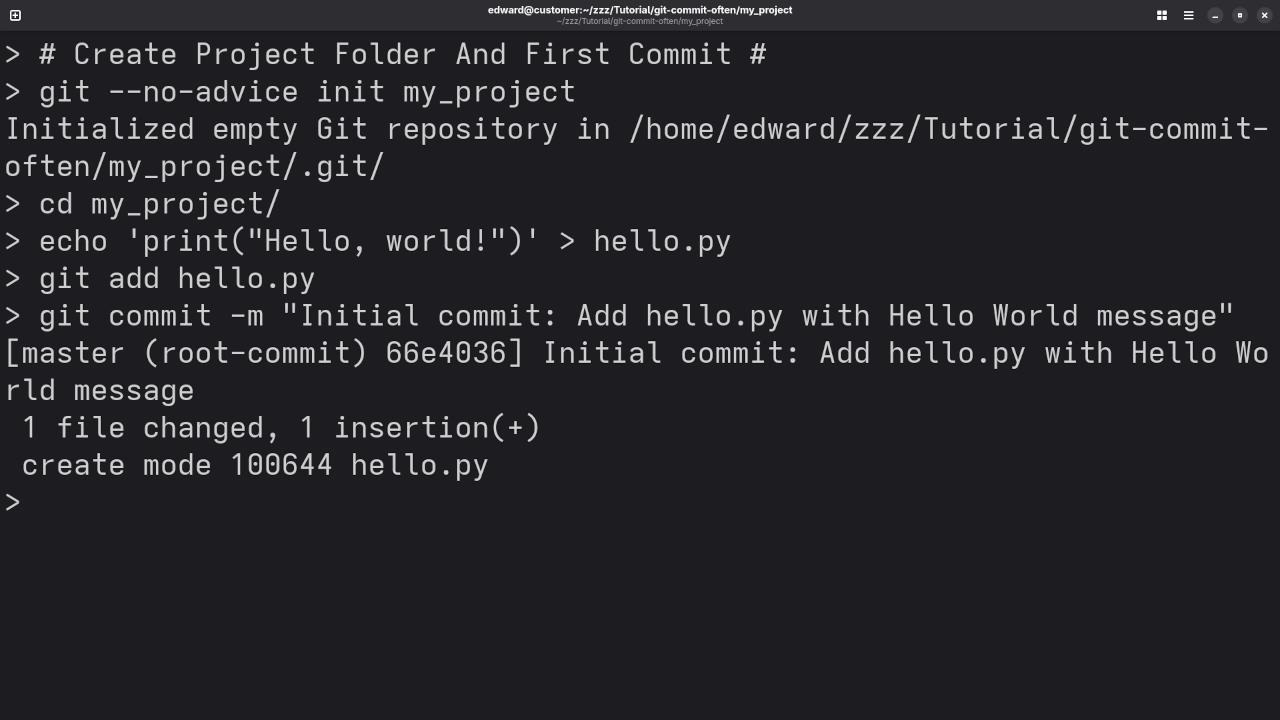
Example 1: Initializing a New Repository and First Commit
mkdir my_project
cd my_project
git init
echo "print('Hello, world!')" > hello.py
git add hello.py
git commit -m "Initial commit: Add hello.py with Hello World message"
This creates a new Git repository, adds a Python file, and makes the first meaningful commit. Always describe the change in your commit message.
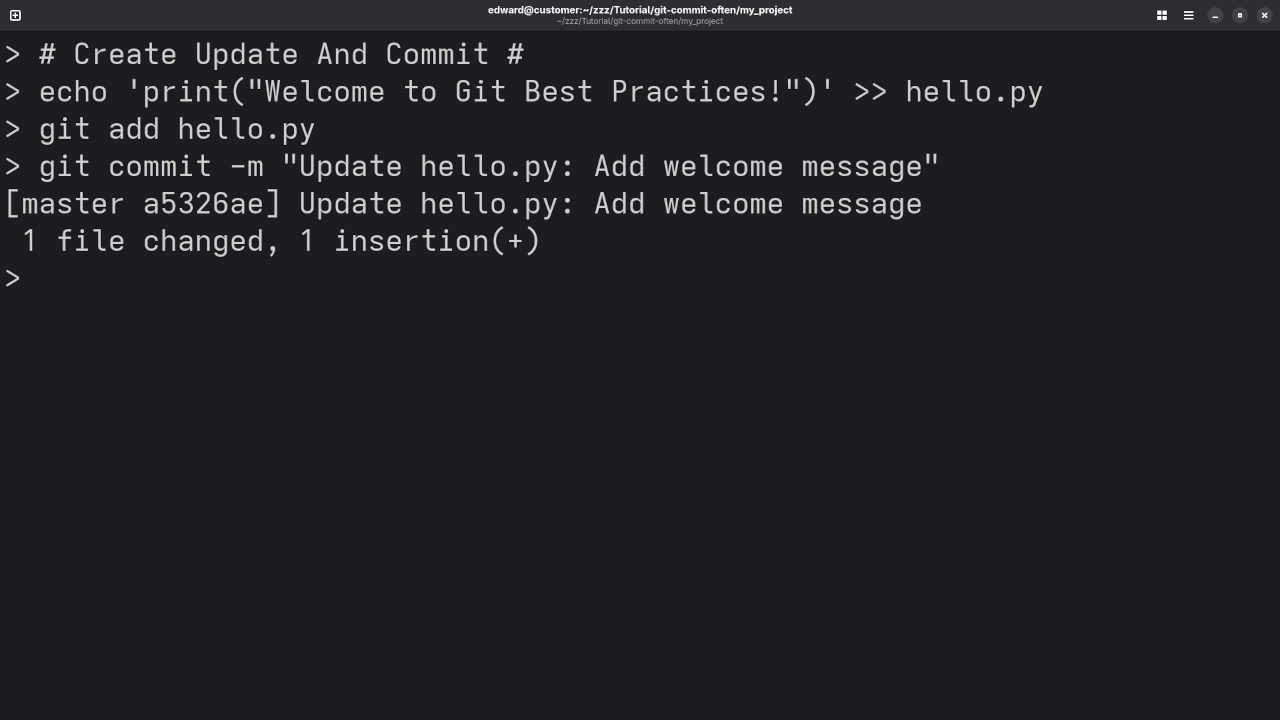
Example 2: Making a Small Update and Committing Again
echo "print('Welcome to Git Best Practices!')" >> hello.py
git add hello.py
git commit -m "Update hello.py: Add welcome message"
A small change was made and committed immediately. This keeps the history clean and focused.
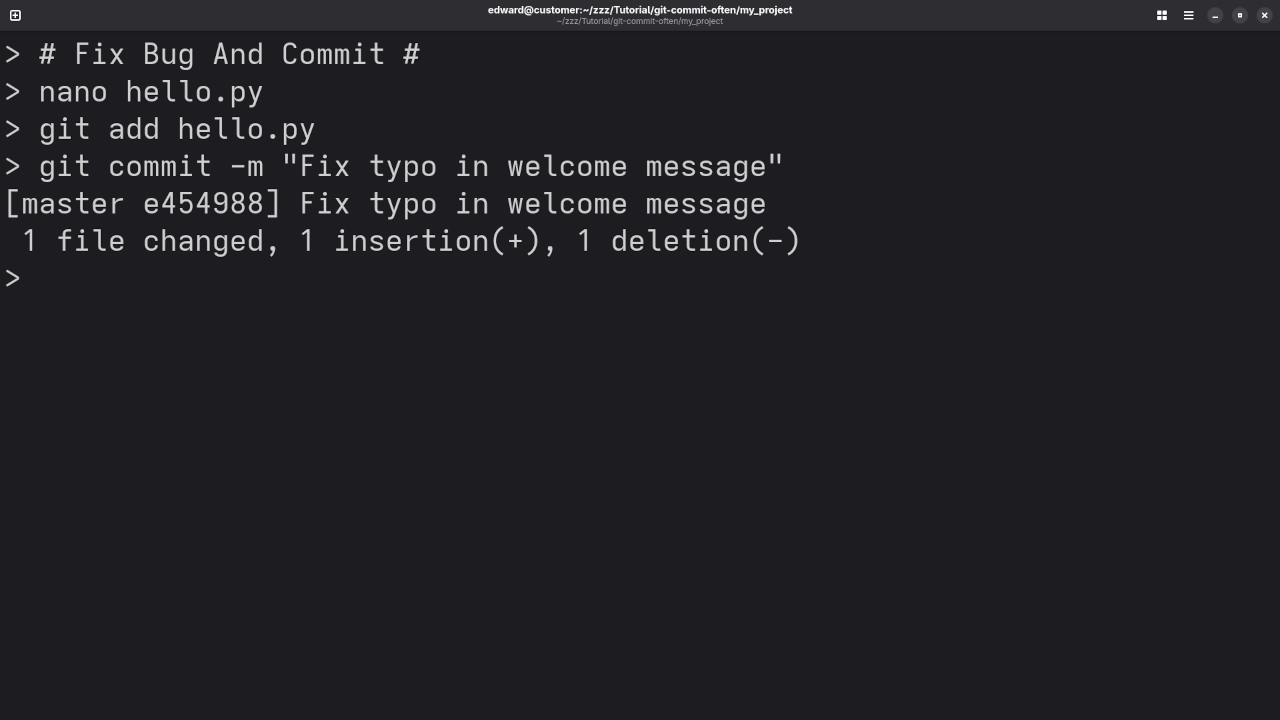
Example 3: Fixing a Typo or Bug
nano hello.py # (fix typo or bug in the code manually)
git add hello.py
git commit -m "Fix typo in welcome message"
Even small fixes deserve their own commit. This helps track what was fixed and when.
Screenshots and Screencast Tutorial
Command Line Git Project Creation CommitCommand Line Git Project Update CommitCommand Line Git Project Bug CommitScreencast Of Git Init To Few Commits
Start with small, descriptive commits and build up a habit of frequent saves. Your project history becomes your best documentation and backup. Remember:
Commit Early. Commit Often.
If you found this helpful, feel free to share it or reach out with questions. Happy coding!
The Apache License 2.0 is one of the most popular and well-respected open source licenses. If you are a developer, content creator, or software user looking to understand your rights and responsibilities under this license, this guide is for you.
The Apache License is used by major projects like Apache HTTP Server, Android, and many tools from Google and Facebook. It is a permissive license, meaning it gives users a lot of freedom—without forcing them to make their own software open source.
Use the software for personal, educational, or commercial purposes.
Modify the source code.
Distribute the original or modified software.
Include the code in proprietary (closed source) projects.
The only major requirements are attribution, license inclusion, and disclosure of changes.
Key Features of the Apache License 2.0
Feature
Description
Free Use
Use the software for any purpose without paying royalties.
Modification
You can change the source code as needed.
Distribution
You can share the software, with or without changes.
License Notice
You must include a copy of the Apache License in your project.
Attribution
Credit the original authors.
Patent Grant
The license gives you rights to use any patents held by the contributors.
This last point is a big win over older licenses like MIT, which do not explicitly mention patents.
Who Should Use the Apache License?
You should consider the Apache License if:
You want to release open source software but allow it to be used in closed-source or commercial products.
You care about patent protection.
You want a license that is enterprise-friendly and compatible with global legal systems.
Apache License Sample
                                 Apache License
                           Version 2.0, January 2004
                        http://www.apache.org/licenses/

   TERMS AND CONDITIONS FOR USE, REPRODUCTION, AND DISTRIBUTION

   1. Definitions.

      "License" shall mean the terms and conditions for use, reproduction,
      and distribution as defined by Sections 1 through 9 of this document.

      "Licensor" shall mean the copyright owner or entity authorized by
      the copyright owner that is granting the License.

      "Legal Entity" shall mean the union of the acting entity and all
      other entities that control, are controlled by, or are under common
      control with that entity. For the purposes of this definition,
      "control" means (i) the power, direct or indirect, to cause the
      direction or management of such entity, whether by contract or
      otherwise, or (ii) ownership of fifty percent (50%) or more of the
      outstanding shares, or (iii) beneficial ownership of such entity.

      "You" (or "Your") shall mean an individual or Legal Entity
      exercising permissions granted by this License.

      "Source" form shall mean the preferred form for making modifications,
      including but not limited to software source code, documentation
      source, and configuration files.

      "Object" form shall mean any form resulting from mechanical
      transformation or translation of a Source form, including but
      not limited to compiled object code, generated documentation,
      and conversions to other media types.

      "Work" shall mean the work of authorship, whether in Source or
      Object form, made available under the License, as indicated by a
      copyright notice that is included in or attached to the work
      (an example is provided in the Appendix below).

      "Derivative Works" shall mean any work, whether in Source or Object
      form, that is based on (or derived from) the Work and for which the
      editorial revisions, annotations, elaborations, or other modifications
      represent, as a whole, an original work of authorship. For the purposes
      of this License, Derivative Works shall not include works that remain
      separable from, or merely link (or bind by name) to the interfaces of,
      the Work and Derivative Works thereof.

      "Contribution" shall mean any work of authorship, including
      the original version of the Work and any modifications or additions
      to that Work or Derivative Works thereof, that is intentionally
      submitted to Licensor for inclusion in the Work by the copyright owner
      or by an individual or Legal Entity authorized to submit on behalf of
      the copyright owner. For the purposes of this definition, "submitted"
      means any form of electronic, verbal, or written communication sent
      to the Licensor or its representatives, including but not limited to
      communication on electronic mailing lists, source code control systems,
      and issue tracking systems that are managed by, or on behalf of, the
      Licensor for the purpose of discussing and improving the Work, but
      excluding communication that is conspicuously marked or otherwise
      designated in writing by the copyright owner as "Not a Contribution."

      "Contributor" shall mean Licensor and any individual or Legal Entity
      on behalf of whom a Contribution has been received by Licensor and
      subsequently incorporated within the Work.

   2. Grant of Copyright License. Subject to the terms and conditions of
      this License, each Contributor hereby grants to You a perpetual,
      worldwide, non-exclusive, no-charge, royalty-free, irrevocable
      copyright license to reproduce, prepare Derivative Works of,
      publicly display, publicly perform, sublicense, and distribute the
      Work and such Derivative Works in Source or Object form.

   3. Grant of Patent License. Subject to the terms and conditions of
      this License, each Contributor hereby grants to You a perpetual,
      worldwide, non-exclusive, no-charge, royalty-free, irrevocable
      (except as stated in this section) patent license to make, have made,
      use, offer to sell, sell, import, and otherwise transfer the Work,
      where such license applies only to those patent claims licensable
      by such Contributor that are necessarily infringed by their
      Contribution(s) alone or by combination of their Contribution(s)
      with the Work to which such Contribution(s) was submitted. If You
      institute patent litigation against any entity (including a
      cross-claim or counterclaim in a lawsuit) alleging that the Work
      or a Contribution incorporated within the Work constitutes direct
      or contributory patent infringement, then any patent licenses
      granted to You under this License for that Work shall terminate
      as of the date such litigation is filed.

   4. Redistribution. You may reproduce and distribute copies of the
      Work or Derivative Works thereof in any medium, with or without
      modifications, and in Source or Object form, provided that You
      meet the following conditions:

      (a) You must give any other recipients of the Work or
          Derivative Works a copy of this License; and

      (b) You must cause any modified files to carry prominent notices
          stating that You changed the files; and

      (c) You must retain, in the Source form of any Derivative Works
          that You distribute, all copyright, patent, trademark, and
          attribution notices from the Source form of the Work,
          excluding those notices that do not pertain to any part of
          the Derivative Works; and

      (d) If the Work includes a "NOTICE" text file as part of its
          distribution, then any Derivative Works that You distribute must
          include a readable copy of the attribution notices contained
          within such NOTICE file, excluding those notices that do not
          pertain to any part of the Derivative Works, in at least one
          of the following places: within a NOTICE text file distributed
          as part of the Derivative Works; within the Source form or
          documentation, if provided along with the Derivative Works; or,
          within a display generated by the Derivative Works, if and
          wherever such third-party notices normally appear. The contents
          of the NOTICE file are for informational purposes only and
          do not modify the License. You may add Your own attribution
          notices within Derivative Works that You distribute, alongside
          or as an addendum to the NOTICE text from the Work, provided
          that such additional attribution notices cannot be construed
          as modifying the License.

      You may add Your own copyright statement to Your modifications and
      may provide additional or different license terms and conditions
      for use, reproduction, or distribution of Your modifications, or
      for any such Derivative Works as a whole, provided Your use,
      reproduction, and distribution of the Work otherwise complies with
      the conditions stated in this License.

   5. Submission of Contributions. Unless You explicitly state otherwise,
      any Contribution intentionally submitted for inclusion in the Work
      by You to the Licensor shall be under the terms and conditions of
      this License, without any additional terms or conditions.
      Notwithstanding the above, nothing herein shall supersede or modify
      the terms of any separate license agreement you may have executed
      with Licensor regarding such Contributions.

   6. Trademarks. This License does not grant permission to use the trade
      names, trademarks, service marks, or product names of the Licensor,
      except as required for reasonable and customary use in describing the
      origin of the Work and reproducing the content of the NOTICE file.

   7. Disclaimer of Warranty. Unless required by applicable law or
      agreed to in writing, Licensor provides the Work (and each
      Contributor provides its Contributions) on an "AS IS" BASIS,
      WITHOUT WARRANTIES OR CONDITIONS OF ANY KIND, either express or
      implied, including, without limitation, any warranties or conditions
      of TITLE, NON-INFRINGEMENT, MERCHANTABILITY, or FITNESS FOR A
      PARTICULAR PURPOSE. You are solely responsible for determining the
      appropriateness of using or redistributing the Work and assume any
      risks associated with Your exercise of permissions under this License.

   8. Limitation of Liability. In no event and under no legal theory,
      whether in tort (including negligence), contract, or otherwise,
      unless required by applicable law (such as deliberate and grossly
      negligent acts) or agreed to in writing, shall any Contributor be
      liable to You for damages, including any direct, indirect, special,
      incidental, or consequential damages of any character arising as a
      result of this License or out of the use or inability to use the
      Work (including but not limited to damages for loss of goodwill,
      work stoppage, computer failure or malfunction, or any and all
      other commercial damages or losses), even if such Contributor
      has been advised of the possibility of such damages.

   9. Accepting Warranty or Additional Liability. While redistributing
      the Work or Derivative Works thereof, You may choose to offer,
      and charge a fee for, acceptance of support, warranty, indemnity,
      or other liability obligations and/or rights consistent with this
      License. However, in accepting such obligations, You may act only
      on Your own behalf and on Your sole responsibility, not on behalf
      of any other Contributor, and only if You agree to indemnify,
      defend, and hold each Contributor harmless for any liability
      incurred by, or claims asserted against, such Contributor by reason
      of your accepting any such warranty or additional liability.

   END OF TERMS AND CONDITIONS

   APPENDIX: How to apply the Apache License to your work.

      To apply the Apache License to your work, attach the following
      boilerplate notice, with the fields enclosed by brackets "[]"
      replaced with your own identifying information. (Don't include
      the brackets!)  The text should be enclosed in the appropriate
      comment syntax for the file format. We also recommend that a
      file or class name and description of purpose be included on the
      same "printed page" as the copyright notice for easier
      identification within third-party archives.

   Copyright [yyyy] [name of copyright owner]

   Licensed under the Apache License, Version 2.0 (the "License");
   you may not use this file except in compliance with the License.
   You may obtain a copy of the License at

       http://www.apache.org/licenses/LICENSE-2.0

   Unless required by applicable law or agreed to in writing, software
   distributed under the License is distributed on an "AS IS" BASIS,
   WITHOUT WARRANTIES OR CONDITIONS OF ANY KIND, either express or implied.
   See the License for the specific language governing permissions and
   limitations under the License.
Permissions
Commercial use
Distribution
Modification
Patent use
Private use
Conditions
License and copyright notice must be included
Changes must be included
Limitations
Liability not provided
Trademark not provided
Warranty not provided
Screencast
Screencast Of Apache License License Review
My Thoughts on the Apache License
The Apache License 2.0 is a clear and well-drafted license that fits well with today’s software development needs. Its permissiveness makes it popular among developers who want widespread use of their code, and its legal clarity and patent clauses make it a top pick for businesses.
It strikes a nice balance between freedom and protection.
Understanding software licenses doesn’t need to be difficult. The Apache License 2.0 offers freedom with fairness. Whether you’re releasing a new plugin, library, or web app, it’s a solid choice that protects both users and creators.
Thanks for reading, and feel free to reach out if you need help applying open source licenses to your next project.
GNU Nano: Beginner-Friendly Open Source Text Editor for Fedora Linux
GNU Nano is a free, open-source, and easy-to-use command-line text editor. It’s an ideal starting point for Linux users who want to edit files in the terminal without the steep learning curve of more advanced editors like Vim or Emacs.
Nano is distributed under the GNU General Public License v3 (GPLv3), which ensures that it remains free to use, modify, and distribute. It’s especially useful for quick edits to configuration files, scripts, or coding in lightweight environments.
Why Choose GNU Nano?
Simple Interface: Clear, on-screen shortcuts and menu options make it user-friendly.
No Learning Curve: Perfect for beginners who need a text editor inside the terminal.
Built-In Help: Common commands are listed at the bottom of the screen.
How to Install GNU Nano
Nano comes pre-installed on many Linux distributions, but if it’s not, you can install it manually using your system’s package manager.
Fedora Linux (Main Focus)
sudo dnf install nano
Ubuntu / Debian
sudo apt update
sudo apt install nano
Arch Linux
sudo pacman -S nano
macOS (via Homebrew)
brew install nano
Windows
For Windows users, Nano can be accessed via Windows Subsystem for Linux (WSL) or used inside terminal emulators like Git Bash.
Screenshots and Screencast
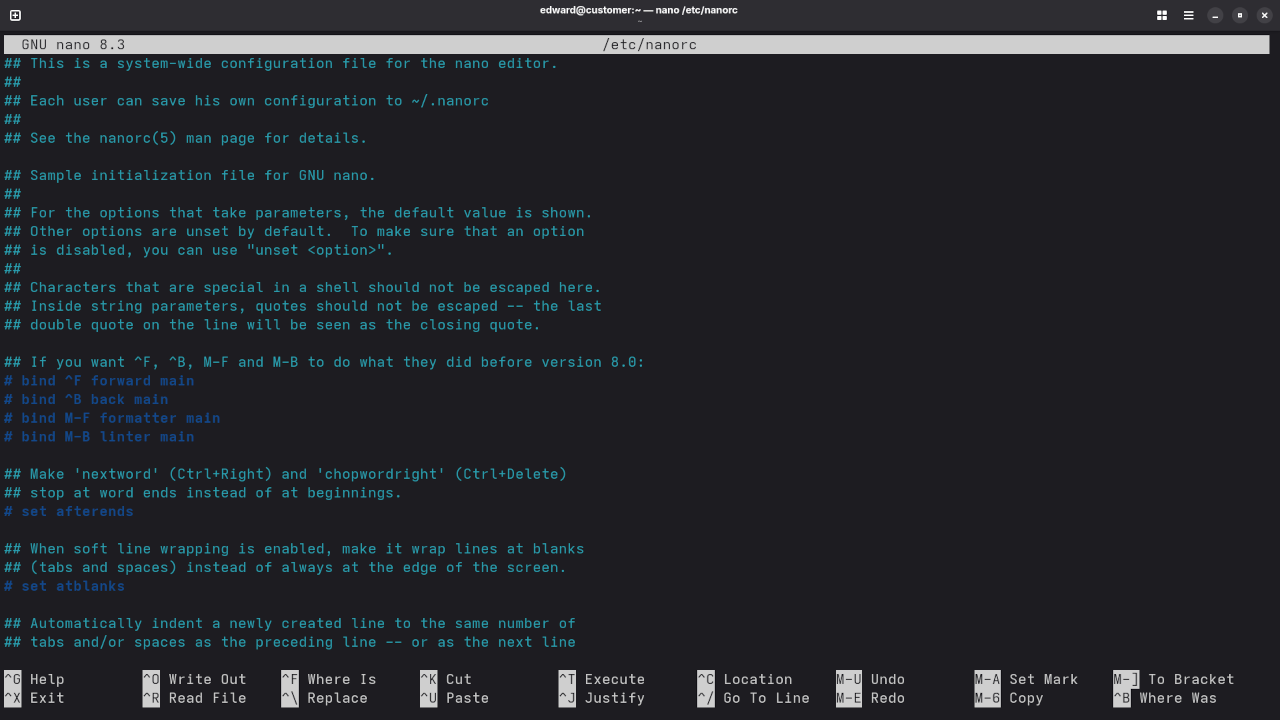
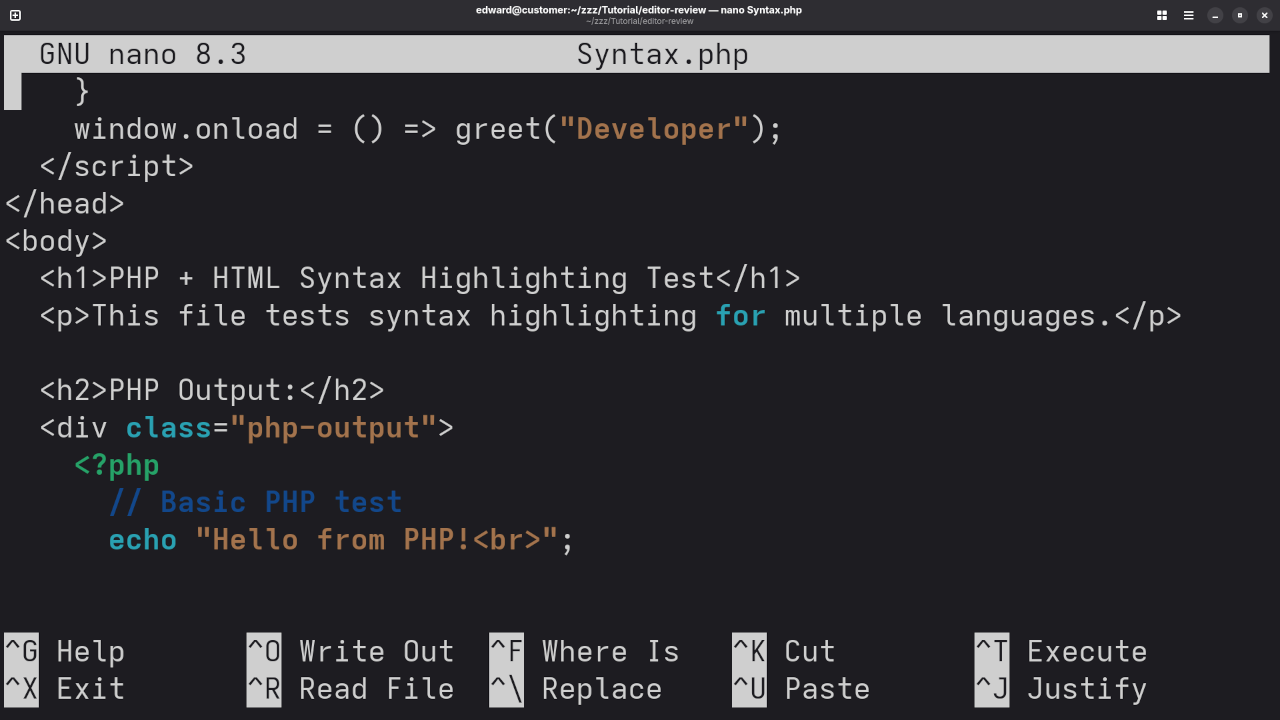
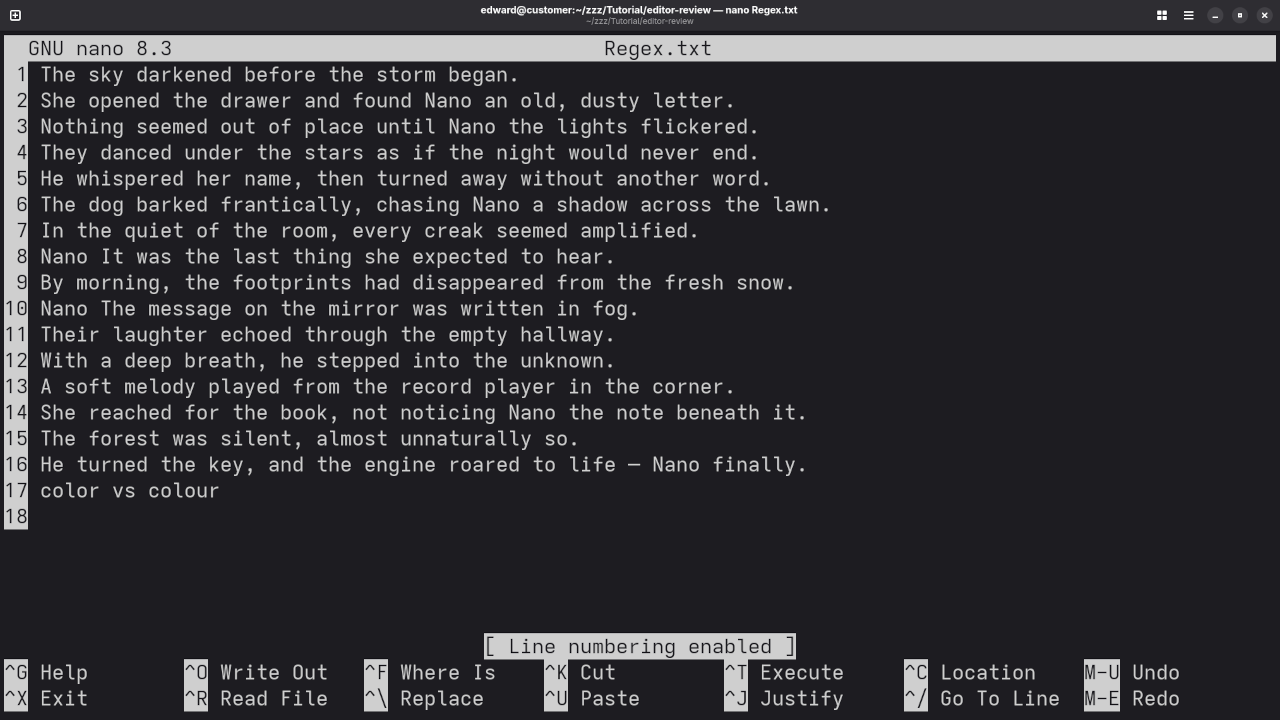
GNU Nano Displaying Nanorc Configuration FileGNU Nano Displaying PHP Syntax HighlightingGNU Nano Displaying Enabled Line Numbers
👉 Screencast showing a beginner session in GNU Nano—editing, saving files, and navigating buffers.
GNU Nano Review And Feature Test
Requirements For Programming Text Editor
Glossary:
Code Editor
Designed for writing and editing source code.
IDE
Integrated Development Environment combines various tools need for software development.
Plugin
Software component that adds specific functionality.
Theme
Preset package containing graphical appearance to customize look and feel.
Open source
Freely available for possible modification and redistribution.
SCM
Source code management use to manage and track modifications to a source code repository.
LMB
Left Mouse Button (LMB) or left click
Test Tools
Test System
Name
Description
CPU
Intel(R) i7 2600 @ 3.40GHz.
Memory
16GB DDR3.
Operating System
Fedora Linux Workstation 42.
Desktop Environment
Gnome 48.
Name
Description
Test Suite
Name
Description
Large File
1GB human-readable text.
Regex File
Text with word “GNU Nano” repeated.
Syntax File
PHP file containing HTML, CSS & JavaScript.
Media File
Smiley face or Tux Linux JPEG file.
Java Version
OpenJDK 21.0.8.
PHP Version
PHP 8.4.11.
Python Version
Python 3.13.7.
GNU Nano Version
8.3.
Name
Description
Test Scoring
Each feature has two parts.
Score of zero indicates a missing feature.
A part of a feature is work a score of 0.5.
Three bias elimination steps were utilized. The editor was used for at least three years on different platforms. Attempts were made to get stable plug-ins for missing features. The same editor was compared between the one in the repository, the developers website, and the compiled version if applicable.
Selecting Editor Version
For this review, GNU Nano was installed using the instructions from the developers website and it did not require additional plugins.
Features
The theme can be native for the editor in terms of the background. GNU Nano dark and light themes can be created or downloaded and changed using the nanorc system-wide in /etc/nanorc or user-specific ~/.nanorc file with custom settings such as set numbercolor "white,black" or set titlecolor "black,white". The score for the theme was a perfect 1.0.
Dragging and dropping a text file into the editor opens a new tab or buffer using ^R to read the file. It is not possible to specify the tab location during the drag and drop operation. The score for drag and drop into editor was 0.5.
Opening a very large text file did not crash GNU Nano. GNU Nano was able to edit the large file. The score for opening a large file was a perfect 1.0.
Multiple documents can opened in multiple tabs or buffers using the optional ^R and set multibuffer in the nanorc file. Tear-off tabs do not work but GNU Nano has a feature to open in new window as a new instance which is handy for multiple monitors. The score for multiple documents was 0.5.
Multiple editors can be opened as new tabs without drag options. Each tab window view can not be split either vertically or horizontally as a multiple editor view, but can be implemented as a feature of terminal multiplexers. The score for multiple editor view was 0.5.
Creating non-project files is possible. Non-project files can be opened on the command line. The score for creating non-project files was a perfect 1.0.
Soft word wrap can be enabled on all documents as line wrapping. Automatic soft wrap for documents is available from the GNU Nano settings or set softwrap in the nanorc file. The score for word wrap was a perfect 1.0.
Spell check works as words are typed. It is toggled by set speller in the nanorc file. Spelling errors are shown in opened documents. The score for spell check was a perfect 1.0.
Word count is available for GNU Nano. Word count for the current buffer or file is enabled with CTRL-C and ALT-D. Selection word count is available as part of word count. The score for word count was a perfect 1.0.
Go to line can jump to a specified line using CTRL-SHIFT-_ and entering the line number, column number. It is possible to jump to either the first or last line. The score for go to line is a perfect 1.0.
Indentation can default to user-defined tab stops using ALT/OPTION-A or ESC-A. Children are automatically indented. The score for indentation was a perfect 1.0.
Fonts can be not dynamically scaled with keyboard shortcuts or the mouse, but can be manually set in the terminal. The system font can be bypassed and a new editor font and size can be set. The score for fonts was 0.5.
Find and replace using regular expressions can be utilized for all open documents in the current session. Find and replace will work for the current document or a selection in the current document. The score for find and replacing using regular expressions was a perfect 1.0.
Multiple language syntax highlighting in one file is enabled if the language syntax files are included or all include "/usr/share/nano/*.nanorc" and toggled by ALT-Y or META-Y. Each language has code-sensitive syntax colours which can be modified such as include "/usr/share/nano/python.nanorc". The score for multiple language syntax highlighting was a perfect 1.0.
Code folding does not work for markup languages such as HTML. Code folding also does not works for programming languages such as Java. The score for code folding was 0.0.
Selecting rectangular block per column does not work. Rectangular block selection does not work with word wrap enabled. The score for selecting rectangular block was a perfect 0.0.
Multiple selection is not available for GNU Nano. Search multiple selection is not available. The score for multiple selection was 0.0.
Distraction-free mode to hide panes works. Line numbers can be toggled using ALT-SHIFT-3 or set linenumbers in nanorc file to improve distraction-free mode. The score for distraction-free was a perfect 1.0.
The file manager can not be enabled. Media files cannot be dragged and dropped into the file manager pane. The score for file manager was 0.0.
Terminal can not be enabled. The terminal does not follow folder. Terminal can execute system commands. The score for terminal was 0.0.
Results
GNU Nano is a simple command line text editor. By default, the GNU Nano editor is missing required features that can be implemented in the terminal. For my required features, the GNU Nano editor scored 62.50% or 6.25 out of 10.
Whether you’re editing a config file or writing your first shell script, GNU Nano is a lightweight, no-fuss text editor that gets the job done. It’s especially perfect for beginners on Fedora Linux and beyond.
If you need help installing or migrating nano, or want to level up your programming skills, feel free to get in touch. I’m here to help.
A Step-by-Step Guide to Setting Up Streaming Infrastructure
Streaming to multiple platforms like YouTube, Twitch, or Rumble can be challenging and costly when relying on third-party restreaming services. Luckily, with open source software like NGINX with the RTMP module, you can easily self-host a lightweight restream server on your local machine. This approach gives you full control over your stream, keeps costs down, and helps you learn how streaming infrastructure works under the hood.
In this beginner-friendly tutorial, I will walk you through:
What is NGINX with RTMP module?
Why self-host your restream server?
How to set it up using OBS and Podman (or Podman-Compose)
How to start streaming from your computer to multiple platforms
What is NGINX with RTMP Module?
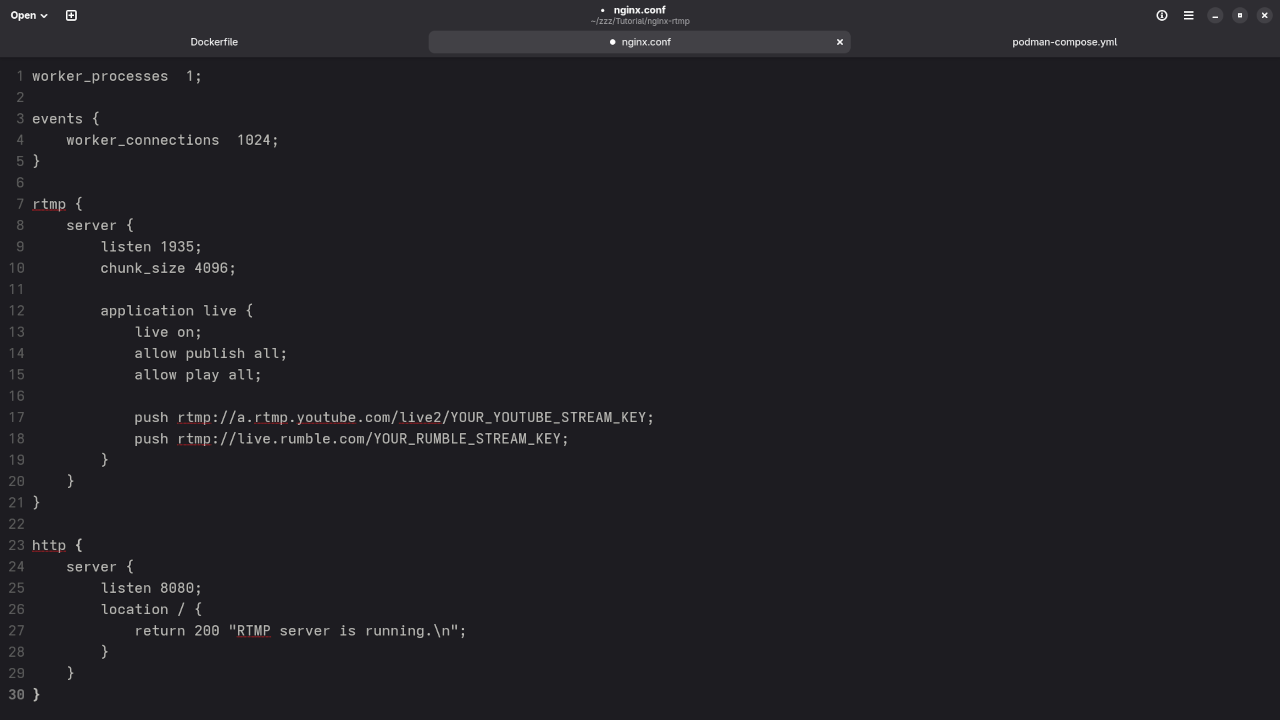
NGINX is a powerful, open source web server known for its speed and reliability. The RTMP module adds real-time messaging protocol (RTMP) support to NGINX, allowing it to accept live video streams and forward (restream) them to multiple destinations.
This setup is very lightweight compared to full restreaming services because it simply forwards your live stream to platforms like YouTube and Rumble, without transcoding. It is ideal for people with limited hardware resources who want to restream from home.
Why Self-Host Your Restream Server?
Open Source: You are in control of the software and data.
Cost-effective: No monthly fees or subscriptions.
Customizable: You can tailor your streaming setup to your needs.
Learning: Gain valuable knowledge about streaming technology and server management.
How to Set Up NGINX with RTMP Module for Local Restreaming
Requirements
A computer with a modern CPU (an i7 or equivalent recommended)
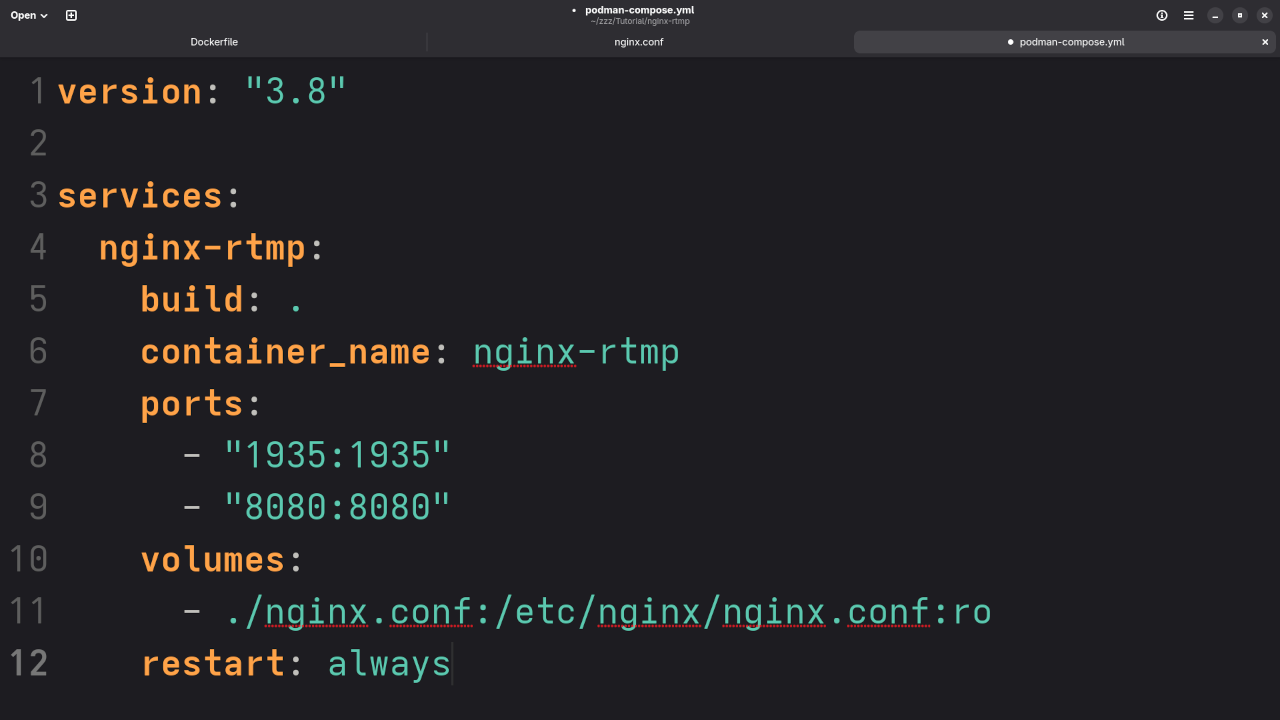
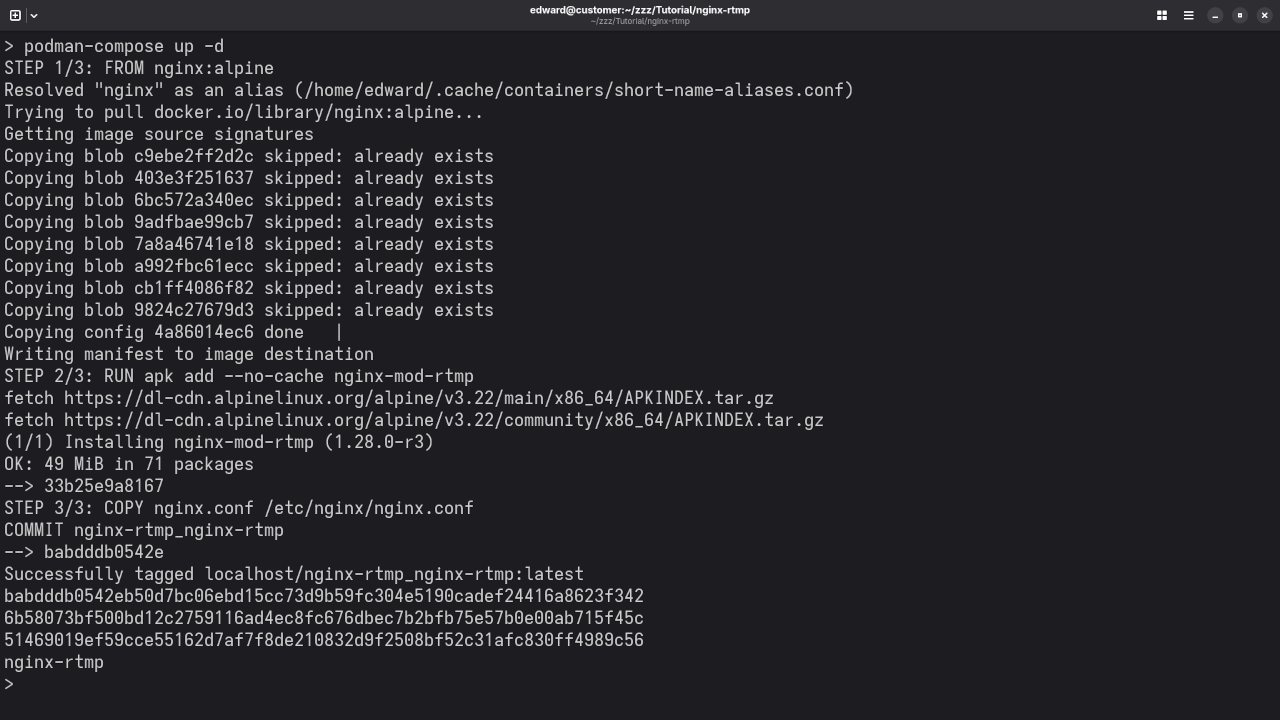
This will build and start your NGINX RTMP server container.
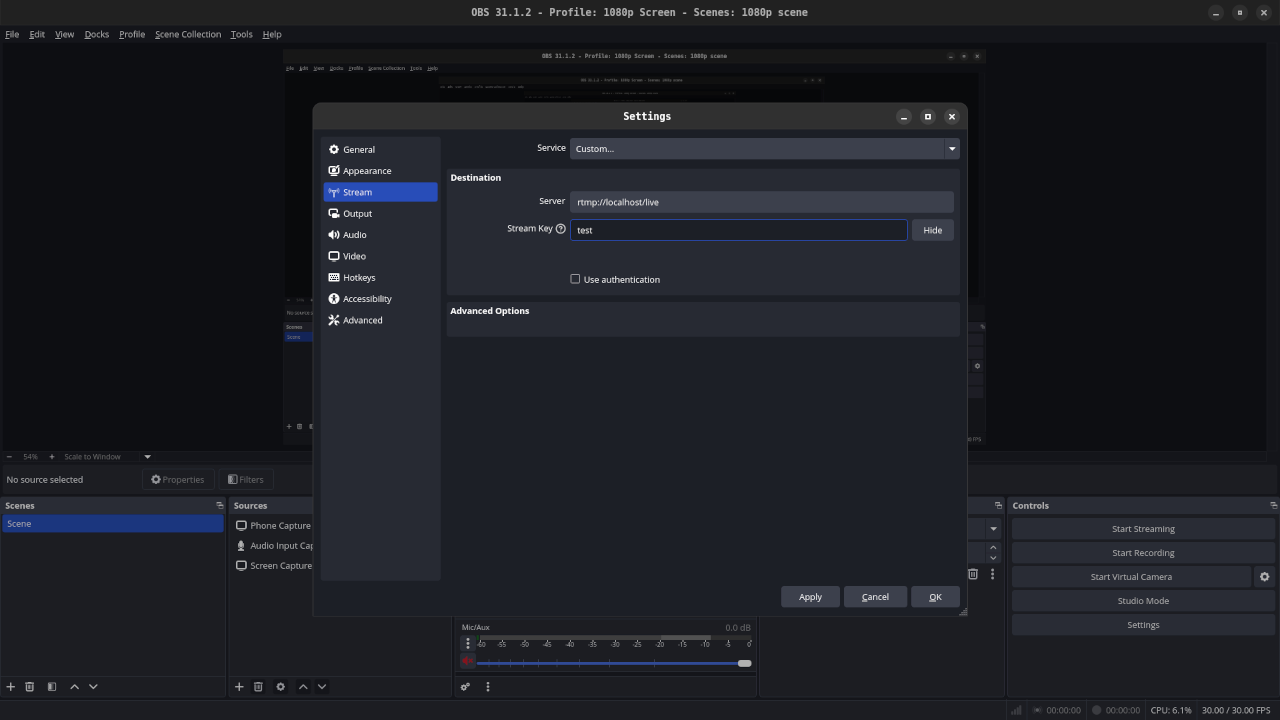
Step 4: Configure OBS Studio
Set your stream Server URL to: rtmp://localhost/live
Use any Stream Key (for example, test).
Start streaming in OBS – your server will forward your stream to YouTube and Rumble automatically.
Screenshots and Screencast
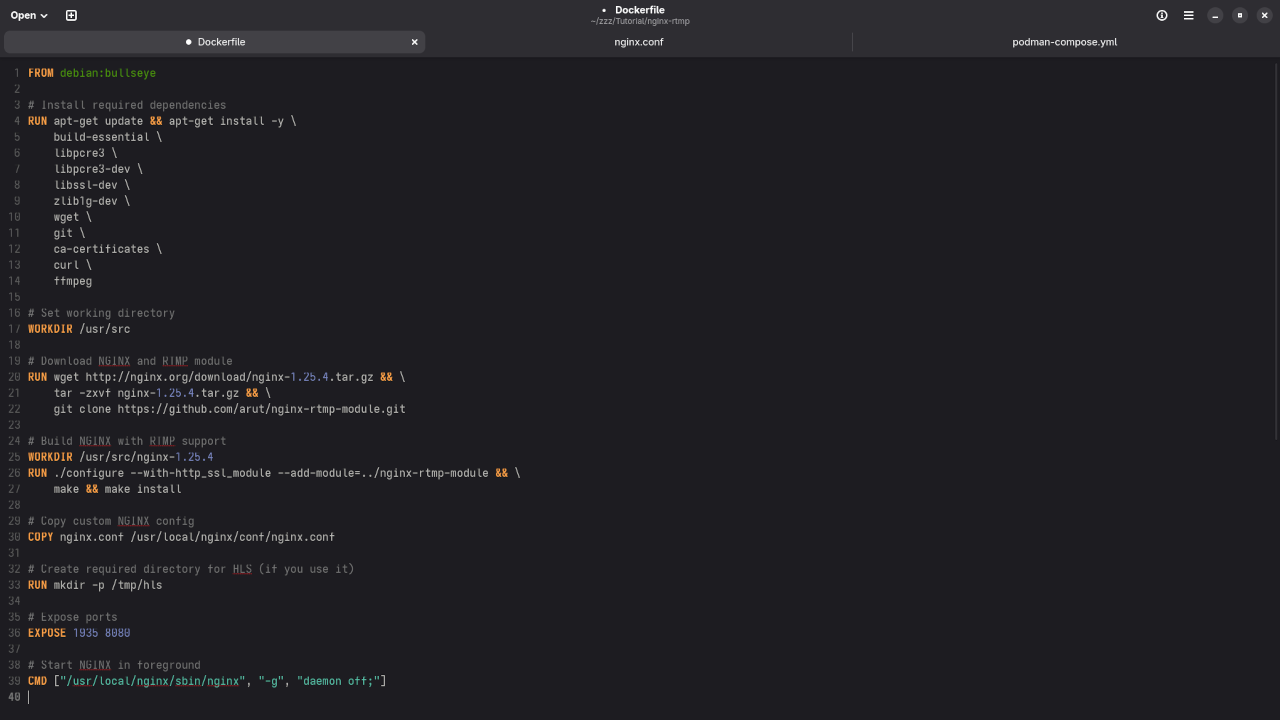
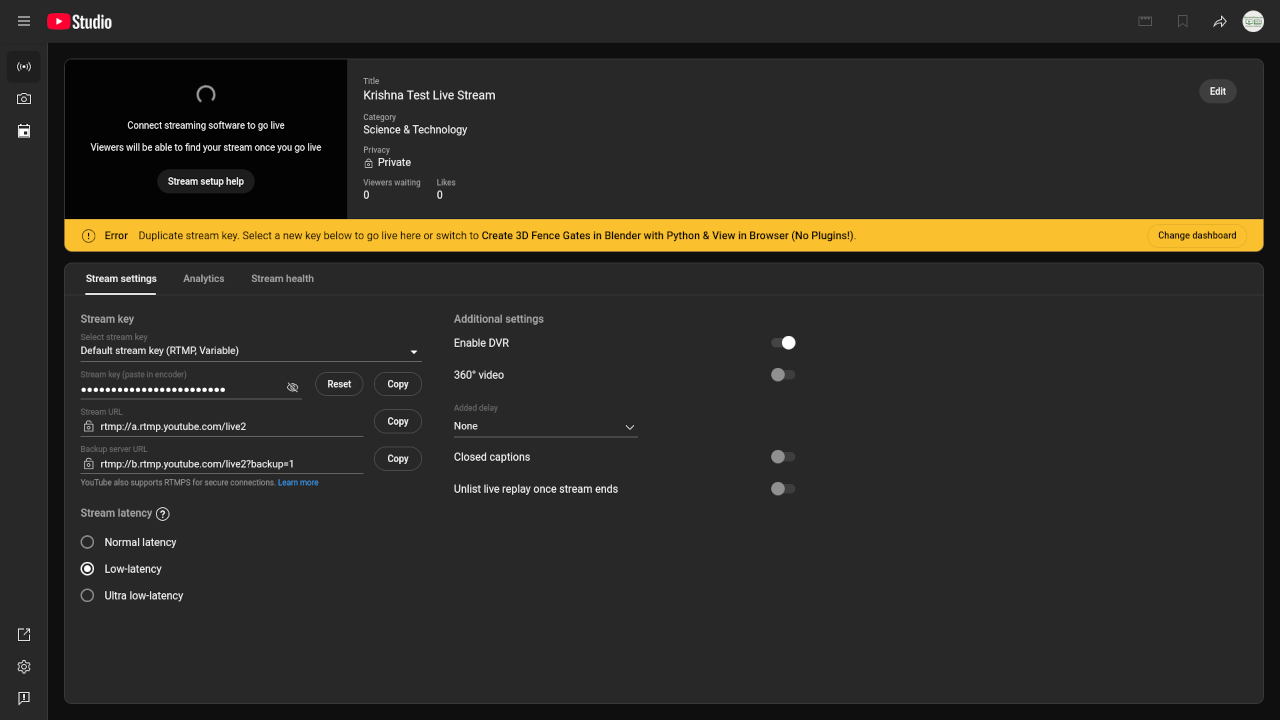
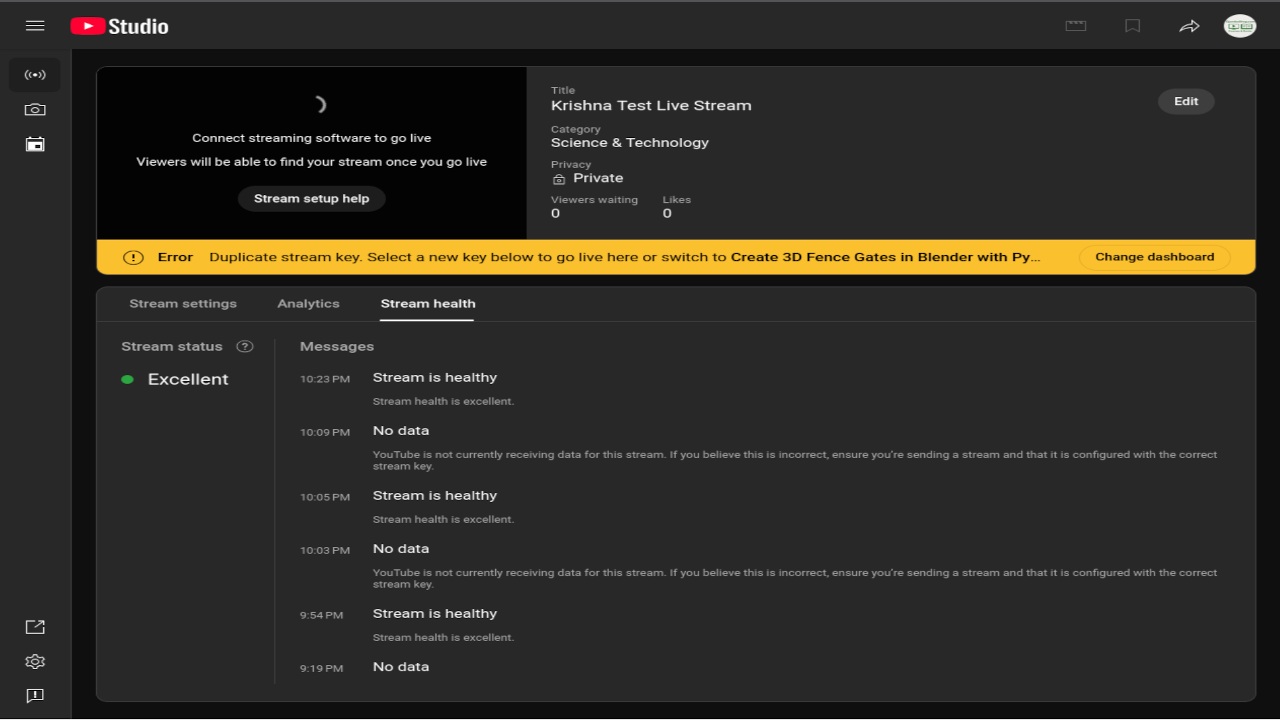
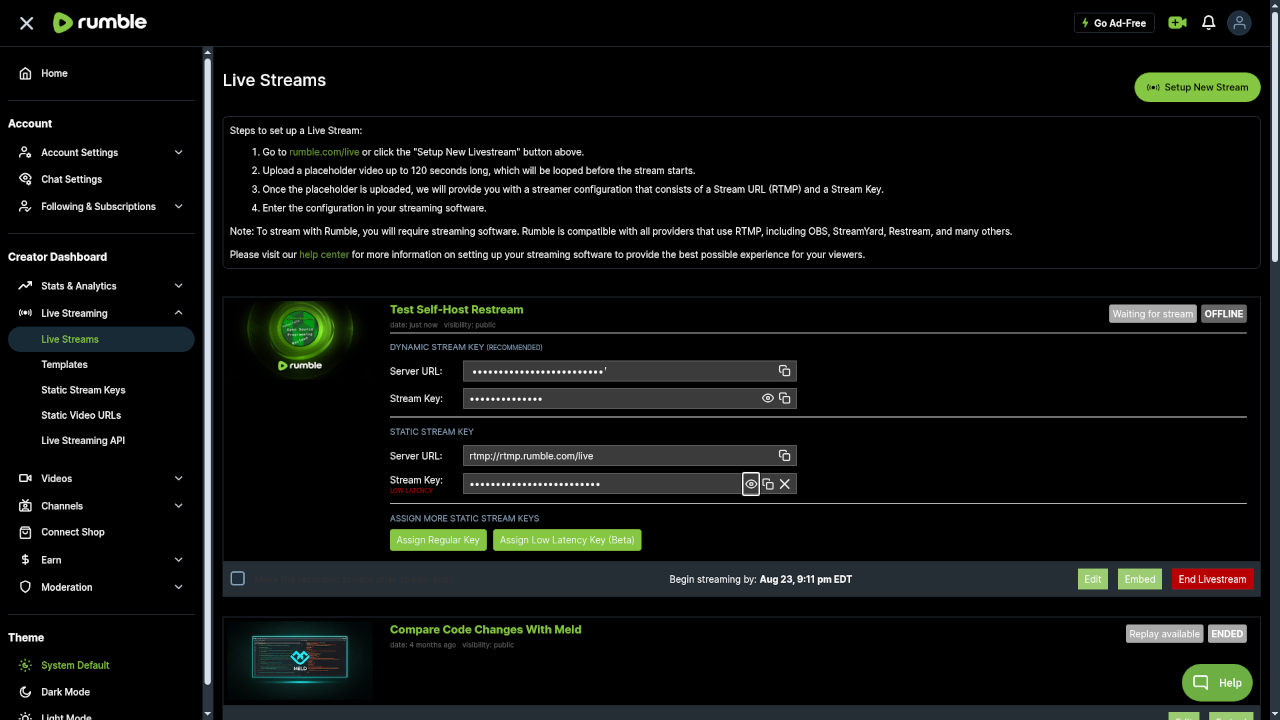
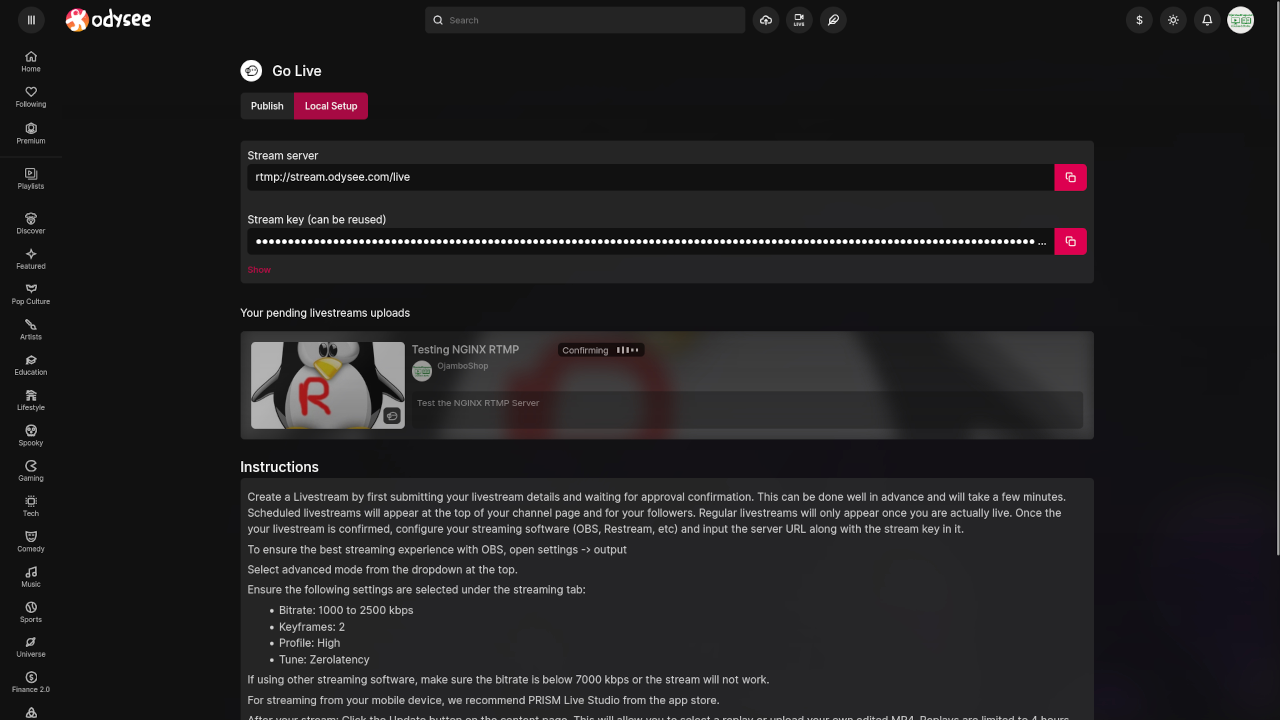
Gnome Text Editor Displaying Containerfile Listing Base Image And CommandsGnome Text Editor Displaying NGINX Configuration FileGnome Text Editor Displaying Compose YAML FileCommand Line Installation Of NGINX RTMP Via Podman Compose BuildOBS Displaying Stream Settings For NGINX RTMPWeb Browser Displaying YouTube Studio Stream Settings And KeyWeb Browser Displaying YouTube Studio Stream StatusWeb Browser Displaying Rumble Stream Settings And KeyWeb Browser Displaying Odysee Stream Settings And KeyNGINX RTMP Installation And Setup Screencast
Need Help or Personalized Support?
If you want one-on-one programming tutorials or assistance with installing, updating, or migrating your NGINX RTMP setup, feel free to contact me at ojambo.com/contact. I offer custom services tailored to your streaming and development needs.
Final Thoughts
Self-hosting your restream server using open source tools like NGINX with the RTMP module is a rewarding project that saves money and gives you control. Whether you are just starting or want to scale your streaming workflow, this approach can help you broadcast with confidence.