Blog

  • Generate Wall Tiled Corner With Blender Python API For Website

    Generate Wall Tiled Corner With Blender Python API For Website

    Creating a Granite-Tiled Wall Corner in Blender Using Python API and Displaying It in the Browser with Model-Viewer

    In this tutorial, we will learn how to use Blender’s Python API to create a simple tiled wall corner with a granite texture, lighting it using an HDR image from the Courtyard EXR in Blender 4.5 LTS. We will also explore how to export the model to a format that can be easily displayed in the web browser using the <model-viewer> element. This approach will allow us to visualize 3D models directly in the browser, providing an interactive experience for website visitors.

    1. Setting up Blender for Python Scripting

    First, ensure that you have Blender installed on your machine. Blender 4.5 LTS is the latest Long-Term Support release, and for this tutorial, we will use the Python API to create a tiled wall corner and apply a granite texture. To begin, open Blender and start a new project.

    2. Generating a Tiled Corner Using Blender Python API

    Blender provides a comprehensive Python API that lets us automate the creation of 3D models. Below is a simple Python script that generates a tiled corner wall and applies a granite texture. This script should be run from the command line within Blender’s scripting environment.


    import bpy
    
    # Clear existing objects in the scene
    bpy.ops.object.select_all(action=&#039;SELECT&#039;)
    bpy.ops.object.delete()
    
    # Create the corner base
    bpy.ops.mesh.primitive_cube_add(size=2, location=(0, 0, 1))
    wall = bpy.context.active_object
    wall.name = &#039;Wall&#039;
    wall.scale = (1, 0.1, 3)
    
    # Create the second wall
    bpy.ops.mesh.primitive_cube_add(size=2, location=(0, 1, 1))
    wall2 = bpy.context.active_object
    wall2.name = &#039;Wall2&#039;
    wall2.scale = (1, 0.1, 3)
    
    # Apply a granite texture to the walls
    # Load a granite image or procedural texture
    granite_texture = bpy.data.textures.new(&#039;GraniteTexture&#039;, &#039;IMAGE&#039;)
    granite_image = bpy.data.images.load(&#039;path/to/granite_image.jpg&#039;)
    granite_texture.image = granite_image
    
    # Create material and assign it to the walls
    material = bpy.data.materials.new(name=&#039;GraniteMaterial&#039;)
    material.use_nodes = True
    material.node_tree.nodes[&#039;Principled BSDF&#039;].inputs[&#039;Base Color&#039;].default_value = (0.3, 0.3, 0.3, 1)
    material.node_tree.nodes[&#039;Principled BSDF&#039;].inputs[&#039;Roughness&#039;].default_value = 0.7
    material.node_tree.nodes[&#039;Principled BSDF&#039;].inputs[&#039;Specular&#039;].default_value = 0.5
    
    wall.data.materials.append(material)
    wall2.data.materials.append(material)
    
    # Add HDR Lighting (Courtyard EXR)
    bpy.context.scene.world.use_nodes = True
    world = bpy.context.scene.world
    node_tree = world.node_tree
    bg_node = node_tree.nodes[&#039;Background&#039;]
    bg_node.inputs[&#039;Color&#039;].default_value = (1, 1, 1, 1)
    bg_node.inputs[&#039;Strength&#039;].default_value = 1.0
    env_texture = node_tree.nodes.new(&#039;ShaderNodeTexEnvironment&#039;)
    env_texture.image = bpy.data.images.load(&#039;path/to/courtyard.exr&#039;)
    node_tree.links.new(env_texture.outputs[&#039;Color&#039;], bg_node.inputs[&#039;Color&#039;])
    
    # Save the scene as a .glb file for web use
    bpy.ops.export_scene.gltf(filepath=&#039;path/to/exported_model.glb&#039;)


    3. Exporting to GLTF for Browser Use

    The GLTF (GL Transmission Format) is an open standard file format for 3D models that is widely supported across web applications. Once you’ve generated the model, export it in .glb format using the command provided in the Python script. The .glb format is great for web browsers since it is optimized for fast loading and can include textures, animations, and materials.

    bpy.ops.export_scene.gltf(filepath='path/to/exported_model.glb')

    GLTF files can be viewed directly in the browser with <model-viewer>, an easy-to-use web component that supports various 3D formats, including .glb files.

    4. Displaying the Model in the Web Browser with <model-viewer>

    To display your model in a web browser, embed it using the <model-viewer> tag in an HTML document:


        &lt;h1&gt;Granite Tiled Corner Wall&lt;/h1&gt;
        &lt;model-viewer src=&quot;path/to/exported_model.glb&quot; alt=&quot;Granite Tiled Corner&quot; auto-rotate camera-controls&gt;&lt;/model-viewer&gt;


    Be sure to replace path/to/exported_model.glb with the actual path to your .glb file.

    5. Supported File Formats for Web Browsers

    When working with 3D models for the web, it’s important to choose a format that is well-supported across all browsers. Here’s a breakdown of some common formats:

    • .hdr and .exr: These are high dynamic range image formats, commonly used for environment maps (HDRI). While supported by some web tools, these formats are not as widely supported directly in web browsers.
    • .ktx and .ktx2: These formats are great for storing textures in compressed form. KTX2 has better support for modern web browsers, and can be used with WebGL for efficient texture mapping. However, it still requires a bit more setup than .glb.
    • Open-source alternatives: The glTF format is highly recommended for 3D models on the web, and is open source, lightweight, and efficiently supported by browsers.

    For best results and browser compatibility, I recommend using the .glb (binary glTF) format for model display in the browser.

    6. Running the Python Script on the Command Line

    To run the Python script from the command line, open a terminal and execute the following command (make sure Blender is installed and added to your system path):

    blender --background --python path/to/your/script.py

    This command runs Blender in the background and executes the Python script, automatically generating your 3D model and exporting it in the desired format.

    📸 Screenshots & Screencast
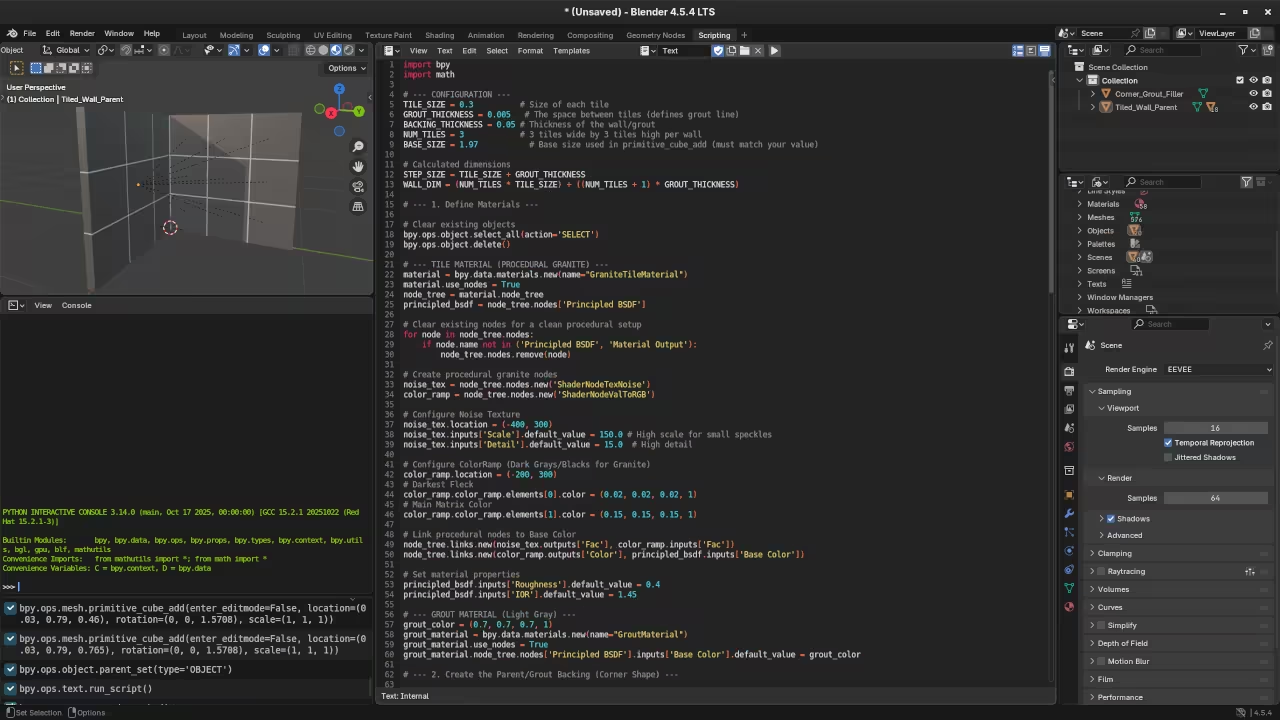
    Low poly wall-tiled-corner Python code
    Blender Scripting Workspace Displaying Low Poly Wall Tiled Corner Python Code

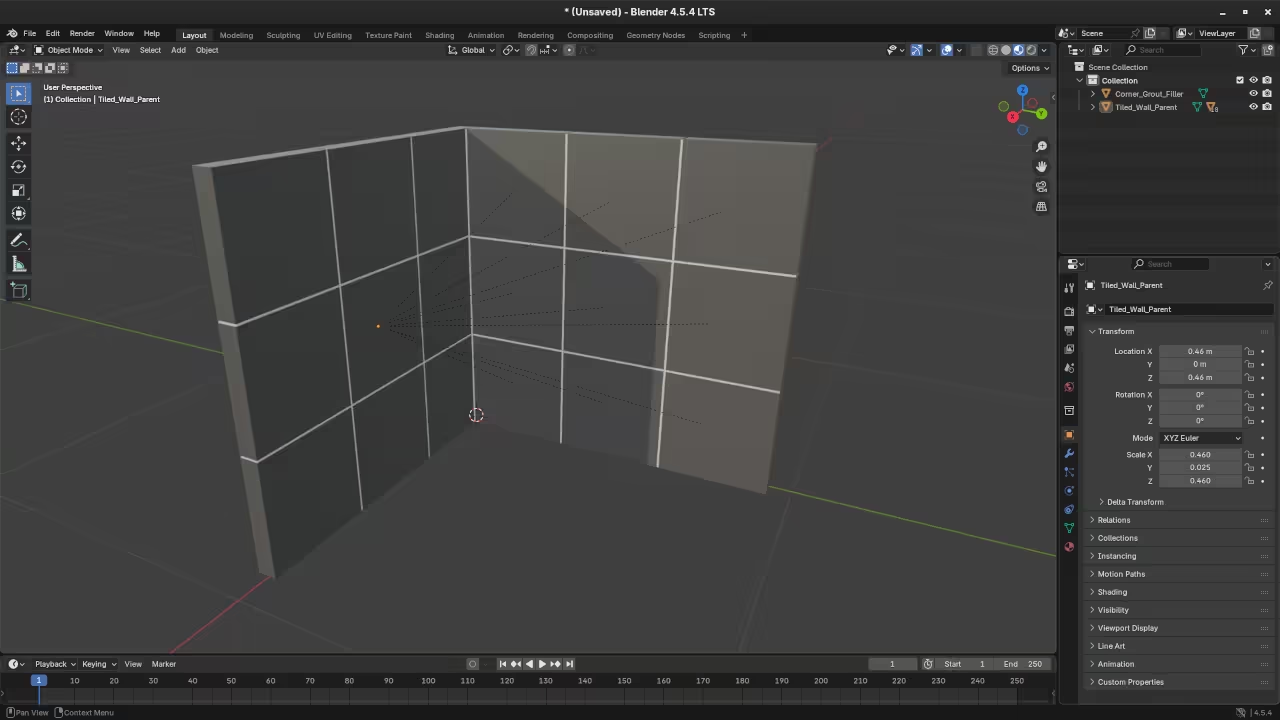
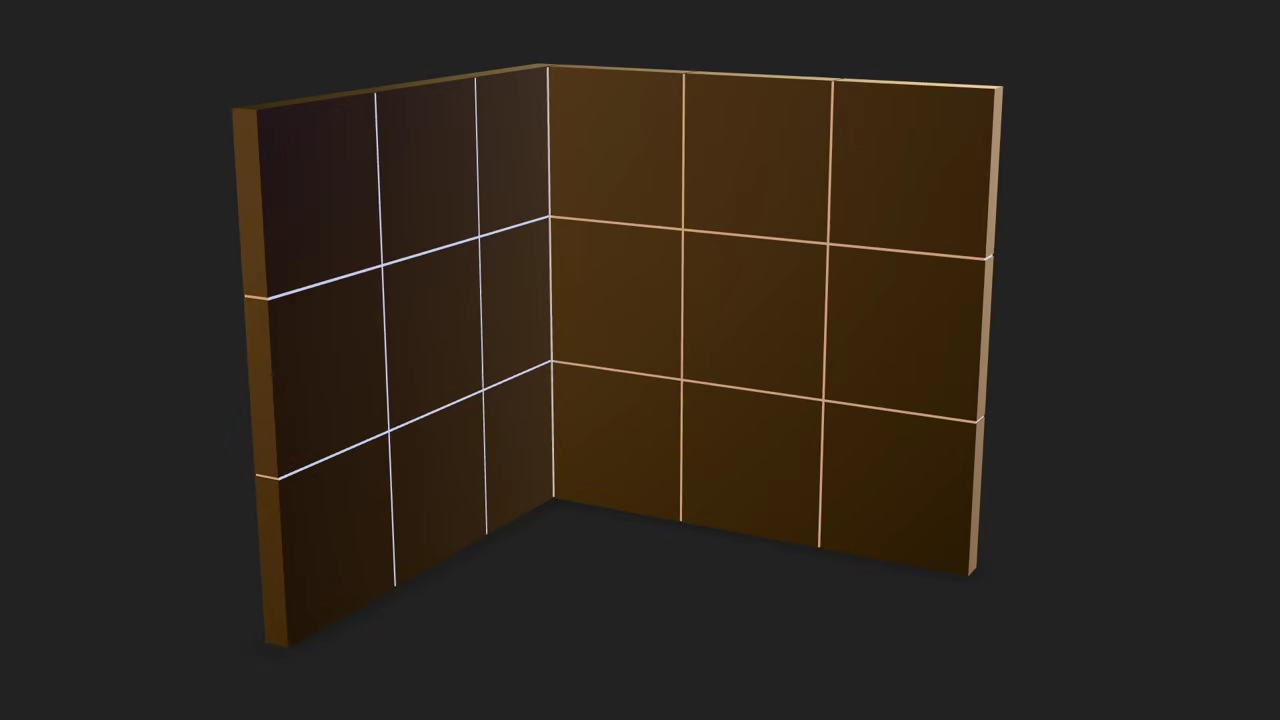
    Low poly wall-tiled-corner in Blender
    Blender Layout Workspace Displaying Low Poly Wall Tiled Corner

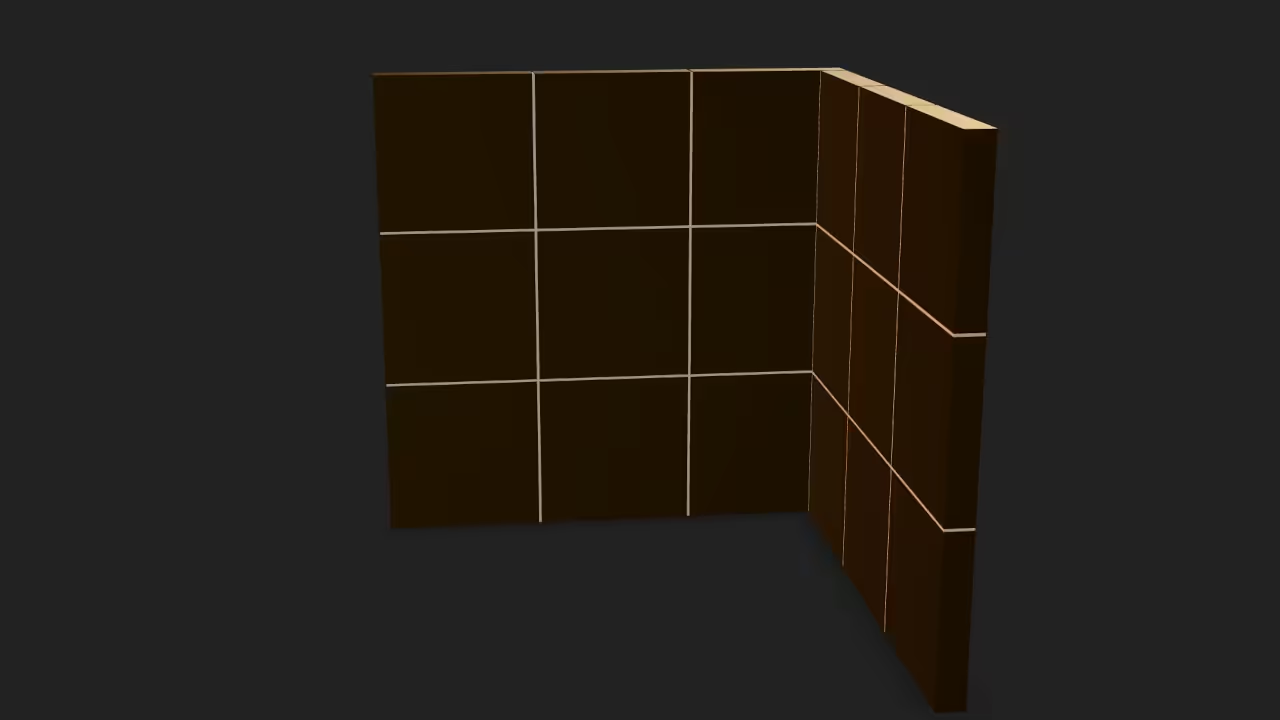
    Low poly wall-tiled-corner in Web browser
    Web Browser Displaying Rendered Low Poly Wall Tiled Corner

    Screencast For Blender Python API Low Poly Wall Tiled Corner

    Conclusion

    With this tutorial, you’ve learned how to create a tiled granite corner wall in Blender using Python, apply HDR lighting with an EXR image, and export your work to a web-friendly GLTF format for display in the browser. This technique is useful for web developers and 3D artists who want to bring their creations to life on the web with minimal hassle.

    Additional Resources

    For more information on Python programming, check out my books:

    You can also explore my course Learning Python, which is perfect for beginners looking to dive into Python programming.

    If you’re looking for personalized instruction, I offer one-on-one Python tutorials, including topics on Blender Python scripting.
  • Getting Started With Cockpit: A Web UI For Server Containers

    Getting Started With Cockpit: A Web UI For Server Containers


    Getting Started with Cockpit: A Beginner’s Guide to Installing on Fedora

    If you are looking for a powerful, open-source web-based server management tool, Cockpit might just be the solution you need. Cockpit allows you to manage your Linux server and system in a simple and intuitive web interface. It is especially useful for both beginners and experienced users, offering tools for managing system resources, services, storage, networks, and more-all from a browser.

    One of the best features of Cockpit is that it is open-source, which means it’s free to use, and anyone can contribute to its development. In this blog post, we’ll walk through how to install Cockpit on a Fedora system. But before we get into the installation, let’s explore what Cockpit is and why it’s worth considering.

    What is Cockpit?

    Cockpit is a web-based management interface for Linux systems that makes it easy to monitor and control your system. It’s designed to work across various distributions, including Fedora, CentOS, and Ubuntu. With Cockpit, you can:

    • Monitor system performance
    • Start and stop services
    • Manage disk storage
    • Set up networking
    • View system logs
    • And much more…

    The best part? You can do all of this via your web browser, making it easy to manage remote servers or even local ones from a comfortable and secure interface.

    Installing Cockpit on Fedora

    Install Cockpit Using Podman Directly

    Follow these steps to install Cockpit using Podman:

    1. Install Podman (if you don’t have it installed already):
      sudo dnf install -y podman
    2. Pull the Cockpit Docker image:
      podman pull cockpit/cockpit
    3. Run Cockpit as a Podman container:
      podman run -d -p 9090:9090 --name cockpit cockpit/cockpit
    4. Access Cockpit: Open your browser and visit:
      http://&lt;your-server-ip&gt;:9090

      Replace <your-server-ip> with the IP address of the machine where you’re running Cockpit.

    📱 Screenshots & Screencast

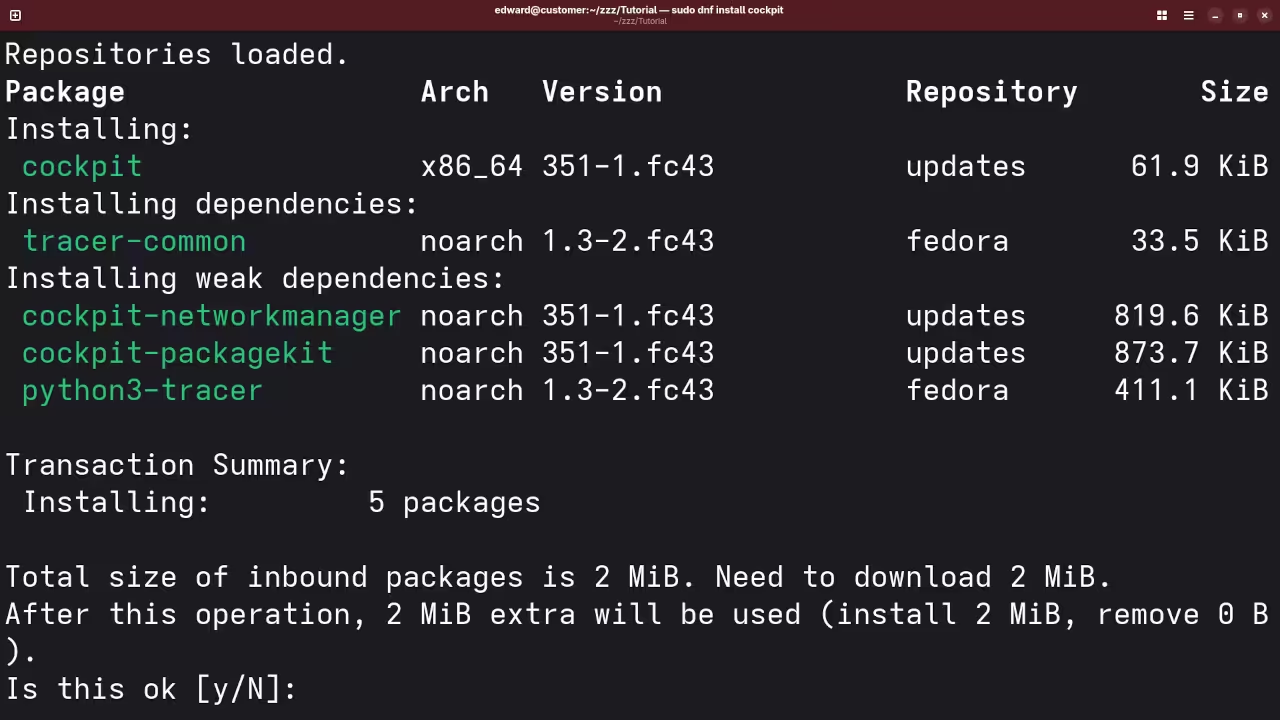
    Cockpit Installation
    Command Line Installation Of Cockpit On Fedora

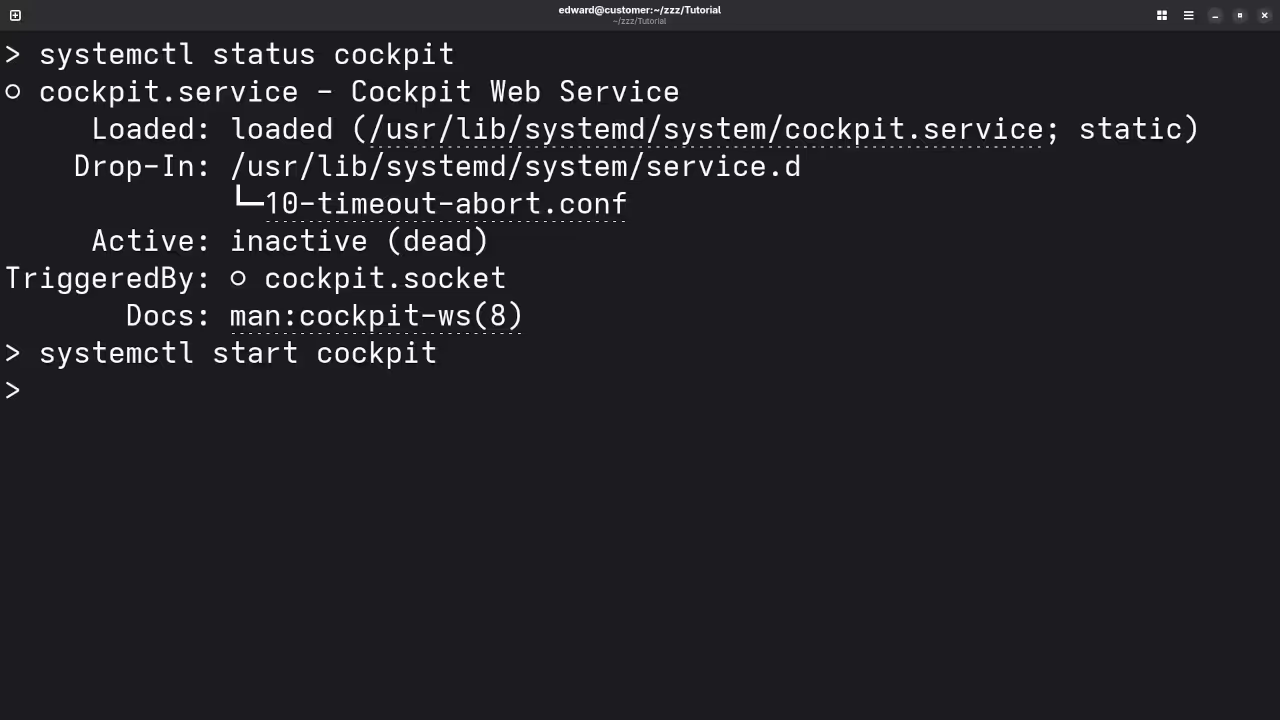
    Cockpit Service
    Command Line Systemd Starting Of Cockpit

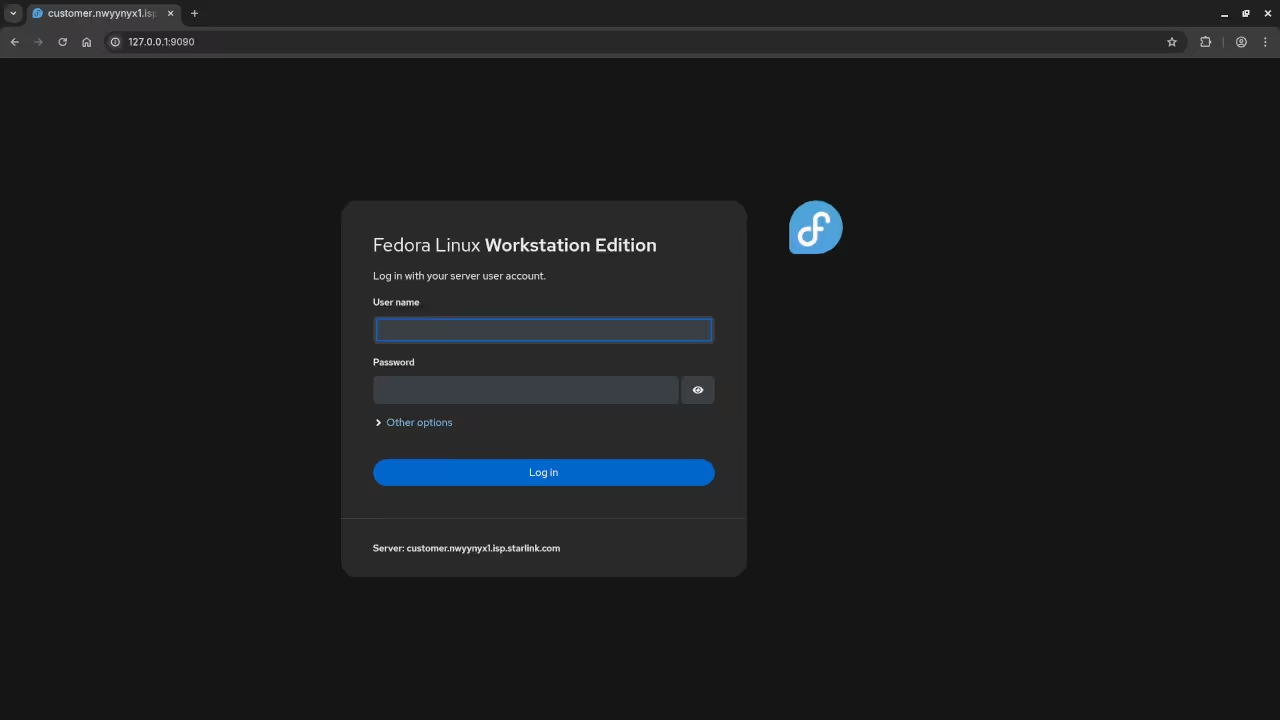
    Cockpit Login
    Web Browser Display Of Cockpit Login Screen

    Cockpit Dashboard
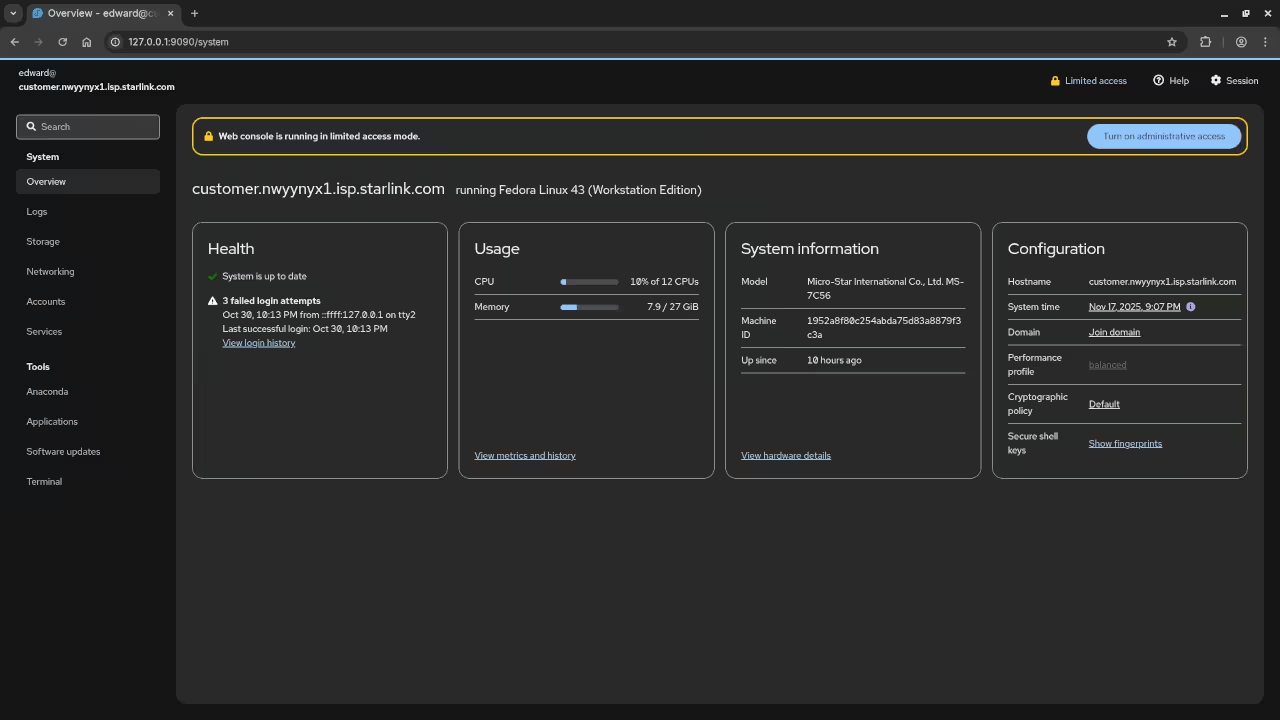
    Web Browser Display Of Cockpit Dashboard Screen

    Cockpit Podman Installation
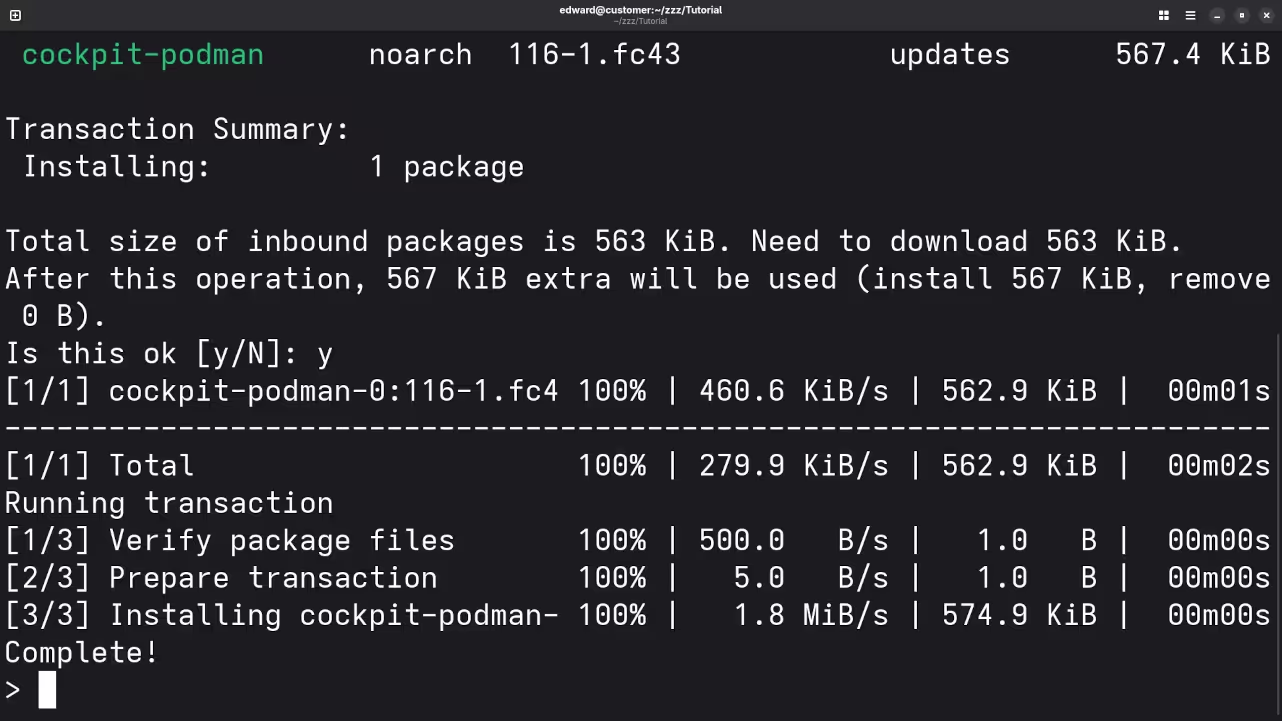
    Command Line Installation Of Cockpit Podman Application On Fedora

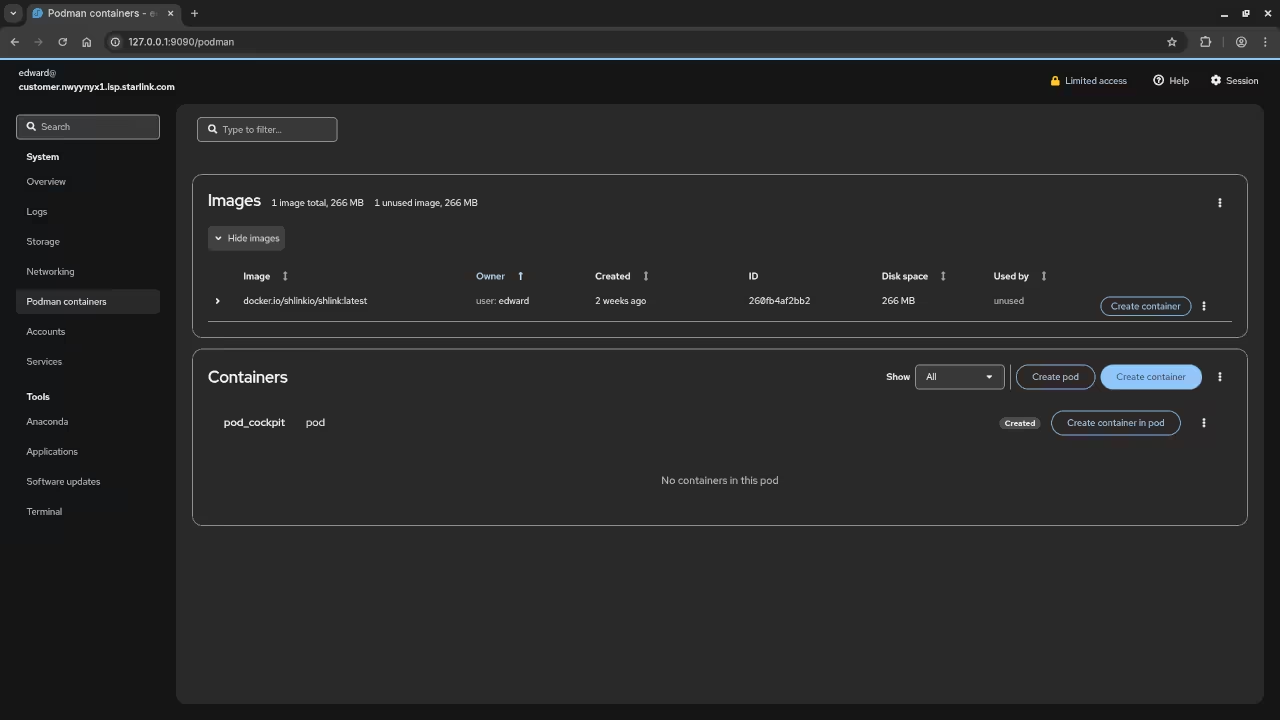
    Cockpit Podman Containers
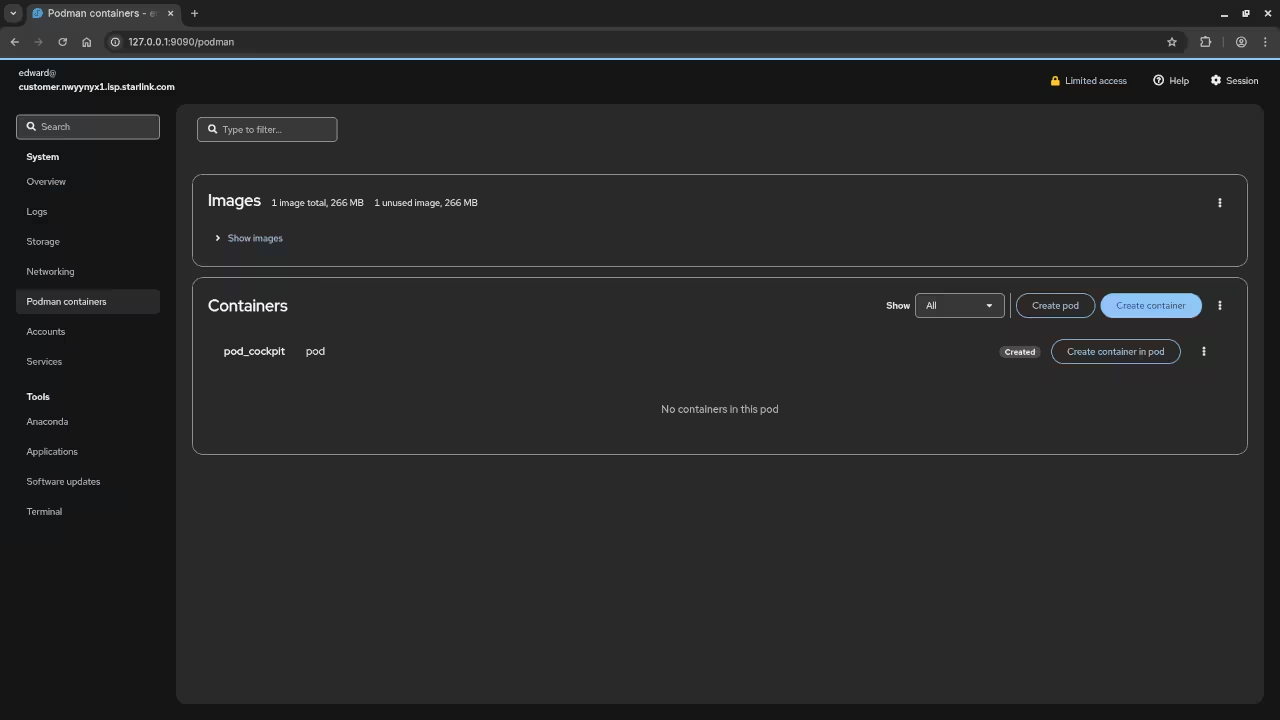
    Web Browser Display Of Cockpit Containers Screen

    Cockpit Installation And Setup Screencast

    Conclusion

    With Cockpit installed, you now have an easy-to-use web interface for managing your Linux server. Whether you are a beginner or experienced user, Cockpit makes it simple to monitor and control your system remotely.

    If you would like to dive deeper into programming or need help with Linux, check out some of my resources:

    • My Programming Books: Check out my books on programming on Amazon here.
    • My Programming Courses: Access my online courses here.
    • One-on-One Programming Tutorials: I offer personalized programming tutorials online. Learn more and book a session here.
    • Cockpit Installation or Migration Services: Need help installing or migrating Cockpit on your system? I offer professional services, and you can contact me here.

    I hope this guide helps you get started with Cockpit on Fedora. Happy coding!

  • Helix 25.07.1 Advanced Editor Review

    Helix 25.07.1 Advanced Editor Review

    Getting Started with Helix: A Lightweight and Fast Text Editor for Developers

    If you are a developer looking for a fast, efficient, and modern text editor, you might want to give Helix a try. Helix is a new, open-source modal text editor designed to provide a seamless and efficient experience for developers. Whether you’re working on programming projects, editing configuration files, or just managing text, Helix provides all the tools you need to boost your productivity.

    In this post, we’ll take a look at how to install Helix on Fedora Linux, explore its key features, and provide some useful resources for those who want to dive deeper into programming.

    What is Helix?

    Helix is an open-source, modal text editor inspired by the likes of Vim and Neovim, but with a modern twist. It focuses on providing an intuitive and fast editing experience using a combination of modes, commands, and plugins.

    One of the standout features of Helix is its performance. Unlike other text editors, Helix is designed to be fast, even when working with large files. Additionally, it supports syntax highlighting for many programming languages, offers a powerful search functionality, and provides native support for multiple cursors.

    Being open-source, Helix is developed and maintained by a community of contributors. It’s free to use, and you can find the source code on GitHub.

    • License: Helix is released under the MIT License.

    Key Features of Helix

    • Fast and Responsive: Helix is built to be lightweight, fast, and responsive, even with large files.
    • Multiple Cursors: It allows for editing multiple places in your document simultaneously.
    • Syntax Highlighting: Supports syntax highlighting for many languages out of the box.
    • Search and Replace: Helix comes with advanced search and replace features.
    • Cross-platform: Works on Linux, macOS, and Windows.

    How to Install Helix on Fedora Linux

    Installing Helix on Fedora Linux is quick and straightforward. Here’s how you can get started:

    Step 1: Install Helix

    Install Helix using the following command:

    sudo dnf install helix

    Step 2: Launch Helix

    After the installation completes, you can start Helix by typing:

    hx

    You should now be able to open Helix and start editing your files!

    How to Install Helix on Other Platforms

    Helix is available on other platforms as well, including macOS and Windows. Here’s how you can install it:

    • macOS: You can install Helix using Homebrew:
      brew install helix
    • Windows: You can download the latest release from the Helix GitHub page and follow the instructions to install it.

    Screenshots and Screencast

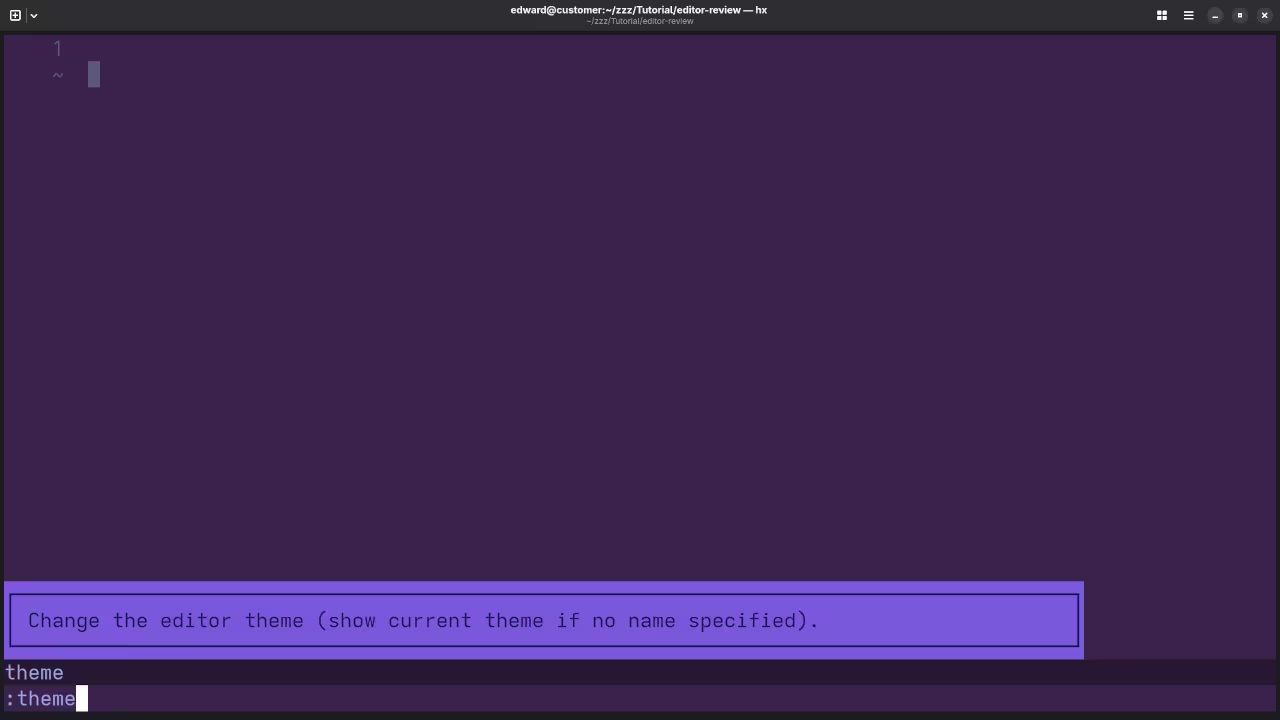
    Helix Settings View
    Helix Displaying Settings

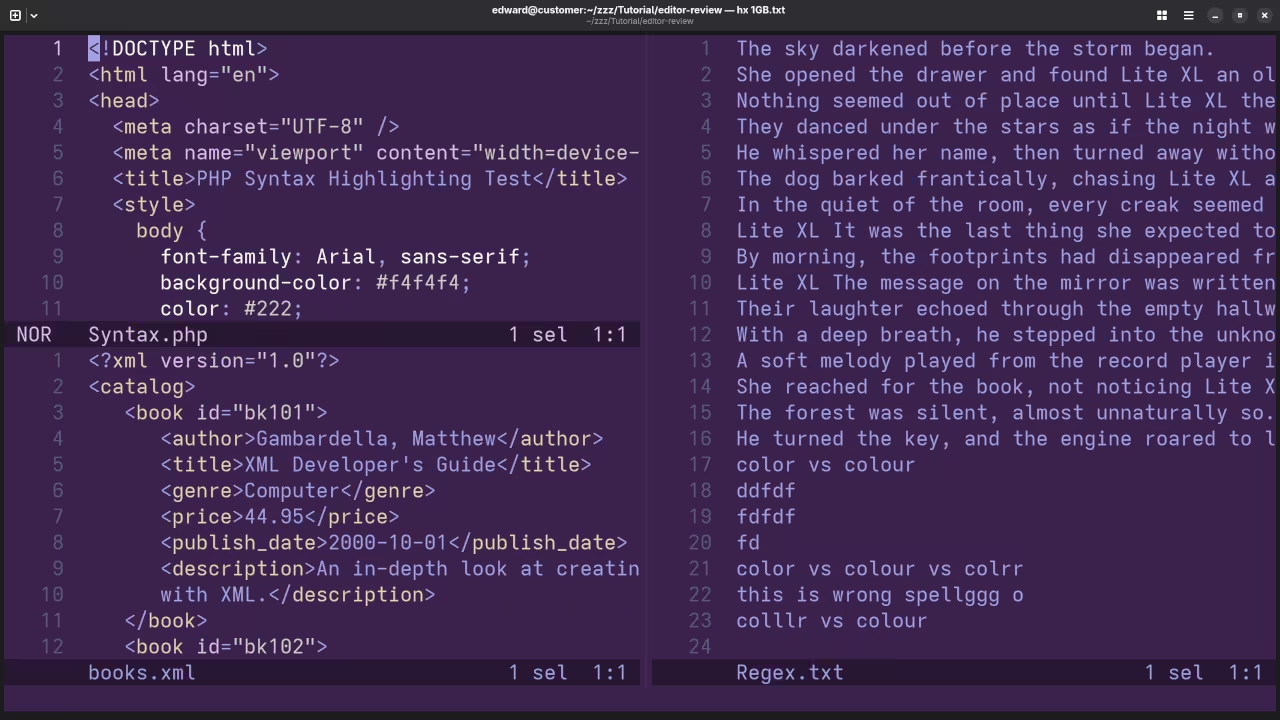
    Helix PHP Syntax Highlighting
    Helix Displaying PHP Syntax Highlighting

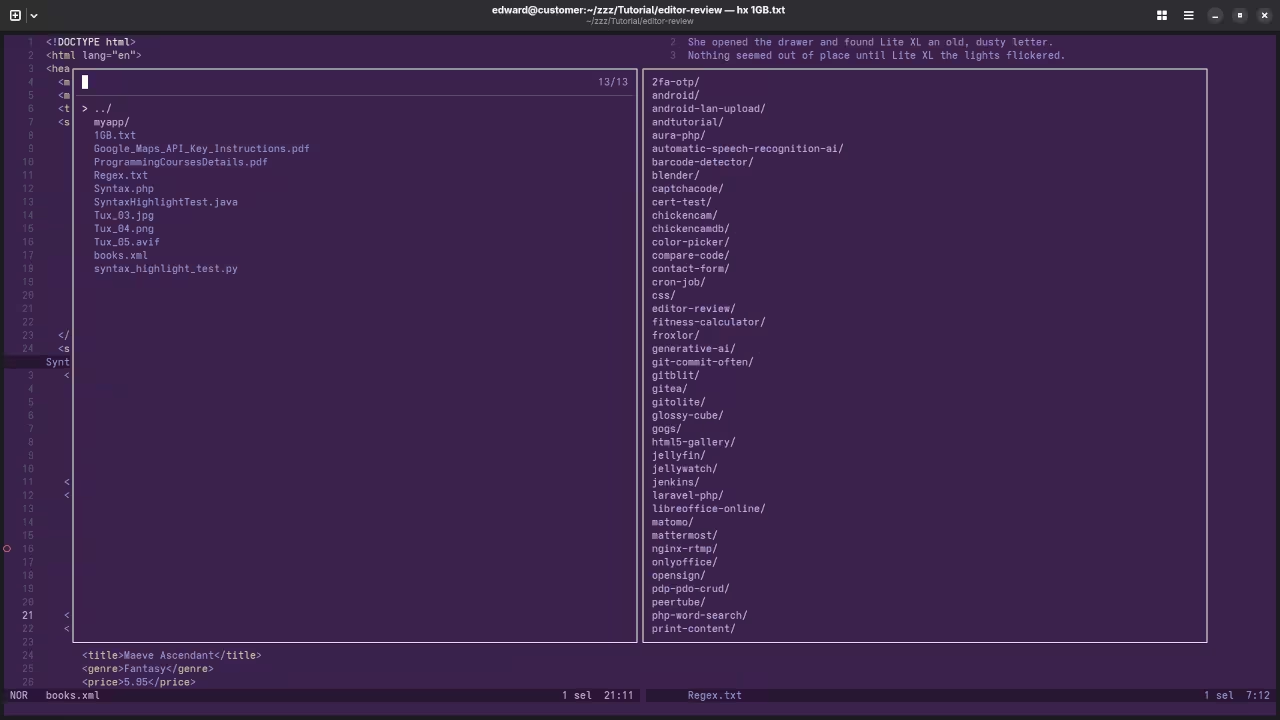
    Helix Folder View
    Helix Displaying Folder In Workspace

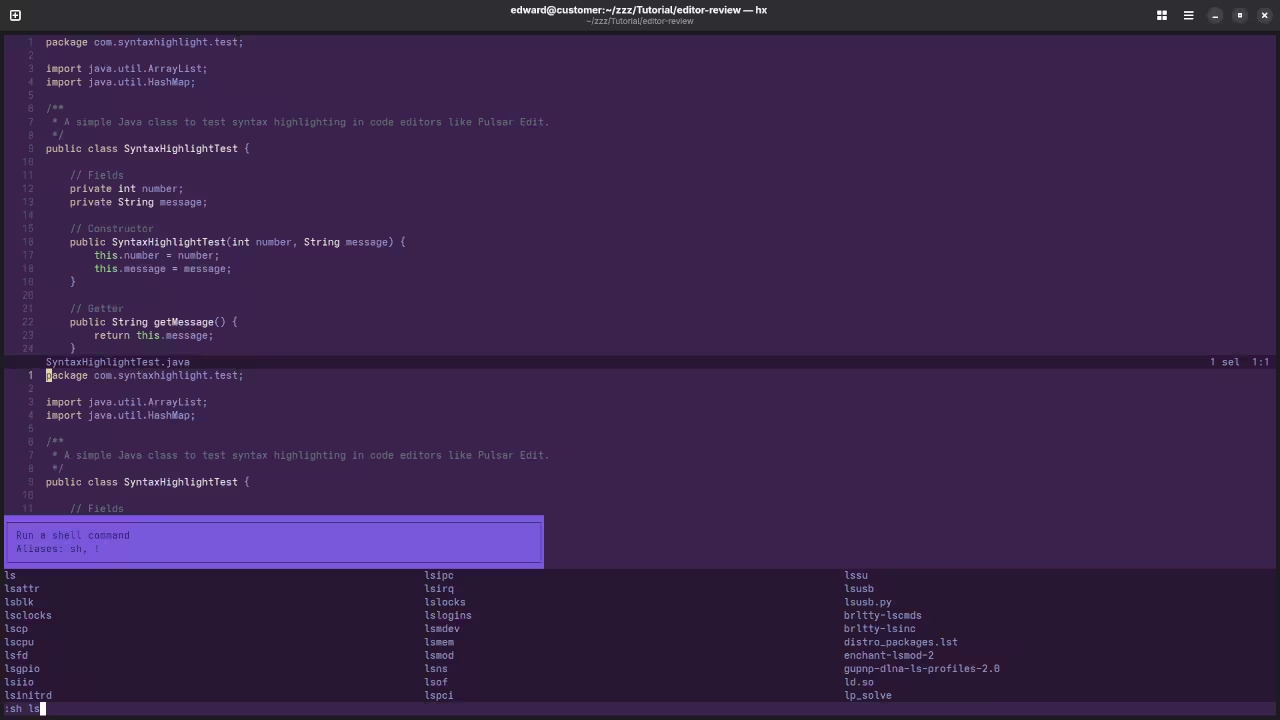
    Helix Terminal
    Helix Displaying How Terminal Works

    👉 Screencast showing a beginner session in Helix—editing, saving files, and navigating buffers.

    Helix Review And Feature Test

    Requirements For Programming Text Editor

    Glossary:

    Code Editor

    Designed for writing and editing source code.

    IDE

    Integrated Development Environment combines various tools need for software development.

    Plugin

    Software component that adds specific functionality.

    Theme

    Preset package containing graphical appearance to customize look and feel.

    Open source

    Freely available for possible modification and redistribution.

    SCM

    Source code management use to manage and track modifications to a source code repository.

    LMB

    Left Mouse Button (LMB) or left click

    MMB

    Middle Mouse Button (MMB) or scroll wheel

    Test Tools

    Test System
    Name Description
    CPU Ryzen 5 5600GT @ 3.60GHz.
    Memory 32GB DDR4.
    Operating System Fedora Linux Workstation 43.
    Desktop Environment Gnome 49.
    Name Description

    Test Suite
    Name Description
    Large File 1GB human-readable text.
    Regex File Text with word “Helix” repeated.
    Syntax File PHP file containing HTML, CSS & JavaScript.
    Media File Smiley face or Tux Linux JPEG file.
    Java Version OpenJDK 21.0.9.
    PHP Version PHP 8.4.13.
    Python Version Python 3.14.0.
    Helix Version 25.07.1
    Name Description

    Test Scoring

    1. Each feature has two parts.
    2. Score of zero indicates a missing feature.
    3. A part of a feature is work a score of 0.5.

    Three bias elimination steps were utilized. The editor was used for at least three years on different platforms. Attempts were made to get stable plug-ins for missing features. The same editor was compared between the one in the repository, the developers website, and the compiled version if applicable.

    Selecting Editor Version

    For this review, Helix was installed using the instructions from the developers website and it did not require additional plugins.

    Features

    1. The theme can be native for the editor in terms of the background and toggled using :theme. Helix dark and light themes can be created or downloaded and changed. The score for the theme was a perfect 1.0.
    2. Dragging and dropping a text file into the editor does not opens a new tab or buffer. It was not possible to specify the tab location during the drag and drop operation. The score for drag and drop into editor was 0.0.
    3. Opening a very large text file did not crash Helix. Helix was able to open or to edit the large file. The score for opening a large file was 1.0.
    4. Multiple documents can opened via :edit filename in multiple tabs or buffers. Tear-off tabs do not work and Helix does not have a feature to open in new window as a new instance which is handy for multiple monitors. The score for multiple documents was 0.5.
    5. Multiple editors can not be opened as new tabs with drag options. Each tab window view can be split either vertically :vsplit filename or horizontally :hssplit filename as a multiple editor view in Wayland display server protocol. The score for multiple editor view was 0.5.
    6. Creating non-project files is possible. Non-project files can be opened on the command line. The score for creating non-project files was a perfect 1.0.
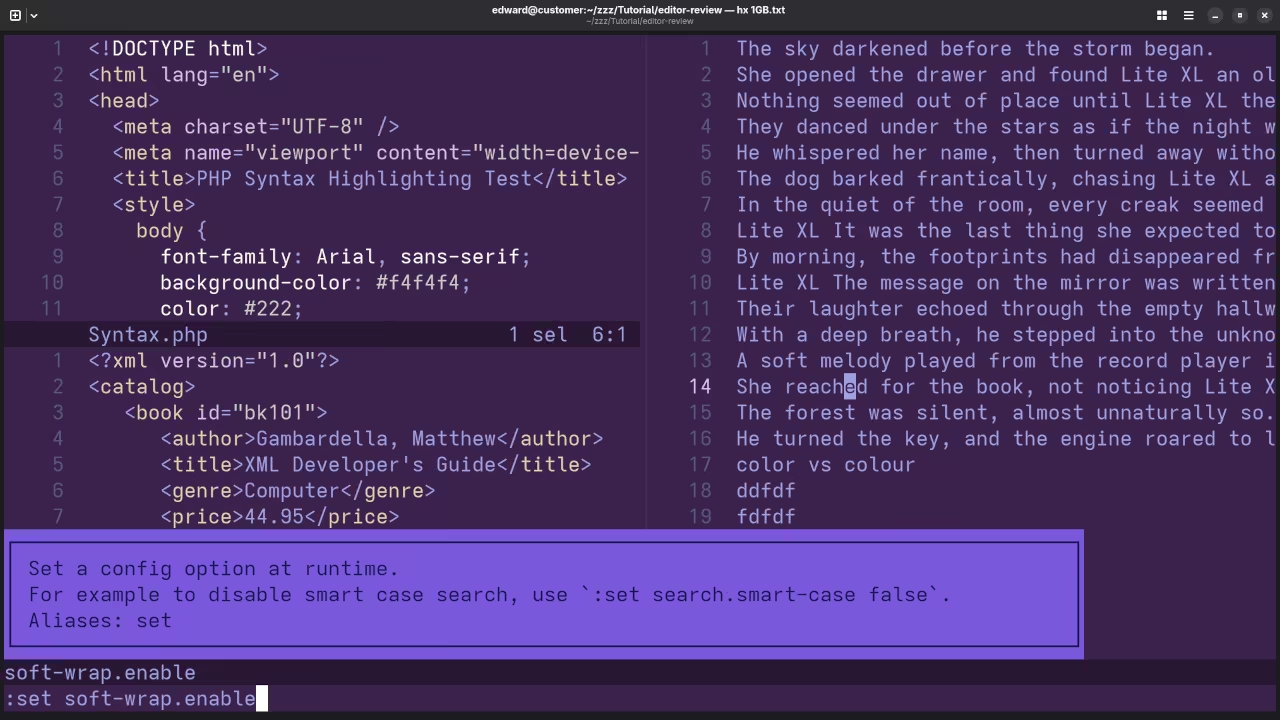
    7. Soft word wrap can be toggled by :set soft-wrap.enable true. Automatic soft wrap for documents is is available for Helix. The score for word wrap was 1.0.
    8. Spell check can be not be enabled but there are discussions on implementing it in the future to work as words are typed. Spelling errors are not shown in opened documents. The score for spell check was 0.0.
    9. Word count can be achieved for the entire buffer or for selection by adding custom status bar commands as it is not built-in. Word count for the current buffer or file worked. Selection word count is available as part of word count. The score for word count was 1.0.
    10. Go to line can jump to a specified line using :linenumber and entering the line number. It is possible to jump to either the first or last line. The score for go to line is a perfect 1.0.
    11. Indentation can default to user-defined tab stops. Children are automatically indented. The score for indentation was a perfect 1.0.
    12. Fonts can be dynamically scaled with custom keyboard shortcuts CTRL-MMB. The system font can be bypassed and a new editor font and size can be set. The score for fonts was a perfect 1.0.
    13. Find and replace / for find and :s/search-item/replace-item/[flags] for replace, and also works when using regular expressions for all open documents in the current session. Find and replace will work for the current document or a selection in the current document. The score for find and replacing using regular expressions was a perfect 1.0.
    14. Multiple language syntax highlighting in one file is enabled. Each language has code-sensitive syntax colours. The score for multiple language syntax highlighting was a perfect 1.0.
    15. Code folding does not work for markup languages such as HTML. Code folding also does not work for programming languages such as Java. The score for code folding was 0.0.
    16. Selecting rectangular block per column works holding the ALT-SHIFT-C key. Rectangular block selection does not work properly with word wrap enabled. The score for selecting rectangular block was 0.5.
    17. Multiple cursors is available using SHIFT-C. Search multiple selection does work using /. The score for multiple selection was 1.0.
    18. Distraction-free mode to hide panes works. Line numbers can be toggled :set line-numberto improve distraction-free mode. The score for distraction-free was a perfect 1.0.
    19. The file manager can be enabled with using SPACE-E. Media files can not be dragged and dropped into the file manager pane. The score for file manager was 0.5.
    20. Terminal is be invoked using :sh. The terminal does follow folder. Terminal can execute system commands. The score for terminal was 1.0.

    Results

    Helix is a lightweight IDE. By default, the Helix editor is missing required features that can be enabled or implemented by plugins. For my required features, the Helix editor scored 75.0% or 7.50 out of 10.

    More Resources for Developers

    If you’re new to programming or looking to sharpen your skills, check out my programming books and courses. Whether you’re learning Python, JavaScript, or another programming language, I have plenty of resources to help you grow as a developer.

    Additionally, if you’re looking for personalized, one-on-one programming tutorials, I am available for online sessions. Contact me here to schedule a lesson.

    Need Help with Helix?

    If you’re looking for assistance with installing Helix or migrating to Helix, I can help! Whether you’re setting it up on your own system or switching from another editor, I provide expert support. You can reach out to me here for help with installation or migration.

    Helix is a fantastic choice for developers who want a fast, modern, and highly customizable text editor. Whether you are a Vim user or new to modal editors, Helix offers a great experience with powerful features and a smooth learning curve. If you want to learn more about how to use Helix effectively, don’t hesitate to contact me for tutorials, support, or even a personalized setup.

    Happy coding!

  • How to Self-Host Shlink: An Open-Source URL shortener

    How to Self-Host Shlink: An Open-Source URL shortener


    How to Set Up Shlink on Your Server with Podman: A Beginner’s Guide

    If you’ve ever wanted a self-hosted URL shortener that is both efficient and secure, Shlink might be just what you’re looking for. In this guide, we’ll walk through installing Shlink using Podman, an open-source container management tool that is an alternative to Docker. Shlink is open-source, so you have full control over your URL shortening needs and can customize it to your heart’s content.

    Let’s dive in and get Shlink up and running with Podman. By the end of this guide, you’ll have your own Shlink instance ready to shorten and manage URLs. You’ll also be able to view a live screencast that demonstrates the installation process.

    What is Shlink?

    Shlink is an open-source URL shortening service. It allows you to create and manage shortened links, track link statistics, and even customize URLs. What sets Shlink apart from other URL shorteners is its self-hosted nature, meaning you can have full control over your data, privacy, and custom features.

    Prerequisites for Shlink Installation

    Before we start, you’ll need the following:

    • A server (local or cloud-based) with access to a terminal.
    • Podman installed on your server.
    • A basic understanding of the command line.
    • Docker Compose (optional but helpful for managing services).

    If you haven’t installed Podman yet, you can follow the official installation guide for your operating system.

    Installing Shlink with Podman

    Now, let’s go through the steps to install Shlink using Podman.

    Step 1: Pull the Shlink Docker Image

    Shlink is available as a Docker image, but since we’re using Podman, it’s compatible because Podman can run Docker images.

    podman pull shlinkio/shlink

    Step 2: Create a Podman Container

    To run Shlink, you’ll need to set up a container. Use the following command to create a container from the Shlink image:

    podman run -d -p 8080:8080 --name shlink shlinkio/shlink

    This command will:

    • Run Shlink in detached mode (-d).
    • Expose port 8080 to access the Shlink web interface.
    • Name the container “shlink”.

    Step 3: Set Up Shlink for the First Time

    Once the container is running, you can access Shlink by navigating to http://<your-server-ip>:8080 in your browser.

    You will need to configure Shlink the first time you access it. Shlink supports various configuration options, such as connecting it to a database, setting up SSL, and more. For simplicity, we’ll assume you’re using the default configuration.

    Step 4: (Optional) Configure with Podman Compose

    If you want to make managing Shlink and its dependencies easier, you can use Podman Compose (similar to Docker Compose). This will allow you to define a docker-compose.yml file that automates the creation of containers and the configuration of services.

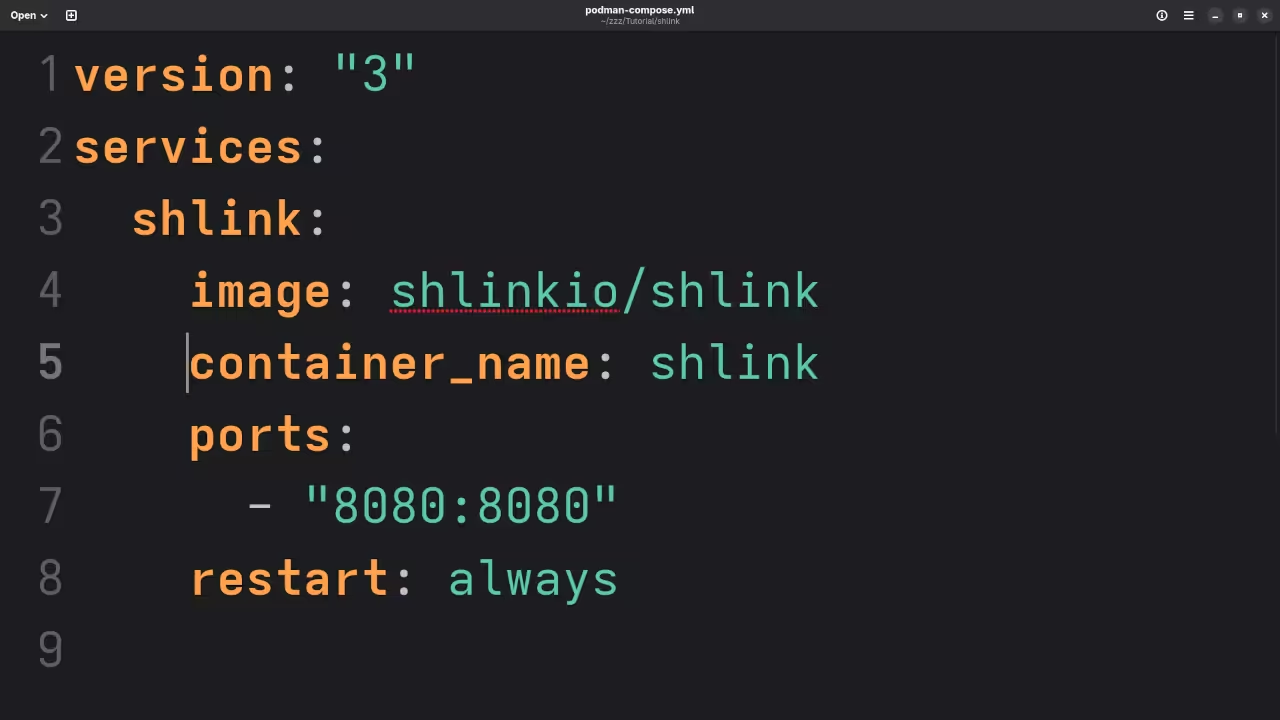
    Here’s an example docker-compose.yml file:

    version: "3"
    services:
      shlink:
        image: shlinkio/shlink
        container_name: shlink
        ports:
          - "8080:8080"
        restart: always

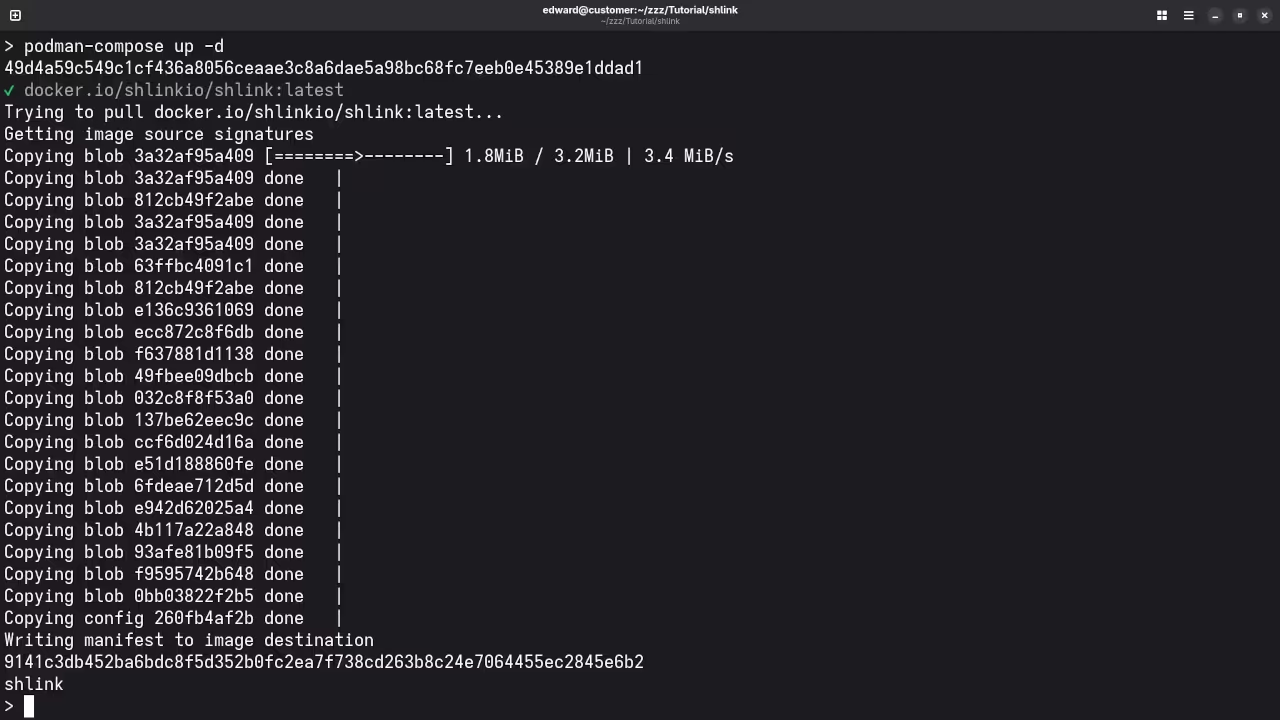
    Save this file and run the following command to start Shlink using Podman Compose:

    podman-compose up -d

    📱 Screenshots & Screencast

    Shlink Compose YAML File
    Gnome Text Editor Displaying Shlink Compose YAML File

    Shlink Podman Compose Build
    Command Line Installation Of Shlink Via Podman Compose Build

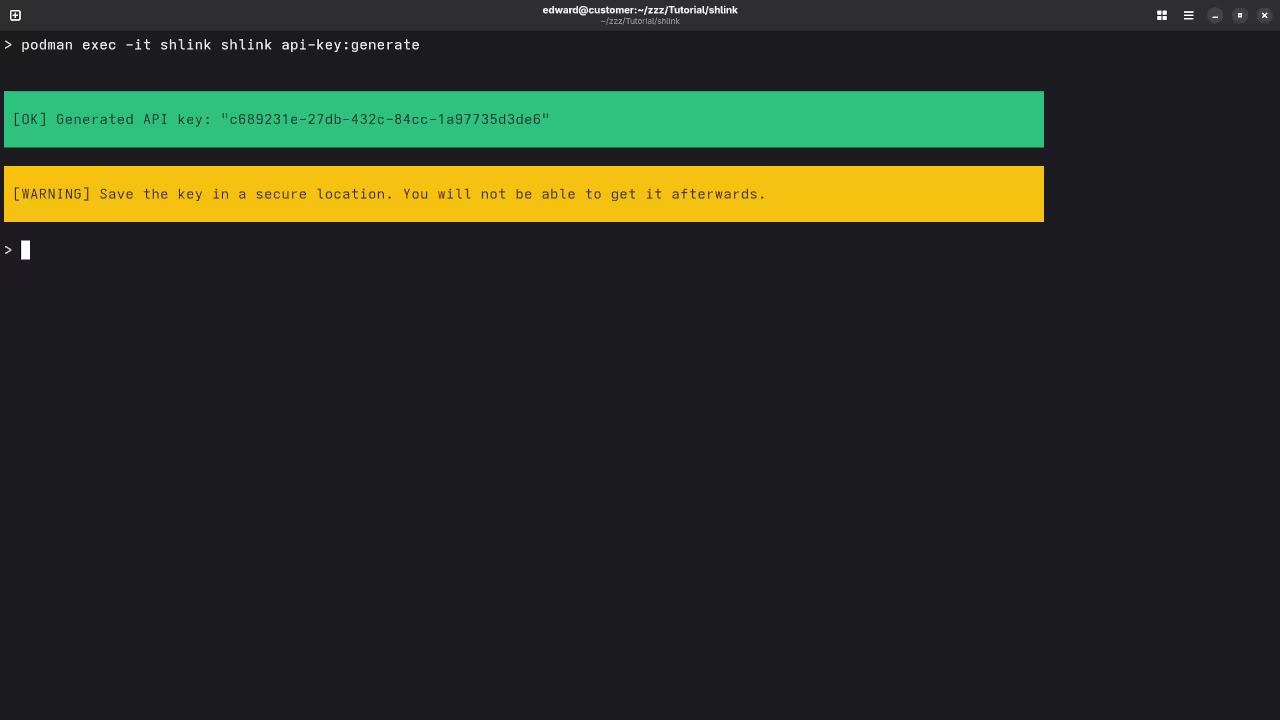
    Shlink API Key Generation
    Command Line Results Of Shlink API Key generation

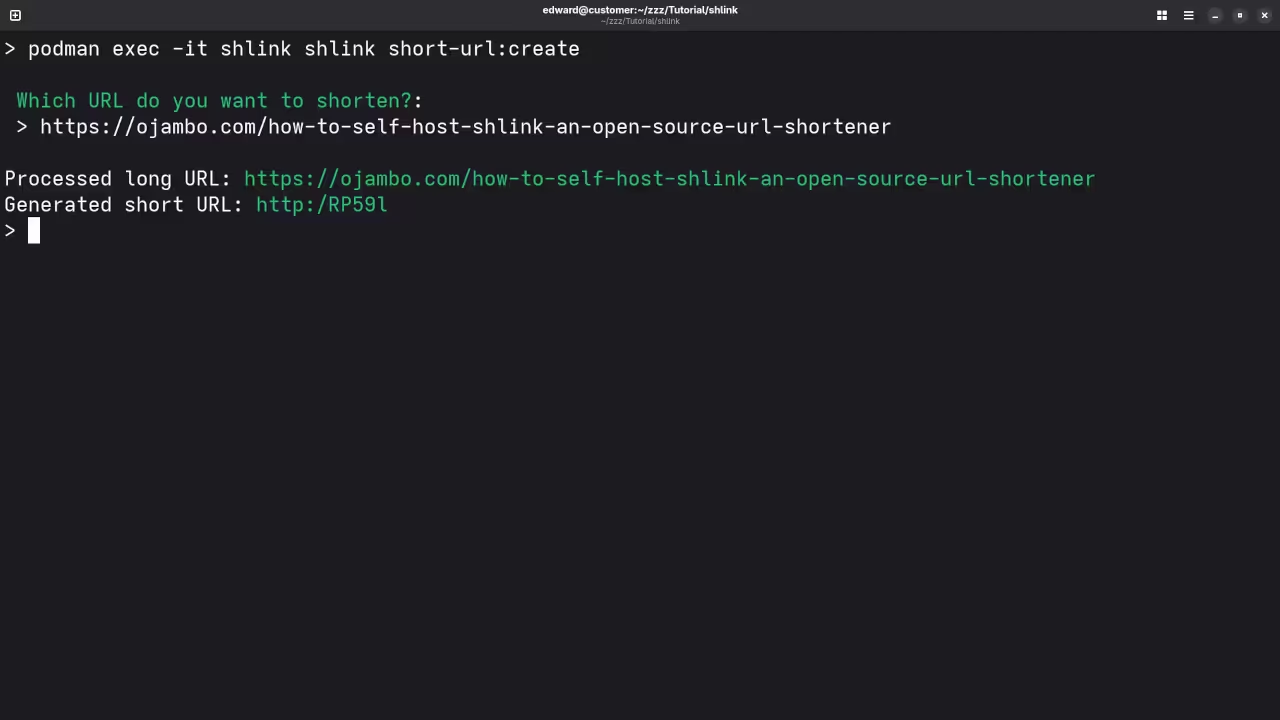
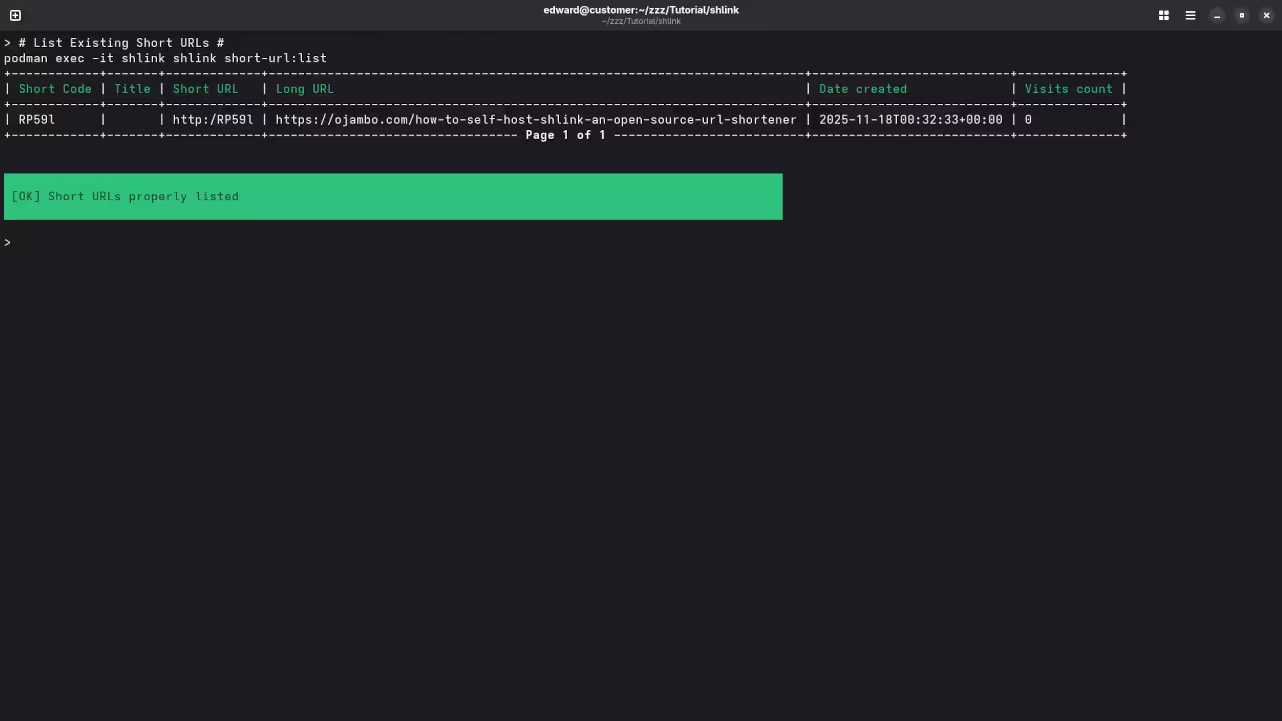
    Shlink Short URLs
    Command Line Results Of Shlink Short URLs List

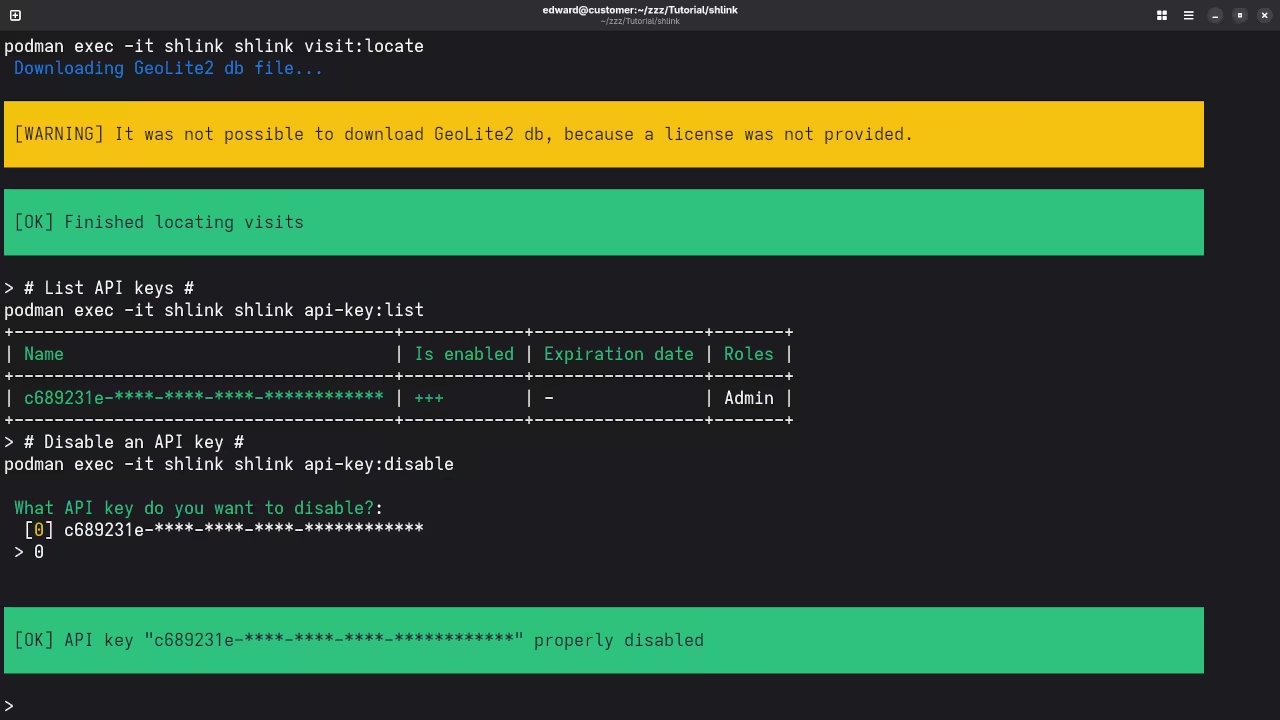
    Shlink API Keys
    Command Line Results Of Shlink API Keys List

    Shlink Installation And Setup Screencast

    Additional Resources & Links

    If you’re interested in learning more about programming or need help with installation and configuration, I have a variety of resources available:

    • Programming Books: Check out my programming books on Amazon.
    • Online Programming Courses: Visit my programming courses page to find courses on a range of topics.
    • One-on-One Online Programming Tutorials: I offer personalized tutorials to help you improve your programming skills. You can contact me through my contact page.
    • Shlink Installation or Migration Services: Need help setting up Shlink or migrating it? I offer services to install or migrate Shlink to your server. Reach out through my Shlink service page.

    Conclusion

    Setting up Shlink using Podman is a straightforward process that can be done in just a few steps. By self-hosting your own URL shortener, you gain control over your data and have the flexibility to customize your links. Whether you’re looking to run Shlink for personal use or for business, it’s a powerful, open-source tool that can meet your needs.

    Happy linking!

  • Reinstall ComfyUI And ROCm 6.4 For Unsupported AMD Instinct MI60 GPU

    Reinstall ComfyUI And ROCm 6.4 For Unsupported AMD Instinct MI60 GPU

    Reinstalling ComfyUI on Linux with ROCm 6.4 and Unsupported AMD Instinct MI60 32GB HBM2

    If you’re looking to get ComfyUI running on a Linux system with the AMD Instinct MI60 GPU, specifically under ROCm 6.4, you’ve come to the right place. In this guide, I’ll walk you through the process of reinstalling ComfyUI while dealing with the limitations of using an unsupported GPU, as well as how to make the most out of your hardware even when it’s not officially supported.

    Let’s get started!

    System Requirements

    Before diving into the steps, let’s make sure your system is ready for this setup. Here’s what you’ll need:

    • Linux Distribution: Fedora 42 or 43 (Fedora 43 ships with ROCm 6.4, but it doesn’t support the AMD Instinct MI60 GPU).
    • ROCm Version: ROCm 6.3 (supports the MI60) or ROCm 6.4 (not officially supported for the MI60).
    • Hardware:
      • AMD Instinct MI60 32GB HBM2 (unsupported with ROCm 6.4).
      • Compatible CPU (recommended: AMD Ryzen, Intel Core i5/i7).
      • At least 16GB of system RAM.
      • SSD with at least 50GB of free space for installation and model storage.

    Important: Fedora 42 comes with ROCm 6.3, which was the last supported version for the MI60 GPU. If you’re using Fedora 43, ROCm 6.4 is installed by default, but this version does not support the AMD Instinct MI60.

    Installation Steps

    Step 1: Install ROCm 6.4 (If You’re on Fedora 43)

    If you’re using Fedora 43 or another system with ROCm 6.4, you’ll need to manually adjust the environment to ensure compatibility with the MI60 GPU.

    1. Install Dependencies:
      Open your terminal and run the following commands to install necessary dependencies:

      sudo dnf install kernel-core kernel-devel rocm-dkms
      sudo dnf install rocm-dev rocm-utils
      sudo dnf install miopen-hip
    2. Install ComfyUI:
      Now let’s get ComfyUI set up. Start by cloning the repository and setting up a Python virtual environment. Here are the steps:

      # Install dependencies
      sudo dnf install python3-pip python3-virtualenv
      
      # Clone the ComfyUI repository
      git clone https://github.com/comfyui/comfyui.git
      cd comfyui
      
      # Create a virtual environment
      python3 -m venv comfyui_env
      source comfyui_env/bin/activate
      
      # Install the required Python packages
      pip install -r requirements.txt

    Step 2: Modify .bashrc for Compatibility

    Since ROCm 6.4 doesn’t support the AMD Instinct MI60 GPU out-of-the-box, you’ll need to adjust some environment variables to force it to work.

    Open your .bashrc file with a text editor:

    nano ~/.bashrc

    Add the following lines at the end of the file:

    export HSA_OVERRIDE_GFX_VERSION=9.0.6
    export HIP_VISIBLE_DEVICES=0
    export CUDA_VISIBLE_DEVICES=0
    export MIOPEN_DEBUG_CONV_WINOGRAD=0
    export MIOPEN_FIND_ENFORCE=4
    export MIOPEN_USER_DB_PATH=/mnt/AI/models/miopen

    After saving the file, refresh your shell:

    source ~/.bashrc

    Step 3: Verify GPU Compatibility

    Once the setup is done, it’s important to verify whether your GPU is detected and functional. To check, run:

    rocminfo

    This will display details about your hardware, including whether your AMD Instinct MI60 is recognized. If you encounter any issues, double-check your .bashrc settings or try reinstalling any missing dependencies.

    Step 4: Launch ComfyUI

    Now that everything is set up, you can start ComfyUI! From the ComfyUI directory, simply run:

    python comfyui.py

    This should launch the user interface in your web browser, and you can begin using ComfyUI for your AI/ML projects.

    Why Are the Environment Variables Needed?

    When using the AMD Instinct MI60 GPU with ROCm 6.4, which doesn’t officially support the MI60, certain environment variables must be set to enable compatibility. Below is an explanation of each of the necessary variables and why they are needed:

    1. export HSA_OVERRIDE_GFX_VERSION=9.0.6

    This variable is crucial because ROCm 6.4 doesn’t officially support the MI60 GPU. The HSA (Heterogeneous System Architecture) defines which GPU architectures ROCm is compatible with. By overriding this version with 9.0.6, you’re forcing ROCm to treat your MI60 GPU like a supported GPU, such as those based on the Vega architecture. Without this, ROCm may not recognize your GPU or fail to load certain libraries needed for computation.

    2. export HIP_VISIBLE_DEVICES=0

    The HIP (Heterogeneous-compute Interface for Portability) runtime controls which GPUs are used for computations. Setting this variable ensures that the system uses the MI60 as the device for workloads. If you have multiple GPUs in your system, you can modify this variable to select a different GPU (e.g., HIP_VISIBLE_DEVICES=1 for the second GPU). Without this, the system may fail to recognize or utilize your GPU for computations.

    3. export CUDA_VISIBLE_DEVICES=0

    This variable is similar to HIP_VISIBLE_DEVICES but for CUDA programs, which typically expect to use NVIDIA GPUs. However, in some cases, programs or libraries may still reference CUDA, so by setting this variable, you’re ensuring that your MI60 GPU is used even when CUDA is involved. Without it, the system might try to use an unsupported NVIDIA GPU or default to the CPU.

    4. export MIOPEN_DEBUG_CONV_WINOGRAD=0

    This environment variable disables debugging for the Winograd algorithm, which is used in deep learning convolution operations. By setting this variable to 0, you’re preventing any debug output or errors related to this optimization. This can improve stability during training or inference, especially when using the MI60 with a version of ROCm that doesn’t fully support it.

    5. export MIOPEN_FIND_ENFORCE=4

    This variable controls how MIOpen, the AMD deep learning library, searches for the best convolution algorithms. Setting it to 4 forces MIOpen to always search for and apply the best algorithms, even when ROCm versions change or the system doesn’t officially support the hardware. This ensures that you get the best performance and stability, even on unsupported hardware like the MI60.

    6. export MIOPEN_USER_DB_PATH=/mnt/AI/models/miopen

    MIOpen uses a performance database to store optimizations for various neural network operations. By setting this variable, you tell MIOpen to store and load its optimizations from a custom location. This is useful if you want to separate MIOpen data from the rest of your system or store it on a faster disk, such as an SSD dedicated to AI/ML workloads.

    Is ComfyUI Open Source?

    Yes, ComfyUI is an open-source project. It is licensed under the MIT License, meaning you are free to use, modify, and distribute the software as you see fit. You can explore the full source code on the ComfyUI GitHub repository.

    Where to Place Your Models

    Model Type Folder
    Checkpoints (e.g. *.safetensors) ComfyUI/models/checkpoints/
    LoRA models ComfyUI/models/loras/
    VAEs ComfyUI/models/vae/
    ControlNet ComfyUI/models/controlnet/

    Just drop your files into the appropriate folder and rerun stable-diffusion.cpp.

    Test Tools

    Test System
    Name Description
    CPU AMD Ryzen 5 5600GT (6C/12T, 3.6GHz).
    Memory 32GB DDR4.
    GPU AMD Instinct MI60 (32GB HBM2).
    Operating System Fedora Linux Workstation 43.
    Desktop Environment Gnome 49.
    Name Description

    Screenshots and Screencast

    Here’s where you’ll find a visual walkthrough of setting up v1-5-pruned-emaonly-fp16.safetensors using ComfyUI on your local system:

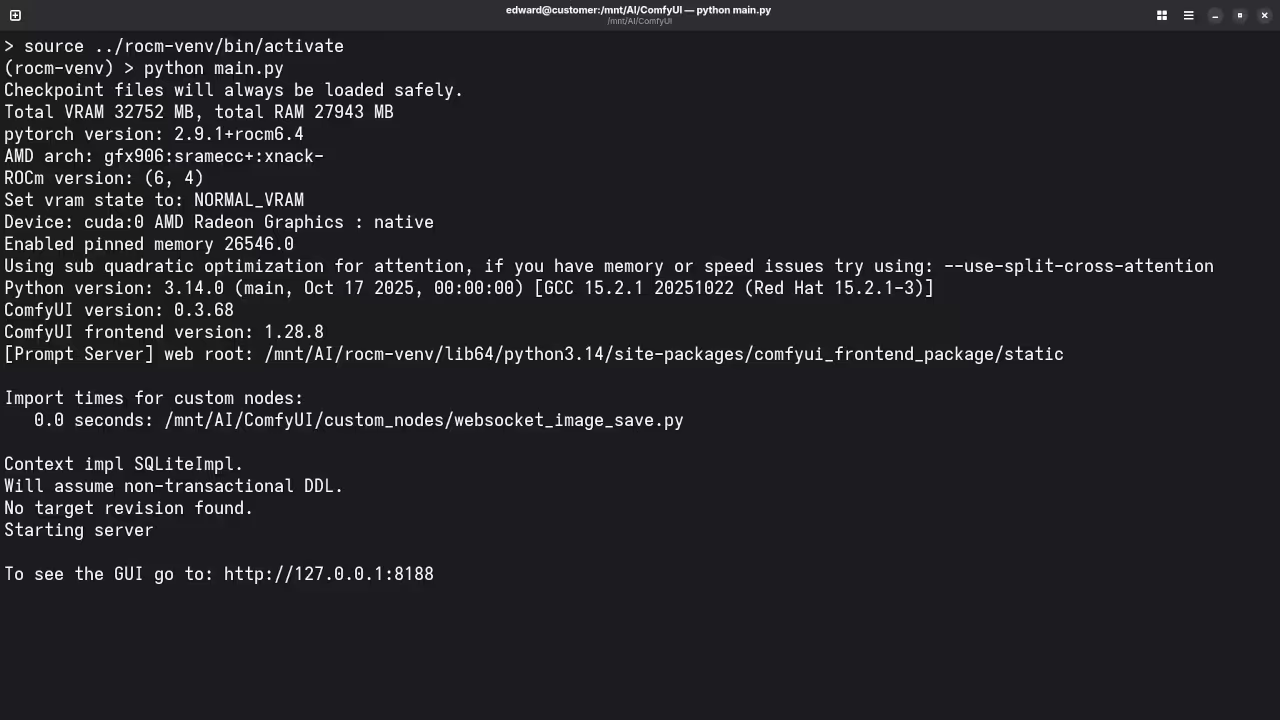
    Starting ComfyUI
    Command Line Starting ComfyU Showing Full AMD Instinct MI60 Support.

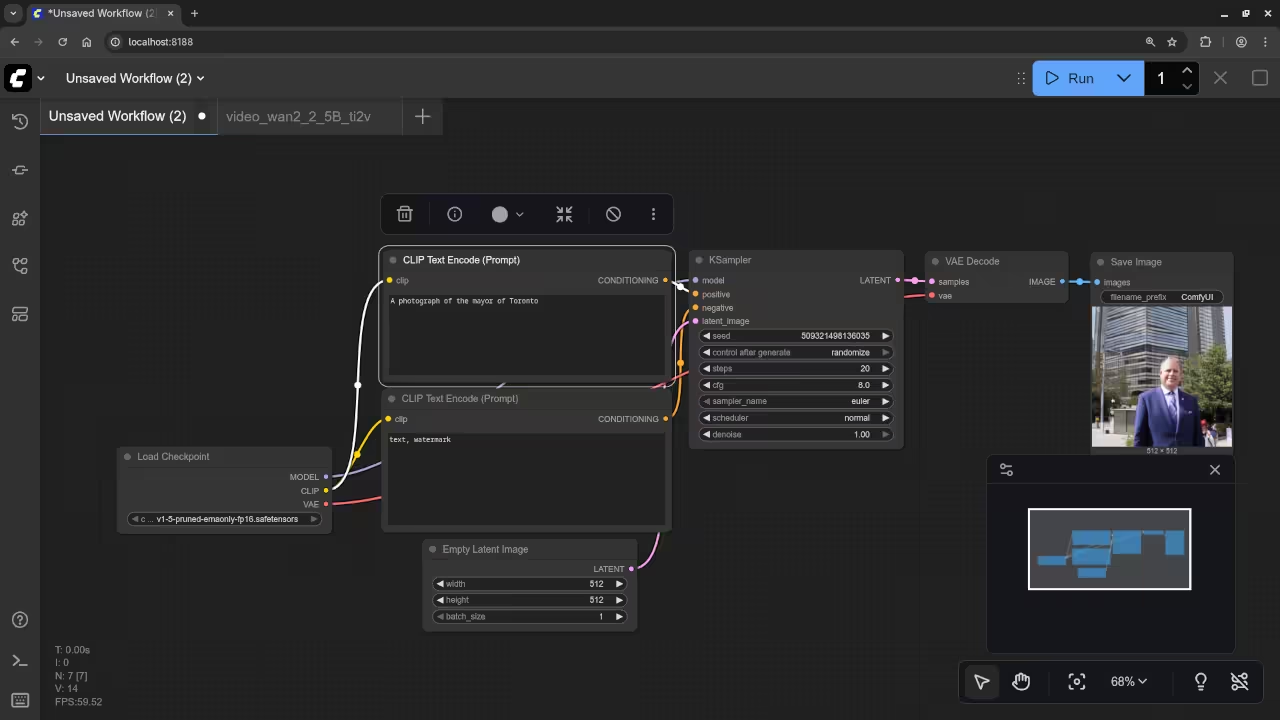
    AI Generated Mayor Of Toronto
    Web Browser ComfyUI Result For AI Generated Toronto Mayor

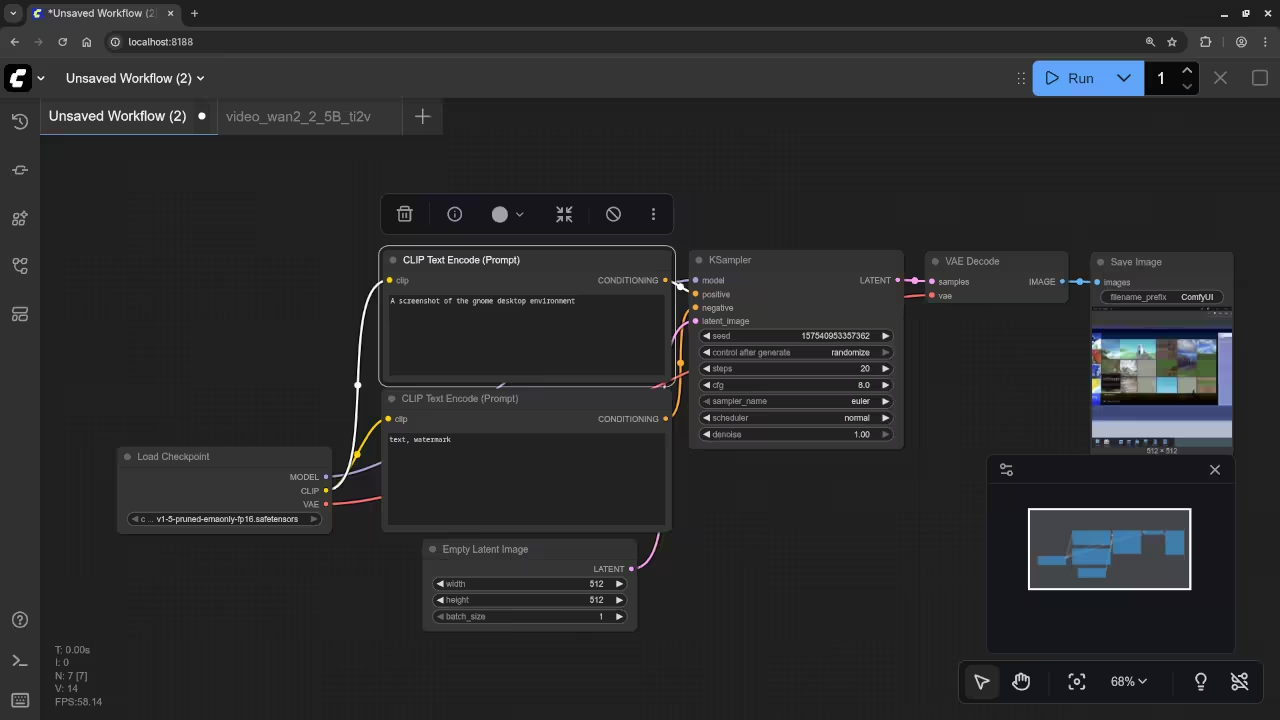
    AI Generated Gnome Desktop
    Web Browser ComfyUI Result For AI Generated Desktop Gnome Environment

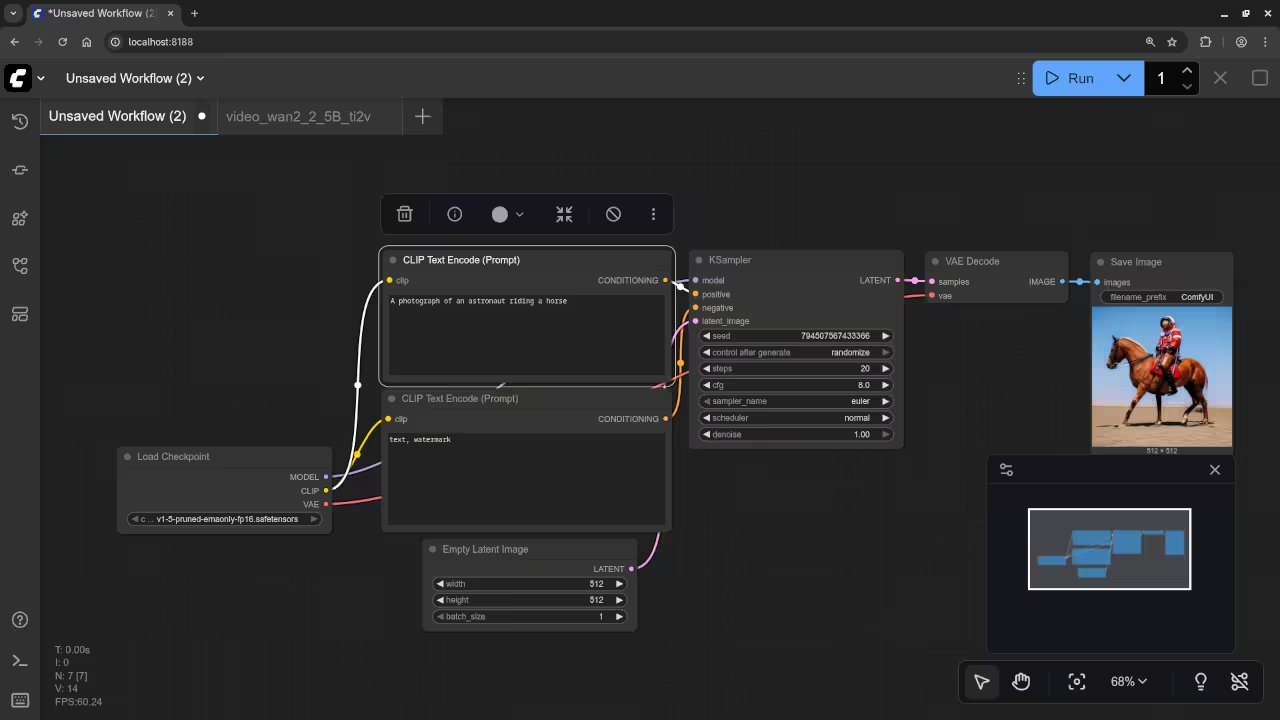
    AI Generated Astronaut Horse
    Web Browser ComfyUI Result For AI Generated Desktop Horse-Riding Astronaut

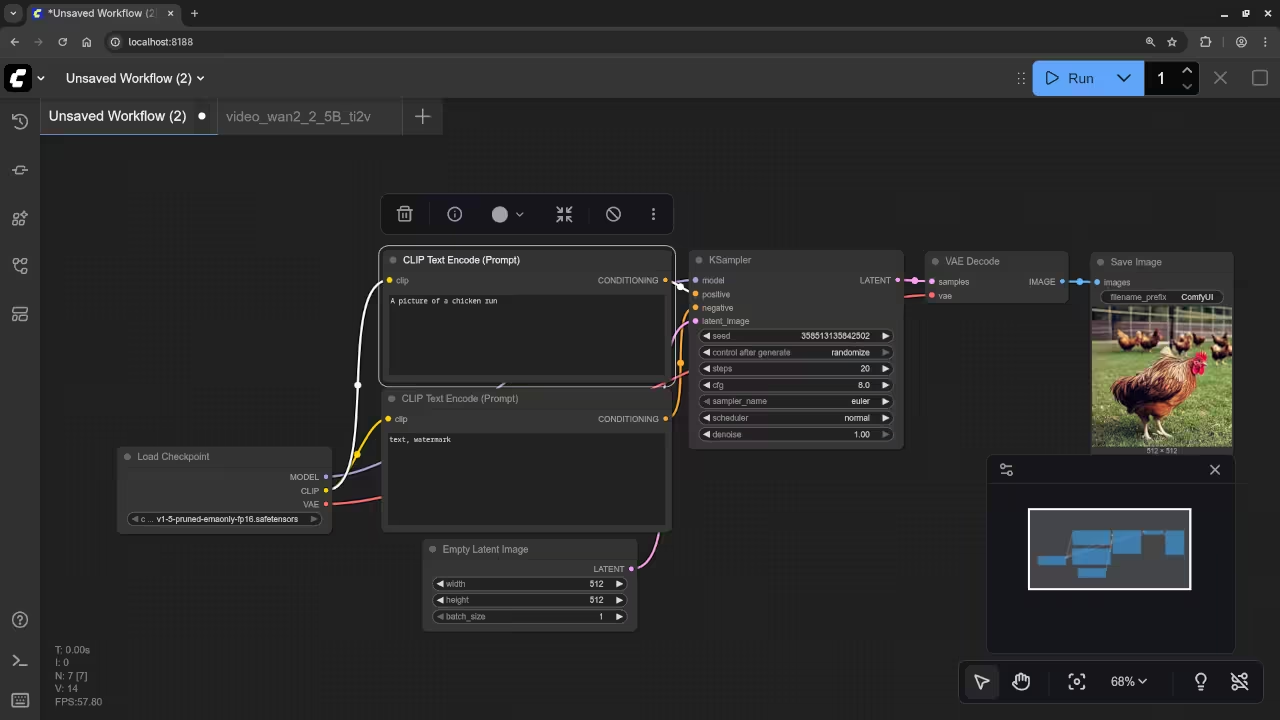
    AI Generated Chicken Run
    Web Browser ComfyUI Result For AI Generated Desktop Pen For Chickens

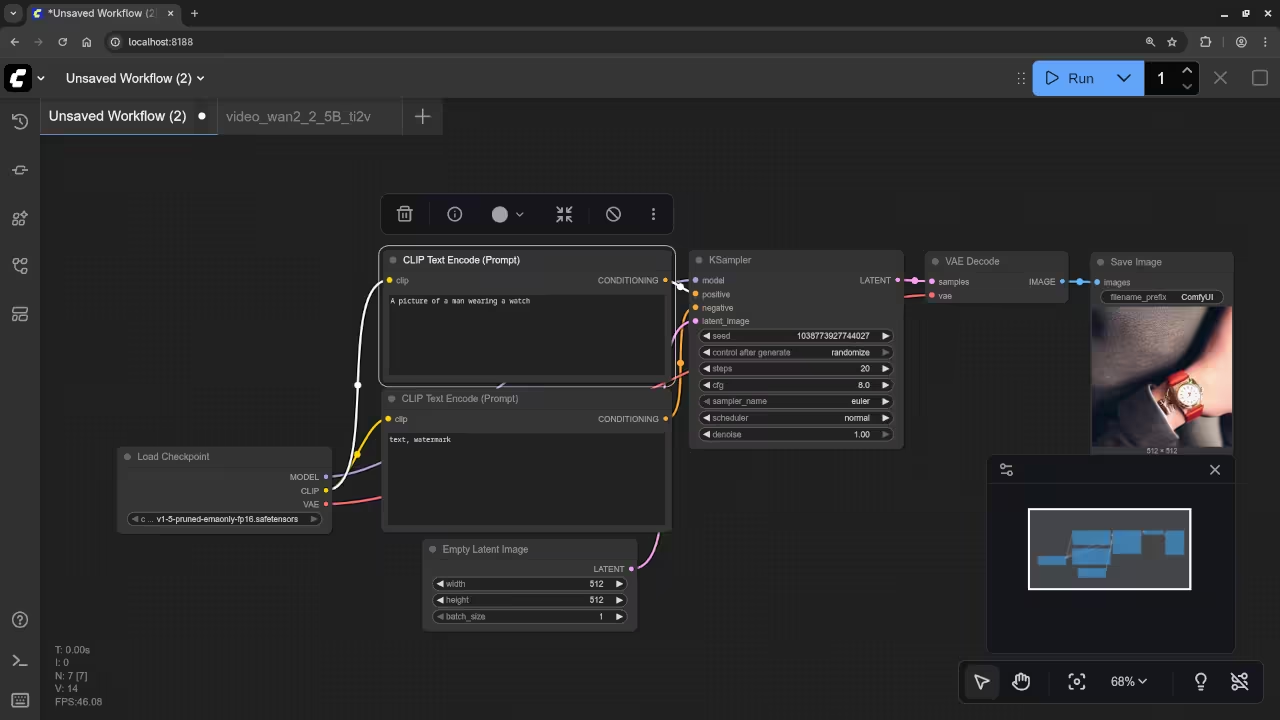
    AI Generated Man's Watch
    Web Browser ComfyUI Result For AI Generated Desktop Wristwatch Closeup

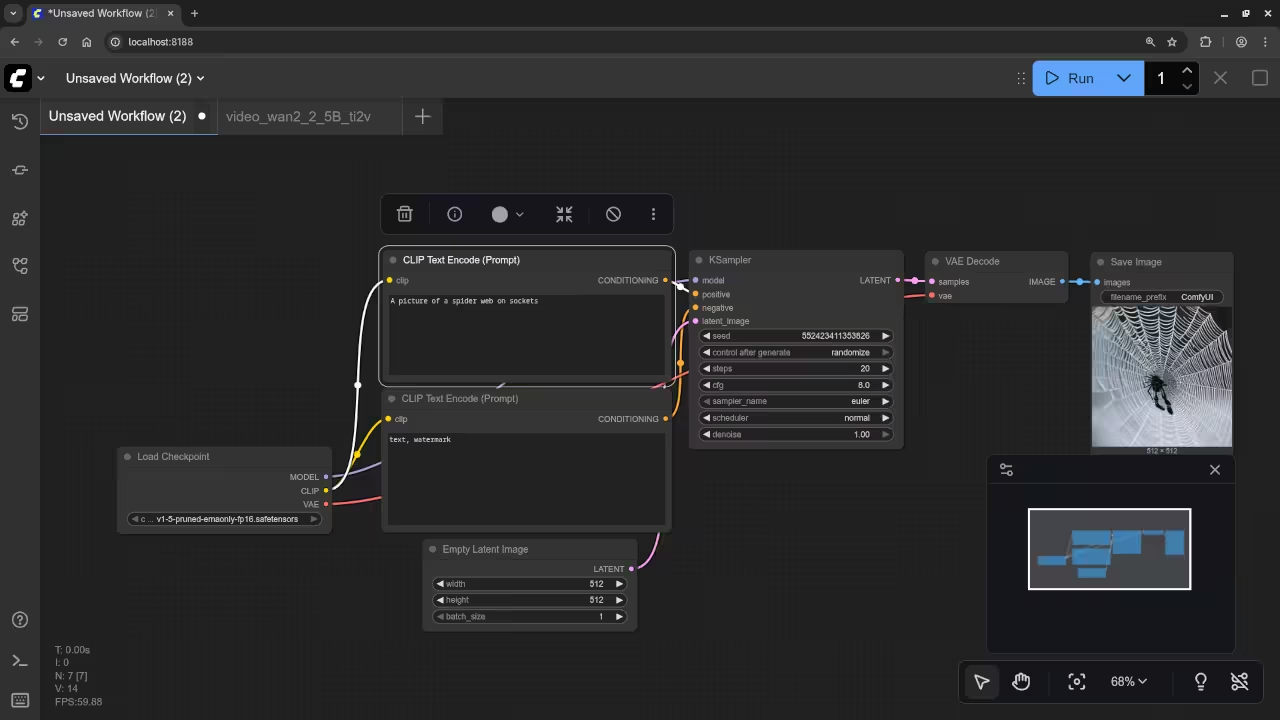
    AI Generated Spider Web
    Web Browser ComfyUI Result For AI Generated Desktop Hanging Spiderweb

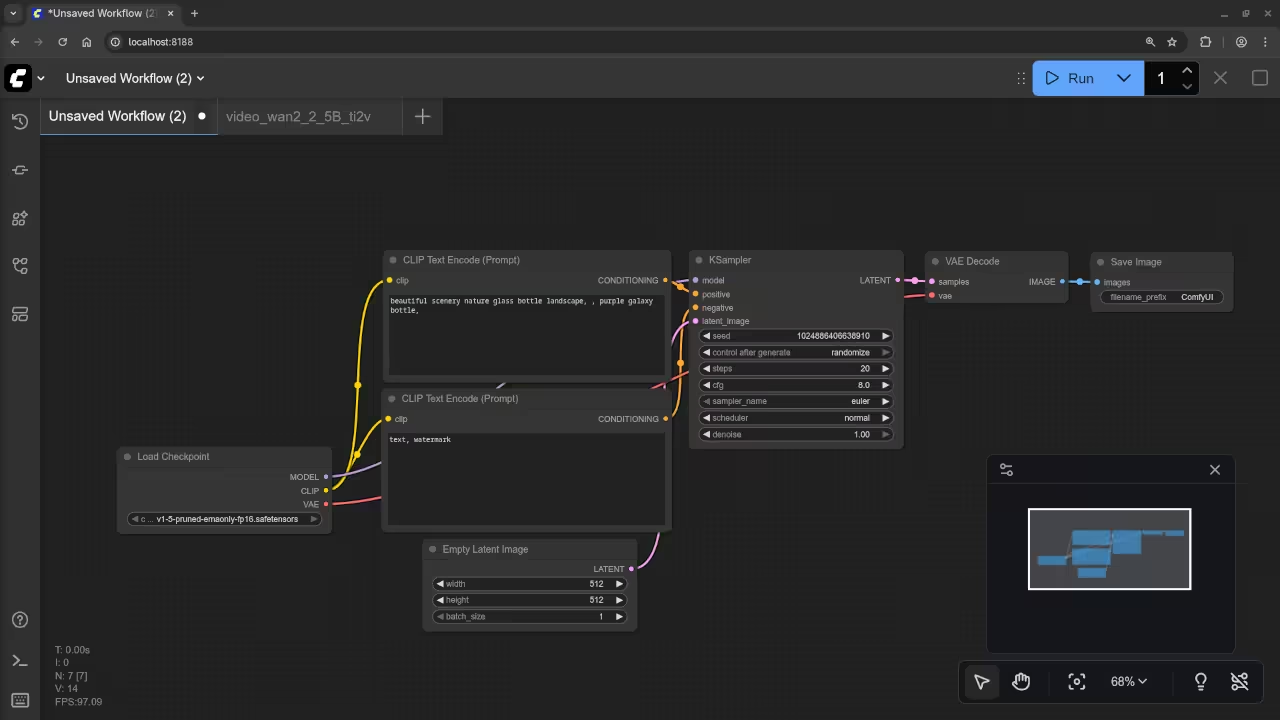
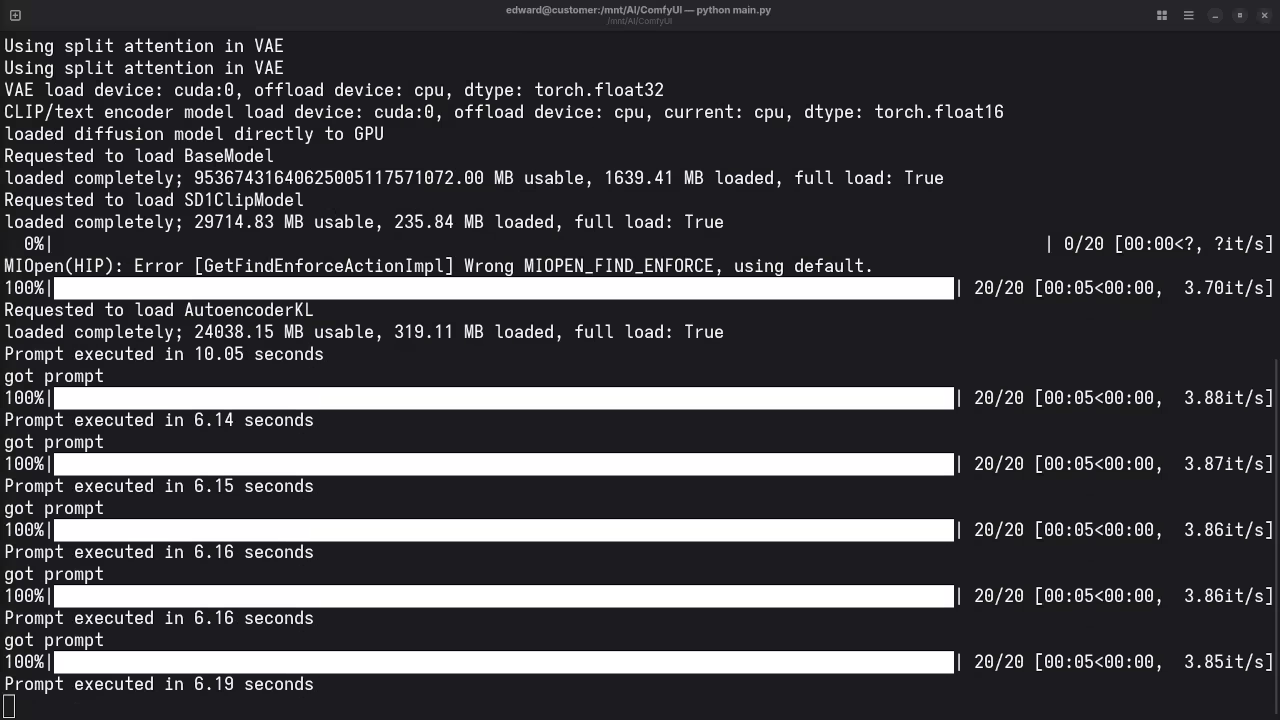
    ComfyUI Prompts
    Command Line Displaying ComfyUI Prompt Results

    Video Displaying Using ComfyUI With ROCm 6.4 And Unsupported AMD Instinct MI60 GPU

    Video Displaying Using ComfyUI With ROCm 6.4 And Unsupported AMD Instinct MI60 GPU

    Results:

    A photograph of the mayor of Toronto

    Accurately drew a photograph mishmash of past mayors of Toronto.

    A screenshot of the gnome desktop environment.

    Accurately drew a screenshot of an older version of the Gnome desktop environment.

    A photograph of an astronaut riding a horse.

    Accurately drew a photograph of an astronaut riding a horse.

    A picture of a chicken run.

    Accurately drew a picture of a chicken run.

    A picture of a man wearing a watch.

    Accurately drew a picture of a man wearing a watch.

    A picture of a spider web on sockets.

    Accurately drew a picture of a spider web on sockets.

    Additional Resources

    If you’re looking to expand your programming skills, I also offer a couple of great resources:

    • Book: Learning Python – A beginner-friendly guide to learning Python.
    • Course: Learning Python – A detailed course that covers Python basics and intermediate topics.
    • One-on-One Python Tutorials: If you need personalized help with Python programming, feel free to reach out for one-on-one online tutorials at ojambo.com/contact.
    • If you need assistance with ROCm or want to migrate your setup, you can contact me at ojamboservices.com/contact.

    I hope this guide helps you get your ComfyUI up and running on Linux with the AMD Instinct MI60. Let me know if you have any questions or run into any issues!

  • PHP Dynamically Change Color Of Image

    PHP Dynamically Change Color Of Image

    How to Dynamically Change the Color of an Image with PHP

    Introduction:

    In this tutorial, we’ll explore how to dynamically change the color of an image on a webpage using PHP. Specifically, we will learn how to take a white shoe image and change its color (for example, to red or green) on the fly, based on user input. This technique can be used for various applications like product customization in e-commerce websites or for fun interactive features.

    What You Will Learn:

    • How to use PHP’s GD Library to manipulate images.
    • How to dynamically change an image color based on user input.
    • How to integrate PHP image manipulation with a simple front-end interface using JavaScript.

    Requirements:

    • Basic understanding of PHP and HTML.
    • A local or live web server with PHP support (e.g., XAMPP, WAMP, or a live hosting environment).
    • An image (for example, a white shoe image) that we will modify.

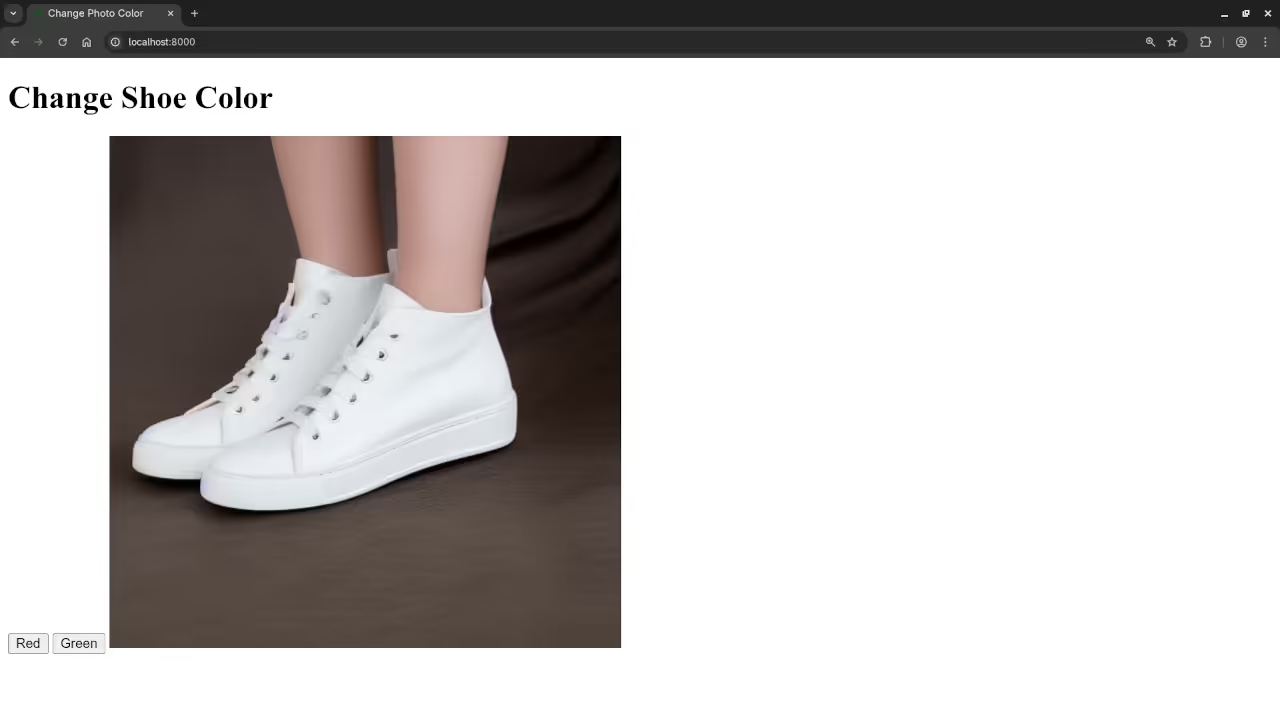
    Step 1: Set Up Your Image

    Before we start coding, let’s assume we have a white shoe image named shoe_white.jpg. Make sure this image is in the same directory as your PHP script.

    Insert a screenshot of the white shoe image here

    Step 2: Frontend Setup (HTML & JavaScript)

    We’ll start by creating a simple webpage that allows the user to choose the color for the shoe. We will use JavaScript to send the color choice to the server, and PHP will dynamically change the image color.

    Here’s the HTML and JavaScript code:


    &lt;h1&gt;Change Shoe Color&lt;/h1&gt;
    &lt;button onclick=&quot;changeShoeColor(&#039;red&#039;)&quot;&gt;Red&lt;/button&gt;
    &lt;button onclick=&quot;changeShoeColor(&#039;green&#039;)&quot;&gt;Green&lt;/button&gt;
    
    &lt;img id=&quot;shoe&quot; src=&quot;shoe_white.jpg&quot; alt=&quot;Shoe&quot;&gt;
    
    &lt;script&gt;
      function changeShoeColor(color) {
        fetch(`changeColor.php?color=${color}`)
          .then(response =&gt; response.blob())
          .then(imageBlob =&gt; {
            const imageUrl = URL.createObjectURL(imageBlob);
            document.getElementById(&#039;shoe&#039;).src = imageUrl;
          })
          .catch(error =&gt; console.error(&#039;Error:&#039;, error));
      }
    &lt;/script&gt;


    In the code above, when the user clicks on the “Red” or “Green” button, JavaScript sends a request to changeColor.php, passing the color parameter. The PHP script then processes the image and returns the modified image as a response.

    Step 3: Backend Setup (PHP)

    Now, we need to create the PHP script that will process the image and change its color. The script will load the image, look for white pixels, and replace them with the requested color.

    Here’s the PHP code for changeColor.php:


    header(&#039;Content-Type: image/jpeg&#039;);
    
    // Get the color from the request
    $color = isset($_GET[&#039;color&#039;]) ? $_GET[&#039;color&#039;] : &#039;red&#039;;
    
    // Load the white shoe image
    $image = imagecreatefromjpeg(&#039;shoe_white.jpg&#039;);
    
    // Get image dimensions
    $width = imagesx($image);
    $height = imagesy($image);
    
    // Define colors for red and green
    $colors = [
        &#039;red&#039; =&gt; imagecolorallocate($image, 255, 0, 0),
        &#039;green&#039; =&gt; imagecolorallocate($image, 0, 255, 0),
    ];
    
    // Choose the color based on the query parameter
    $targetColor = isset($colors[$color]) ? $colors[$color] : $colors[&#039;red&#039;];
    
    // Loop through each pixel and change the color of the white ones
    for ($x = 0; $x &lt; $width; $x++) {
        for ($y = 0; $y &lt; $height; $y++) {
            $rgb = imagecolorat($image, $x, $y);
            $r = ($rgb &gt;&gt; 16) &amp; 0xFF;
            $g = ($rgb &gt;&gt; 8) &amp; 0xFF;
            $b = $rgb &amp; 0xFF;
            
            if ($r &gt; 200 &amp;&amp; $g &gt; 200 &amp;&amp; $b &gt; 200) {
                imagesetpixel($image, $x, $y, $targetColor);
            }
        }
    }
    
    // Output the modified image
    imagejpeg($image);
    
    // Clean up
    imagedestroy($image);


    In the PHP code above, we:

    1. Load the white shoe image.
    2. Define the target colors (red and green).
    3. Loop through every pixel, and if it’s a “white” pixel (RGB values close to 255), we change it to the desired color.

    Step 4: Test the Dynamic Color Change

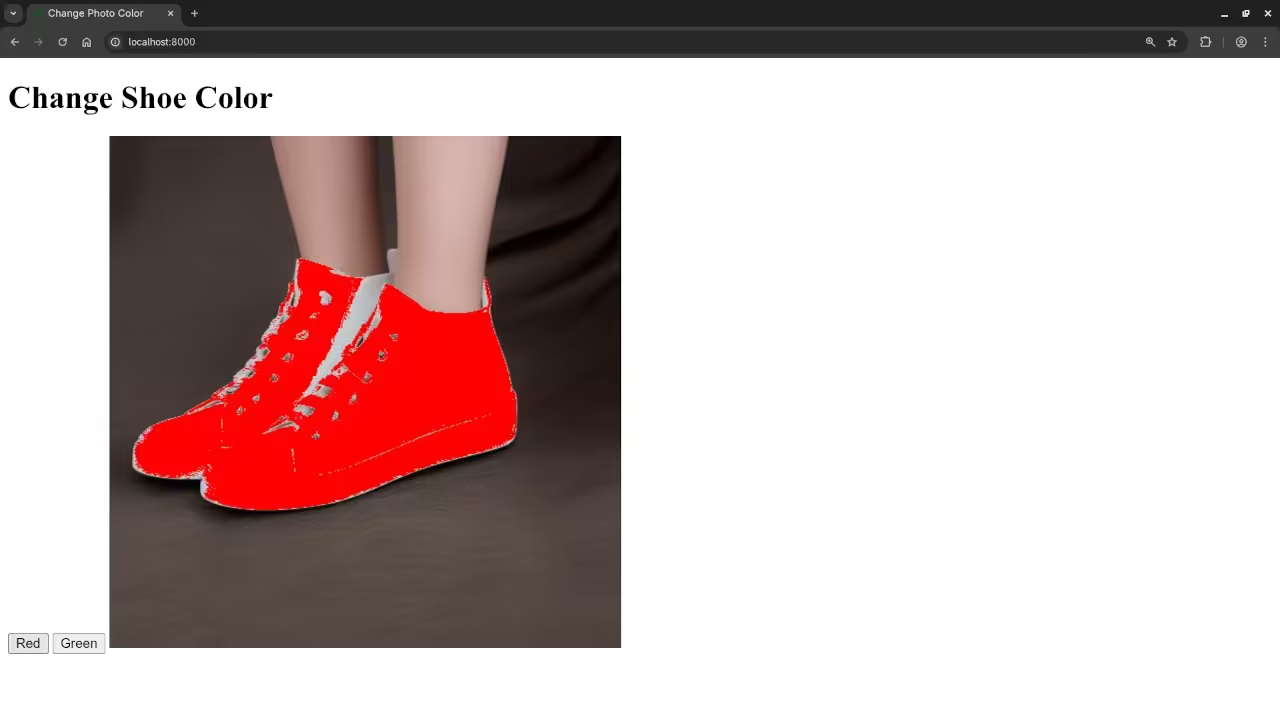
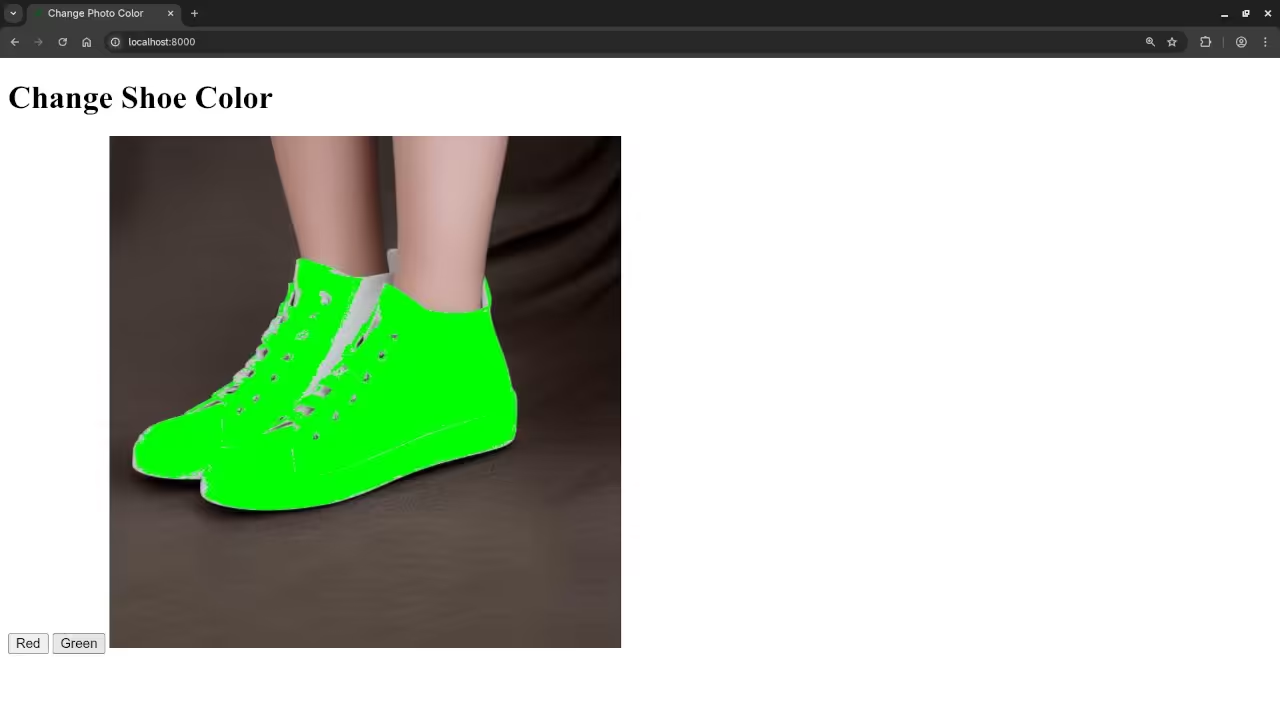
    Once you’ve added the HTML and PHP files to your server, load the HTML file in a browser. When you click on the “Red” or “Green” buttons, the PHP script will change the color of the shoe dynamically without needing to refresh the page.

    Screenshots And Screencast

    Change Image Color To Red
    Web Browser Displaying Red Image

    Change Image Color To Green
    Web Browser Displaying Green Image

    PHP Change Image Color Video

    Conclusion

    In this simple tutorial, we demonstrated how to dynamically change the color of an image using PHP’s GD library and JavaScript. You can extend this method for various uses, including custom product selectors or interactive features on your website.

    Want to Learn More About PHP?

    If you’re new to PHP or want to dive deeper into PHP programming, I recommend checking out my book Learning PHP, which covers the fundamentals of PHP development in a beginner-friendly way.

    Additionally, I offer a comprehensive course called Learning PHP that covers all the essential PHP topics you’ll need to build dynamic web applications.

    Need One-on-One Help?

    If you’re looking for personalized help with PHP programming or need assistance with updating or migrating your PHP applications, feel free to contact me for one-on-one programming tutorials.

    Thanks for reading, and happy coding!

  • Build An HTML5 Color Picker with CMYK

    Build An HTML5 Color Picker with CMYK

    Creating an HTML5 Color Picker with CMYK Using the Input Element

    Creating an HTML5 Color Picker with CMYK Using the Input Element

    In this post, we’ll explore how to create a simple HTML5 color picker that allows users to select colors in the CMYK color model (Cyan, Magenta, Yellow, and Key/Black) using the <input> element. While most color pickers use RGB (Red, Green, Blue) or HEX values, CMYK is commonly used in print design and offers an alternative for specific design needs.

    What You’ll Need:

    • A basic understanding of HTML5.
    • Some familiarity with JavaScript (if you want to implement interactivity).
    • A text editor (like Visual Studio Code) to write your code.

    Step 1: HTML5 Input Element for Color Selection

    HTML5 introduced the <input type="color"> element, which lets users pick colors through a native browser interface. But it only supports RGB and HEX formats. We’ll need to create a custom solution to work with CMYK.

    Here’s the basic HTML structure for the color picker:


        &lt;h1&gt;HTML5 Color Picker with CMYK&lt;/h1&gt;
        &lt;p&gt;Select a color and see the CMYK values:&lt;/p&gt;
        
        &lt;!-- Input for selecting color in HEX --&gt;
        &lt;input type=&quot;color&quot; id=&quot;colorPicker&quot;&gt;
        
        &lt;div id=&quot;cmykValues&quot;&gt;
            &lt;p&gt;C: &lt;span id=&quot;cyan&quot;&gt;0&lt;/span&gt;%&lt;/p&gt;
            &lt;p&gt;M: &lt;span id=&quot;magenta&quot;&gt;0&lt;/span&gt;%&lt;/p&gt;
            &lt;p&gt;Y: &lt;span id=&quot;yellow&quot;&gt;0&lt;/span&gt;%&lt;/p&gt;
            &lt;p&gt;K: &lt;span id=&quot;key&quot;&gt;0&lt;/span&gt;%&lt;/p&gt;
        &lt;/div&gt;
    
        &lt;script src=&quot;script.js&quot;&gt;&lt;/script&gt;


    This simple structure creates a color picker input field and a place to display the CMYK values.

    Step 2: JavaScript to Convert RGB to CMYK

    To convert the color chosen in RGB to CMYK, we’ll write a JavaScript function. This will take the RGB values from the color picker and convert them to their respective CMYK values.

    Here’s the JavaScript code:


    document.getElementById(&#039;colorPicker&#039;).addEventListener(&#039;input&#039;, function(event) {
        let hex = event.target.value;
        let rgb = hexToRgb(hex);
        let cmyk = rgbToCmyk(rgb.r, rgb.g, rgb.b);
    
        document.getElementById(&#039;cyan&#039;).textContent = Math.round(cmyk.c * 100) + &#039;%&#039;;
        document.getElementById(&#039;magenta&#039;).textContent = Math.round(cmyk.m * 100) + &#039;%&#039;;
        document.getElementById(&#039;yellow&#039;).textContent = Math.round(cmyk.y * 100) + &#039;%&#039;;
        document.getElementById(&#039;key&#039;).textContent = Math.round(cmyk.k * 100) + &#039;%&#039;;
    });
    
    // Convert HEX to RGB
    function hexToRgb(hex) {
        let r = parseInt(hex.slice(1, 3), 16);
        let g = parseInt(hex.slice(3, 5), 16);
        let b = parseInt(hex.slice(5, 7), 16);
        return { r, g, b };
    }
    
    // Convert RGB to CMYK
    function rgbToCmyk(r, g, b) {
        r /= 255;
        g /= 255;
        b /= 255;
    
        let k = 1 - Math.max(r, g, b);
        let c = (1 - r - k) / (1 - k);
        let m = (1 - g - k) / (1 - k);
        let y = (1 - b - k) / (1 - k);
    
        return { c, m, y, k };
    }


    Here’s how the code works:

    1. We listen for the input event on the color picker and retrieve the selected color in HEX format.
    2. We then convert this HEX value into RGB values.
    3. After that, we convert the RGB values into CMYK using a simple formula.
    4. Finally, we display the resulting CMYK values on the page.

    Step 3: Adding Some Style

    You can add some CSS to make the page look better and more organized. Here’s a simple style:


        body {
            font-family: Arial, sans-serif;
            margin: 20px;
            background-color: #f4f4f4;
        }
        h1 {
            color: #333;
        }
        #cmykValues p {
            font-size: 16px;
            margin: 5px 0;
        }
        #colorPicker {
            margin: 20px 0;
            padding: 10px;
            width: 100px;
            height: 40px;
        }


    This will add some space between elements, adjust the size of the color picker, and generally make the page look cleaner.

    Consolidated Demo

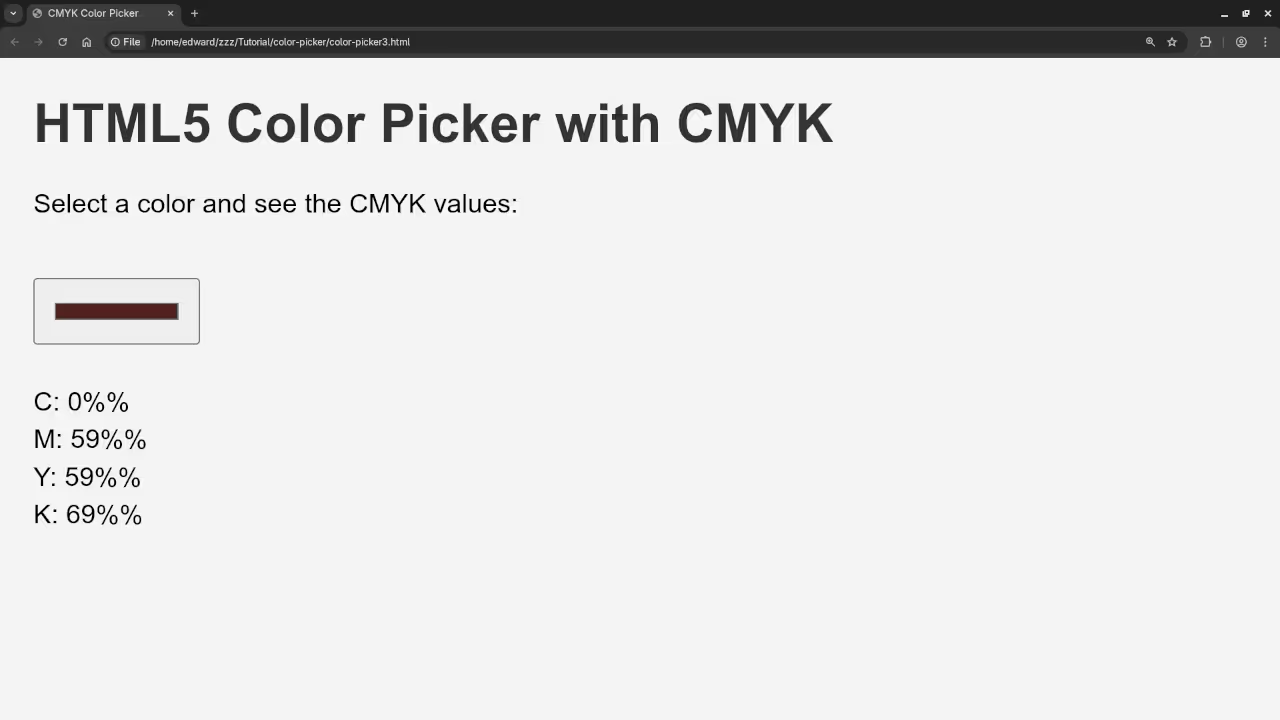
    HTML5 CYMK Color Picker Demo

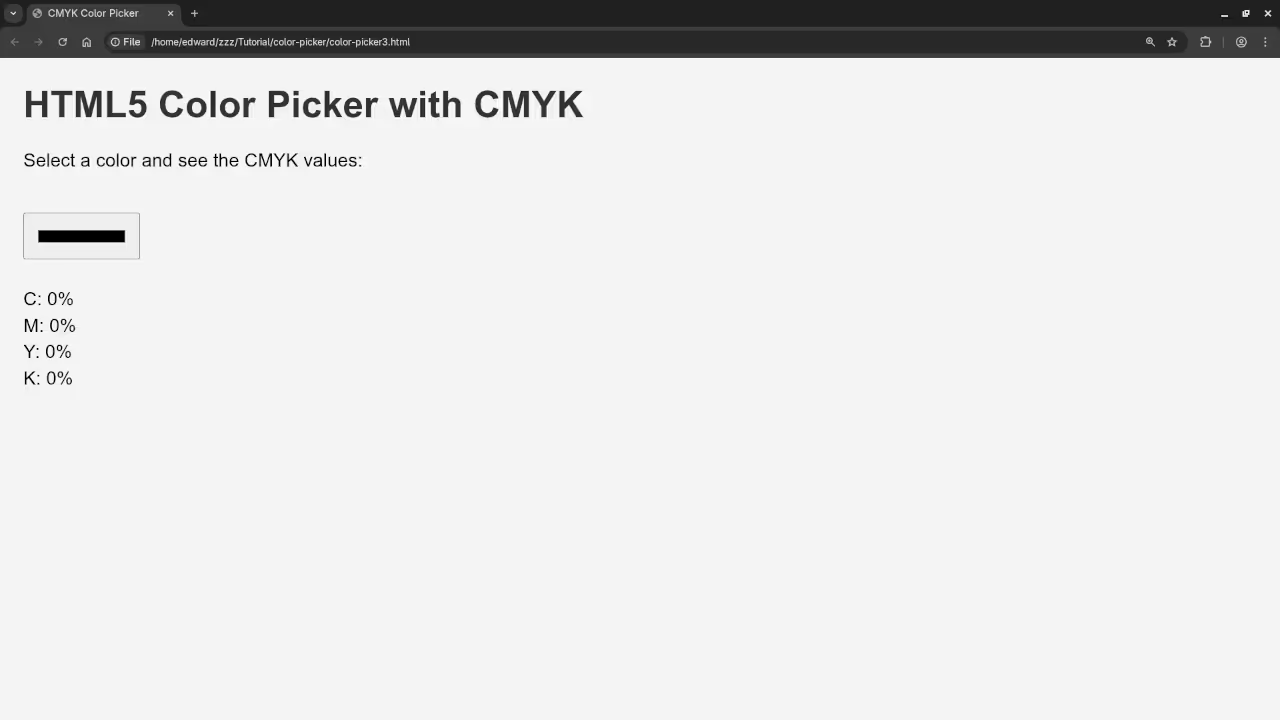
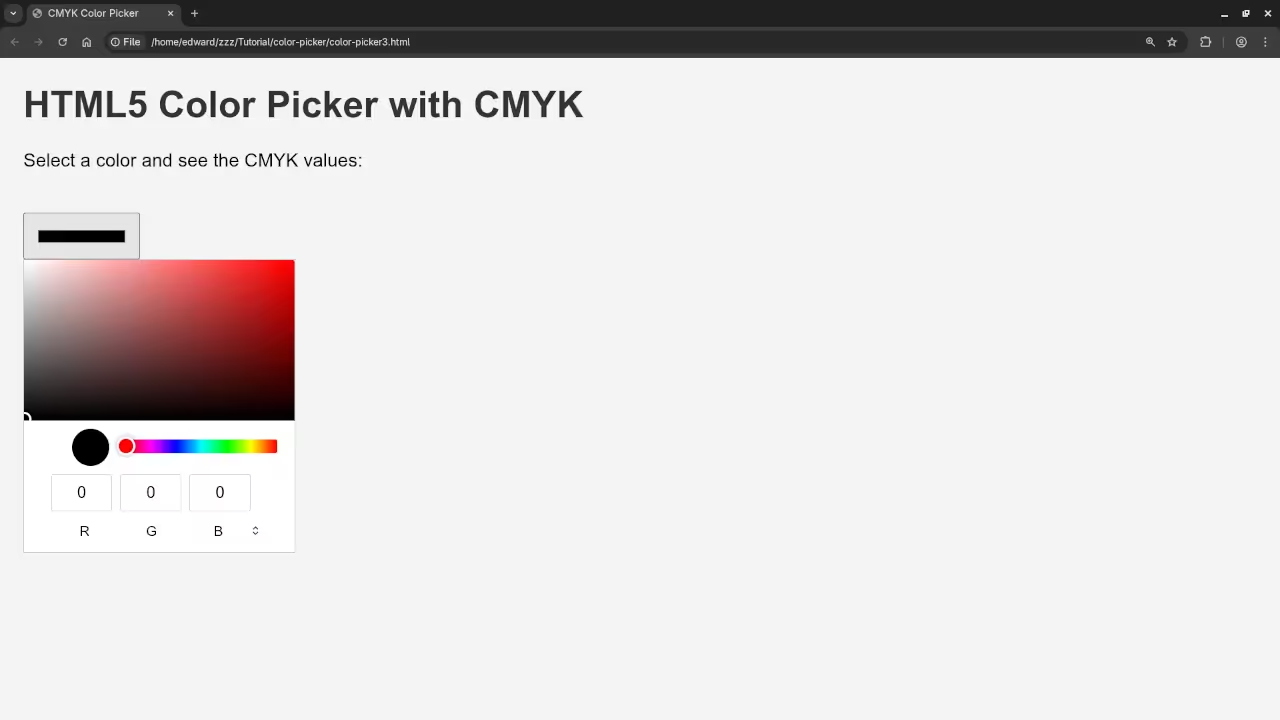
    Screenshot

    HTML5 Color Picker
    Web Browser Showing HTML5 Color Picker

    HTML5 Dynamic CMYK Values
    Web Browser Showing HTML5 Color Picker Dynamic CMYK Values

    Live Screencast

    Screencast Of HTML5 Color Picker CMYK Values

    Step 4: Further Learning

    If you’re interested in expanding your JavaScript knowledge, check out my book, Learning JavaScript, or my course Learning JavaScript for in-depth lessons and hands-on coding exercises.

    If you’re looking for personalized guidance, I offer one-on-one programming tutorials. Feel free to reach out to me via my contact page.

    Conclusion

    Creating a color picker in HTML5 with CMYK support is a fun and practical project that can help you learn more about color models and the power of HTML5’s input element. I hope this tutorial was helpful, and don’t forget to check out my book and course if you want to dive deeper into JavaScript!

    Feel free to let me know if you have any questions or suggestions. Happy coding!