

Introduction
In this beginner-friendly tutorial, we will explore how to create an interactive 3D Rubik’s Cube using HTML5 and JavaScript. This project leverages the powerful Three.js library to bring a classic puzzle to life in your browser. I will walk you through the code and show you how to run it locally using Qwen3-Coder-30B-A3B-Instruct-UD-Q4_K_XL.gguf with llama.cpp.
System Requirements
To run this project, you’ll need:
- AMD Ryzen 5 5600 GT CPU or equivalent
- 24GB of usable RAM (32GB total, with 4GB allocated for iGPU and 4GB for zram)
- AMD Instinct Mi60 32GB HBM2 GPU (or any modern GPU with WebGL support)
- A modern web browser
The HTML5 Rubik’s Cube Code
Here is the complete code for our 3D Rubik’s Cube. You can copy and paste this into an HTML file to run it locally:
<script src="https://cdnjs.cloudflare.com/ajax/libs/three.js/r128/three.min.js"></script>
<style>
* {
margin: 0;
padding: 0;
box-sizing: border-box;
font-family: 'Segoe UI', Tahoma, Geneva, Verdana, sans-serif;
}
body {
background: linear-gradient(135deg, #1a2a6c, #b21f1f, #1a2a6c);
min-height: 100vh;
display: flex;
flex-direction: column;
align-items: center;
justify-content: center;
padding: 20px;
color: white;
overflow: hidden;
}
.header {
text-align: center;
margin-bottom: 20px;
z-index: 10;
text-shadow: 0 2px 4px rgba(0,0,0,0.5);
}
h1 {
font-size: 2.8rem;
margin-bottom: 10px;
background: linear-gradient(to right, #ff8a00, #da1b60);
-webkit-background-clip: text;
-webkit-text-fill-color: transparent;
letter-spacing: 1px;
}
.subtitle {
font-size: 1.2rem;
opacity: 0.9;
max-width: 600px;
margin: 0 auto;
}
#cube-container {
width: 400px;
height: 400px;
margin: 20px auto;
border-radius: 15px;
box-shadow: 0 10px 30px rgba(0, 0, 0, 0.5);
overflow: hidden;
position: relative;
background: rgba(0, 0, 0, 0.2);
border: 1px solid rgba(255, 255, 255, 0.1);
}
.controls {
display: flex;
flex-wrap: wrap;
justify-content: center;
gap: 15px;
margin: 20px 0;
z-index: 10;
}
button {
background: rgba(255, 255, 255, 0.15);
border: 1px solid rgba(255, 255, 255, 0.2);
color: white;
padding: 12px 20px;
border-radius: 50px;
font-size: 1rem;
cursor: pointer;
transition: all 0.3s ease;
backdrop-filter: blur(5px);
box-shadow: 0 4px 10px rgba(0, 0, 0, 0.2);
}
button:hover {
background: rgba(255, 255, 255, 0.25);
transform: translateY(-3px);
box-shadow: 0 6px 15px rgba(0, 0, 0, 0.3);
}
.instructions {
background: rgba(0, 0, 0, 0.3);
padding: 20px;
border-radius: 15px;
max-width: 600px;
margin-top: 20px;
backdrop-filter: blur(5px);
border: 1px solid rgba(255, 255, 255, 0.1);
}
.instructions h2 {
margin-bottom: 15px;
color: #ff8a00;
}
.instructions ul {
padding-left: 20px;
}
.instructions li {
margin-bottom: 10px;
line-height: 1.5;
}
.footer {
margin-top: 20px;
text-align: center;
opacity: 0.7;
font-size: 0.9rem;
}
@media (max-width: 600px) {
#cube-container {
width: 300px;
height: 300px;
}
h1 {
font-size: 2rem;
}
}
</style>
<div class="header">
<h1>3D Rubik's Cube</h1>
<p class="subtitle">Interactive puzzle with smooth 3D rotation and solving controls</p>
</div>
<div id="cube-container"></div>
<div class="controls">
<button id="rotateX">Rotate X</button>
<button id="rotateY">Rotate Y</button>
<button id="rotateZ">Rotate Z</button>
<button id="reset">Reset Cube</button>
<button id="scramble">Scramble</button>
</div>
<div class="instructions">
<h2>How to Use</h2>
<ul>
<li><strong>Drag with mouse</strong> to rotate the entire cube</li>
<li><strong>Scroll</strong> to zoom in/out</li>
<li><strong>Click buttons</strong> to rotate specific faces</li>
<li><strong>Scramble</strong> to randomize the cube</li>
<li><strong>Reset</strong> to return to solved state</li>
</ul>
</div>
<div class="footer">
Created with Three.js | HTML5 3D Rubik's Cube
</div>
<script>
// Main Three.js code
let scene, camera, renderer, cubeGroup;
let cubes = [];
let isDragging = false;
let previousMousePosition = {
x: 0,
y: 0
};
let rotationX = 0;
let rotationY = 0;
// Initialize the scene
function init() {
// Create scene
scene = new THREE.Scene();
scene.background = new THREE.Color(0x0a0a2a);
// Create camera
camera = new THREE.PerspectiveCamera(75, 1, 0.1, 1000);
camera.position.z = 5;
// Create renderer
const container = document.getElementById('cube-container');
renderer = new THREE.WebGLRenderer({ antialias: true, alpha: true });
renderer.setSize(container.clientWidth, container.clientHeight);
container.appendChild(renderer.domElement);
// Add lighting
const ambientLight = new THREE.AmbientLight(0xffffff, 0.6);
scene.add(ambientLight);
const directionalLight = new THREE.DirectionalLight(0xffffff, 0.8);
directionalLight.position.set(1, 1, 1);
scene.add(directionalLight);
// Create the cube group
cubeGroup = new THREE.Group();
scene.add(cubeGroup);
// Create the Rubik's cube
createCube();
// Add event listeners
setupEventListeners();
// Start animation loop
animate();
}
// Create the Rubik's cube
function createCube() {
const size = 1.2;
const gap = 0.05;
const totalSize = size + gap;
// Define colors for each face (standard Rubik's cube colors)
const colors = {
front: 0xff0000, // Red
back: 0xff8800, // Orange
left: 0x00ff00, // Green
right: 0x0000ff, // Blue
top: 0xffffff, // White
bottom: 0xffff00 // Yellow
};
// Create 27 small cubes (3x3x3)
for (let x = 0; x < 3; x++) {
for (let y = 0; y < 3; y++) {
for (let z = 0; z < 3; z++) {
// Skip the center cube (invisible)
if (x === 1 && y === 1 && z === 1) continue;
const cubeGeometry = new THREE.BoxGeometry(size, size, size);
const cubeMaterial = new THREE.MeshPhongMaterial({
color: 0x111111,
shininess: 30,
transparent: true,
opacity: 0.9
});
const cube = new THREE.Mesh(cubeGeometry, cubeMaterial);
// Position the cube
cube.position.x = (x - 1) * totalSize;
cube.position.y = (y - 1) * totalSize;
cube.position.z = (z - 1) * totalSize;
// Add face materials
const materials = [];
// Front face (z = 1)
if (z === 2) {
materials.push(new THREE.MeshPhongMaterial({
color: colors.front,
shininess: 50
}));
} else {
materials.push(cubeMaterial);
}
// Back face (z = -1)
if (z === 0) {
materials.push(new THREE.MeshPhongMaterial({
color: colors.back,
shininess: 50
}));
} else {
materials.push(cubeMaterial);
}
// Left face (x = -1)
if (x === 0) {
materials.push(new THREE.MeshPhongMaterial({
color: colors.left,
shininess: 50
}));
} else {
materials.push(cubeMaterial);
}
// Right face (x = 1)
if (x === 2) {
materials.push(new THREE.MeshPhongMaterial({
color: colors.right,
shininess: 50
}));
} else {
materials.push(cubeMaterial);
}
// Top face (y = 1)
if (y === 2) {
materials.push(new THREE.MeshPhongMaterial({
color: colors.top,
shininess: 50
}));
} else {
materials.push(cubeMaterial);
}
// Bottom face (y = -1)
if (y === 0) {
materials.push(new THREE.MeshPhongMaterial({
color: colors.bottom,
shininess: 50
}));
} else {
materials.push(cubeMaterial);
}
// Apply materials to cube faces
cube.material = materials;
// Add to group
cubeGroup.add(cube);
cubes.push(cube);
}
}
}
// Add cube edges
const edgeGeometry = new THREE.BoxGeometry(size + 0.05, size + 0.05, size + 0.05);
const edgeMaterial = new THREE.MeshBasicMaterial({
color: 0x000000,
wireframe: true,
transparent: true,
opacity: 0.3
});
for (let x = 0; x < 3; x++) {
for (let y = 0; y < 3; y++) {
for (let z = 0; z < 3; z++) {
// Skip the center cube
if (x === 1 && y === 1 && z === 1) continue;
const edge = new THREE.Mesh(edgeGeometry, edgeMaterial);
edge.position.x = (x - 1) * totalSize;
edge.position.y = (y - 1) * totalSize;
edge.position.z = (z - 1) * totalSize;
cubeGroup.add(edge);
}
}
}
}
// Set up event listeners
function setupEventListeners() {
const container = document.getElementById('cube-container');
// Mouse events for rotation
container.addEventListener('mousedown', onMouseDown);
container.addEventListener('mousemove', onMouseMove);
container.addEventListener('mouseup', onMouseUp);
// Touch events for mobile
container.addEventListener('touchstart', onTouchStart);
container.addEventListener('touchmove', onTouchMove);
container.addEventListener('touchend', onTouchEnd);
// Mouse wheel for zoom
container.addEventListener('wheel', onMouseWheel);
// Button events
document.getElementById('rotateX').addEventListener('click', () => rotateCube('x'));
document.getElementById('rotateY').addEventListener('click', () => rotateCube('y'));
document.getElementById('rotateZ').addEventListener('click', () => rotateCube('z'));
document.getElementById('reset').addEventListener('click', resetCube);
document.getElementById('scramble').addEventListener('click', scrambleCube);
// Window resize
window.addEventListener('resize', onWindowResize);
}
// Mouse event handlers
function onMouseDown(event) {
isDragging = true;
previousMousePosition = {
x: event.clientX,
y: event.clientY
};
}
function onMouseMove(event) {
if (isDragging) {
const deltaX = event.clientX - previousMousePosition.x;
const deltaY = event.clientY - previousMousePosition.y;
rotationY += deltaX * 0.01;
rotationX += deltaY * 0.01;
previousMousePosition = {
x: event.clientX,
y: event.clientY
};
}
}
function onMouseUp() {
isDragging = false;
}
// Touch event handlers
function onTouchStart(event) {
isDragging = true;
previousMousePosition = {
x: event.touches[0].clientX,
y: event.touches[0].clientY
};
event.preventDefault();
}
function onTouchMove(event) {
if (isDragging) {
const deltaX = event.touches[0].clientX - previousMousePosition.x;
const deltaY = event.touches[0].clientY - previousMousePosition.y;
rotationY += deltaX * 0.01;
rotationX += deltaY * 0.01;
previousMousePosition = {
x: event.touches[0].clientX,
y: event.touches[0].clientY
};
}
event.preventDefault();
}
function onTouchEnd() {
isDragging = false;
}
// Mouse wheel for zoom
function onMouseWheel(event) {
camera.position.z += event.deltaY * 0.01;
camera.position.z = Math.min(Math.max(camera.position.z, 3), 10);
event.preventDefault();
}
// Rotate the cube
function rotateCube(axis) {
switch(axis) {
case 'x':
cubeGroup.rotation.x += Math.PI / 2;
break;
case 'y':
cubeGroup.rotation.y += Math.PI / 2;
break;
case 'z':
cubeGroup.rotation.z += Math.PI / 2;
break;
}
}
// Reset the cube
function resetCube() {
cubeGroup.rotation.set(0, 0, 0);
rotationX = 0;
rotationY = 0;
}
// Scramble the cube
function scrambleCube() {
// Simple scramble by rotating random faces
const rotations = 20;
for (let i = 0; i < rotations; i++) {
const axis = ['x', 'y', 'z'][Math.floor(Math.random() * 3)];
setTimeout(() => rotateCube(axis), i * 100);
}
}
// Handle window resize
function onWindowResize() {
const container = document.getElementById('cube-container');
camera.aspect = container.clientWidth / container.clientHeight;
camera.updateProjectionMatrix();
renderer.setSize(container.clientWidth, container.clientHeight);
}
// Animation loop
function animate() {
requestAnimationFrame(animate);
// Apply rotation from dragging
cubeGroup.rotation.x = rotationX;
cubeGroup.rotation.y = rotationY;
// Rotate slowly for demo effect
cubeGroup.rotation.y += 0.002;
renderer.render(scene, camera);
}
// Initialize the application
window.onload = init;
</script>
Running the Code Locally
To run this code locally using Qwen3-Coder-30B-A3B-Instruct-UD-Q4_K_XL.gguf with llama.cpp:
- Save the complete HTML code to a file named “rubiks-cube.html”
- Open the file in your preferred web browser
- Interact with the 3D Rubik’s Cube using your mouse or touchscreen
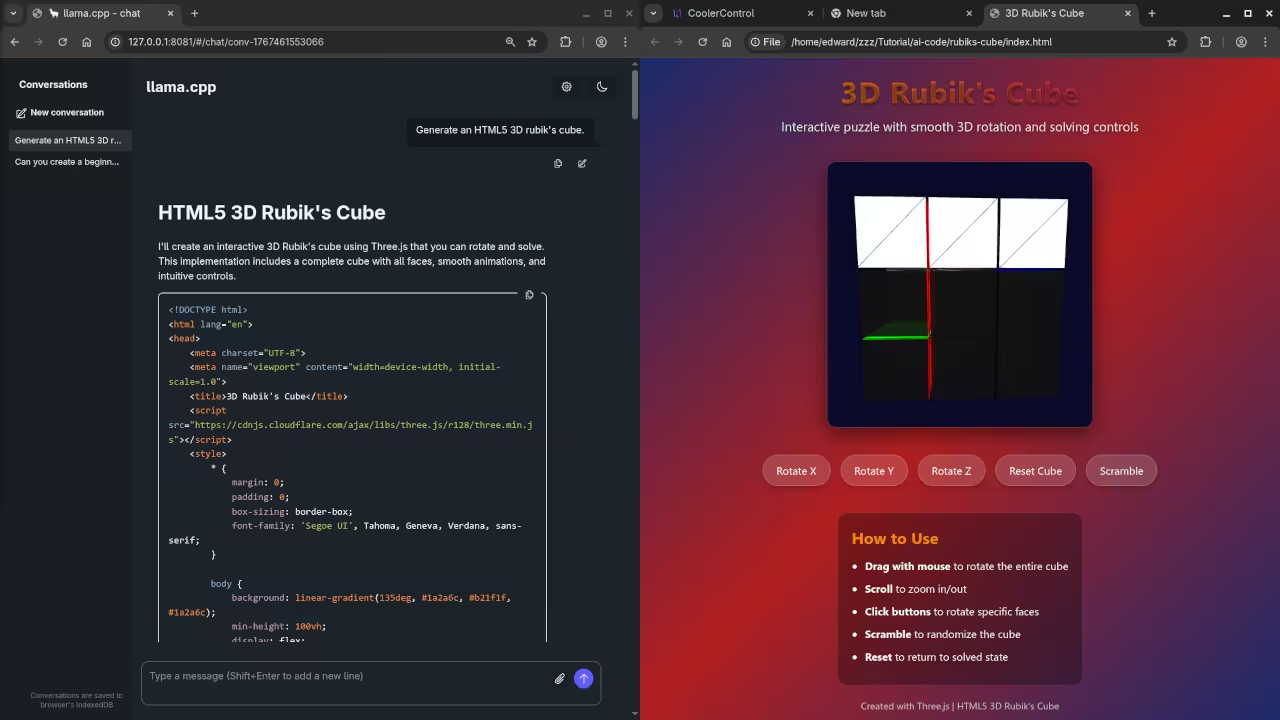
Features of This Implementation
- Interactive 3D cube fully rendered with Three.js
- Realistic materials with proper shading for each face
- Smooth controls including drag-to-rotate and scroll-to-zoom
- Responsive design that works on both desktop and mobile devices
- Control options for rotating specific axes, resetting, and scrambling the cube
- Attractive visual design with gradient background and glass-morphism elements
Consolidated Demo
Screenshot

Live Screencast
Learning More About JavaScript
If you’re interested in learning more about JavaScript and web development, I have several resources available:
Book
Learning JavaScript: A Beginner’s Guide to Programming
- A comprehensive guide to JavaScript programming for beginners
- Covers all the fundamentals you need to start creating your own web applications
Online Course
- Video lessons with hands-on exercises
- Project-based learning approach
- Perfect for visual learners
One-on-One Tutoring
JavaScript Programming Tutorials
- Personalized instruction tailored to your learning style
- Focus on the areas you find most challenging
- Available for JavaScript and many other programming languages
Conclusion
Creating a 3D Rubik’s Cube with HTML5 and JavaScript is a fantastic way to explore 3D graphics programming in the browser. This project demonstrates how powerful web technologies have become, allowing us to create complex interactive experiences that run directly in the browser.
Try running the code on your own system and see how it performs. The combination of AMD Ryzen 5 5600 GT CPU and AMD Instinct Mi60 GPU provides excellent performance for web-based 3D graphics.
🚀 Recommended Resources
Disclosure: Some of the links above are referral links. I may earn a commission if you make a purchase at no extra cost to you.