
ComfyUI + Wan 2.2 T2V 14B: Beginner’s Guide to Text-to-Video on Linux (AMD Instinct Mi60 Setup)
Hello, creative minds and tech enthusiasts! Ever wanted to turn your text prompts into amazing, high-quality videos right on your own Linux machine? Today, we’re diving into the exciting world of **ComfyUI** and the powerful **Wan 2.2 T2V 14B** Text-to-Video model. This guide is tailored for beginners running **Linux** with an **AMD Instinct Mi60 32GB HBM2 GPU**-a powerful setup that can truly make this model shine.
ComfyUI is a node-based interface that makes advanced Stable Diffusion and video generation workflows more visual and manageable. Wan 2.2 T2V 14B is a cutting-edge AI model that excels at generating high-fidelity videos from text. Let’s get started!
System Requirements and Model Details
Before we jump into the fun part, let’s make sure your system’s ready to handle this robust model. The Wan 2.2 T2V 14B model is a significant undertaking, and running it on a single GPU often requires specialized optimization.
| Requirement | Recommended/Required Specification | Notes |
|---|---|---|
| Operating System | Linux (e.g., Ubuntu, Debian) | Necessary for native AMD ROCm support. |
| GPU | AMD Instinct Mi60 32GB HBM2 | Your 32GB VRAM is excellent! This model typically runs best with 80GB+ VRAM for full-speed, unoptimized inference, but your 32GB should be usable with quantization (GGUF) and/or model offloading techniques in ComfyUI. |
| AMD Drivers | ROCm 6.3.4 or higher | Required for efficient use of your AMD GPU for AI tasks. |
| System RAM | 64GB minimum (32GB is the absolute minimum) | Essential for model offloading, which moves parts of the model not actively used to system RAM to free up VRAM. |
| Storage | SSD recommended | Faster loading times for the large model checkpoints. |
| Software | Python, PyTorch (with ROCm support), ComfyUI | You’ll need these foundational tools installed correctly. |
Is Wan 2.2 T2V 14B Open Source?
Yes, Wan 2.2 T2V 14B is an open-source model!
- License: The model is released under the **Apache 2.0 License**.
- Restrictions: The Apache 2.0 license is highly permissive. It generally allows you to **use, modify, and distribute** the software and models, even for **commercial purposes**, without royalties. However, it requires you to include the original **copyright and license notices** in your work and note any significant changes you make. **Always check the latest official repository documentation** for any specific usage limitations or ethical guidelines (e.g., concerning harmful or illegal content generation) that the creators may have imposed.
Step-by-Step: Configuring Wan 2.2 T2V 14B in ComfyUI
Since you’re using Linux with an AMD GPU, you must rely on **ROCm** for GPU acceleration.
1. Prerequisites (For AMD Linux Users)
Ensure you have your **ROCm** drivers and a PyTorch version compiled with ROCm support installed. This is the foundation for using your Mi60 for AI tasks.
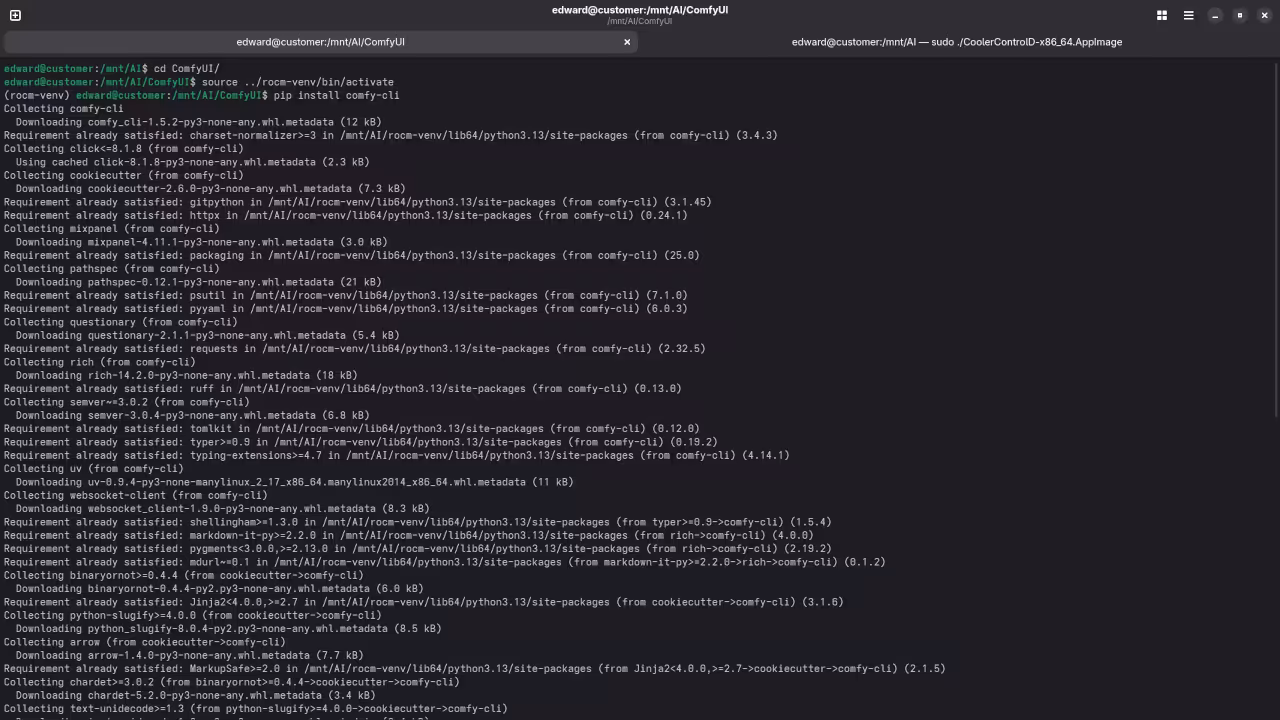
2. Install ComfyUI
- Clone the Repository: Open your Linux terminal and clone the ComfyUI repository.
git clone https://github.com/comfyanonymous/ComfyUI.git cd ComfyUI - Install Dependencies: Use the ROCm-compatible requirement installation.
pip install -r requirements.txt Note: If you have issues, search for guides on installing PyTorch with ROCm for your specific ROCm version.
3. Install the Wan2.2 Custom Node
Wan 2.2 integration often requires a custom ComfyUI node to load and manage the MoE (Mixture-of-Experts) architecture. You can often find these via the **ComfyUI Manager** (a recommended custom node for managing others), or by manually cloning a dedicated Wan2.2 workflow/node repository into your ComfyUI/custom_nodes folder.
4. Download the Model Checkpoint
- Locate the official **Wan 2.2 T2V 14B checkpoint** (or a recommended GGUF/quantized version for lower VRAM) on platforms like Hugging Face.
- Place the model file (e.g., a
.ckptor.safetensorsfile) into yourComfyUI/models/unetdirectory. For GGUF files, the location may vary (e.g.,ComfyUI/models/llmor a specific folder designated by the custom node).
5. Run ComfyUI and Load the Workflow
- Start ComfyUI from your terminal:
python main.py - Open the web interface (usually
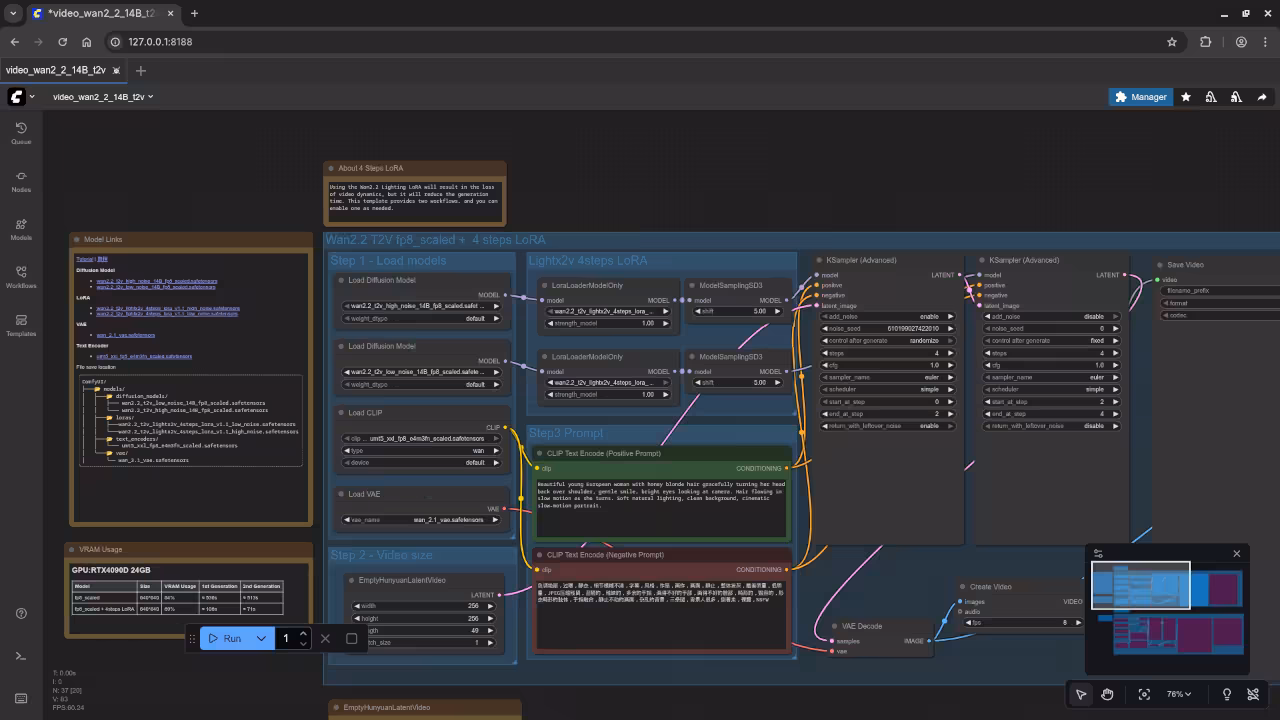
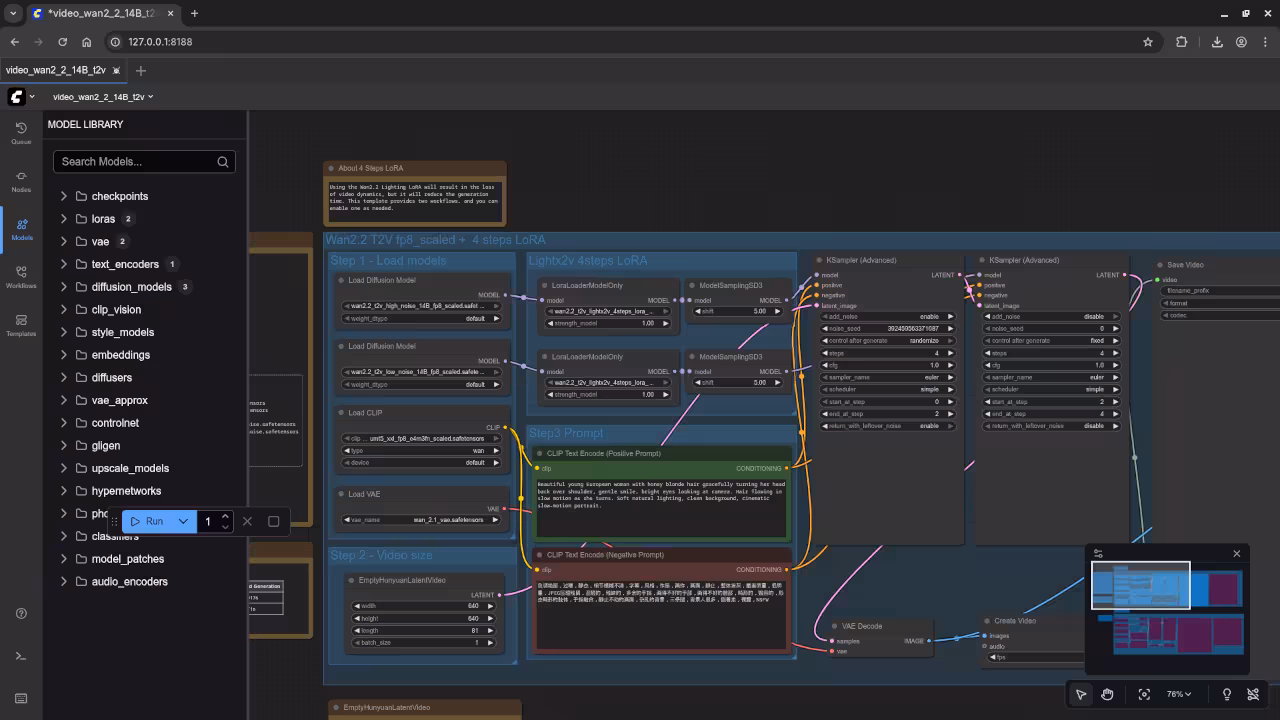
http://127.0.0.1:8188). - Load a Workflow: Find a pre-built **Wan 2.2 T2V 14B ComfyUI workflow** online (they are often shared as
.jsonfiles or directly through the node’s documentation). Load this workflow by dragging the.jsonfile onto the ComfyUI canvas. This pre-configures all the necessary nodes for you. - Select the Model: In the **Checkpoint Loader** or specific Wan 2.2 loading node, select the
Wan2.2-T2V-A14Bmodel file you downloaded.
6. Configure and Generate!
- Adjust Settings: Modify the text prompt (your desired video description) and other parameters like frame count, resolution (start with 480P or a smaller resolution like 832×480 to test performance), and number of steps.
- Optimize for 32GB VRAM: Look for settings in your workflow that enable **model offloading** or use a **quantized (GGUF)** checkpoint. These are crucial for fitting the 14B model onto your 32GB VRAM.
- Click “Queue Prompt”: ComfyUI will process your request, utilizing your powerful AMD Instinct Mi60! Video generation can take several minutes, depending on the complexity and settings.
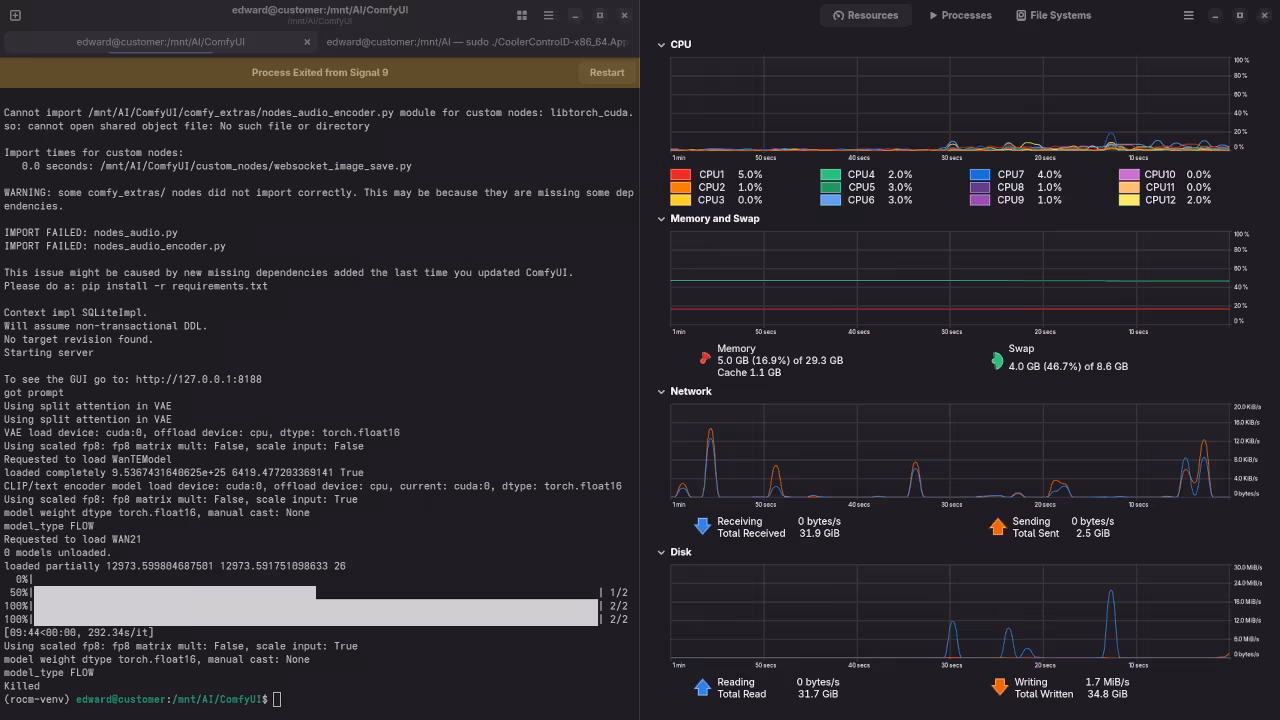
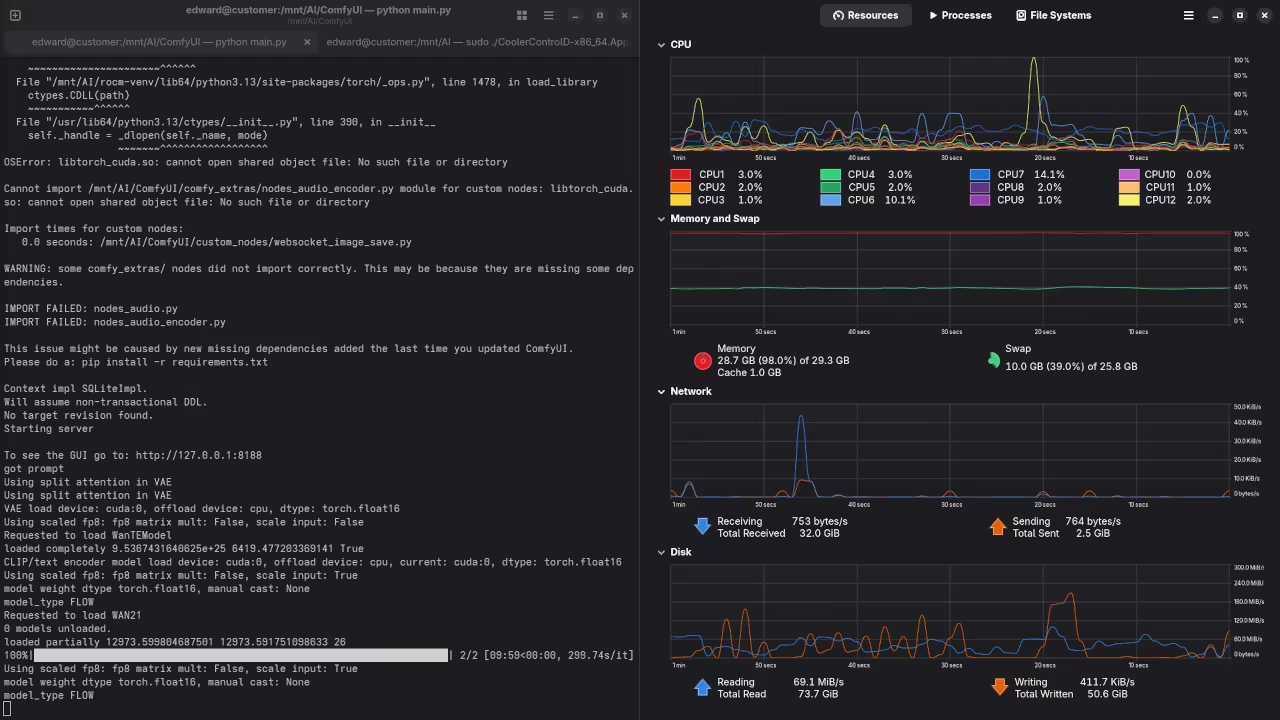
Analysis of Model Loading Failure
The following table summarizes resource usage before and during the memory-intensive AI model loading process. The rapid consumption of resources led to an immediate Out-of-Memory (OOM) event.
Resource Usage During AI Model Loading
| Metric | Idle State (Before Loading) | Peak Load (During Model Loading) | Change / Impact |
|---|---|---|---|
| Model Parameters | N/A | Default settings, 640×640, length 81 | N/A |
| RAM Usage | 8.2 GB | 28.3 GB | Increased by 20.1 GB |
| Swap Usage | Idle (0 GB) | 4.4 GB | System started using swap aggressively |
| CPU Temperature | 37°C | 55°C | Increased by 18°C |
| dGPU Temperature | 43.0°C | 80°C | Increased by 37°C |
Summary of the Failure Event
The system experienced a critical failure because the AI model’s memory requirements, peaking with a 20.1 GB increase in RAM demand, exceeded the combined total of physical RAM and the compressed ZRAM swap.
Although the system attempted to manage the load by utilizing 4.4 GB of swap space, this was insufficient. The failure message-“Application Stooped Device memory is nearly full. An application was using a lot of memory and was forced to stop.”-confirms an Out-of-Memory (OOM) event was triggered. This resulted in the operating system forcibly terminating the application. The simultaneous spikes in CPU temperature (to 55°C) and dedicated GPU temperature (to 80°C) confirm that the hardware was stressed right up until the point of termination. Increasing the disk swap capacity, as outlined in the previous steps, is the correct measure to allow the system to handle these large memory demands by providing a large, disk-backed memory overflow.
Increasing Swap for AI Workloads (Adding Disk Swap)
I had an 8GB ZRAM partition (/dev/zram0), which is compressed swap space that lives in RAM. Since AI workloads demand high memory, we will add a 16GB disk-backed swap file on the dedicated AI partition (/mnt/AI on /dev/sdb1) to act as a high-capacity overflow.
Using the /mnt/AI partition is ideal because it isolates the heavy swap I/O from your root system drive (/dev/sda3) and utilizes the available 103GB on that dedicated drive.
Command Verification
$ swapon --show
NAME TYPE SIZE USED PRIO
/dev/zram0 partition 8G 3.5G 100
$ sudo fallocate -l 16G /mnt/AI/swapfile_ai
$ sudo chmod 600 /mnt/AI/swapfile_ai
$ sudo mkswap /mnt/AI/swapfile_ai
Setting up swapspace version 1, size = 16 GiB (17179865088 bytes)
no label, UUID=your-real-uuid-7a1c2e9b-5f3d-4b90-a021-1111aabbccdd
$ swapon --show
NAME TYPE SIZE USED PRIO
/dev/zram0 partition 8G 3.5G 100 Step 1: Activate the New Swap File
The disk swap file was created and initialized, but was not yet active. Use swapon to activate it immediately.
- Activate the Swap File:
sudo swapon /mnt/AI/swapfile_ai - Verify Total Swap Space (Expected 24GB Total):
You should now see both the ZRAM and the new disk file active. The system automatically prioritizes the fast ZRAM (PRIO 100) over the slower disk swap (lower PRIO).
swapon --show Expected Output will show both entries:
NAME TYPE SIZE PRIO /dev/zram0partition 8G 100 /mnt/AI/swapfile_aifile 16G -2 (or similar low value)
Step 2: Make the Disk Swap Permanent (/etc/fstab)
This is a crucial step to ensure the 16GB swap file is enabled automatically every time you reboot.
- Open the
/etc/fstabfile:sudo nano /etc/fstab - Add the following line to the end of the file:
/mnt/AI/swapfile_ai none swap sw 0 0 - Save and close the file (in nano, press
Ctrl+OthenEnter, thenCtrl+X).
Step 3: Kernel Optimization (Swappiness)
Since you are running AI tasks, it’s best to configure the kernel to keep active data in the fast physical RAM as long as possible before resorting to disk swap.
- Set swappiness to 10 (less aggressive swapping):
sudo sysctl vm.swappiness=10 sudo sh -c 'echo "vm.swappiness=10" >> /etc/sysctl.conf' -
This setting is permanent and will take effect immediately and after reboots.
Model Precision and Quantization Comparison
To run large AI models like the 14B parameter model efficiently on systems with limited memory (like 32GB VRAM + 27GB RAM), it’s crucial to reduce the model’s footprint. This is achieved by moving from standard full-precision formats (FP32) to half-precision (FP16) and finally to advanced quantization (like FP8 and GGUF).
Comparison Table: Precision vs. Performance
| Format/Quantization | Memory Usage (Relative) | Quality/Fidelity | Best For | Typical Use in ComfyUI |
|---|---|---|---|---|
| FP32 (Full Precision) | 4x (Highest) | Highest Fidelity | Training, fine-tuning, or inference on dedicated high-end servers (e.g., 80GB+ GPUs). | Original checkpoint format (rarely used for inference). |
| FP16 (Half Precision) | 2x (High) | Minimal quality loss compared to FP32. | Inference on high-VRAM consumer GPUs (24GB-48GB). Standard for many Stable Diffusion workflows. | Common checkpoint format (e.g., _fp16.safetensors). |
| FP8 (8-bit) | 1x (Low) | Good. Negligible loss for most inference tasks. | Inference on mid-range GPUs (16GB-24GB) or when memory is the primary constraint. | Quantized models (e.g., ExLlamaV2/GPTQ for LLMs, emerging for Diffusion/T2V). |
| GGUF K-Quants (Q4_K, Q5_K) | Approx. 0.75x (Lowest) | Excellent balance of size/speed/quality. | Inference on memory-constrained systems (e.g., your 32GB VRAM + swapping setup). | Primarily used for large language models, but the concept applies to any aggressive quantization. |
| K-Quant Suffixes (_S, _M, _L) | Varies by suffix: S < M < L | Varies by suffix: S < M < L | These letters denote sub-versions within a bit-depth (e.g., Q4_K). **_M (Medium)** offers the best blend of speed and quality. **_S (Small)** is for maximum compression. | |
Key Takeaways for Your Workflow
Given the hardware and the memory failure, switching to a lower precision model is the most effective solution:
- FP32: **Infeasible.** Requires 4x the memory and would instantly crash your system.
- FP16: **Too Large.** The current failure indicates the 14B model in FP16 is too big for your combined memory, forcing the slow disk swap.
- FP8 or Q4_K: **Recommended.** These formats reduce the memory requirement enough to keep the entire model structure within your **VRAM and fast RAM**, eliminating the need to constantly offload to the extremely slow disk swap. This will directly resolve the “long time” taken during the last step and prevent memory crashes.
Part 3: Download Recommendation Summary
For the specific hardware (32GB VRAM + 27GB RAM), the **Q5\_K\_M** level is the optimal choice for the 14B model, as it is the highest quality file likely to fit entirely within your fast memory, thus eliminating the severe slowdown caused by disk swapping.
Recommended GGUF File
| Quantization Level | Approx. File Size (per expert) | Quality / Fidelity | Action |
|---|---|---|---|
| **Q5\_K\_M** | ~9.6 GB | Very High (Negligible loss) | **Primary Choice.** Best balance of speed and fidelity for systems with 32GB VRAM. |
| **Q4\_K\_M** | ~8.4 GB | Good (Industry Standard) | **Fallback.** Use this if Q5\_K\_M still causes significant speed issues. |
Download the following two files for the I2V diffusion model:
Wan2.2-I2V-A14B-HighNoise-Q5_K_M.ggufWan2.2-I2V-A14B-LowNoise-Q5_K_M.gguf
Note: You must also download the separate VAE and Text Encoder files for the Wan 2.2 model and place them in their correct ComfyUI directories.
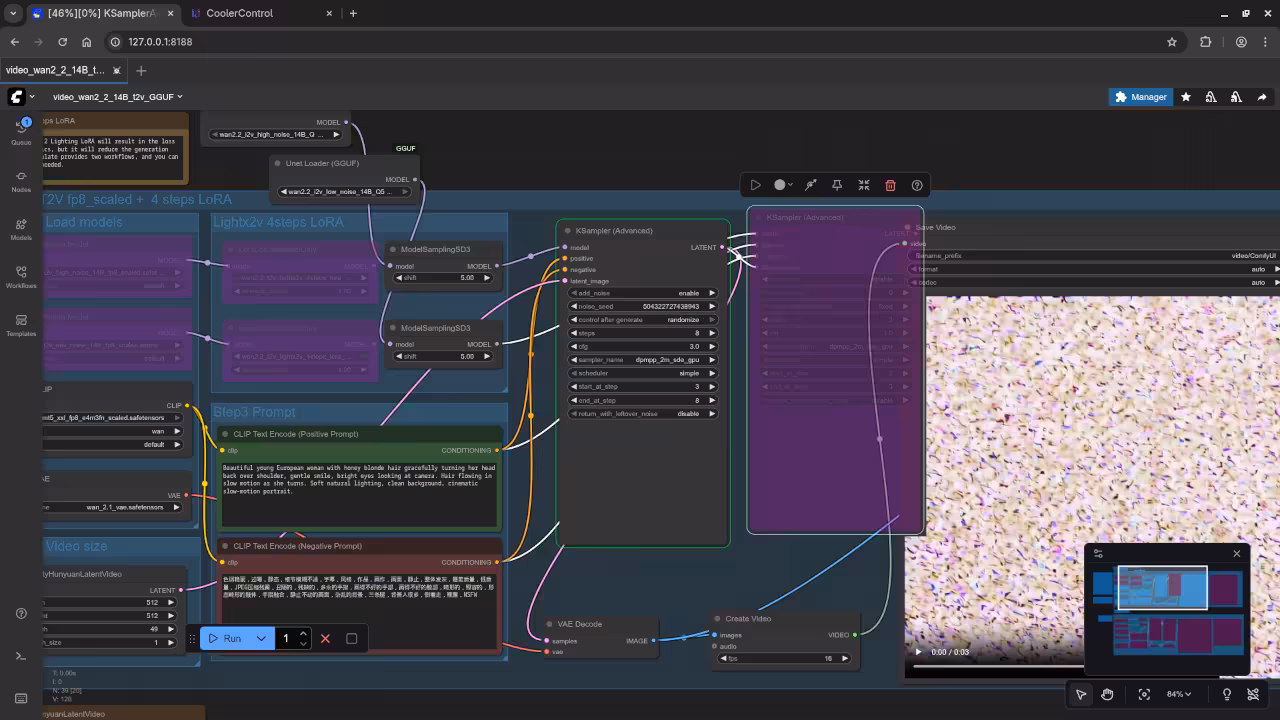
🚀 Workflow Structural Summary: GGUF Optimization Guide
The goal is to convert your memory-intensive workflow from **FP8 safetensors** to the highly efficient **GGUF Q5_K_M** format. This involves replacing the standard model loading nodes and removing incompatible components.
📄 Original vs. Optimized Structure
| Original Node (FP8) | Action / Optimized Node (GGUF) | Reason |
|---|---|---|
Load Diffusion Model (High Noise FP8) |
⇒ **REPLACE WITH** Unet Loader (GGUF) |
GGUF files require a specialized loader node. |
Load Diffusion Model (Low Noise FP8) |
⇒ **REPLACE WITH** Unet Loader (GGUF) |
Switching to the quantized, highly-optimized GGUF files. |
LoraLoader (LightX2V LoRA) |
❌ **REMOVE / BYPASS** | LoRA is generally not compatible with GGUF quantization. |
💾 Download Link and File Location
Download the required **High Noise** and **Low Noise** GGUF models from the repository below. Look under the “Files and versions” tab to find the specific Q5_K_M files.
🗃️ GGUF Repository Link (Wan2.2-T2V-A14B)
https://huggingface.co/bullerwins/Wan2.2-T2V-A14B-GGUF
Place all downloaded .gguf files into your ComfyUI/models/unet directory.
🔴 Required Action Checklist
- **INSTALL:** The
ComfyUI-GGUFcustom node via the ComfyUI Manager. - **DOWNLOAD & PLACE:** Get the two **Q5_K_M** GGUF files and put them in
ComfyUI/models/unet. - **SWAP NODES:** In your workflow, replace the two existing
Load Diffusion Modelnodes with two newUnet Loader (GGUF)nodes, selecting the corresponding High and Low Noise files. - **BYPASS:** Remove or bypass any
LoraLoadernodes.
Guide: Running GGUF Models (Wan 2.2) in ComfyUI
This guide explains how to install the custom nodes necessary to use highly efficient GGUF models (like the Wan 2.2 video models) and set up the required dual-model workflow.
1. Installation: ComfyUI-GGUF Custom Node
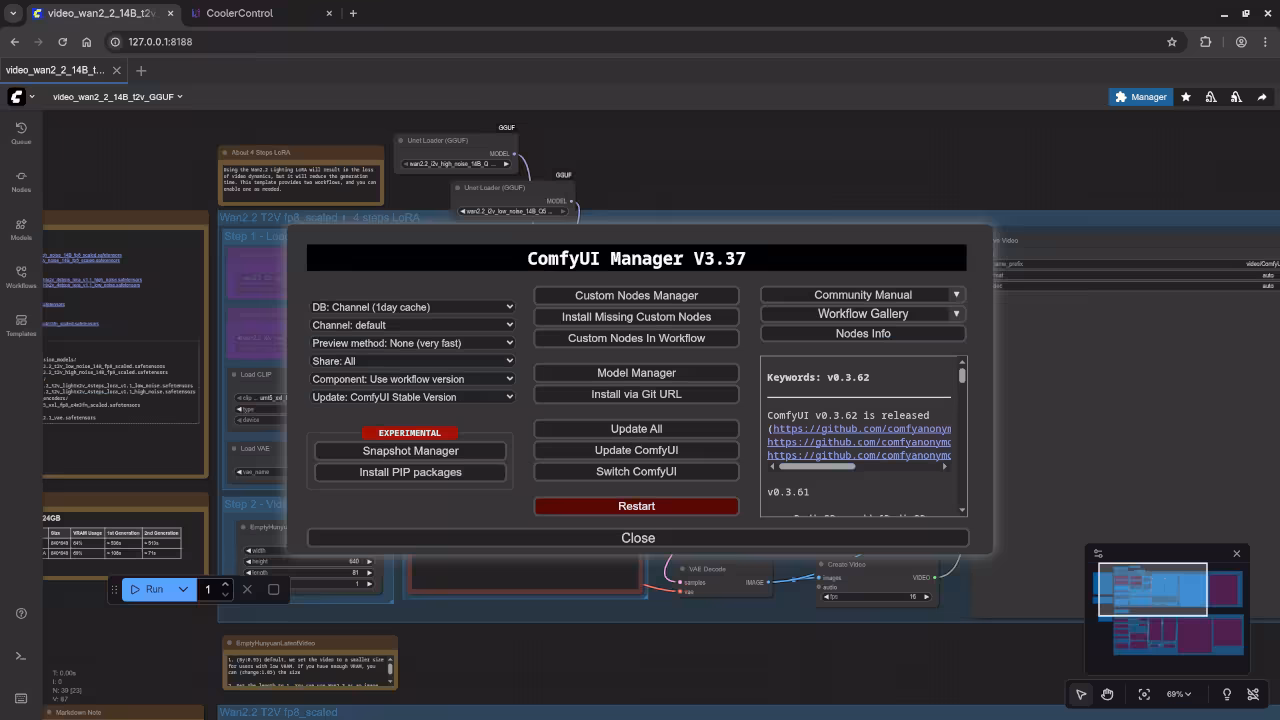
Step 1: Install via ComfyUI Manager
- Click the Manager button in ComfyUI.
- Select Install Custom Nodes.
- Search for
ComfyUI-GGUF(bycity96). - Click Install, then Restart ComfyUI.
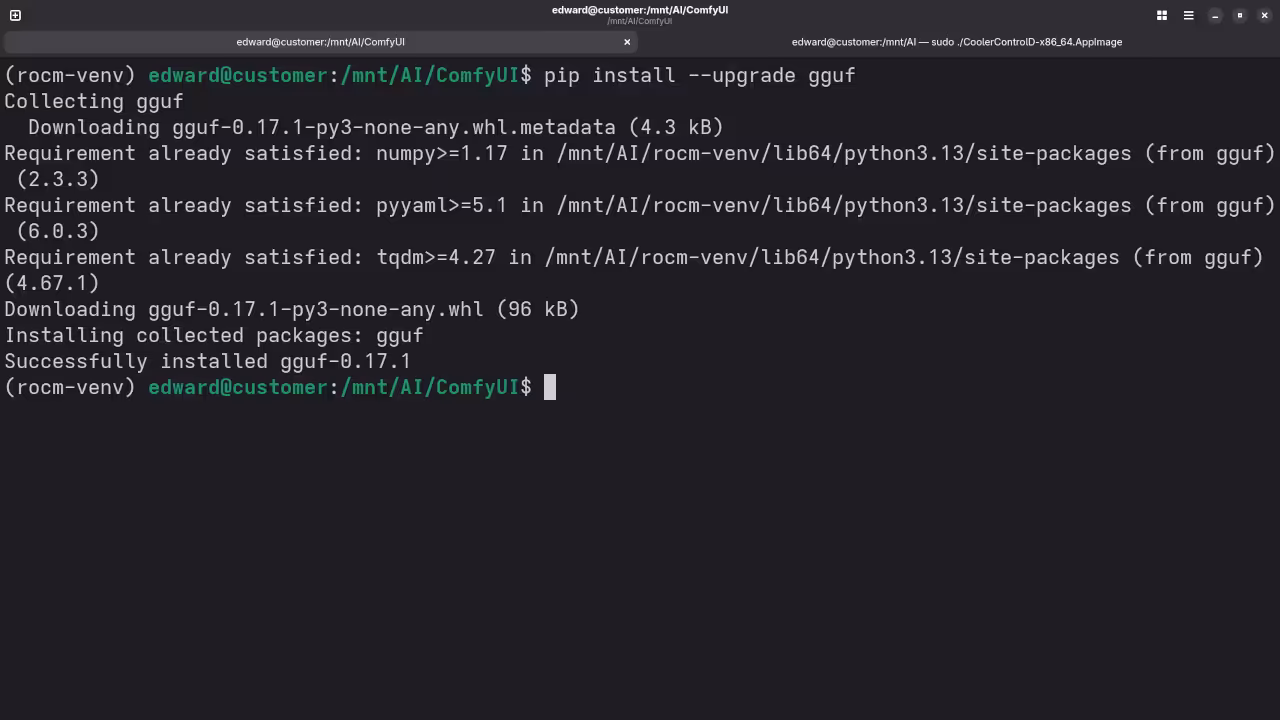
Step 2: Install Python Dependency (Crucial Fix)
The custom node often fails to load without its required Python library.
- Close ComfyUI (browser and terminal).
- Open your command line/terminal and navigate to your ComfyUI installation folder.
- Execute the following command to install the
gguflibrary:pip install --upgrade gguf (Use
.\python_embeded\python.exe -s -m pip install --upgrade ggufif on a portable Windows install.) - Restart ComfyUI.
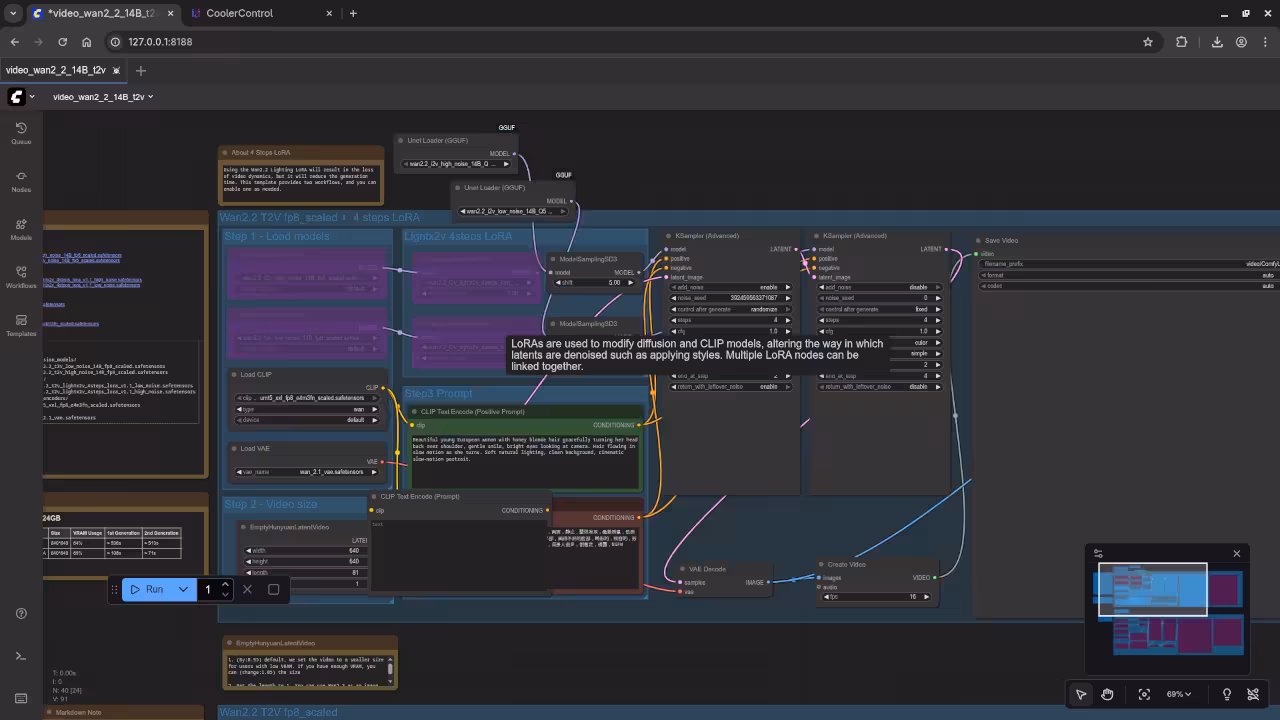
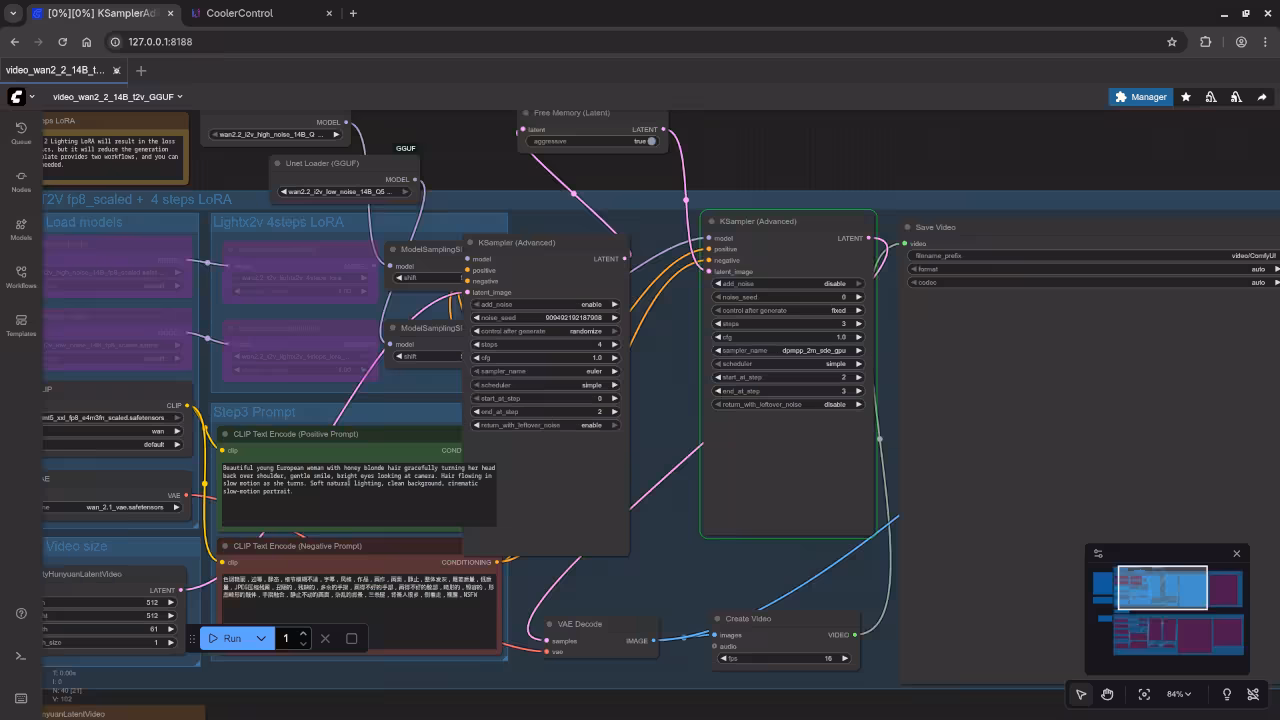
2. Workflow Setup: The Dual-Stage GGUF Flow
You will replace your standard Load Diffusion Model nodes with the GGUF components, using two separate models for the two-stage process (High Noise and Low Noise).
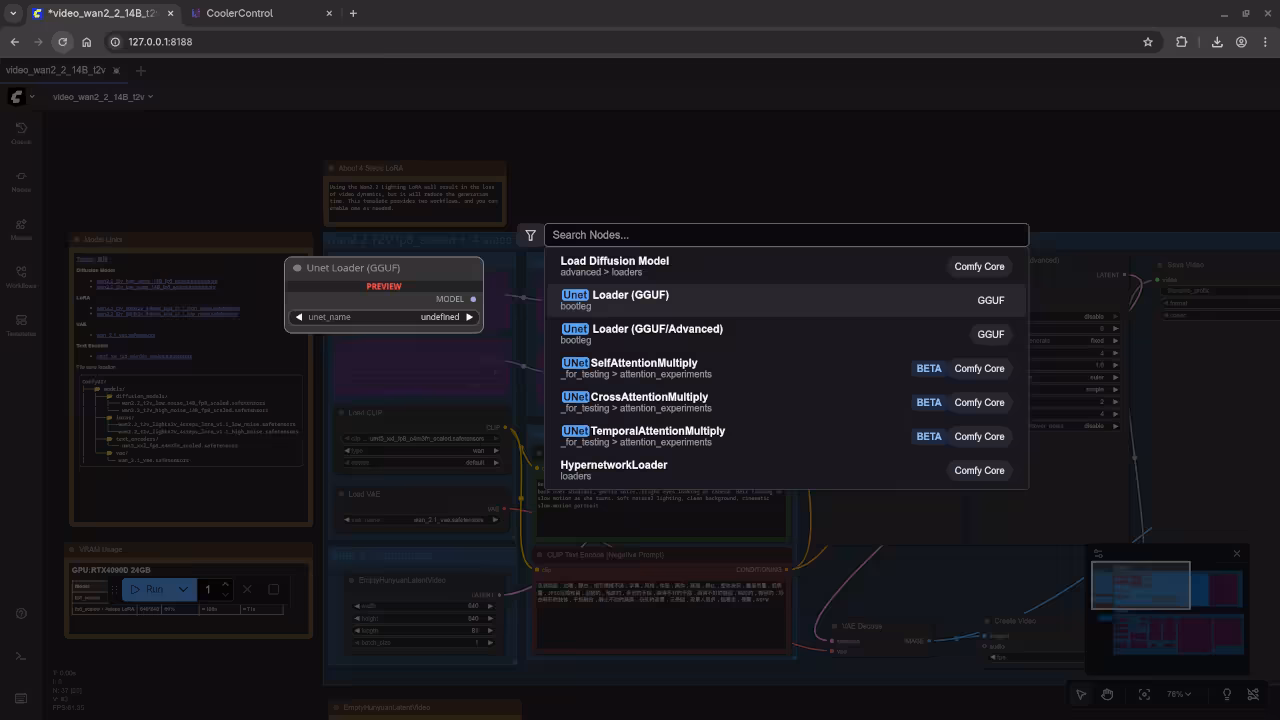
Step 1: Add the GGUF Loaders
- Delete/Bypass your old
Load Diffusion Modelnodes. - Add Two instances of the node:
Unet Loader (GGUF). - Instance 1: Select the High Noise model (
wan2.2_t2v_high_noise...). - Instance 2: Select the Low Noise model (
wan2.2_t2v_low_noise...).
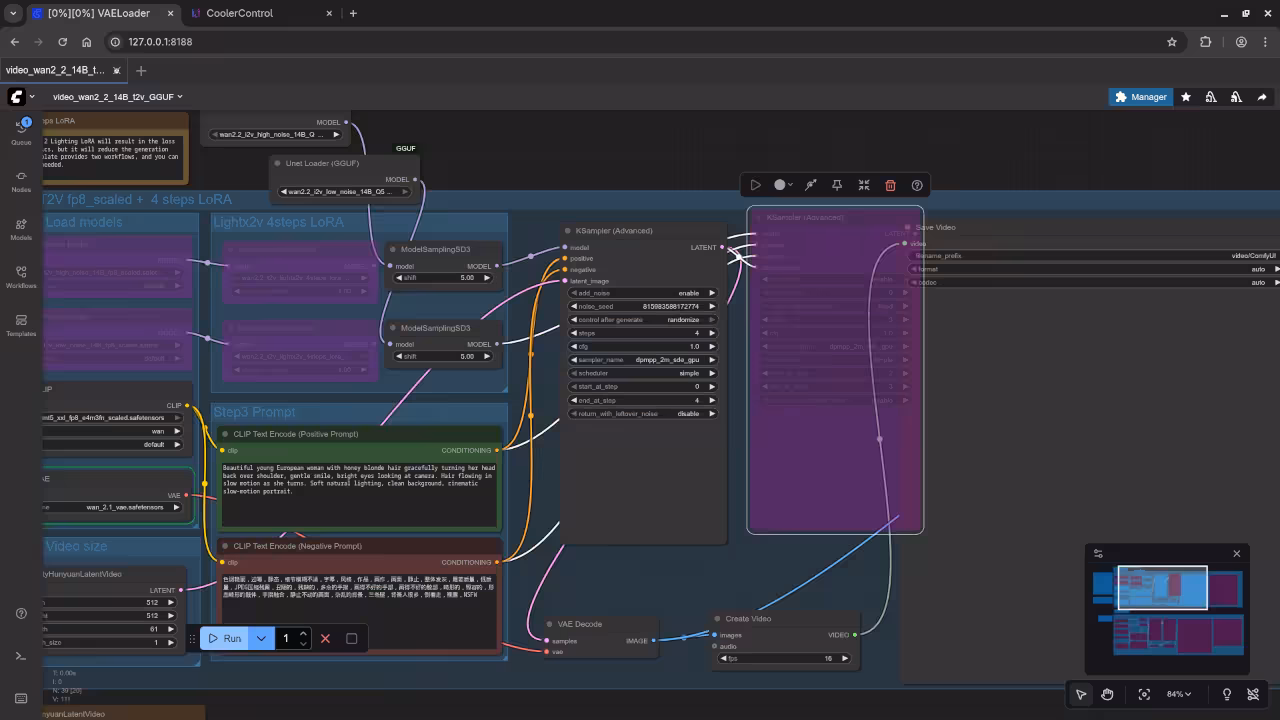
Step 2: Add Model Sampling Nodes
The Wan 2.2 model requires the SD3-style sampling patch.
- Add Two instances of the node:
ModelSamplingSD3. - For both nodes, ensure the
shiftparameter is set to5.0(or your observed default).
Step 3: Connect the Final Flow to K-Samplers
The entire workflow uses two separate chains that lead to your two K-Sampler nodes.
| Stage | Connection Flow |
|---|---|
| High Noise Flow | Unet Loader (GGUF) (High Noise) → ModelSamplingSD3 → First K-Sampler (initial steps) |
| Low Noise Flow | Unet Loader (GGUF) (Low Noise) → ModelSamplingSD3 → Second K-Sampler (refinement steps) |
This setup allows you to leverage the VRAM-saving benefits of the GGUF format for the Wan 2.2 model.
3. GGUF Conversion: Node Replacement Summary
The GGUF workflow is designed to replace the VRAM-heavy original model loading and sampling nodes while keeping the core logic of the Wan 2.2 dual-stage generation intact. The key changes are summarized below:
| Original Node (FP8 Workflow) | GGUF Replacement Node | Purpose & Action |
|---|---|---|
Load Diffusion Model (High Noise) |
Unet Loader (GGUF) |
Replace. Loads the memory-efficient wan2.2_..._high_noise.gguf file. |
Load Diffusion Model (Low Noise) |
Unet Loader (GGUF) |
Replace. Loads the memory-efficient wan2.2_..._low_noise.gguf file. |
| (Often Absent/Implied Patching) | ModelSamplingSD3 (with shift: 5.0) |
Add. Required patch for the SD3-style sampling logic that the Wan 2.2 DiT architecture uses. Must be added after both Unet Loader (GGUF) nodes. |
Load CLIP |
Load CLIP / CLIPLoader (GGUF) (Optional) |
Keep or Replace. If you use the standard CLIP model, keep the original. For max VRAM savings, replace with CLIPLoader (GGUF) if a quantized CLIP model is available. |
Load VAE |
Load VAE |
Keep. The VAE is typically loaded separately and does not have a GGUF replacement in this specific workflow. |
By following these steps, you successfully transition your powerful Wan 2.2 workflow to the VRAM-optimized GGUF format, making cinematic-quality video generation accessible on consumer-grade hardware.
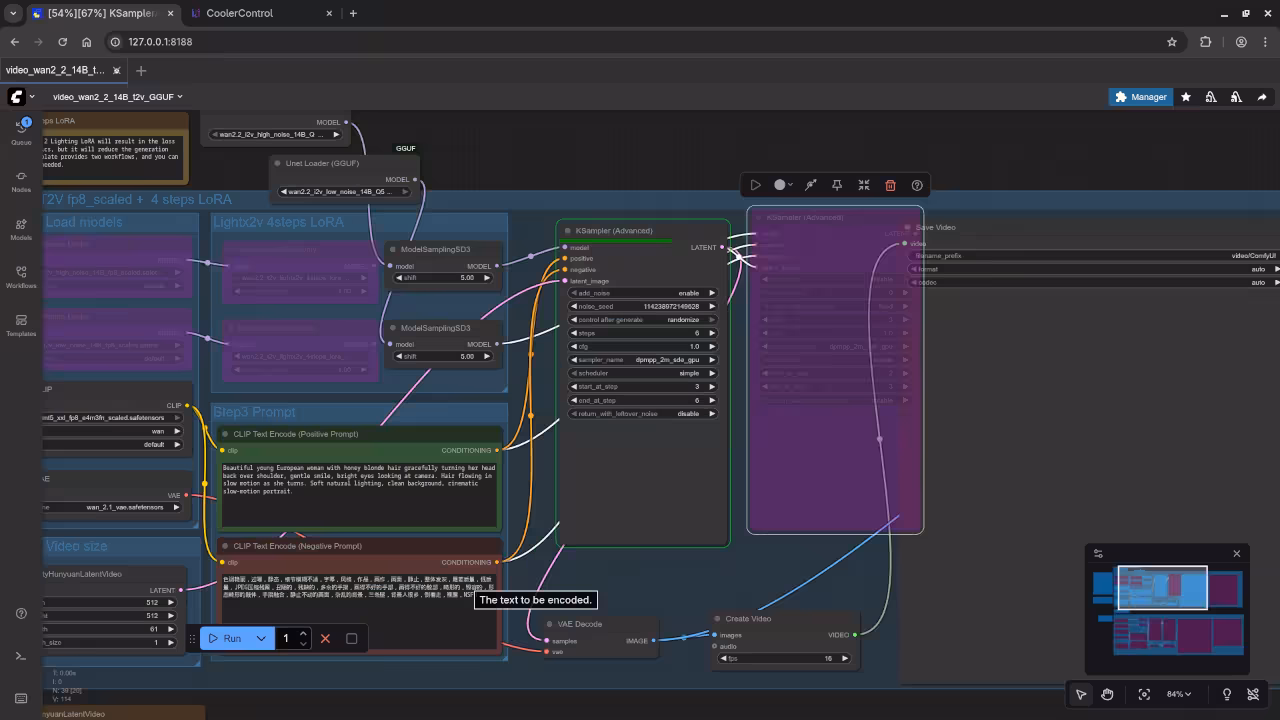
Step 4: Adding the Free Memory (Latent) Node to the Workflow
Now that the node is installed, you need to correctly insert it between your two KSampler nodes. This step forces the VRAM clean-up to happen exactly when the Model from the first pass is no longer needed.
A. Disconnect the Latent Wire
First, remove the direct connection between your two KSampler nodes:
- **Disconnect** the wire from the **LATENT** output of your **KSampler (Pass 1)**.
- **Disconnect** the wire from the **latent_image** input of your **KSampler (Pass 2)**.
B. Insert and Connect the Node
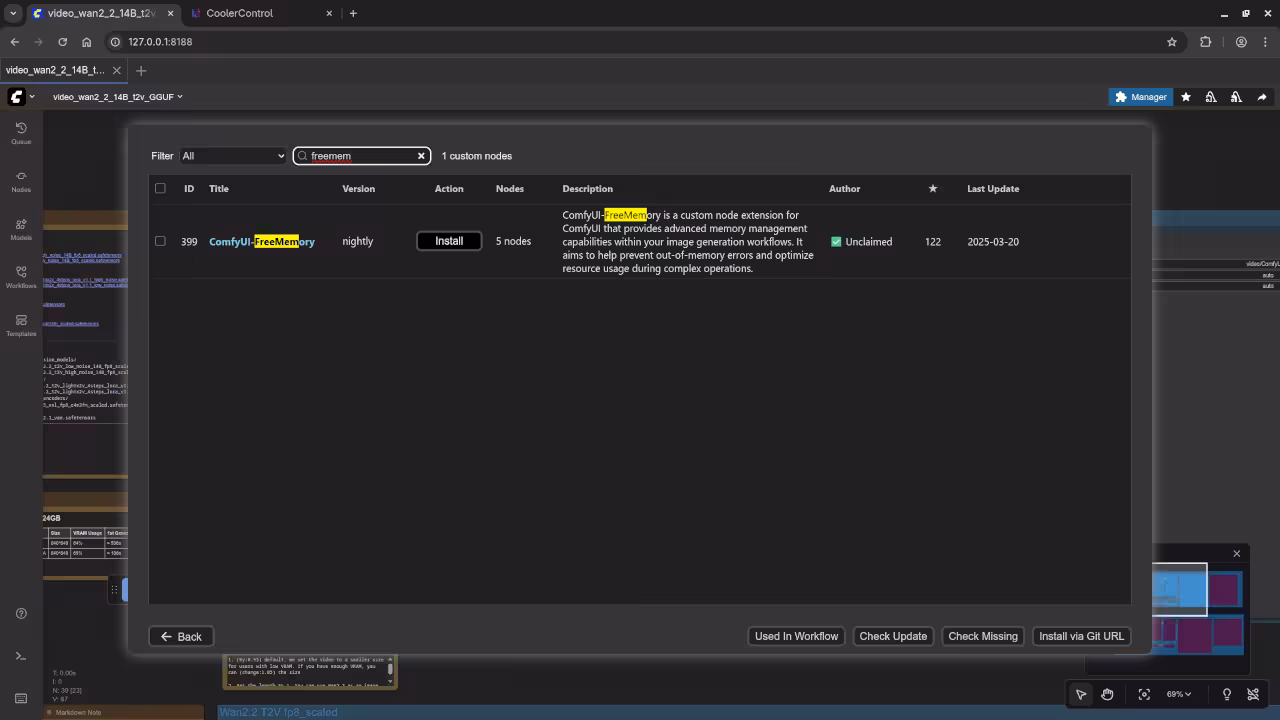
Insert the **Free Memory (Latent)** node and use it as a bridge for the latent data.
- Add the **Free Memory (Latent)** node to your canvas (Add Node → custom_nodes → ComfyUI-FreeMemory → Free Memory (Latent)).
- Connect the **LATENT** output of the **KSampler (Pass 1)** to the **latent** input of the **Free Memory (Latent)** node.
- Connect the **LATENT** output of the **Free Memory (Latent)** node to the **latent_image** input of the **KSampler (Pass 2)**.
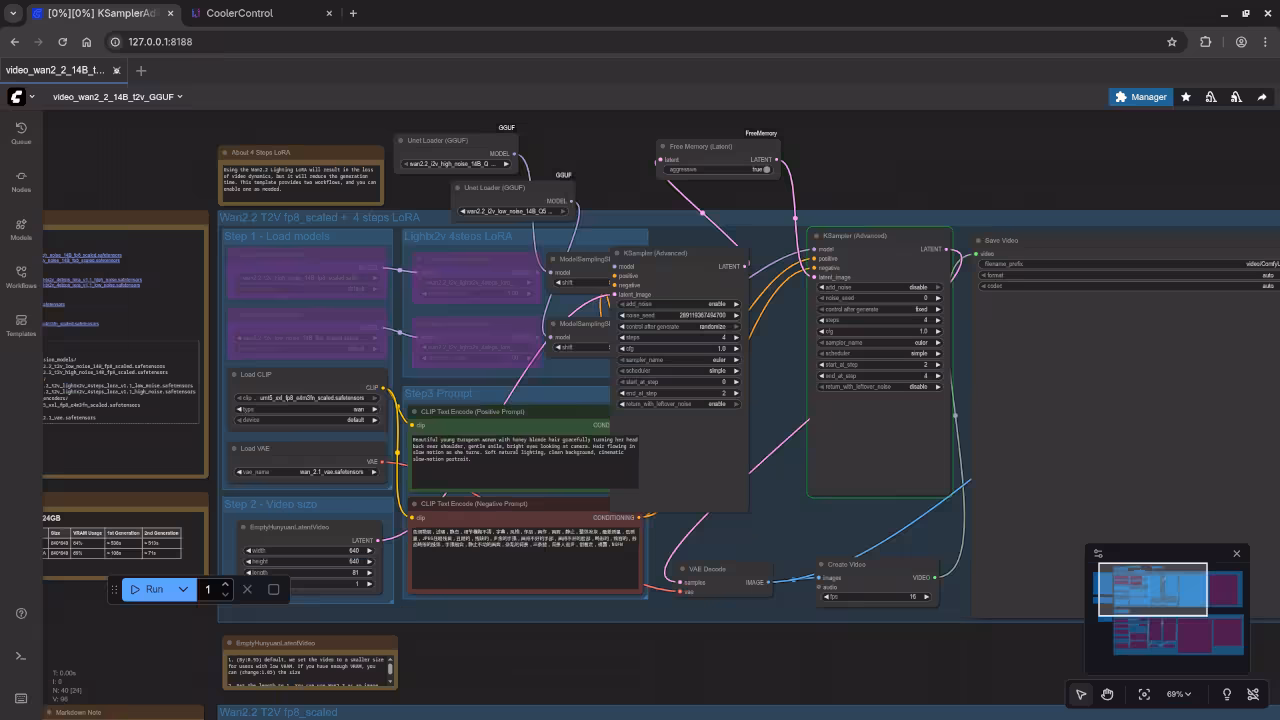
C. Final Workflow Structure
Your finished multi-sampler chain will now look like this, ensuring optimal VRAM management:
| Connection Point | Source Node | Output Port | → | Destination Node | Input Port |
|---|---|---|---|---|---|
| 1st Pass Latent | KSampler (Pass 1) | LATENT | → | Free Memory (Latent) | latent |
| Memory Cleanup | Free Memory (Latent) | LATENT | → | KSampler (Pass 2) | latent_image |
Step 5: Reviewing the “Aggressive” Setting
The **Free Memory (Latent)** node includes an aggressive boolean input, which defaults to False. Understanding this setting is crucial for balancing performance and memory management.
| Aggressive Setting | Action Performed | When to Use |
|---|---|---|
| False (Default) | Performs a standard VRAM clear (clearing the PyTorch/CUDA cache). This is faster as it keeps models loaded in case they are reused. | Use by default. It offers better speed for most complex workflows where memory is tight but manageable. |
| True | Performs an intense clear: **Unloads all loaded models** from VRAM, then clears caches. This is slower because the next KSampler must reload its Model. | Only use if you get an Out-of-Memory (OOM) error. This is your last resort to free the maximum possible VRAM for resource-heavy models. |
aggressive set to False first. Only enable it if you encounter OOM errors, as the added reloading time can significantly increase your generation time.
Why the Free Memory Node is Essential for the Original Setup
You asked a critical question: Would the **ComfyUI-FreeMemory** node work on the original, default template? The answer is a definitive **Yes**, and in fact, its entire purpose is to be the **fix** for that exact scenario.
The Problem: VRAM Caching in the Default Chain
The standard ComfyUI architecture is designed for speed and automatically caches (keeps loaded) large models like the U-Net in VRAM after they run, assuming they will be needed again immediately. In the original, memory-inefficient setup:
- **Pass 1 (KSampler)** loads its Model. The workflow completes this step and holds the Model in VRAM.
- **Pass 2 (KSampler)** attempts to load its required components (or a second, large upscaling model).
- Since the VRAM from Pass 1 was never explicitly freed, the system runs out of space, resulting in the dreaded Out-of-Memory (OOM) error.
The Solution: Forcing a VRAM Checkpoint
The custom **ComfyUI-FreeMemory (Latent)** node acts as a mandatory checkpoint. By inserting it between KSampler 1 and KSampler 2, you are manually executing the critical cleanup command that ComfyUI’s default caching mechanism skips.
| Workflow Step | Node Involved | VRAM Status (Default) | VRAM Status (With Free Memory Node) |
|---|---|---|---|
| **Initial Pass** | KSampler 1 | High (Model Loaded) | High (Model Loaded) |
| **The Critical Bridge** | **Free Memory (Latent)** | **High (Cache is Held)** | **Low (Cache is Forced Clear) ✅** |
| **Refinement Pass** | KSampler 2 | **CRASH (OOM)** | High (New Model Loads Successfully) |
Therefore, inserting this node is not an optional optimization, but a **necessary functional step** to enable the two-KSampler latent upscale chain on systems that are VRAM-constrained.
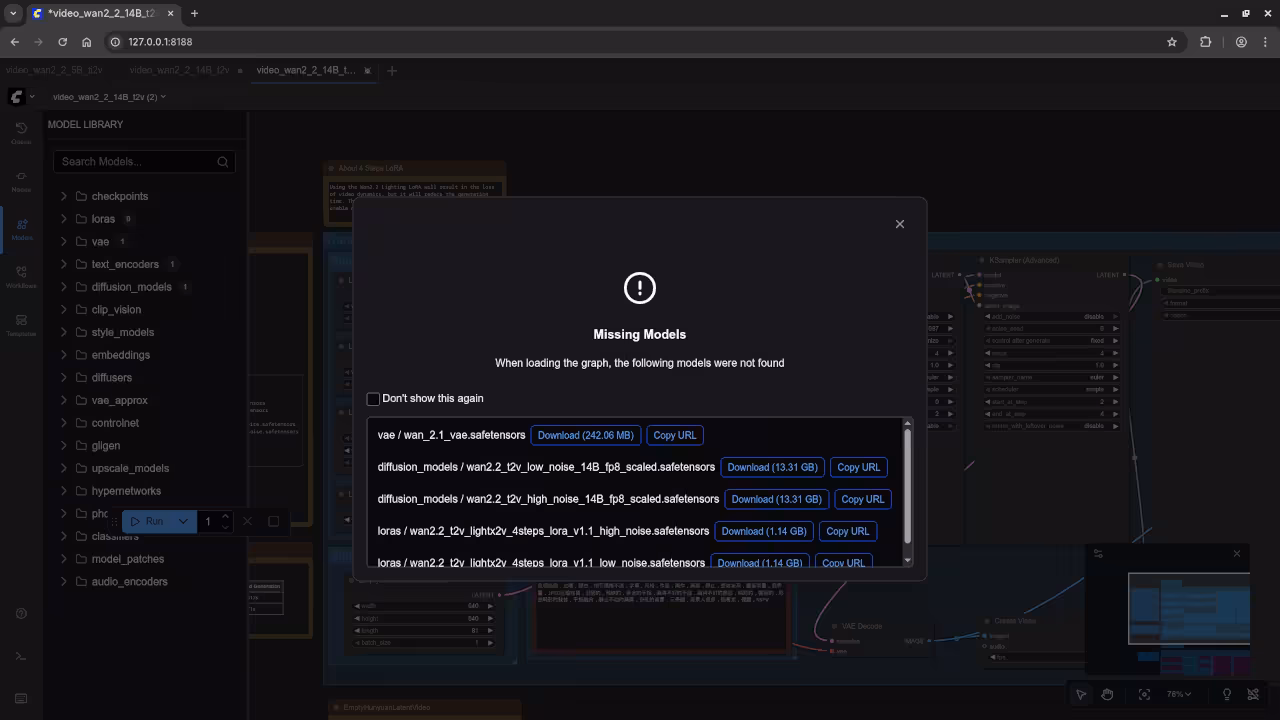
Wan 2.2 T2V 14B File Information
| Space Location | File Size | File Path |
|---|---|---|
| Models/Vae | 242.04MB | models/vae/wan_2.1_vae.safetensors |
| Models/Diffusion Models | 13.31GB | models/diffusion_models/wan2.2_t2v_low_noise_14B_fp8_scaled.safetensors |
| Models/Diffusion Models | 13.31GB | models/diffusion_models/wan2.2_t2v_high_noise_14B_fp8_scaled.safetensors |
| Models/Loras | 1.14GB | models/loras/wan2.2_t2v_lightx2v_4steps_lora_v1.1_high_noise.safetensors |
| Models/Loras | 1.14GB | models/loras/wan2.2_t2v_lightx2v_4steps_lora_v1.1_low_noise.safetensors |
| Models/Unet | 10.8GB | models/unet/wan2.2_i2v_high_noise_14B_Q5_K_M.gguf |
| Models/Unet | 10.8GB | models/unet/wan2.2_i2v_low_noise_14B_Q5_K_M.gguf |
| Custom Nodes | 322.3KB | custom_nodes/ComfyUI-GGUF |
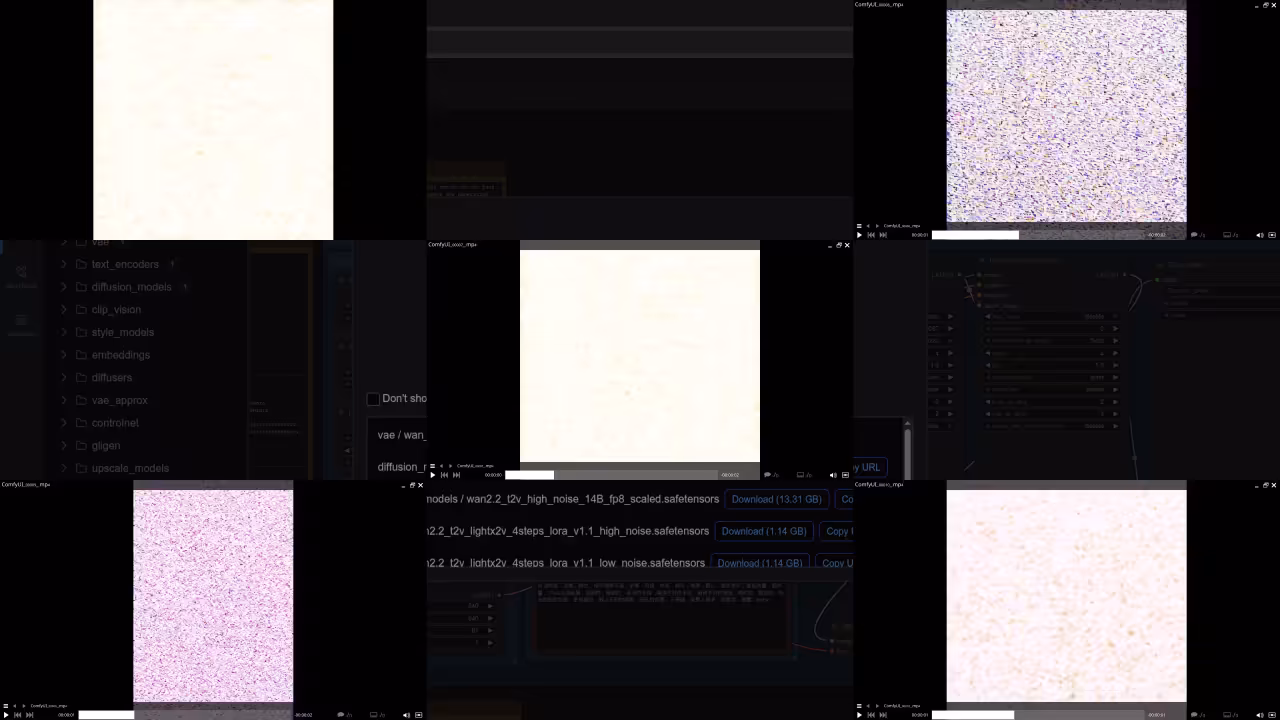
📷 Screenshots
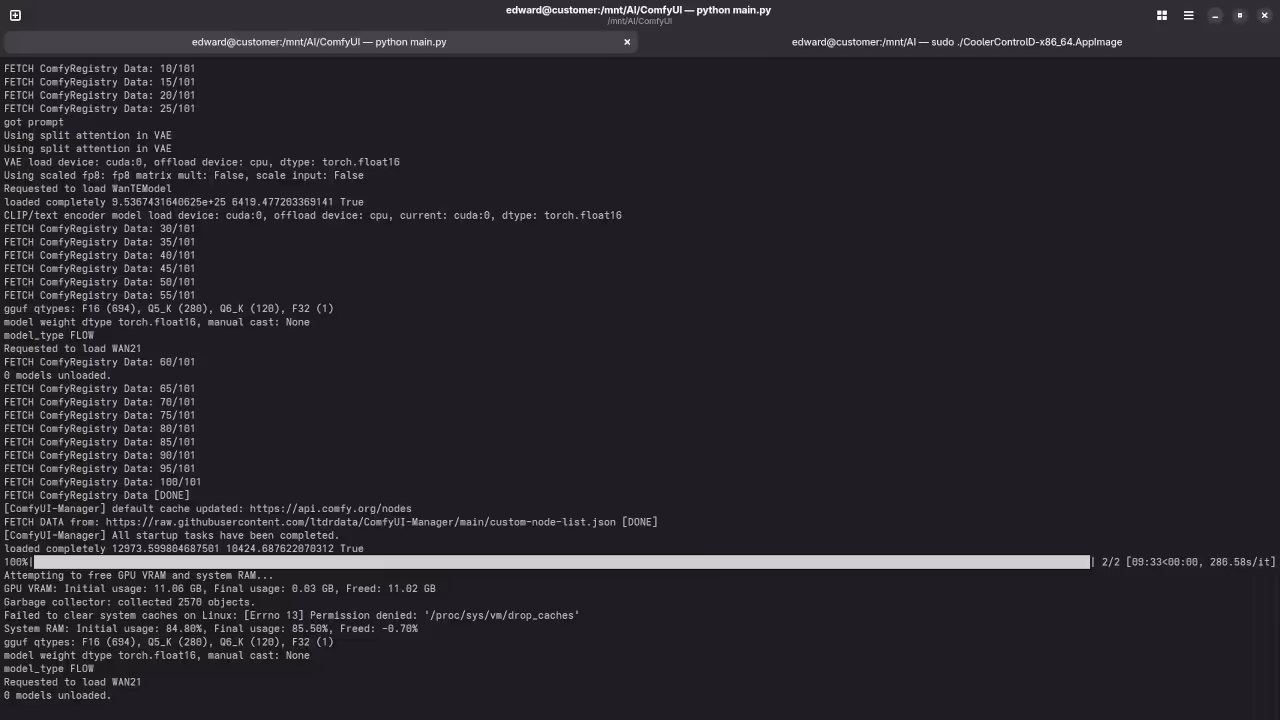
▶️ Screencast
Watch my real-time demo of Wan 2.2 T2V 14B on Linux:
Results:
3 seconds 512×512 16FPS GGUF 2 KSamplers Video
Produced square noise video in Quicktime container.
3 second 512×512 16FPS GGUF 2 Tweaked KSamplers Video
Produced square noise video in Quicktime container.
3 second 768 16FPS GGUF 2 Tweaked KSamplers Video
Produced vertical noise video in Quicktime container.
3 second 512×512 16FPS GGUF 1 KSampler Video
Produced square noise video in Quicktime container.
3 second 512×512 16FPS GGUF 1 Tweaked KSampler Video
Produced square noise video in Quicktime container.
Ready to Deepen Your Python Skills?
If this guide sparked your interest in the technical side of AI, you’re in luck! Python is the core language used in tools like ComfyUI and PyTorch.
- Check out my books, including **”Learning Python”** on Amazon: https://www.amazon.com/Learning-Python-Programming-eBook-Beginners-ebook/dp/B0D8BQ5X99
- Enroll in the companion online course, **”Learning Python”** to accelerate your knowledge: https://ojamboshop.com/product/learning-python
- **Need personalized guidance?** I am available for **one-on-one online Python tutorials**. Book your session here: https://ojambo.com/contact
- **Want expert setup?** If you need assistance with the complex setup process, I offer professional services to **install or migrate Wan 2.2 T2V 14B** or other AI models for you. Contact me for service inquiries: https://ojamboservices.com/contact
🚀 Recommended Resources
Disclosure: Some of the links above are referral links. I may earn a commission if you make a purchase at no extra cost to you.