
Tensegrity Tables from Code to Web: Your Blender Python & Model-Viewer Project
Ever wanted to create cool 3D models with code and show them on your website? This beginner-friendly blog post will guide you through generating a fascinating Tensegrity Table (a structure held together by continuous tension and discontinuous compression) using a Python script inside Blender, and then displaying that 3D model right in your web browser using Google’s awesome <model-viewer> element! Get ready to combine the power of Python, 3D design, and web development.
Step 1: Generating the Low-Poly Tensegrity Table in Blender with Python
Blender, the free and open-source 3D suite, has a powerful Python API (Application Programming Interface). To keep things simple and easy to understand for beginners, we will use a **low-poly** approach, building the struts from simple **cubes** and the cables from **edges**.
Here is the Python script you need. Save it as low_poly_tensegrity_table.py:
import bpy
import math
from mathutils import Vector
# --- Configuration ---
FILE_NAME = "square_floating_table.glb"
TABLE_HEIGHT = 1.0 # Vertical distance between the plates
SIDE_LENGTH = 1.5 # Side length of the square tabletop and base
TOP_THICKNESS = 0.05 # Thickness of the tabletop
BASE_THICKNESS = 0.05 # Thickness of the base
STRUT_HEIGHT = 0.2 # Height of the floating central strut
STRUT_THICKNESS = 0.05 # Thickness of the floating central strut
CABLE_THICKNESS = 0.008
LOW_POLY_VERTICES = 8 # Vertex count for low-poly appearance
JOINT_SIZE = 0.04
# --- Constants for Z-Positioning ---
TABLE_TOP_Z = TABLE_HEIGHT + TOP_THICKNESS / 2
BASE_BOTTOM_Z = -BASE_THICKNESS / 2
STRUT_TOP_Z = TABLE_HEIGHT / 2 + STRUT_HEIGHT / 2
STRUT_BOTTOM_Z = TABLE_HEIGHT / 2 - STRUT_HEIGHT / 2
STRUT_CENTER_Z = TABLE_HEIGHT / 2
# --- Utility Functions ---
def clear_scene():
"""Removes all objects from the current scene."""
bpy.ops.object.select_all(action='DESELECT')
bpy.ops.object.select_all(action='SELECT')
bpy.ops.object.delete(use_global=False)
def create_material(name, color, metallic=0.0, roughness=0.5):
"""Creates a simple PBR material."""
if name in bpy.data.materials: return bpy.data.materials[name]
mat = bpy.data.materials.new(name=name); mat.use_nodes = True
bsdf = mat.node_tree.nodes["Principled BSDF"]
bsdf.inputs['Base Color'].default_value = color
bsdf.inputs['Metallic'].default_value = metallic
bsdf.inputs['Roughness'].default_value = roughness
return mat
def apply_material(obj, mat):
"""Applies a material to a given object."""
if obj.data.materials: obj.data.materials[0] = mat
else: obj.data.materials.append(mat)
def create_cylinder_between_points(start_loc, end_loc, radius, name, material, vertices=LOW_POLY_VERTICES):
"""Creates a cylinder and aligns it between two vector locations."""
center = (start_loc + end_loc) / 2; direction = end_loc - start_loc
length = direction.length
bpy.ops.mesh.primitive_cylinder_add(vertices=vertices, radius=radius, depth=length, location=center)
obj = bpy.context.object; obj.name = name; apply_material(obj, material)
if length > 0.0001:
rotation_quat = direction.normalized().to_track_quat('Z', 'Y')
obj.rotation_euler = rotation_quat.to_euler()
return obj
def create_joint(location, size, name, material):
"""Creates a low-poly sphere at a connection point."""
bpy.ops.mesh.primitive_uv_sphere_add(
segments=LOW_POLY_VERTICES, ring_count=LOW_POLY_VERTICES // 2,
radius=size / 2, location=location
)
obj = bpy.context.object; obj.name = name; apply_material(obj, material)
return obj
# --- Main Generation Logic ---
def generate_square_floating_table():
clear_scene()
# Define Materials
WOOD_MATERIAL = create_material("Wood_Material", (0.5, 0.25, 0.0, 1.0), roughness=0.8)
CABLE_MATERIAL = create_material("Cable_Material", (0.1, 0.1, 0.1, 1.0), metallic=0.0, roughness=0.9)
JOINT_MATERIAL = create_material("Joint_Material", (0.1, 0.3, 0.5, 1.0), metallic=0.2, roughness=0.4)
# --- 1. Define Points ---
half_side = SIDE_LENGTH / 2
# Base Corners (Z-level of base surface)
base_surface_z = BASE_BOTTOM_Z + BASE_THICKNESS/2
base_pts = [
Vector(( half_side, half_side, base_surface_z)),
Vector((-half_side, half_side, base_surface_z)),
Vector((-half_side, -half_side, base_surface_z)),
Vector(( half_side, -half_side, base_surface_z))
]
# Tabletop Corners (Z-level of top surface)
top_surface_z = TABLE_TOP_Z - TOP_THICKNESS/2
top_pts = [p + Vector((0, 0, TABLE_HEIGHT)) for p in base_pts]
# Cable Anchor Points (Midpoints of table/base edges)
# These points are closer to the center to suspend the central strut
anchor_radius = SIDE_LENGTH * 0.25
base_anchor_pts = [
Vector(( anchor_radius, 0, base_surface_z)),
Vector((0, anchor_radius, base_surface_z)),
Vector((-anchor_radius, 0, base_surface_z)),
Vector((0, -anchor_radius, base_surface_z))
]
top_anchor_pts = [p + Vector((0, 0, TABLE_HEIGHT)) for p in base_anchor_pts]
# All points for joint creation
all_points = base_pts + top_pts + base_anchor_pts + top_anchor_pts + [Vector((0,0,STRUT_TOP_Z)), Vector((0,0,STRUT_BOTTOM_Z))]
# --- 2. Create Tabletop and Base (Compression Plates) ---
# Table Top (Square Cube)
bpy.ops.mesh.primitive_cube_add(
size=SIDE_LENGTH,
location=(0, 0, TABLE_TOP_Z),
scale=(1, 1, TOP_THICKNESS / SIDE_LENGTH)
)
obj = bpy.context.object; obj.name = "Table_Top"; apply_material(obj, WOOD_MATERIAL)
# Base (Square Cube)
bpy.ops.mesh.primitive_cube_add(
size=SIDE_LENGTH,
location=(0, 0, BASE_BOTTOM_Z),
scale=(1, 1, BASE_THICKNESS / SIDE_LENGTH)
)
obj = bpy.context.object; obj.name = "Base_Bottom"; apply_material(obj, WOOD_MATERIAL)
# --- 3. Create Central Strut (Compression) ---
bpy.ops.mesh.primitive_cube_add(
size=STRUT_THICKNESS,
location=(0, 0, STRUT_CENTER_Z),
scale=(1, 1, STRUT_HEIGHT / STRUT_THICKNESS)
)
obj = bpy.context.object; obj.name = "Central_Strut"; apply_material(obj, WOOD_MATERIAL)
# --- 4. Create Cables and Joints (Tension) ---
# a) Main Tensegrity Cables (4 diagonal, providing overall stability)
# These run from the base corners to the OPPOSITE side tabletop corners (i+2 is more stable than i+1)
for i in range(4):
create_cylinder_between_points(
base_pts[i], top_pts[(i + 2) % 4], CABLE_THICKNESS / 2, f"Cable_Main_{i+1}", CABLE_MATERIAL
)
# b) Central Strut Suspension Cables (8 total, connecting strut to plates)
strut_top = Vector((0, 0, STRUT_TOP_Z))
strut_bottom = Vector((0, 0, STRUT_BOTTOM_Z))
for i in range(4):
# Top Strut to Tabletop Anchors
create_cylinder_between_points(
strut_top, top_anchor_pts[i], CABLE_THICKNESS / 2, f"Cable_Strut_Top_{i+1}", CABLE_MATERIAL
)
# Bottom Strut to Base Anchors
create_cylinder_between_points(
strut_bottom, base_anchor_pts[i], CABLE_THICKNESS / 2, f"Cable_Strut_Bottom_{i+1}", CABLE_MATERIAL
)
# c) Place Spheres (Joints) at all cable attachment points
for i, loc in enumerate(all_points):
create_joint(loc, JOINT_SIZE, f"Joint_{i}", JOINT_MATERIAL)
# --- Execution ---
if __name__ == "__main__":
generate_square_floating_table()
print(f"\n--- Square Tensegrity Table (Floating Strut Design) generation complete! ---")
This script clears the scene, uses simple math to calculate the positions of the three struts, creates those struts as **low-poly cubes**, connects the top and bottom points with **simple edges** (our cables), and then exports the final model as a **GLB file**.
How to Run the Python Script from the Command Line
To run your low_poly_tensegrity_table.py script using the Blender Python interpreter, open your Terminal (macOS/Linux) or Command Prompt/PowerShell (Windows) and use the following format:
/path/to/blender -b -P low_poly_tensegrity_table.py - Replace
/path/to/blenderwith the actual path to your Blender executable (e.g., on Windows:"C:\Program Files\Blender Foundation\Blender\blender.exe"). - The
-bflag tells Blender to run in background mode (headless), meaning the graphical user interface won’t load-it’s faster! - The
-Pflag specifies the Python script Blender should execute.
This command will run your script, which should be set up to export the generated Tensegrity Table as a 3D file format suitable for the web, like GLB or GLTF.
Step 2: Displaying the Model on the Web with <model-viewer>
Once you have your low_poly_tensegrity.glb file exported from Blender, it’s time to put it on a webpage! The <model-viewer> custom web element makes embedding interactive 3D models incredibly easy, often without needing complex frameworks.
- Include the Library: In the
<head>of your HTML file, include the<model-viewer>script:<script type="module" src="https://ajax.googleapis.com/ajax/libs/model-viewer/3.4.0/model-viewer.min.js"></script> - Add the Element: Place the
<model-viewer>tag in the<body>of your HTML, pointing to your exported model file:<model-viewer src="low_poly_tensegrity.glb" alt="A Low-Poly Tensegrity Table generated with Blender Python" shadow-intensity="1" camera-controls touch-action="pan" auto-rotate> </model-viewer>
The attributes like camera-controls and auto-rotate allow users to interact with your 3D model (rotate, zoom, pan) right in their browser!
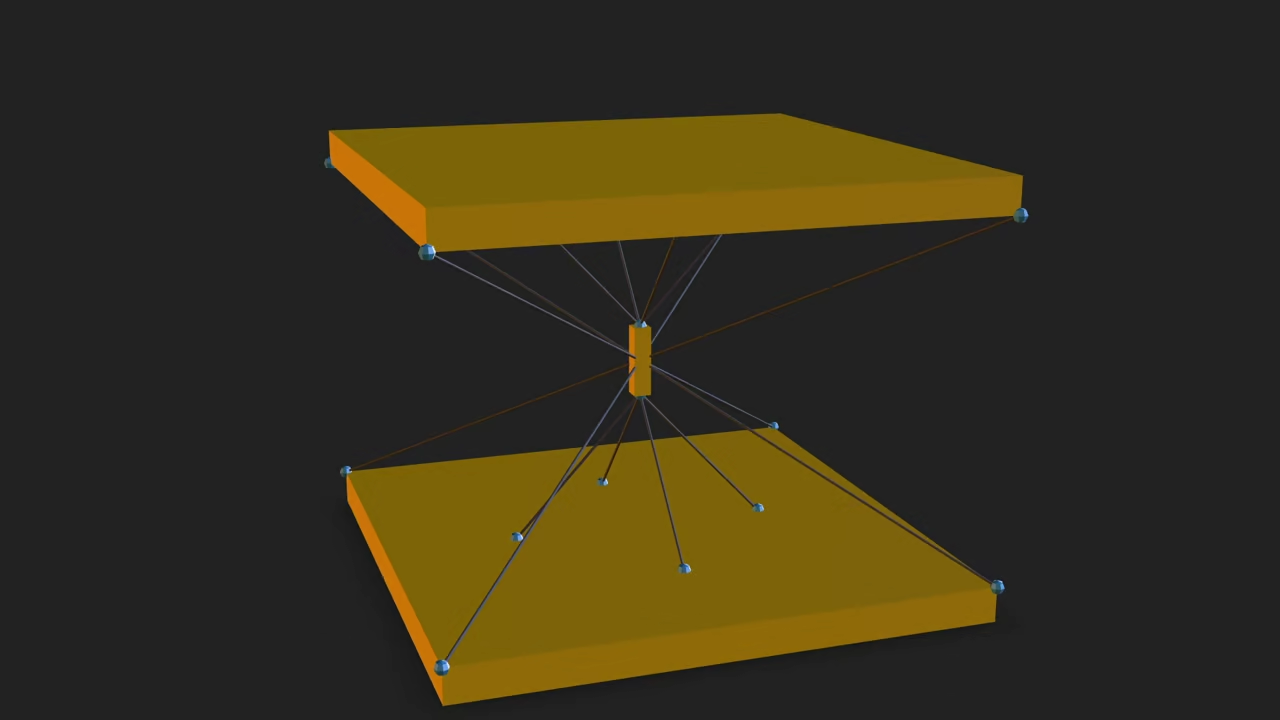
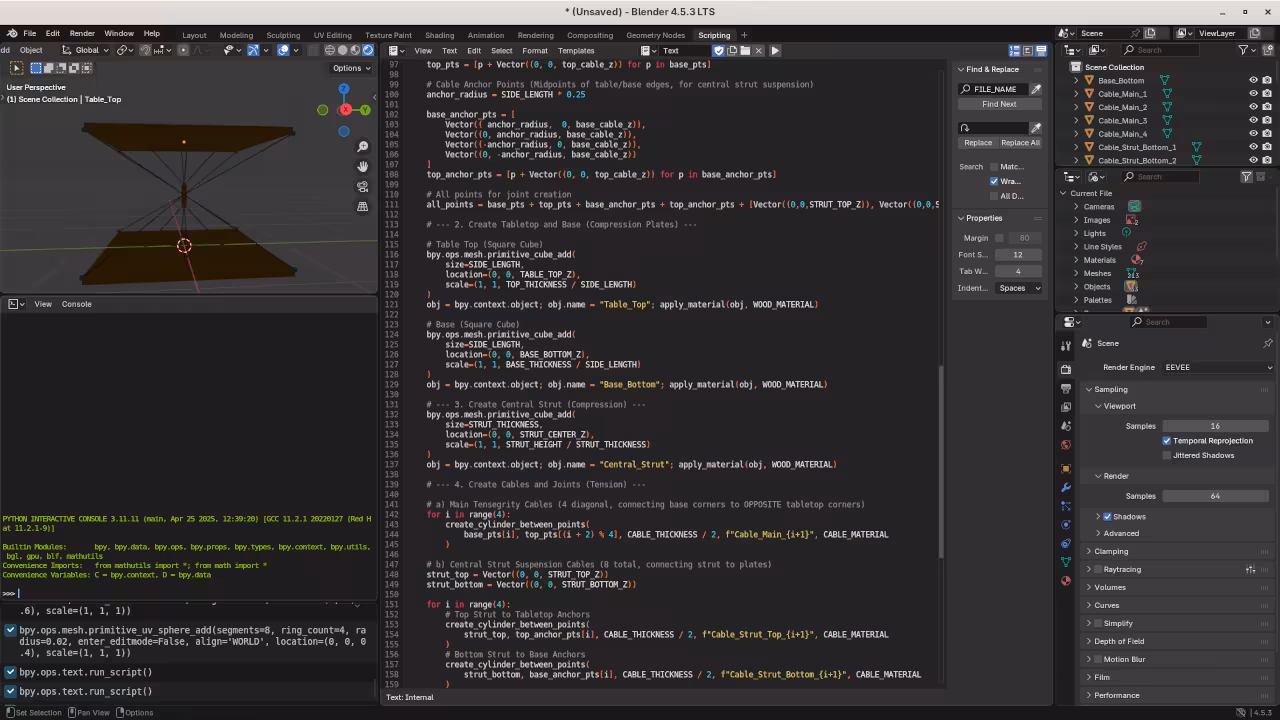
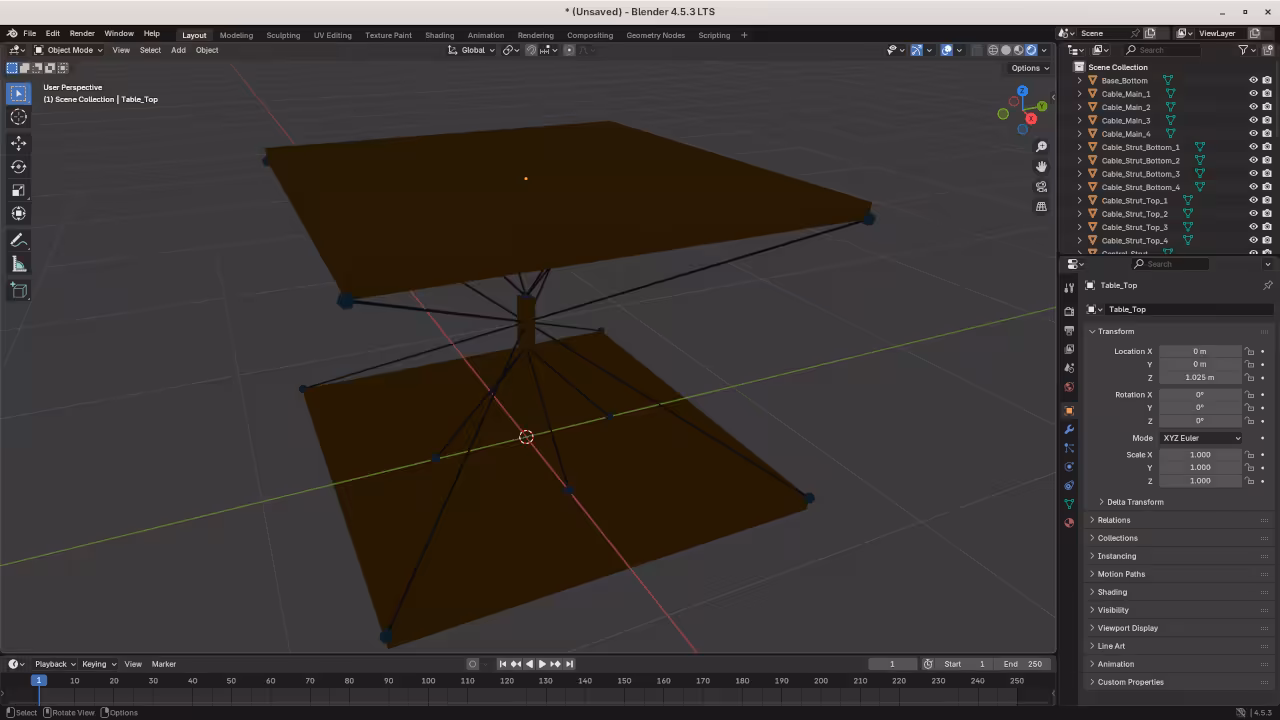
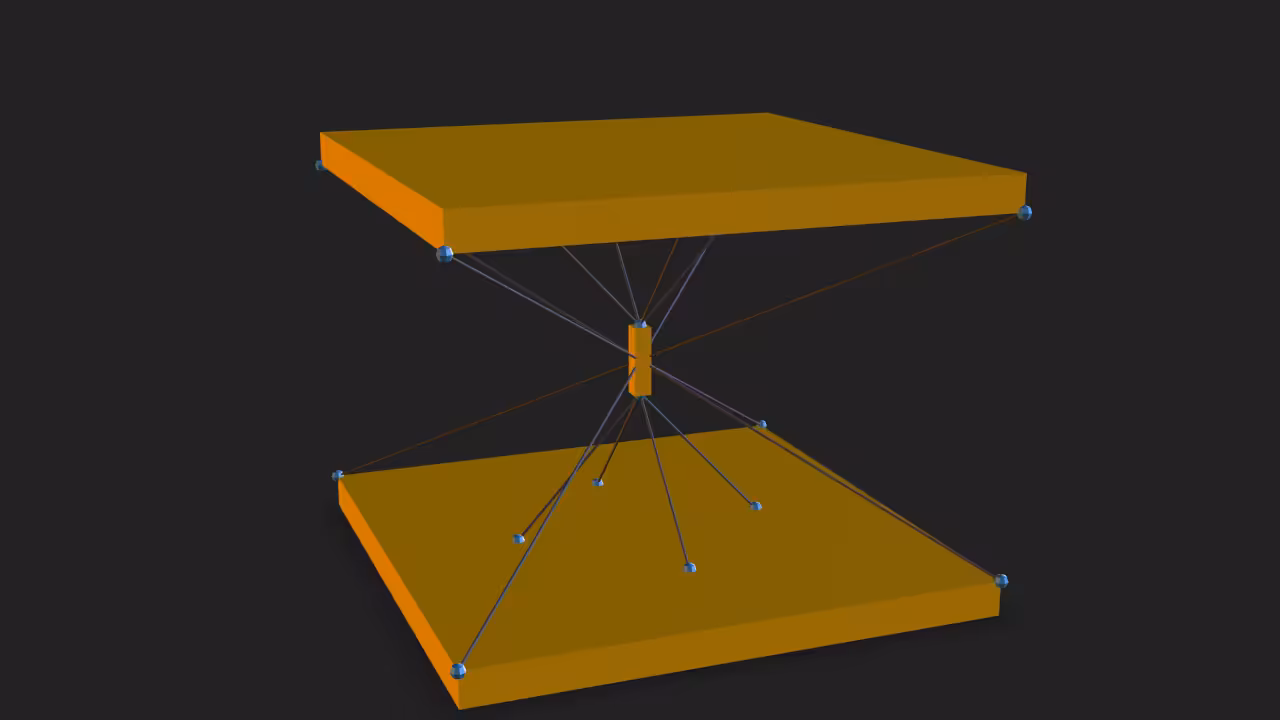
📸 Screenshots & Screencast
Resources to Keep Learning
Ready to dive deeper into Python and Blender scripting? Check out these resources!
My Books:
- “Learning Python”: A comprehensive guide to Python programming for beginners.
Find it on Amazon: https://www.amazon.com/Learning-Python-Programming-eBook-Beginners-ebook/dp/B0D8BQ5X99 - “Mastering Blender Python API”: Take your 3D automation to the next level with in-depth Blender scripting knowledge.
Find it on Amazon: https://www.amazon.com/Mastering-Blender-Python-API-Programming-ebook/dp/B0FCCQKFFZ
My Course:
- “Learning Python”: An in-depth course to master the fundamentals of Python.
Enroll here: https://ojamboshop.com/product/learning-python
One-on-One Tutoring:
- Need personalized help with Python, including the Blender Python API? I’m available for one-on-one online Python tutorials.
Contact me for availability: https://ojambo.com/contact
Happy coding and happy modeling!
🚀 Recommended Resources
Disclosure: Some of the links above are referral links. I may earn a commission if you make a purchase at no extra cost to you.