
How to setup Google DNS
Google has a public DNS that may speed up your browsing experience. Many independent probably already use Google for name searches. The Google Public DNS service is free.
Most of the instructions you find will be about servers. What if you do not have a server? What if you want to set this service up for all your computers?
This tutorial will show you how to setup the service once on your router or gateway. Then, all your computers will be able to use the public DNS without any modifications.
- Tools are required:
- Router or Gateway server.
- Optional computer is not using a gateway.
- Browser to view output.
Optional Public DNS For Single Computer
- Microsoft Windows 7:
- Control Panel.
- Network and Internet -> Network and Sharing Center.
- Change adapter settings -> Connection -> Properties.
- Networking Tab -> Select Internet Protocol -> Properties.
- Advanced -> DNS Tab -> Write down any IP addresses.
- Ok -> Use the following DNS server addresses.
- IPv4 = 8.8.8.8 and 8.8.4.4.
- Alternative IPv6 = 2001:4860:4860::8888 and 2001:4860:4860::8844.
- Restart Connection.
- Open your favourite browser and type http://ojambo.com.
- Apple OS X:
- Apple Menu.
- System Preferences -> Network.
- Make Changes -> Connection -> Advanced.
- DNS Tab -> Write down any IP addresses.
- Add -> Use the following DNS server addresses.
- IPv4 = 8.8.8.8 and 8.8.4.4.
- Alternative IPv6 = 2001:4860:4860::8888 and 2001:4860:4860::8844.
- Apply -> Ok.
- Restart Connection.
- Open your favourite browser and type http://ojambo.com.
- Linux Network Manager:
- System Menu.
- Preferences -> Network Connections.
- Connection -> Edit.
- DNS Field -> Write down any IP addresses.
- Add -> Use the following DNS server addresses.
- IPv4 = 8.8.8.8 and 8.8.4.4.
- Alternative IPv6 = 2001:4860:4860::8888 and 2001:4860:4860::8844.
- Apply.
- Restart Connection.
- Open your favourite browser and type http://ojambo.com.
Public DNS For Routers & Gateways
Manually setting up individual computers is tedious. If you possess a router or gateway which might be a server then you can setup the public DNS once. The following instructions are for the D-Link WBR-1310 router.
- D-Link WBR-1310:
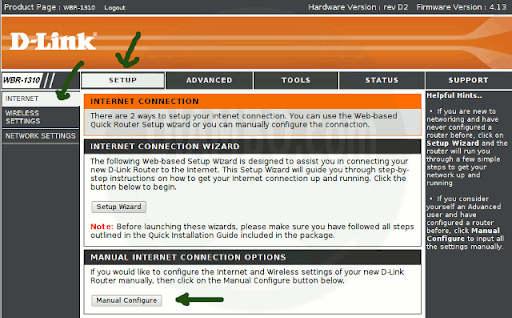
- Login to the router interface.
- Select INTERNET on the left side bar.
- Select Manual Configure under MANUAL INTERNET CONNECTION OPTIONS.
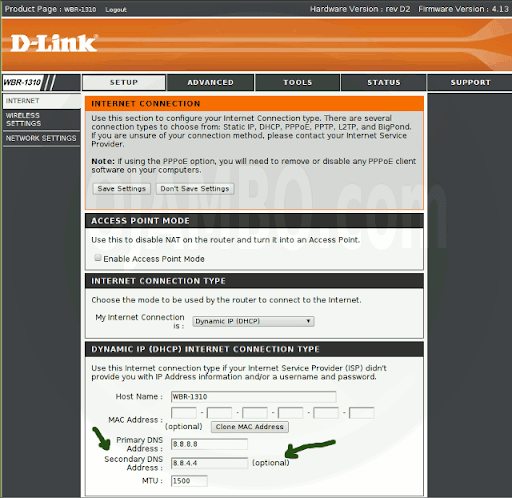
- Look under DYNAMIC IP (DHCP) INTERNET CONNECTION TYPE.
- Primary DNS Address Field -> Write down any IP addresses.
- Optional Secondary DNS Address Field -> Write down any IP addresses.
- Add -> Use the following DNS server addresses.
- IPv4 = 8.8.8.8 and 8.8.4.4.
- Alternative IPv6 = 2001:4860:4860::8888 and 2001:4860:4860::8844.
- Apply.
- Restart Connection.
- Open your favourite browser and type http://ojambo.com.
Benefits:
According to google, there are three benefits to using their public dns service. The first is increased browsing speed by removing significant bottleneck.
The second is improved security by reducing threats and mitigations.
The third benefit is “getting the results you expect with absolutely no redirection”.
Conclusion:
Using Public DNS servers can improve your browsing experience. You can choose to use the public dns service on select computers. A easy way to use the public dns service for all computers is to apply it on your router or gateway.
- Recommendations:
- Test the public dns service on one computer first.
- Write down the default information before changing name servers.
- If you are using IPv4, be prepared to change to IPv6.
- Always restart your connect after making changes.
One thought on “Setup Google DNS”